Author Topic: Dividing head  (Read 129175 times)

Offline mattinker

  • Hero Member
  • *****
  • Posts: 1317
Re: Dividing head
« Reply #100 on: November 03, 2013, 05:53:28 PM »
 Krv,

plodding along! By multiplying my gear potential by three, I'm also multiplying the gear mounting bits by three! So I'm plodding along! Quit a lot of little bits to go.

All the best, Matthew

Offline mattinker

  • Hero Member
  • *****
  • Posts: 1317
Re: Dividing head
« Reply #101 on: November 12, 2013, 10:29:30 AM »
Hi,

I realise from the number of photos that I just uploaded to Botophucket (dyslexia rules!) that I haven't updated in a while. In addition, I've decided to make it  so that I can use three different sets of gears. Two disadvantages,:-

I. I can't drill for a draw bar to enable me to use a Morse taper which could have been useful.
II. I have a lot more little parts to make!

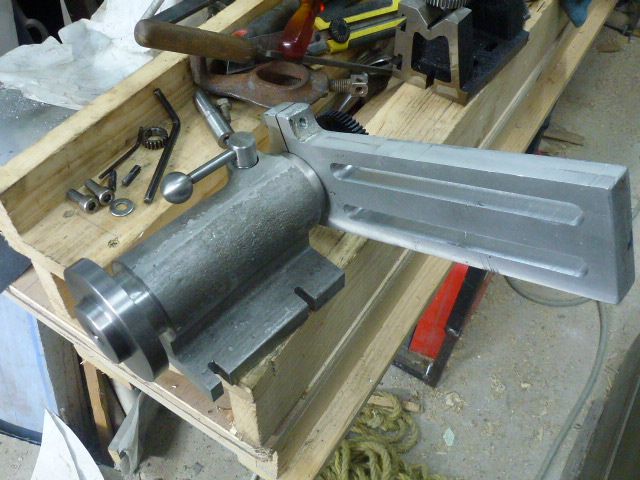
So here it is, starting with the gear carriers.
http://i917.photobucket.com/albums/ad16/mattinker/gear%20carrier/gearcarier1_zpsf08111da.jpgDividing head

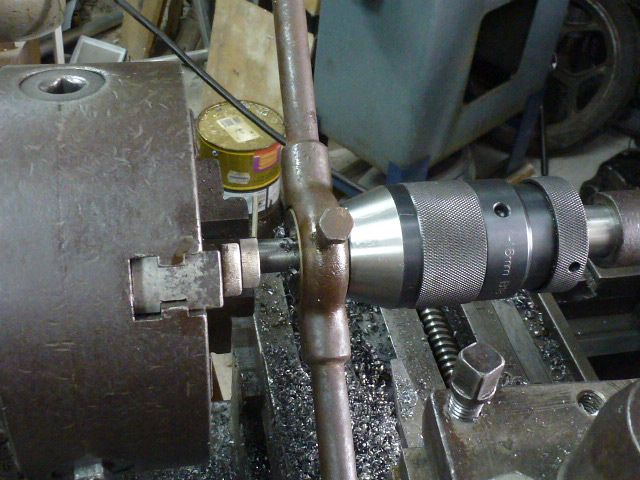
The top slide on the lathe still being  set up with the taper (about 20°) it's a good place to start.

http://i917.photobucket.com/albums/ad16/mattinker/gear%20carrier/gearcarier3_zps9a07b89a.jpgDividing head

By turning the end of the 17mmØ down to 14mm and flipping it round, I could then cut the taper in the same direction as it was cut on the inside of the spindle.

http://i917.photobucket.com/albums/ad16/mattinker/gear%20carrier/gearcarier5_zps6f0c15df.jpgDividing head

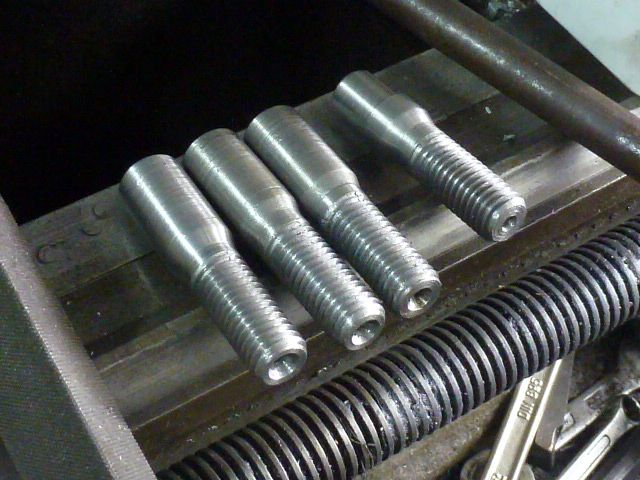
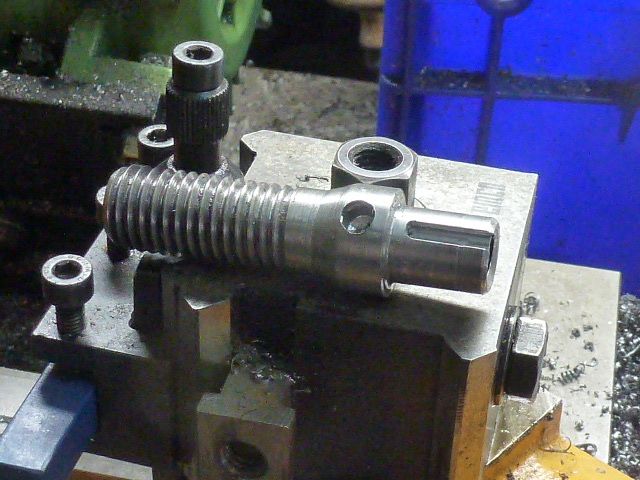
Cutting the M14 thread. I made four as who knows what gears might turn up in the future!

http://i917.photobucket.com/albums/ad16/mattinker/gear%20carrier/gearcarier6_zps1e00e700.jpgDividing head

Three blanks plus the one that I already  reduced to 14mm.

http://i917.photobucket.com/albums/ad16/mattinker/gear%20carrier/gearcarier7_zps12ed7aa6.jpgDividing head

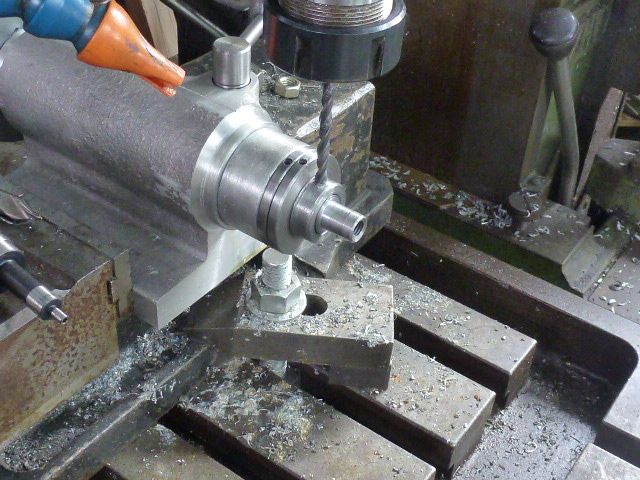
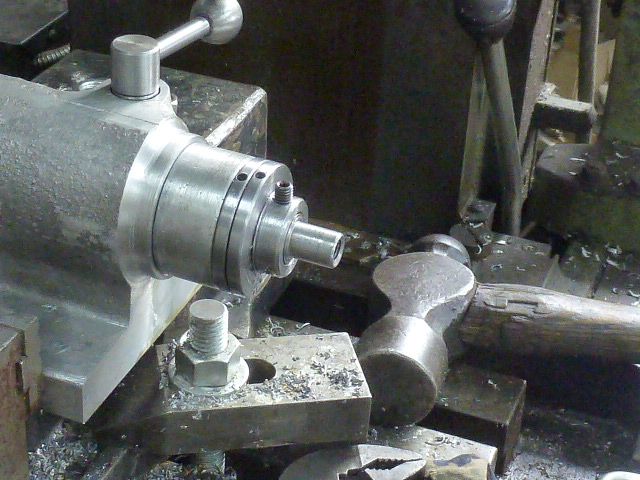
I set the spindle up in the fixed steady to use it as a mandrel to reduce the ends of the carriers and to drill and tap to M8 for the gear retaining bolt.

http://i917.photobucket.com/albums/ad16/mattinker/gear%20carrier/gearcarier8_zps6dc34467.jpgDividing head

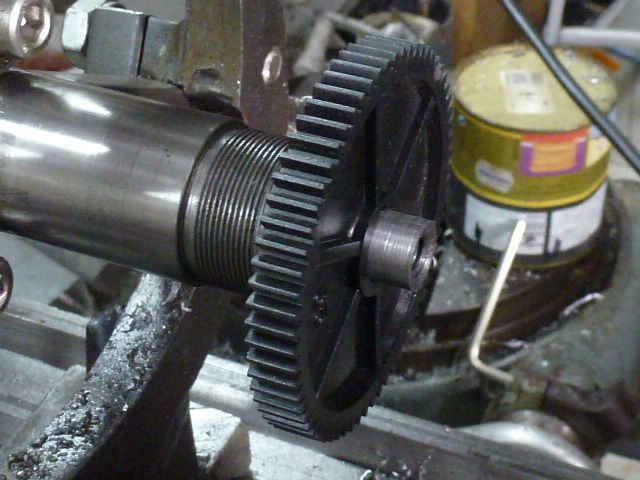
The 12mm carrier test with a plastic gear!

http://i917.photobucket.com/albums/ad16/mattinker/gear%20carrier/gearcarier9_zps4f024aa4.jpgDividing head

With the spindle once again set up in the dividing head, I centred with a centre finder and centre drilled for an M6 thread.

http://i917.photobucket.com/albums/ad16/mattinker/gear%20carrier/gearcarier10_zpsc88706f3.jpgDividing head

Without moving the setup, I drilled all of the carriers 5mm .

http://i917.photobucket.com/albums/ad16/mattinker/gear%20carrier/gearcarier11_zpsbb4a8e63.jpgDividing head

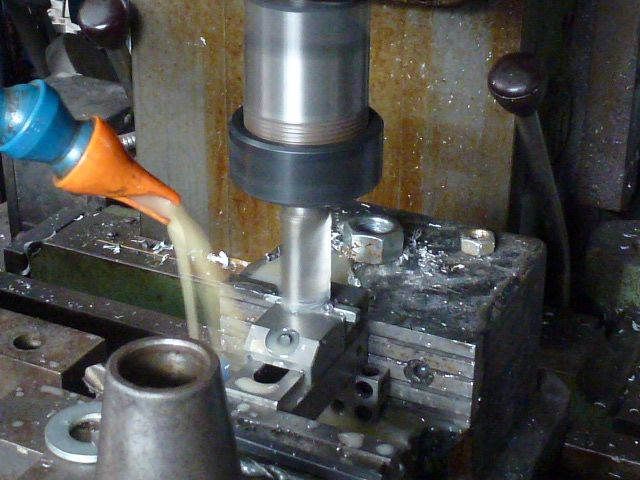
Tapping the spindle M6.

http://i917.photobucket.com/albums/ad16/mattinker/gear%20carrier/gearcarier12_zps2b93ec1b.jpgDividing head

The drive belts arrived today, now I can use that nice precise little three jaw and the power feed again!

http://i917.photobucket.com/albums/ad16/mattinker/gear%20carrier/gearcarier13_zps7d22b3eb.jpgDividing head

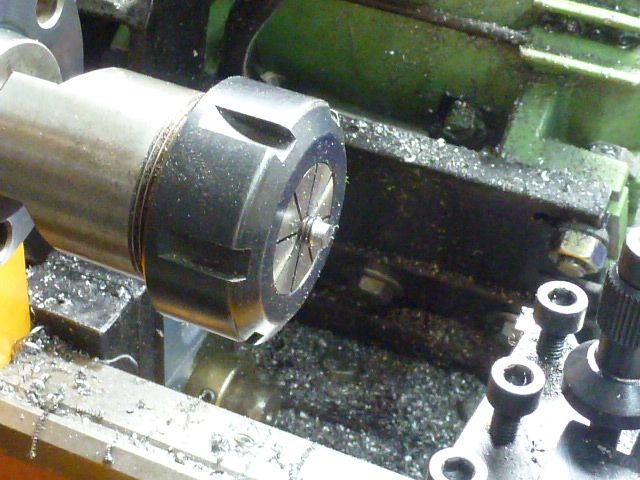
In addition, I can use my ER32 collets, handy when shortening and reducing grub screws.

http://i917.photobucket.com/albums/ad16/mattinker/gear%20carrier/gearcarier14_zps595c093e.jpgDividing head

Grubscrew, now there will be two Allen key sizes  on the dividing head.

http://i917.photobucket.com/albums/ad16/mattinker/gear%20carrier/gearcarier15_zps9b906b8b.jpgDividing head

The finished product, just needs deburring. I forgot to take pictures of cutting the keyways. I was nervous, having never cut 3 and 4mm keyways with a 2mm slot drill before, my mill seems enormous with that tiny little end mill in it! No problems encountered!

http://i917.photobucket.com/albums/ad16/mattinker/gear%20carrier/gearcarier16_zps0f1fd411.jpgDividing head

All three of the key-ways are different! This is the Emco one which is four mm wide.

http://i917.photobucket.com/albums/ad16/mattinker/gear%20carrier/gearcarier17_zps9720e9e2.jpgDividing head

Milling the keys to size.

http://i917.photobucket.com/albums/ad16/mattinker/gear%20carrier/gearcarier18_zpsa2adbc7f.jpgDividing head

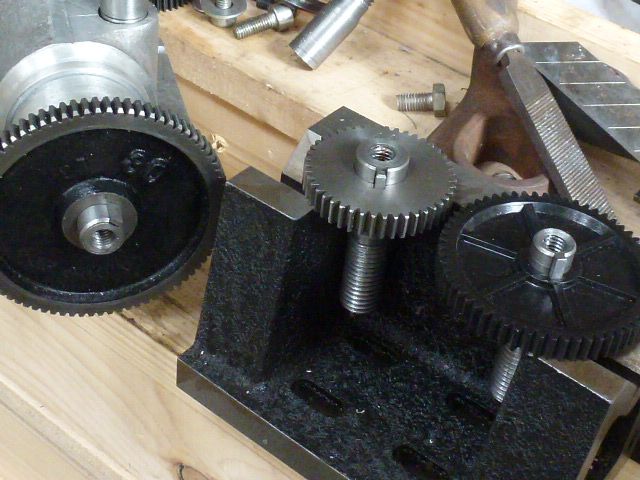
The three carriers finished with their respective gears and keys.
I may soft solder the keys in place so that they don't get lost.

http://i917.photobucket.com/albums/ad16/mattinker/banjo%20slots/banjoslots1_zpsbf035c2f.jpgDividing head

With the gear carriers done, I can get on with the Banjo. Spot the mistake!
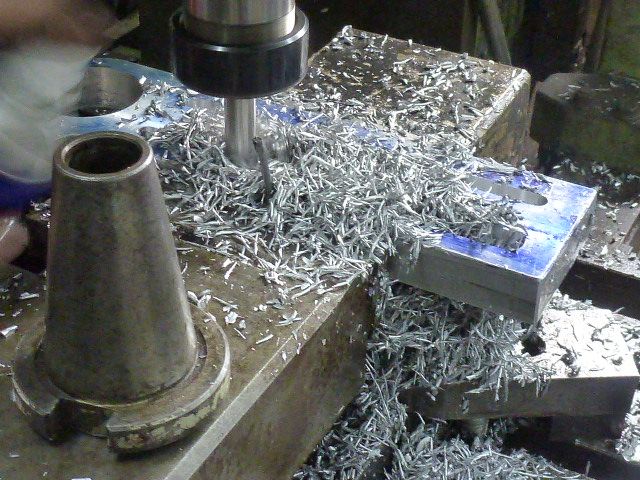
http://i917.photobucket.com/albums/ad16/mattinker/banjo%20slots/banjoslots2_zpsc3cfd458.jpgDividing head

Carving out the slots.

http://i917.photobucket.com/albums/ad16/mattinker/banjo%20slots/banjoslots4_zps7645f35e.jpgDividing head

The set up is flawed, having not tried to cut slots this way before, I hadn't thought about the fact that I was squeezing up on an area that I was removing metal from!

http://i917.photobucket.com/albums/ad16/mattinker/banjo%20slots/banjoslots5_zps1a35baea.jpgDividing head

The Banjo gently started to rise in the vice, no damage, but another reminder about how to set up!
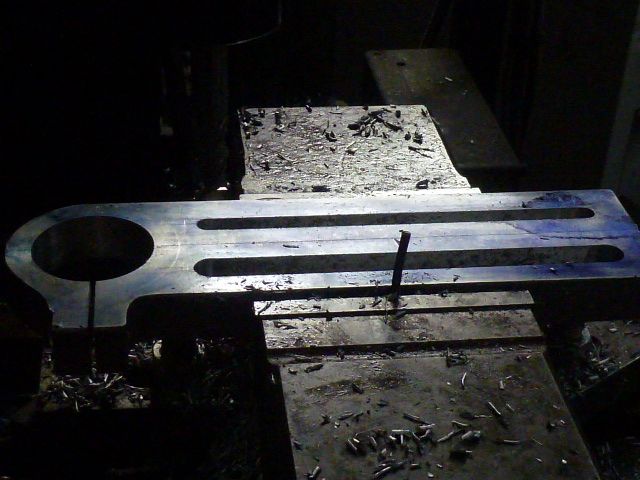
http://i917.photobucket.com/albums/ad16/mattinker/banjo%20slots/banjoslots6_zps18f006cf.jpgDividing head

The slots are finished, Al that the Banjo needs is a clean up and chamfer.

I'll be back later, I'm not even half way through the photos that I've taken!

Regards, Matthew

Offline mattinker

  • Hero Member
  • *****
  • Posts: 1317
Re: Dividing head
« Reply #102 on: November 12, 2013, 03:02:41 PM »
Hi,

the next chapter is the plunger assembly.

http://i917.photobucket.com/albums/ad16/mattinker/plunger%20assembly/plungerassembly1_zps1276b602.jpgDividing head

A piece of 25mm cold rolled is reduced to 12mm over a length of 20mm.

http://i917.photobucket.com/albums/ad16/mattinker/plunger%20assembly/plungerassembly2_zpsd02c8694.jpgDividing head

Drilled 6.75mm, tapping size for M8 and tapped  to a depth of 25mm.

http://i917.photobucket.com/albums/ad16/mattinker/plunger%20assembly/plungerassembly3_zps5ffa8334.jpgDividing head

This allows fixing in either slot of the banjo.

http://i917.photobucket.com/albums/ad16/mattinker/plunger%20assembly/plungerassembly4_zpscb83c975.jpgDividing head

The centre is found and a centre hole drilled.

http://i917.photobucket.com/albums/ad16/mattinker/plunger%20assembly/plungerassembly5_zps8682ea6f.jpgDividing head

Pilot drilled.

http://i917.photobucket.com/albums/ad16/mattinker/plunger%20assembly/plungerassembly6_zps9b4c6f39.jpgDividing head

http://i917.photobucket.com/albums/ad16/mattinker/plunger%20assembly/plungerassembly7_zps64cef559.jpgDividing head

Drilled 14mm, tapping size for M16, a flat is milled to allow the plunger to seat ot 90°s to it's support.

http://i917.photobucket.com/albums/ad16/mattinker/plunger%20assembly/plungerassembly8_zps39107c18.jpgDividing head

Tapped M16.

http://i917.photobucket.com/albums/ad16/mattinker/plunger%20assembly/plungerassembly9_zpsf1ff305b.jpgDividing head

A second flat is machined on the other side an the circular portion that had been supporting the end turned off in the lathe.

http://i917.photobucket.com/albums/ad16/mattinker/plunger%20assembly/plungerassembly10_zpsb37e3615.jpgDividing head

In position on the Banjo.

http://i917.photobucket.com/albums/ad16/mattinker/plunger%20assembly/plungerassembly11_zps30fb7db5.jpgDividing head

Plunger body, reduced and threaded M16.

http://i917.photobucket.com/albums/ad16/mattinker/plunger%20assembly/plungerassembly12_zps7dfb0228.jpgDividing head

Shoulder turned at the end of the thread to allow to seat on it's support.

http://i917.photobucket.com/albums/ad16/mattinker/plunger%20assembly/plungerassembly13_zps36ed69ab.jpgDividing head

Drilled through 7mm.

http://i917.photobucket.com/albums/ad16/mattinker/plunger%20assembly/plungerassembly14_zpsd2daf7df.jpgDividing head

Setting up square to correct an error! The flats were not parallel, I was asking too much of my collets.

http://i917.photobucket.com/albums/ad16/mattinker/plunger%20assembly/plungerassembly15_zps61a3e492.jpgDividing head

Re-milling the lower flat.

http://i917.photobucket.com/albums/ad16/mattinker/plunger%20assembly/plungerassembly16_zps314b8cb2.jpgDividing head

I haven't got a 10mm reamer yet, so I used a 10mm Slot Drill to drill the larger diameter in the plunger housing.

http://i917.photobucket.com/albums/ad16/mattinker/plunger%20assembly/plungerassembly17_zps4214c50c.jpgDividing head

http://i917.photobucket.com/albums/ad16/mattinker/plunger%20assembly/plungerassembly18_zpsd087f21b.jpgDividing head

Centre drilling and drilling an annealed ball bearing to make the handle for the plunger.

http://i917.photobucket.com/albums/ad16/mattinker/plunger%20assembly/plungerassembly19_zps5af84c5a.jpgDividing head

Centre drilling a piece of 12mm cold rolled to make the plunger.

http://i917.photobucket.com/albums/ad16/mattinker/plunger%20assembly/plungerassembly20_zps5089d6c6.jpgDividing head

First opperation, reduced to 6mm in diameter and threaded M6 to accept the ball bearing.

http://i917.photobucket.com/albums/ad16/mattinker/plunger%20assembly/plungerassembly21_zps4b3072a6.jpgDividing head

Preparing to reduce the plunger to 7mm and 10mm diameters.

http://i917.photobucket.com/albums/ad16/mattinker/plunger%20assembly/plungerassembly22_zpsadfb0472.jpgDividing head

7mm

http://i917.photobucket.com/albums/ad16/mattinker/plunger%20assembly/plungerassembly23_zps294c0ba2.jpgDividing head

Spring winding, thanks Tom Griffin for your recent video contribution! I ended up making 3 mandrels, the first, 7mm, produced a spring that was nearly twice the mandrel diameter, A 4mm one was well undersized, a 6mm would have been best, but I made a 5mm mandrel as I had some 5mm in stock. I had to open up the coils slightly by hand. I got good results from 6thenths of a mm piano wire.

http://i917.photobucket.com/albums/ad16/mattinker/plunger%20assembly/plungerassembly24_zps071f7897.jpgDividing head

Plunger with it's spring.

http://i917.photobucket.com/albums/ad16/mattinker/plunger%20assembly/plungerassembly26_zps8aca563d.jpgDividing head

Milling the plunger point. I used a 17mmØ mill, which was as rear as I could get to the radius of the gear teeth.

http://i917.photobucket.com/albums/ad16/mattinker/plunger%20assembly/plungerassembly27_zps9a440867.jpgDividing head

The fit is reasonable, especially bearing in mind that the radii change with the diameter of the gears.

http://i917.photobucket.com/albums/ad16/mattinker/plunger%20assembly/plungerassembly28_zps7e527459.jpgDividing head

Plunger assembly nearly finished.

http://i917.photobucket.com/albums/ad16/mattinker/plunger%20assembly/plungerassembly29_zpsb00da5ea.jpgDividing head

Lining up the plunger body to slot the guide.

http://i917.photobucket.com/albums/ad16/mattinker/plunger%20assembly/plungerassembly31_zpsce3ee1aa.jpgDividing head

Slotting the plunger.

http://i917.photobucket.com/albums/ad16/mattinker/plunger%20assembly/plungerassembly32_zpsc16531b9.jpgDividing head

Dialling in the plunder to drill for the pin at right angles to the point.

http://i917.photobucket.com/albums/ad16/mattinker/plunger%20assembly/plungerassembly33_zps9a5fecd3.jpgDividing head

Centre drilling the plunger.

http://i917.photobucket.com/albums/ad16/mattinker/plunger%20assembly/plungerassembly34_zpsde0f81ea.jpgDividing head

Drilling plunger, 2.5mm.

http://i917.photobucket.com/albums/ad16/mattinker/plunger%20assembly/plungerassembly35_zps00f556f9.jpgDividing head

In place on the lathe.

http://i917.photobucket.com/albums/ad16/mattinker/plunger%20assembly/plungerassembly36_zps32154a29.jpgDividing head

http://i917.photobucket.com/albums/ad16/mattinker/plunger%20assembly/plungerassembly37_zps4a8bd199.jpgDividing head

http://i917.photobucket.com/albums/ad16/mattinker/plunger%20assembly/plungerassembly38_zps5d9a0779.jpgDividing head

Drilling the spindle.

http://i917.photobucket.com/albums/ad16/mattinker/plunger%20assembly/plungerassembly39_zps21cfbe8f.jpgDividing head

Final drilling.

http://i917.photobucket.com/albums/ad16/mattinker/plunger%20assembly/plungerassembly40_zpsee684db8.jpgDividing head

The chuck in place, one of those nice moments!

Nearly finished! To be continued.

Regards, Matthew


Offline doubleboost

  • Madmodder Committee
  • Hero Member
  • *****
  • Posts: 1619
  • Newcastle Upon Tyne
Re: Dividing head
« Reply #103 on: November 12, 2013, 03:23:40 PM »
Very nice
Well documented and photographed
John

Offline mattinker

  • Hero Member
  • *****
  • Posts: 1317
Re: Dividing head
« Reply #104 on: November 12, 2013, 04:17:39 PM »
Very nice
Well documented and photographed
John

Thanks John,

I wasn't sure whether or not I'm putting too much detail in!

Regards, Matthew

Offline doubleboost

  • Madmodder Committee
  • Hero Member
  • *****
  • Posts: 1619
  • Newcastle Upon Tyne
Re: Dividing head
« Reply #105 on: November 12, 2013, 04:31:43 PM »
I did 10 hours of video lol
 :doh: :doh: :doh: :doh: :doh: :doh: :doh: :doh:
John

Offline mattinker

  • Hero Member
  • *****
  • Posts: 1317
Re: Dividing head
« Reply #106 on: November 12, 2013, 04:43:58 PM »
I did 10 hours of video lol
 :doh: :doh: :doh: :doh: :doh: :doh: :doh: :doh:
John

Point taken!

Offline stvy

  • Jr. Member
  • **
  • Posts: 30
Re: Dividing head
« Reply #107 on: November 13, 2013, 06:30:34 AM »
Hi,

I'm enjoying the build log. For me as a beginner the extra detail and pictures are helpful. Many thanks.
Steve

Offline mattinker

  • Hero Member
  • *****
  • Posts: 1317
Re: Dividing head
« Reply #108 on: November 13, 2013, 01:54:17 PM »
Hi,

I'm enjoying the build log. For me as a beginner the extra detail and pictures are helpful. Many thanks.
Steve

Thanks Steve,

feedback is useful and nice! I'm glad it's helpfull.

Regards, Matthew

Offline kayz1

  • Full Member
  • ***
  • Posts: 114
Re: Dividing head
« Reply #109 on: November 13, 2013, 03:20:13 PM »
  Steve said  (  I'm enjoying the build log. For me as a beginner the extra detail and pictures are helpful. Many thanks)

  Same goes here.. many thanks..   Lyn.

Offline tom osselton

  • Hero Member
  • *****
  • Posts: 1301
Re: Dividing head
« Reply #110 on: November 13, 2013, 03:52:24 PM »
I enjoyed watching your build thanks for taking us along!  :beer:

Offline krv3000

  • Hero Member
  • *****
  • Posts: 2188
Re: Dividing head
« Reply #111 on: November 13, 2013, 04:31:01 PM »
hi and well dun all you need to do gnaw is send me that one as its you prototype and mack one for your self  :) :)

Offline tom osselton

  • Hero Member
  • *****
  • Posts: 1301
Re: Dividing head
« Reply #112 on: November 13, 2013, 05:06:38 PM »
Bob nice try,  or is he done a gear from the feed shaft would give a 4th axis   :D

Offline Fredbare

  • Full Member
  • ***
  • Posts: 169
  • Fakenham, Norfolk
Re: Dividing head
« Reply #113 on: November 13, 2013, 05:48:23 PM »
The amount of detail was fine by me, as a beginner, thanks for taking the time and trouble to share, enjoyed it immensely.

John

Offline mattinker

  • Hero Member
  • *****
  • Posts: 1317
Re: Dividing head
« Reply #114 on: November 13, 2013, 06:35:19 PM »
I enjoyed watching your build thanks for taking us along!  :beer:

Hi Tom,

it's not quit finished yet, for the moment, I can only do direct indexing from single gears! A few more bits to make!

Regards, Matthew

Offline mattinker

  • Hero Member
  • *****
  • Posts: 1317
Re: Dividing head
« Reply #115 on: November 13, 2013, 06:36:53 PM »
The amount of detail was fine by me, as a beginner, thanks for taking the time and trouble to share, enjoyed it immensely.

John

John,

glad you enjoyed, thanks for your comment!

Regards, Matthew

Offline mattinker

  • Hero Member
  • *****
  • Posts: 1317
Re: Dividing head
« Reply #116 on: November 13, 2013, 06:38:29 PM »
  Steve said  (  I'm enjoying the build log. For me as a beginner the extra detail and pictures are helpful. Many thanks)

  Same goes here.. many thanks..   Lyn.

Lyn,

thanks for your comment, back soon!

Regards, Matthew

Offline mattinker

  • Hero Member
  • *****
  • Posts: 1317
Re: Dividing head
« Reply #117 on: November 13, 2013, 06:41:01 PM »
hi and well dun all you need to do gnaw is send me that one as its you prototype and mack one for your self  :) :)

Bob,

maybe I'm going to have to make you a casting, that way, you could show me how you'd do it differently!

Glad to see you back!

Regards, mùatthew

Offline svk

  • Jr. Member
  • **
  • Posts: 17
Re: Dividing head
« Reply #118 on: November 13, 2013, 07:05:09 PM »
Well done, I have learnd alot from this thread, the DH is on the endless long todo list :D
Nice with all the detail photos, me like :headbang:

Offline mattinker

  • Hero Member
  • *****
  • Posts: 1317
Re: Dividing head
« Reply #119 on: November 13, 2013, 07:34:43 PM »
Well done, I have learnd alot from this thread, the DH is on the endless long todo list :D
Nice with all the detail photos, me like :headbang:

svk,

thanks svk, I'm glad it was usefull!

Regards, Matthew

Offline nel2lar

  • Jr. Member
  • **
  • Posts: 81
Re: Dividing head
« Reply #120 on: November 13, 2013, 10:54:42 PM »
Matthew
I enjoyed your build, and I like how you kept to the drawings, Very nice, you will be able to use it for years.
Nelson Collar

Offline mattinker

  • Hero Member
  • *****
  • Posts: 1317
Re: Dividing head
« Reply #121 on: November 14, 2013, 02:59:47 AM »
Thanks Nelson,

I've learnt a lot on this build and I'm going to end up with a useful tool into the bargain!

Regards, Matthew


Offline Meldonmech

  • Hero Member
  • *****
  • Posts: 933
Re: Dividing head
« Reply #122 on: November 14, 2013, 05:00:53 AM »
Hi Matthew

                Your presentation has the correct ratio of pictures to text, the content was clear and interesting and I have picked up some tips on the way.  Producing these posts involves many hours, and this has resulted in a great read. Look forward to the final result.
                                   Well Done       
                                                           David

Offline mattinker

  • Hero Member
  • *****
  • Posts: 1317
Re: Dividing head
« Reply #123 on: November 14, 2013, 11:24:14 AM »
Thanks David,

I'm glad that I'm apparently not over doing the photos, it's hard to tell when one is working on something.

I find doing the build posts stimulating, it makes me think about the project differently!

Regards, Matthew

Offline northumbrian

  • Jr. Member
  • **
  • Posts: 21
Re: Dividing head
« Reply #124 on: November 16, 2013, 04:50:27 PM »
Just finished reading this, excellent job, really enjoyed it :)