Hiya guys

, thanks for all the comments and advice

.
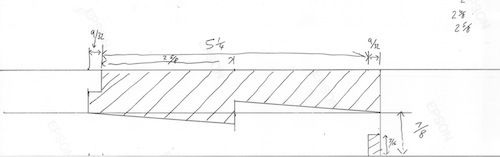
RGY, Yep a drawing would be interesting, any new bit of knowledge comes in handy.
Generally traditional European framing uses various "scribe rules" to fit joints. This is a way of using non-square/parallel timbers. Each joint is fitted to each other, so nothing needs to be square, straight or parallel, but it is time consuming and uses plumbs, levels, rods, dividers and a fair bit of thinking. In the States I understand "square rule" carpentry is the norm, but I'm not too familiar with this. It was explained as "imagining a perfectly square bit of wood inside the timber being used". Apparently the Japanese have some magical way of cutting the joints separately and they fit!?! However I saw a video on Youtube and they tend to have some very large mallets!
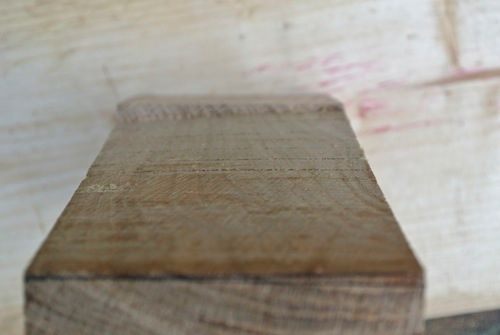
I'm thinking mainly of fitting the joint to itself at the moment. I did get the block square and parallel to a good extent (well, to the thinnest feeler gauge across 3" although the thinnest one now is not the thinnest one it came with, I think that's still in the tappets of my Honda

), but overnight this has changed a bit. Humidity is everywhere at the moment, the lid on my new toolbox has siezed up and warped again, so there must be an expansion of a couple of thirty seconds or sixteenths across 12"
Meanwhile, back at the ranch; Unusually for me ahem, progress has been slow for the past couple of days, could be due to the weather;
I had managed to split the wood into two bits, I had intended to cut diagonally to save on waste and had had some good suggestions on how to do this, but in the end I just cut em square(ish);

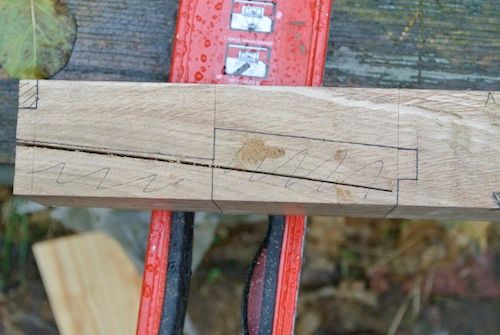
Next I planned how to mark the joints out. There are some conventions to do this, based on the width of a Japanese square (15mm), which helps speed up and accuratise (thats not a word is it!) marking out. Not having one of these I sort of approximated. I made the length of the slope 3x the width of the wood, not including the noses and did everything else in English;
and then knifed this into the wood, highlighting in pen;
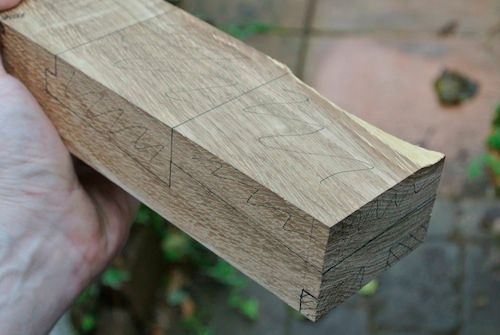
Ive marked a face and face edge on both bits of wood to try and mark from the same reference, initially I was going to mark both out before applying saw, but I really couldnt be bothered so will mark part 2 from the finished part 1. The weather cleared, so I ran out, set up the bench and started a bit of ripping, following the order in the book only to completely go off line and create a compound curve inside the wood;
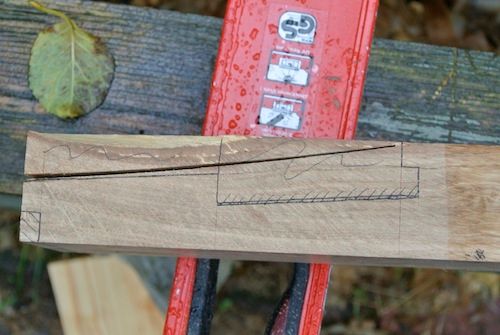
.ho hum, I could always go back to plastic models for a hobby! I cross-cut out the waste;
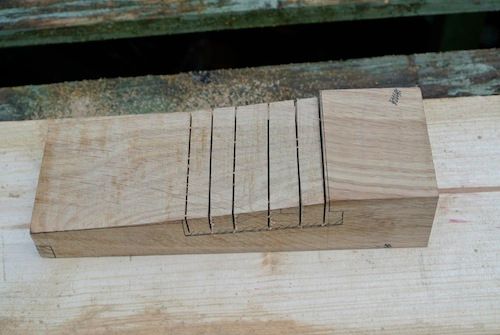
bashed a chisel with a hitting stick;
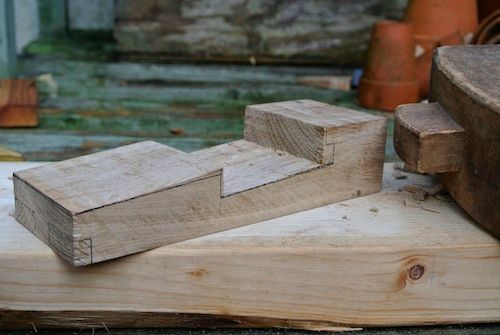
started to plane the slope to the knife line, with a 60 ½ and the heavens opened, so I called it a day, Sunday I think I called it!
PS. Pete, I roasted the first batch of chestnuts as per my instructions, one detonated at 13 mins. I eventually had about 3 where the skin fell straight off, but these didn't taste too good, a couple of nice ones where the skin wasn't too difficult to take off and a lot of blood sweat and tears for little reward. I now know why they come in tins.


