Author Topic: New Project Started!  (Read 58918 times)

bogstandard

  • Guest
Re: New Project Started!
« Reply #50 on: November 29, 2009, 03:49:57 AM »
Quote
I can fine tune that length if it runs!

And what does that mean Nick!!!!!

You have no reason to think failure, IT WILL RUN, we will not allow to not run. :poke: :wack:


Just a little note about some of your holding techniques. You have been very lucky in some of your machining.

When you are cutting two or more pieces, say side by side or on top of each other like for your end milling, the thickness or width of the two parts can cause one to be held tighter than the other, it only requires a minute amount of difference between the two for one to be sent flying out of the vice or move and have the cutter bury itself into the job.

If you can, stick them together some way (I use superglue or good quality double sided tape) or drill holes in areas you are later going to machine away, and bolt them together.

I don't know why people get such a rough finish when using an end mill. So here is how I do it, and it gives me mirror like results.

You really need a new or little used cutter for doing this job, one that has been used a fair amount will have dull side flutes. Or use an area of the cutter towards the shank, that is liable to be the sharpest.

Get the cutter speed well up with a very slow feed, and keep away from climb milling if you can, plenty of lube (for ali, a squirt of WD40) and if you have an air blower, keep the shavings from being dragged around by the cutter and so getting embedded into the cut face (DON'T use a brush, it is liable to get snatched into the cut). The finishing cut should only be something like 0.002" (0.05mm).


John

Offline AdeV

  • Madmodder Committee
  • Hero Member
  • *****
  • Posts: 2434
  • Country: gb
Re: New Project Started!
« Reply #51 on: November 29, 2009, 08:59:45 AM »

I don't know why people get such a rough finish when using an end mill. So here is how I do it, and it gives me mirror like results.

You really need a new or little used cutter for doing this job, one that has been used a fair amount will have dull side flutes. Or use an area of the cutter towards the shank, that is liable to be the sharpest.

Get the cutter speed well up with a very slow feed, and keep away from climb milling if you can, plenty of lube (for ali, a squirt of WD40) and if you have an air blower, keep the shavings from being dragged around by the cutter and so getting embedded into the cut face (DON'T use a brush, it is liable to get snatched into the cut). The finishing cut should only be something like 0.002" (0.05mm).


I concur with all of that; in particular the sharpness of the cutter has a particularly marked effect on the final finish. I have one truly excellent end mill which I reserve for these final cuts.

One thing, and maybe it's because I have a big heavy mill, I find I can get away with a 0.002" climbing cut, which is a little smoother than the equivalent conventional cut.
Cheers!
Ade.
--
Location: Wallasey, Merseyside. A long way from anywhere.
Occasionally: Zhengzhou, China. An even longer way from anywhere...

Offline NickG

  • Madmodder Committee
  • Hero Member
  • *****
  • Posts: 1890
Re: New Project Started!
« Reply #52 on: November 30, 2009, 03:44:03 AM »
Bogs,

Thanks for the tips. I did use a new cutter but guessed on the speed and didn't use any lube. I used a 12mm cutter with the max in the lower gear which is meant to be 1000rpm.

I'm not sure whether I mentioned in the text but you're right, I was lucky. When I took the skim off the base with both clamped 1 on top of the other, it was only a tiny skim to make sure it was square after cutting the sides. but when I tried to do the same on the other end taking the bigger cuts to get down to size, as you pointed out, 1 of them kept moving. It must be a minute amount as you said because I'd previously milled them together to make sure they were exactly the same size.

Probably the only reason I got away with it when I turned them around was because I hadn't touched the thickness. Will certainly remember this in future.

On my rocking engine when I used that poor quality aluminium from the shelf it gave really bad pick up, sort of tearing the soft metal and I did have to take a small climb cut to get an acceptable finish. I will try the lube, still not sure whether the speed is right. Also, they were cheapo end mills from China - £12 for a set of 7!

Nick
Location: County Durham (North East England)

Offline NickG

  • Madmodder Committee
  • Hero Member
  • *****
  • Posts: 1890
Re: New Project Started!
« Reply #53 on: November 30, 2009, 08:12:58 PM »
Here is tonight’s instalment. It’s quite hard to get motivated to get out there initially after being at work all day but once I get out there I don’t want to come back in! Came in at about 11:20 tonight, got a reasonable bit done.
First I thought I’d measure the 12mm end mill to see if it was actually a 12mm – it was! So I decided to put it in the vice and try opening the bearing housings by hand:


To my surprise it worked a treat – nice push fit:

I decided to put a dab of loctite on them; they will never be coming back out.
So with that bit quickly done, I was feeling quite good and made a start on the crankshaft. I decided I would do it my old way, but with more care and attention – threaded shaft, disc and pin.

Started by facing off the stock (think this is either 32mm stainless or some sort of chromium steel I was given at work) it seems to machine quite nicely whatever it is. I then drilled and tapped 3/16” x 40 tpi.  


I didn’t fancy my chances of parting off – am a bit nervous about doing steel for some reason, it starts to make squeaking noises then I get the hacksaw out! Anyway, it was sticking way to far out of the chuck for parting off. Getting it closer to the chuck would have meant another saw cut since it didn't fit through the chuck body. So this time I just skipped a step and went for the hacksaw – which is now pretty blunt!


About  10 mins later I had this:


I was pretty happy with that straight cut and the finish was ok, so I thought I’d just leave it!

Lol, just checking you’re awake, of course it would be screwed to the shaft and faced off later!

Started machining down some 10mm stainless for the shaft.


It cuts really nicely, think it’s 303 or 304. The metal comes of in long spirals:

In fact on one of the cuts it was one continuous piece of swarf

Taking finishing cuts and lots of passes at the same setting. I had a bit of a flexing issue so the end furthest from the chuck was always larger – this makes it hard to test fit in the bearings. Consequently it is a marginally looser fit on the end near the chuck that I would have liked, no play but just a sliding fit rather than a push fit. I contemplated buying some 6mm bar but I think it would have needed reducing marginally to fit the bearings anyway.


I turned the shoulder for the thread and gave it an undercut with the hack saw – dodgy I know but a parting tool wouldn’t work that far out from the chuck.

Then I put the 3/16” x 40 Tpi thread on. This engine is a bit mix & match on the sizes. It was originally designed in metric so for the first time I am trying to stick to that, but all my taps and dies are imperial or BA and some of my metal was imperial! Oh, and my machines, so there’s been a bit of conversion going on! I used to always use imperial but I think I actually prefer metric now – if I had DRO’s I definitely would.


Crankdisc screwed on and loctited in place.


Facing disc down to thickness. This also gets it square to the shaft if there is any misalignment in the threads. The back face doesn’t matter as long as it doesn’t catch on anything but there doesn’t appear to be much misalignment anyway.


Bit of a polish with some wet & dry and here is the crankshaft / disc.


Next I turned the crankpin which is 3mm. I decided to use some 1/8” silver steel for this, it didn’t need to be silver steel, just about anything would do, it was just the nearest size I had.


Turned the slightly smaller shoulder and threaded 6ba, don’t think I took a photo of that.


I set the crankshaft / disc up in the milling machine to drill & tap the hole for the crank pin. To do this I just aligned the centre drill by eye to the centre pip then wound the table out 13.5mm which is the throw.


Centre drilled, then drilled and tapped 6ba. Screwed and loctited the pin in place:


Some of you will notice I’ve deviated from the drawings here. I’ve just got a pin sticking out rather than a special shoulder and screw that clamps together. The cylinder / bearing housings will be arranged on the baseplate such that the big end bearing is positioned in the centre of the crank pin (1.5mm space either side) but it is free to slide which should allow it to account for any out of squareness without binding. As John (Bogs) said it would be better practice to do it the way he has and Jan has in his drawings but this is the same method I used on my stirling engine and it seemed to work on that so I’ll give it a go here. If not, I can easily make up a spacer and a screw to make it rigid. Then I'll get  :poke: and :wack:

I'm also not bothering with any balancing. I think the pin / big end is light enough and the flywheel sufficiently heavy not to make a difference on this design.

Quick test assembly:


I still need to machine the slot and hole in the piston, make the conrod, make the base plate, a base from brown stuff and now I think a burner.  I was planning to use the glass burner from my chemistry set I had when I was about 10 but it’s a sort of bulb shape and interferes with the cylinder  columns so I don’t think I will be able to manoeuvre the flame into the correct position with that one. Not sure whether to solder a burner or machine one from solid alloy as I did with my stirling. This will need a lot more fuel though so think I may solder it to save time boring stuff out!

Got one eye on the finishing line but am determined not to attempt any start up until it’s completely finished!

Nick
« Last Edit: December 01, 2009, 04:27:31 AM by NickG »
Location: County Durham (North East England)

Offline Darren

  • Madmodder Committee
  • Hero Member
  • *****
  • Posts: 3795
  • N/Wales
Re: New Project Started!
« Reply #54 on: November 30, 2009, 08:54:54 PM »
Very nice Nick, very nice ..... looks like a bit of mill finish steel .... get yourself a magnet to test Stainless. Though you will be able to "see" it in time as it has it's own look colour usually.

Also it's the one with no rust on it after you've had it for a while  :lol:
You will find it a distinct help… if you know and look as if you know what you are doing. (IRS training manual)

Offline NickG

  • Madmodder Committee
  • Hero Member
  • *****
  • Posts: 1890
Re: New Project Started!
« Reply #55 on: December 01, 2009, 04:34:48 AM »
Thanks Darren. What is mill steel? Or did you mean mild? Pretty certain it's not mild, the OD has a very shiny mirror, chrome like finish and there's no rust in sight. It reminds me of a bit of Chromium steel which came as a part of Sparey 0.8cc diesel kit from Woking precision models (incidentally that was the first thing I attempted to make as a first project - didn't get very far!!). Will try it with a magnet though.

Nick
Location: County Durham (North East England)

Offline Darren

  • Madmodder Committee
  • Hero Member
  • *****
  • Posts: 3795
  • N/Wales
Re: New Project Started!
« Reply #56 on: December 01, 2009, 06:51:39 AM »
Strew brought me over some mill steel when he came for a vist.

He informed me it's mild steel that has had it's outer diameter mill peeled which gives it that distinctive banded finish.

If it was chrome steel you would prob have a very hard time cutting it I would guess.

Some SS is magnetic, but no where as near as much as normal steel ... so don't let it trick you  :thumbup:
You will find it a distinct help… if you know and look as if you know what you are doing. (IRS training manual)

Offline NickG

  • Madmodder Committee
  • Hero Member
  • *****
  • Posts: 1890
Re: New Project Started!
« Reply #57 on: December 01, 2009, 08:07:01 AM »
Ah right. It does have a banded finish. Thanks for the info.

I didn't really have any problem cutting the other chrome steel though, it was a little hard, a bit like silver steel, comes off in small chips.

Well I'll be happy if it doesn't rust cos I can't be @rsed polishing it!  :lol: That's why I thought I'd try to use stainless wherever possible on this build. Should have used it for the bearing housings too but not sure how it mills, not tried it on mill yet.

Nick
Location: County Durham (North East England)

Offline Darren

  • Madmodder Committee
  • Hero Member
  • *****
  • Posts: 3795
  • N/Wales
Re: New Project Started!
« Reply #58 on: December 01, 2009, 08:14:01 AM »
SS on the mill .... turn the spindle rpm down, try half of what you would use for MS. Then adjust as you see fit.

Go at it too fast and you'll wear the teeth right off your cutter in no time .... exp is everything  :doh:
You will find it a distinct help… if you know and look as if you know what you are doing. (IRS training manual)

Offline NickG

  • Madmodder Committee
  • Hero Member
  • *****
  • Posts: 1890
Re: New Project Started!
« Reply #59 on: December 02, 2009, 07:23:52 PM »
Hi all,

Made a small amount of progress tonight although it doesn’t feel like I’ve done much!

When I did that test run of the flywheel on the crank in its bearings I realised there were a few minor issues.
The first one was that I hadn’t yet carried out a method of attaching the flywheel to anything!  :lol: I can’t remember why, I think I just got bored and decided to do something else! Anyway, it’s pretty essential so I decided just to use my usual method - drill an angled hole, tap and stick a bolt in it.
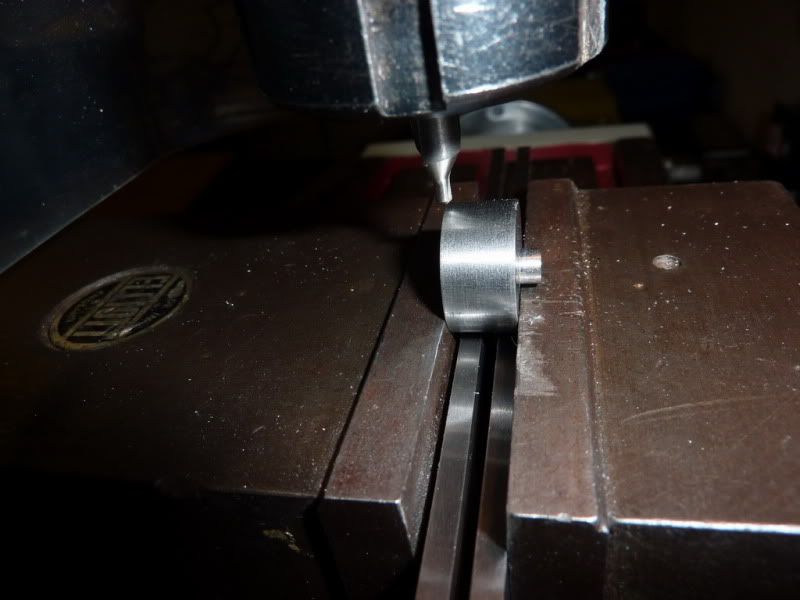
Here’s the set up on the drill (the first time I have used it during this project I think!


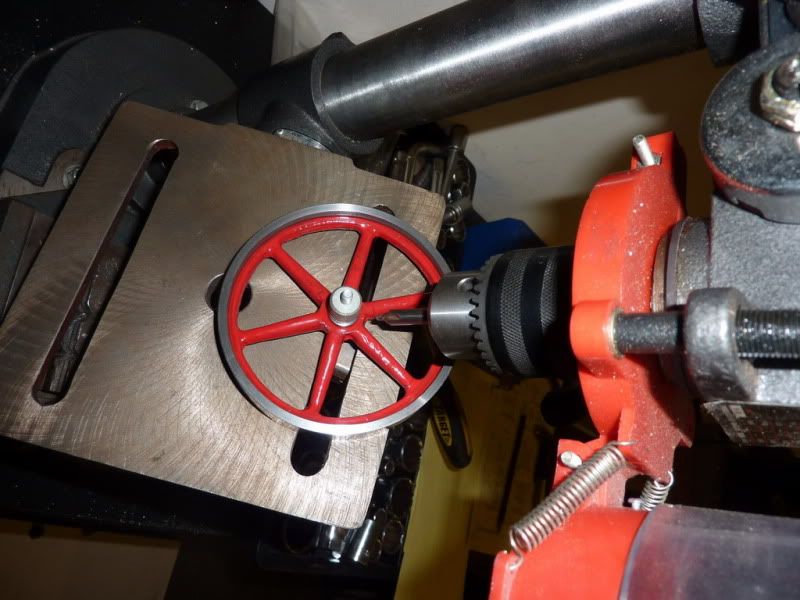
I started the taper tap off in the drill at the same setting before moving it to the vice to finish:
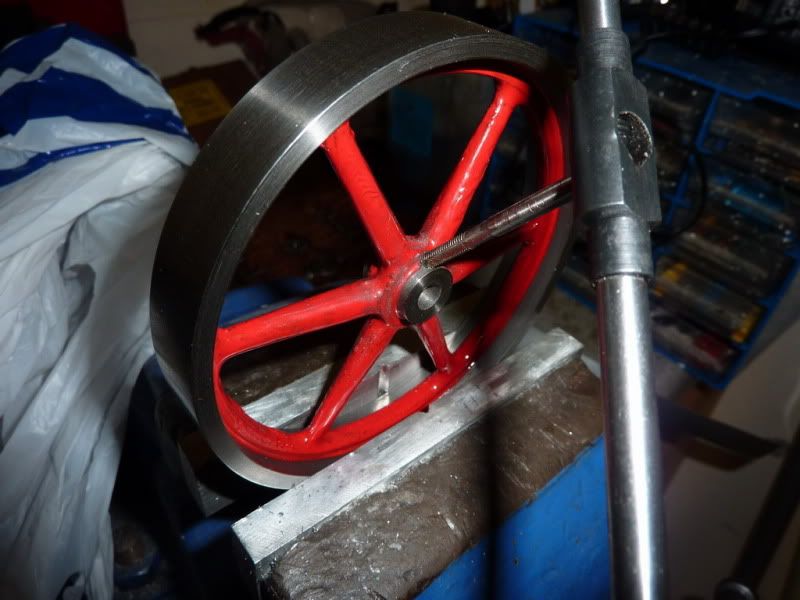
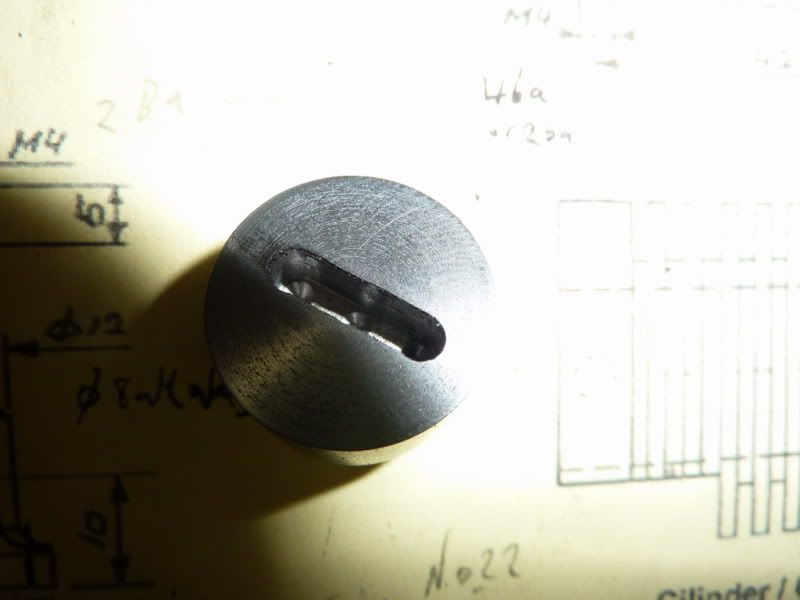
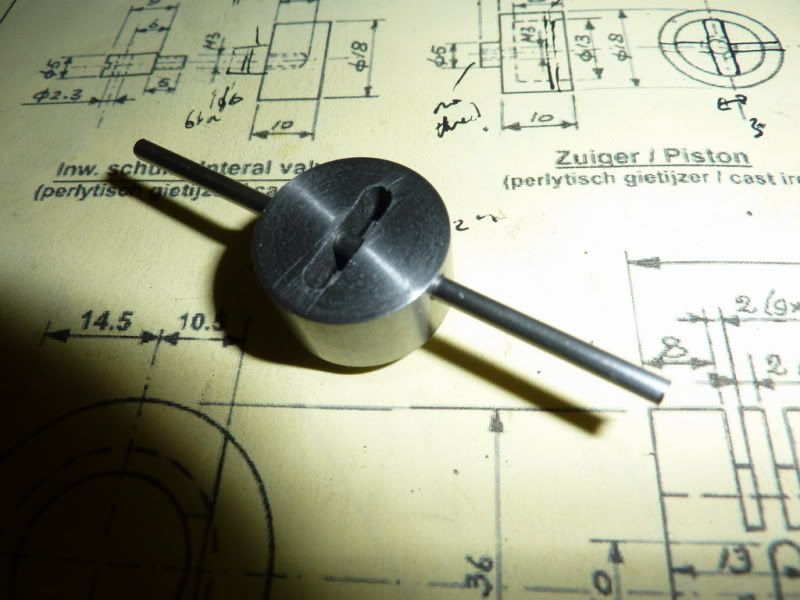

That was the flywheel done – ish! On carrying out another test run I realised something else- I the 4ba bolt to hold the flywheel on stuck out too far and fouled the bearing housing. So I just chopped it off and put a slot in it to make a grub screw.
Then there was a problem with the clearances between the bearing housings & flywheel which allowed it to move around and rub on the housing. This was because I got a bit carried away when doing the flywheel – I didn’t realise that the spokes actually have a slight curve from one side to the other, so because I was concentrating on getting the amount the boss sticks out on each side the same, the boss actually ended up narrower than the width of the flywheel!
Anyway, I decided to measure up and make some brass spacers to give necessary clearances and avoid rubbing.
I don’t have pics of the machining but I just turned some brass to a smaller OD than the boss, drilled a hole for the crankshaft and parted off. 2 x 0.5mm thick and 1 x 2.5mm thick.


That pic was straight from the lathe, surprisingly there are no burrs, which is why I picked brass. Just gave them a rub on some wet & dry after this.
I skimmed 10 thou of each side of the flywheel outer rim to avoid any rubbing with the housings. Another test build showed that when the grub screw was tightened, it made the flywheel slightly wonky –  :doh: Yes I have committed a cardinal sin! So I had to find a small piece of shim to pack under the side where the grub screw isn’t. That seems to have solved the problem. Being a cast flywheel the spokes aren’t very balanced or uniform anyway, there’s not a lot I can do about that but at least the outer runs true – ish!

Another little niggly job that I had put off was milling the slot in the piston and drilling the hole for the gudgeon pin. So thought I might as well get that out of the way too.

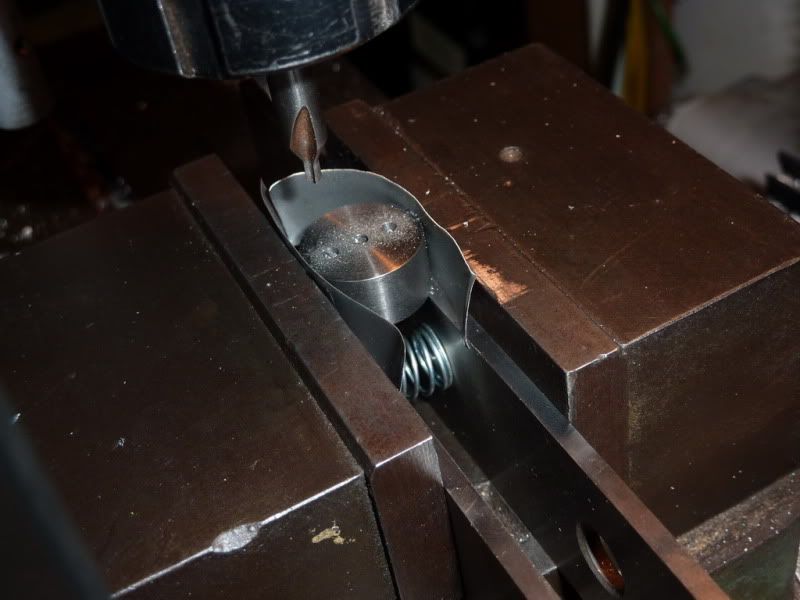
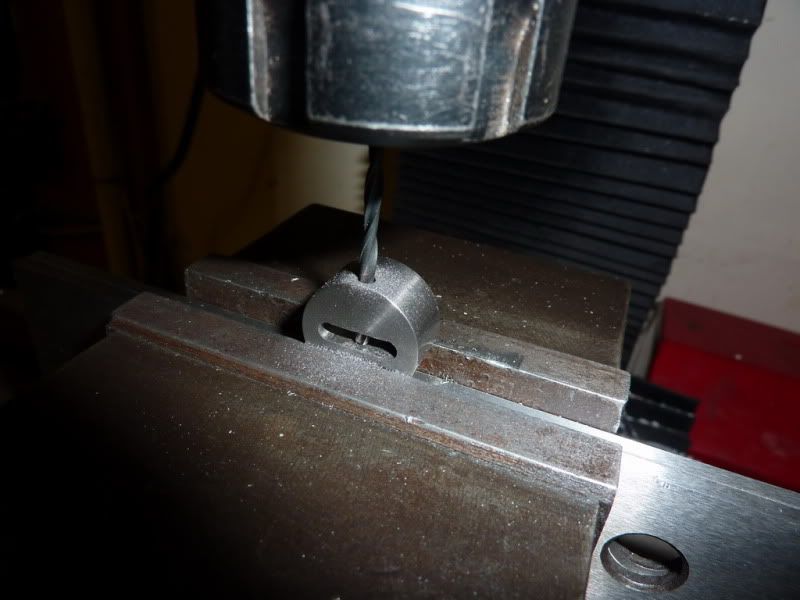
Set up in the milling vice. First I centre drilled and drilled 3 holes, 1 in centre then the 2 extremes of the slot. I should maybe have used a slightly smaller drill than the cutter but I used a slightly larger one.


Joining the holes up with the 3mm milling cutter:


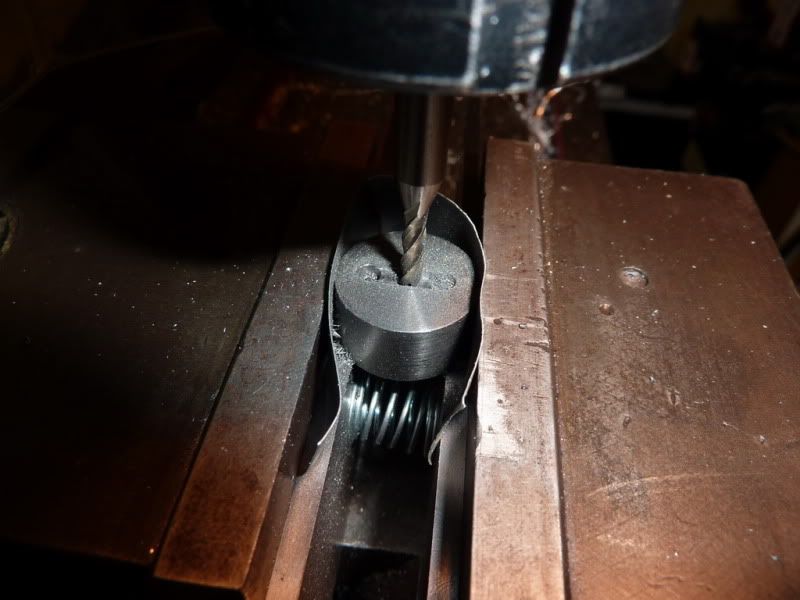
At first I started taking tiny cuts, but then thought I’d try half depth – that worked so it only took a couple of cuts. Think I could have done it full depth to be honest but I am still finding the limitations of the milling machine. I’ve given it a bit of a slagging off recently, but it actually works pretty well, it’s just not the highest quality but I guess you can’t expect that anyway. Would love a Harrison one to match the lathe!

Here is a pic of the finished slot. It worked reasonably well. If I wanted a really accurate thing I would have had to use a smaller cutter then take extra cuts to come up to size. But I knew this 3mm would give a little more than 3mm, which is what I needed on this occasion. I don’t want any friction between the piston and con-rod.


Now all that was left on the piston was to drill the hole for the gudgeon pin. For this I just clamped in the mill, lining the slot up parallel to the top of the vice jaw by eye. I also just aligned the point of the centre drill to centre and edge by eye  - good enough for this since there is still scope for adjustment with this engine.


Drilling the hole gently. This cast iron cuts like butter anyway though, a joy to machine.


Test fit of the gudgeon pin material. 3/32” stainless. It is a lovely free fit but no play. The steel measured 2.36mm I used a number drill that measured 2.38 on the shank.


Cut the gudgeon pin to length and faced the ends. 1mm shorter than the dia of the piston.

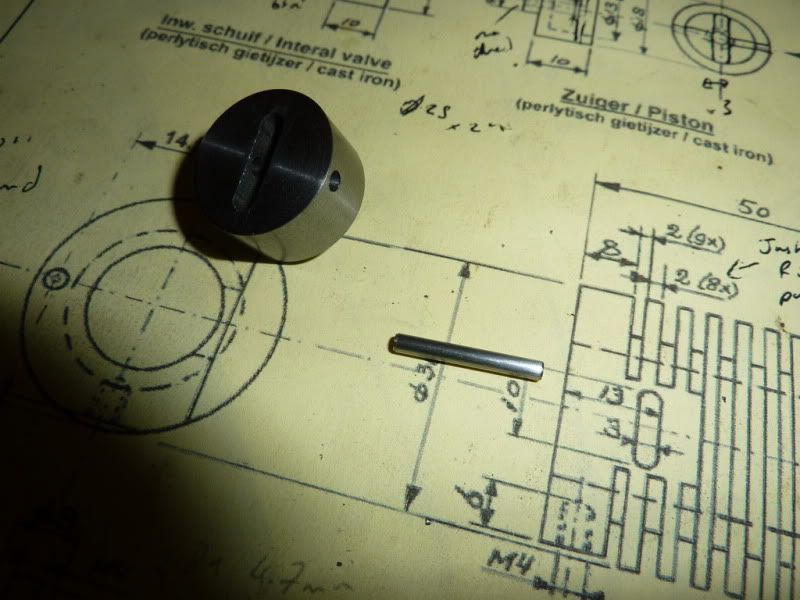
The bearing surfaces will be those in the cast iron piston, it will be a tight fit through the rod so maintaining its position in the centre of the piston.

Here’s a bit of a mock up on the aluminium that will be the base plate:


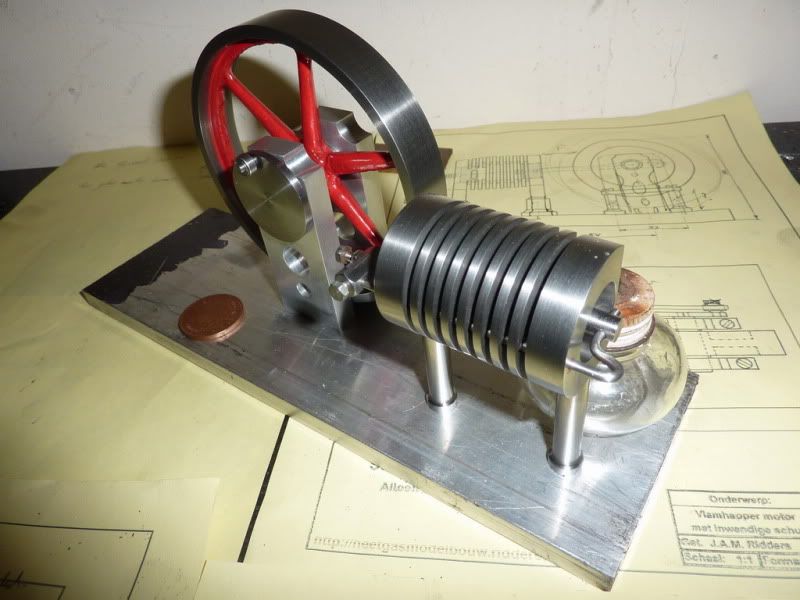
Unfortunately the glass burner I was planning on using won’t fit to give me the right flame position so I will need to make one.
I even remembered something for scale- the coin is a 2 pence piece. (Just over an inch dia)
It will certainly be the largest engine I have ever built. Can I still call it an engine if it doesn’t work?!  :lol:

I’m not sure what to do with the edge of the aluminium plate. For the wooden base I will chamfer with a countersink as I liked the look of that on my rocking engine but not sure how well that will work on alloy.

Maybe I could do a stepped edge? Any ideas? Don’t think it’ll look great just square.

The finishing line is definitely in sight now I just need  :whip: to get over it!:
Con rod
Base Plate
Wooden Base
Burner

Nick
 :ddb:
Location: County Durham (North East England)

Offline chuck foster

  • Sr. Member
  • ****
  • Posts: 334
  • Country: ca
Re: New Project Started!
« Reply #60 on: December 02, 2009, 10:05:32 PM »
looking real good nick  :thumbup: :thumbup:

you could use a router bit to shape the edges of the ali base, router bits were made for wood but they do a great job on ali and brass.

chuck  :wave:
hitting and missing all the way :)

skype:  aermotor8

former hmem member

Offline sbwhart

  • Global Moderator
  • Hero Member
  • *****
  • Posts: 3530
  • Country: gb
  • Smile, Be Happy, Have Fun and Rock Until you Drop
Re: New Project Started!
« Reply #61 on: December 03, 2009, 02:17:05 AM »
Great Job Nick  :clap:

Running a bull nose cutter around the edges finishes them off nice.

Have fun

Stew
A little bit of clearance never got in the road
 :wave:

Location:- Crewe Cheshire

bogstandard

  • Guest
Re: New Project Started!
« Reply #62 on: December 03, 2009, 02:37:47 AM »
Nick,

Conrod, burner, RUN. In that order.

Get it running first, bling after.

You are only putting off the inevitable, so get to the running stage first, as you might need to make slight tweaks and could damage the bling. Then polish and shape away to your hearts content.


John

Offline NickG

  • Madmodder Committee
  • Hero Member
  • *****
  • Posts: 1890
Re: New Project Started!
« Reply #63 on: December 03, 2009, 03:27:31 AM »
Chuck / Stew -

I don't have any ball nosed cutters, might have to buy a few thought, they are sure to come in handy anyway. I was looking in a tool catalogue yesterday and saw a sort of engraving / chamfering tool that looked quite handy. people could make these themselves if they had indexable tips  - it's basically a straight rod with the end milled flat and a 90 deg indexable tip bolted on. They were about £50 squid though - sod that!

Chuck, I think my dad has some router bits but not sure if he's got any small enough. What sort of speed would I need to run at for ali?

Bogs,

I usually jump the gun and try to run things before they are ready so thought I'd try to finish this one first as in the past I've forgotton about things like brown stuff bases and it's ended up looking crap! Do you reckon I should mount the stuff on a scrap, test base first to get it running then incase I need to move holes etc? Then make the real base and do finishing touches?

Cheers guys,

Nick
Location: County Durham (North East England)

bogstandard

  • Guest
Re: New Project Started!
« Reply #64 on: December 03, 2009, 04:32:03 AM »
Actually Nick, I got myself into the same predicament as yourself.

I got my twin licker running wonderful on a crappy base. Unfortunately it was at a time when I had loads of ideas for new engines in my brain cell, and I concentrated on getting them made and running.

Only now am I getting back to a couple of them, to bling them up, in fact one is destined to be started next week or the week after.

I don't want to restart the Halo project until Kvom has his up and running, as it is silly having two of the same sort of builds going on at the same time. So I am getting those engines up to scratch first.

In all honesty, you have made such a big dedication to this post, I don't think you would do what I did, and leave it unfinished. So get it running first by whatever means, only then finish it off to a high standard using the dimensions for the base of the running engine.


John


Offline sbwhart

  • Global Moderator
  • Hero Member
  • *****
  • Posts: 3530
  • Country: gb
  • Smile, Be Happy, Have Fun and Rock Until you Drop
Re: New Project Started!
« Reply #65 on: December 03, 2009, 07:06:57 AM »
Nick

As a one off you could make a D bit chamfering tool, nice and cheap and effective.

Have fun

Stew
A little bit of clearance never got in the road
 :wave:

Location:- Crewe Cheshire

Offline NickG

  • Madmodder Committee
  • Hero Member
  • *****
  • Posts: 1890
Re: New Project Started!
« Reply #66 on: December 03, 2009, 07:12:17 AM »
Good point John, I have done it before but as you say, this is my biggest and (hopefully) best project so far so I will definitely finish it. It just seems like more work making another base but better than messing up the real thing!

One of the good things about Jan's design is, because the columns are a flat bottom and screwed up from underneath, there is a slight margin for adjustment with slotted holes which would be hidden by the column bases.

Another good point of using a dummy base is so that I can see the overall , what's the word? Not foot print, but the overall max. dimesions of the assembly as I always like to try and leave an even border around each side.

I feel a bit apprehensive about this one, but other people have got them running and I know the only issues could be the fit of the pistons so it's just fingers crossed time I guess.

Nick
Location: County Durham (North East England)

Offline NickG

  • Madmodder Committee
  • Hero Member
  • *****
  • Posts: 1890
Re: New Project Started!
« Reply #67 on: December 03, 2009, 07:14:42 AM »
Oh yeah, why didn't I think of that seeing as we've been discussing D bits  :doh: :bang:

Actually, haven't got any big enough silver steel though, only got 3/16" is any other steel hardenable?

Nick
Location: County Durham (North East England)

Offline NickG

  • Madmodder Committee
  • Hero Member
  • *****
  • Posts: 1890
Re: New Project Started!
« Reply #68 on: December 03, 2009, 07:56:21 PM »
Made a little more progress tonight. I thought I’d better turn that awful looking bit of brass plate I’ve been staring at for the last month into something – the connecting rod.

Started by finding a drill that would suit the 7mm bearing. Found one just under and did a test drill. It was ok, a sliding fit but I would loctite it. The brass was bloody hard stuff though.

Milled it square, to width and to length:


Then marked it out a bit – well I knew what it meant! Incidentally this rod is 20mm longer than the drawings to account for my larger flywheel, slightly different design too.


Back into the mill to drill the holes while it’s a uniform shape and more rigid.


Wasting away the sides to give the narrow section:


I then flipped it flat in the vice and milled the radii making sure I wasn’t climb milling. Stupidly, I decided I’d take a lick off the end but because it was only gripped by the narrow centre section the mill tried to pull it upwards.  :doh:  :wack: I really do some silly things sometimes! Luckily I backed off straight away and was able to clamp it back straight in the vice. There is a tiny machine mark on the end now but nothing to worry about really.


Fitted to the piston and the bearing loctited in:


Another trial mockup, nothing is bolted down here but it seems pretty good and if I bolt the bits in the right place it will be very free running so that’s the first tick in the box.


It was really the first time I got to try the ‘pop’ test with the piston on the rod and something to pull on. The vacuum was more than I thought with the valve covering the port it took quite  a bit of force to pull the piston out which resulted in quite a tuneful pop! So that made me a bit happier – ½ a tick in the box I reckon – don’t want to count my chickens!

Base, burner and brown stuff left to do!  :ddb:

Nick
Location: County Durham (North East England)

Offline Stilldrillin

  • Global Moderator
  • Hero Member
  • *****
  • Posts: 4972
  • Country: gb
  • Staveley, Derbyshire. England.
Re: New Project Started!
« Reply #69 on: December 04, 2009, 02:22:42 AM »
That`s taking shape nicely Nick!  :thumbup:

David D
David.

Still drilling holes... Sometimes, in the right place!

Still modifying bits of metal... Occasionally, making an improvement!

Offline sbwhart

  • Global Moderator
  • Hero Member
  • *****
  • Posts: 3530
  • Country: gb
  • Smile, Be Happy, Have Fun and Rock Until you Drop
Re: New Project Started!
« Reply #70 on: December 04, 2009, 02:29:58 AM »
Good going Nick I recon we'll soon have a runner  :thumbup:

Are you making the base out of ally? if so you could try making the edge trimming D bit from case hardened mild steel it may just work as a one off, I think Bernd used a one off mild steel cutter on his south bend indexer thread.

Have fun

Stew

A little bit of clearance never got in the road
 :wave:

Location:- Crewe Cheshire

Offline NickG

  • Madmodder Committee
  • Hero Member
  • *****
  • Posts: 1890
Re: New Project Started!
« Reply #71 on: December 04, 2009, 04:17:47 AM »
Stew,

Yes the base is ally. I think I am going to try the D-Bit route just for the experience if nothing else. I might be able to get one big enough for a chamfer out of the 3/16" silver steel if I'm careful.

If I went the mild seel route would I need case hardening powder or is there any other way you can do it?

Many thanks,

Nick
Location: County Durham (North East England)

Offline sbwhart

  • Global Moderator
  • Hero Member
  • *****
  • Posts: 3530
  • Country: gb
  • Smile, Be Happy, Have Fun and Rock Until you Drop
Re: New Project Started!
« Reply #72 on: December 04, 2009, 04:24:10 AM »
Nick

You'll need the case hardening powder its the only home shop method I know, unless anyone else knows another way.
If you can hang on until next week I can get a bit of larger silver steel to you by the usual method.

Stew
A little bit of clearance never got in the road
 :wave:

Location:- Crewe Cheshire

Offline NickG

  • Madmodder Committee
  • Hero Member
  • *****
  • Posts: 1890
Re: New Project Started!
« Reply #73 on: December 05, 2009, 09:14:43 AM »
Stew,

Thanks for the info and the offer. I've just realised that with the way I had to machine the base - had to pack it on wood with edges over hanging. I could actually turn it upside down and use my 45deg dovetail cutter and take a small chamfer off the underside. This should work shouldn't it?

Here is last night's installment - I'm absolutely knackered, was in there until around 2am which is a bit silly but I just got into one of those moods thinking I am not leaving until I do what I intended!

I started by sawing the base to rough length and milling the sides in the vice to give the correct width.


Unfortunately it won’t fit in my vice so I had to remove the vice and clamp it on 2 blocks of wood with the edges overhanging. So I clocked it with a little gadget for my dial indicator another member kindly donated. Thanks very much  :thumbup:


I milled the ends square:


I then marked it up as a precaution.


Drilled all the holes, centre drilling first.


Then I realized I didn’t have any 2ba bolts, screws or anything! Pretty pissed off, I set about making some screws in a mad frenzy! Unfortunately, because I was rushing the shank size is slightly bigger than 2ba clearance size so I had to open the holes in the base up a bit.


Everything bolted up quite nicely.


But I must have made a mistake somewhere in my calculations!  :doh:  :bang: Good job I took bogs advice and didn’t finish the base yet! The piston was not coming to the end of the bore, but at the other end it was sticking out by the same amount. This meant I had either drilled the holes too close together on the base – I was annoyed and about to re-drill / slot the holes, then I thought why – I can just shorten the conrod. So I did that and it means no damage to the base. It all looks how I intended so think I must have made the con rod wrong! Actually, come to think of it, when I wound the distance in using the milling machine dials I thought, that’s miles out … but put it down to the dials, I know them to be inaccurate over large distances – probably the pitch error on the lead screws. So I thought nothing of it and used my markings instead. Maybe I calculated the marking wrongly – oh well, no matter.

It spins over nice and freely so the only thing left to do was try it!


Unfortunately I couldn’t get a peep out of it,  :( I was just holding the burner in different positions whilst trying to spin the flywheel but it didn’t show any signs of life. It makes a nice sucking noise and you could see it sucking the flame in and blowing it out if held in the wrong place. I need to have a proper look at flame positions, size of flame and timing of the valve now – I didn’t think timing would be an issue but maybe it is. I bit dis-heartened but I will keep trying, it can’t be that far away. If it still doesn’t show anything I’ll go for a new piston and valve.

Nick

Location: County Durham (North East England)

Offline NickG

  • Madmodder Committee
  • Hero Member
  • *****
  • Posts: 1890
Re: New Project Started!
« Reply #74 on: December 05, 2009, 09:20:19 AM »
Just found this one which looks interesting! Good effort there!
&feature=fvw
Location: County Durham (North East England)