Author Topic: Minnie TE Long term project  (Read 115968 times)

Offline Joe d

  • Sr. Member
  • ****
  • Posts: 251
  • Country: ca
Re: Minnie TE Long term project
« Reply #125 on: April 04, 2015, 07:27:13 AM »
Thanks, guys!  It's very enjoyable when you hit one of these "you can stick it together and it looks like something" moments.

Joe

Offline Stilldrillin

  • Global Moderator
  • Hero Member
  • *****
  • Posts: 4972
  • Country: gb
  • Staveley, Derbyshire. England.
Re: Minnie TE Long term project
« Reply #126 on: April 04, 2015, 08:19:51 AM »
That's a crackin' milestone to have reached, Joe.......  :thumbup:

Well done!  :clap: :clap: :clap:

David D
David.

Still drilling holes... Sometimes, in the right place!

Still modifying bits of metal... Occasionally, making an improvement!

Offline tom osselton

  • Hero Member
  • *****
  • Posts: 1256
  • Country: ca
Re: Minnie TE Long term project
« Reply #127 on: April 04, 2015, 06:23:32 PM »
I really enjoy this build I've always liked traction engines!

Offline Joe d

  • Sr. Member
  • ****
  • Posts: 251
  • Country: ca
Re: Minnie TE Long term project
« Reply #128 on: April 04, 2015, 11:01:19 PM »
David, Tom, thanks!  Glad you are enjoying it :clap:

Offline Joe d

  • Sr. Member
  • ****
  • Posts: 251
  • Country: ca
Re: Minnie TE Long term project
« Reply #129 on: April 08, 2015, 10:16:36 PM »
Spent a bit of time doing some catching up stuff, made the final hinge pin for the firebox door, ,made the locking pin for the gear selector,
broached some of the gears, made the retaining collars for two of the shafts.... did the hubcaps for the rear wheels...

then got to work on more of the rear axle stuff:  Turned the driving centre,


Then used it as a work holding spigot to turn the winding drum


as I turned both parts from the same bit of steel, I bushed the drum with some bronze, then faced it to size and bored the bushing


here it is from the rear view


put the driving centre on the dividing head to cut the ratchet


a little hacksaw and file work to make the pawl, and here we are:


Now just have to find some steel wire rope to finish it off.

Cheers, Joe


Offline Zadig

  • Jr. Member
  • **
  • Posts: 68
  • Country: gb
Re: Minnie TE Long term project
« Reply #130 on: April 09, 2015, 01:38:26 AM »
Fine workmanship Joe, not a lot of places to hide from the camera on the smaller models.

Offline Joe d

  • Sr. Member
  • ****
  • Posts: 251
  • Country: ca
Re: Minnie TE Long term project
« Reply #131 on: April 10, 2015, 10:07:10 PM »
Thanks, Zadig.

Carried on with turning the brake drum, turned one side, then trued it up in the small 4 jaw which was then held in the large 4 jaw,
as the jaws on the larger chuck would have destroyed the rim on the finished side. (My large 4 jaw is Number One on the I want to
replace this list)


Stuck all together on the axle blank just to have a look:


Made up the drive pins, a little turning, filing, and silver soldered together


and then trimmed the shaft to final length, milled some keyways, and assembled it all:

from the rear


From the right


And from the other side:


Only thing left to do with this is to install the wire rope once it arrives.

Time to shift to the front end and pick up where I left off with that end of things...


Offline mexican jon

  • Full Member
  • ***
  • Posts: 214
  • Country: england
Re: Minnie TE Long term project
« Reply #132 on: April 10, 2015, 10:53:42 PM »
WOW  :clap: :clap: :clap: Excellent Work  :) :) :)
People say you only live once ! I say thank F@*K can't afford to do it twice.

Offline Stilldrillin

  • Global Moderator
  • Hero Member
  • *****
  • Posts: 4972
  • Country: gb
  • Staveley, Derbyshire. England.
Re: Minnie TE Long term project
« Reply #133 on: April 11, 2015, 03:56:59 AM »
I've run out of meaningful things to write, Joe.......  :scratch:

Watching. Appreciating. Admiring.  :clap: :clap: :thumbup:

David D
David.

Still drilling holes... Sometimes, in the right place!

Still modifying bits of metal... Occasionally, making an improvement!

Offline Joe d

  • Sr. Member
  • ****
  • Posts: 251
  • Country: ca
Re: Minnie TE Long term project
« Reply #134 on: April 12, 2015, 11:46:51 PM »
Jon, David:  Thanks

Turned some 12L14 to start the smokebox door ring


once done everything i could do from that side, cut it off, flipped it around and finished the other side


Turned a piece for the door, stepped off to form a curved face, filed and sanded out the machining marks after this photo


drilling the rivet holes, happily a 0-80 screw neatly fits a 1/16" rivet hole to hold everything in place


fitting the door hinge


did all the riveting, then drilled for the hinge pin


cleaned up the hinge, stuck in a temporary hinge pin, and here we are:


Still have to turn the securing screw, and then, since the front axle and wheels are done, it on to the chimney.

Joe

Offline Zadig

  • Jr. Member
  • **
  • Posts: 68
  • Country: gb
Re: Minnie TE Long term project
« Reply #135 on: April 13, 2015, 05:58:37 AM »
Looking excellent Joe. Great machining skills, a really enjoyable thread.

Offline Joe d

  • Sr. Member
  • ****
  • Posts: 251
  • Country: ca
Re: Minnie TE Long term project
« Reply #136 on: April 13, 2015, 09:48:31 PM »
Thanks, Zadig.  My Minnie parts are a bit easier to manhandle compared to your Burrell.

Offline Zadig

  • Jr. Member
  • **
  • Posts: 68
  • Country: gb
Re: Minnie TE Long term project
« Reply #137 on: April 14, 2015, 12:58:36 AM »
Yes, but you need stronger specs, so it all evens out.

Offline Joe d

  • Sr. Member
  • ****
  • Posts: 251
  • Country: ca
Re: Minnie TE Long term project
« Reply #138 on: April 17, 2015, 11:00:06 PM »
Started machining the casting for the smokebox saddle,  fussed around and got it running more or less true to turn the
chucking spigot


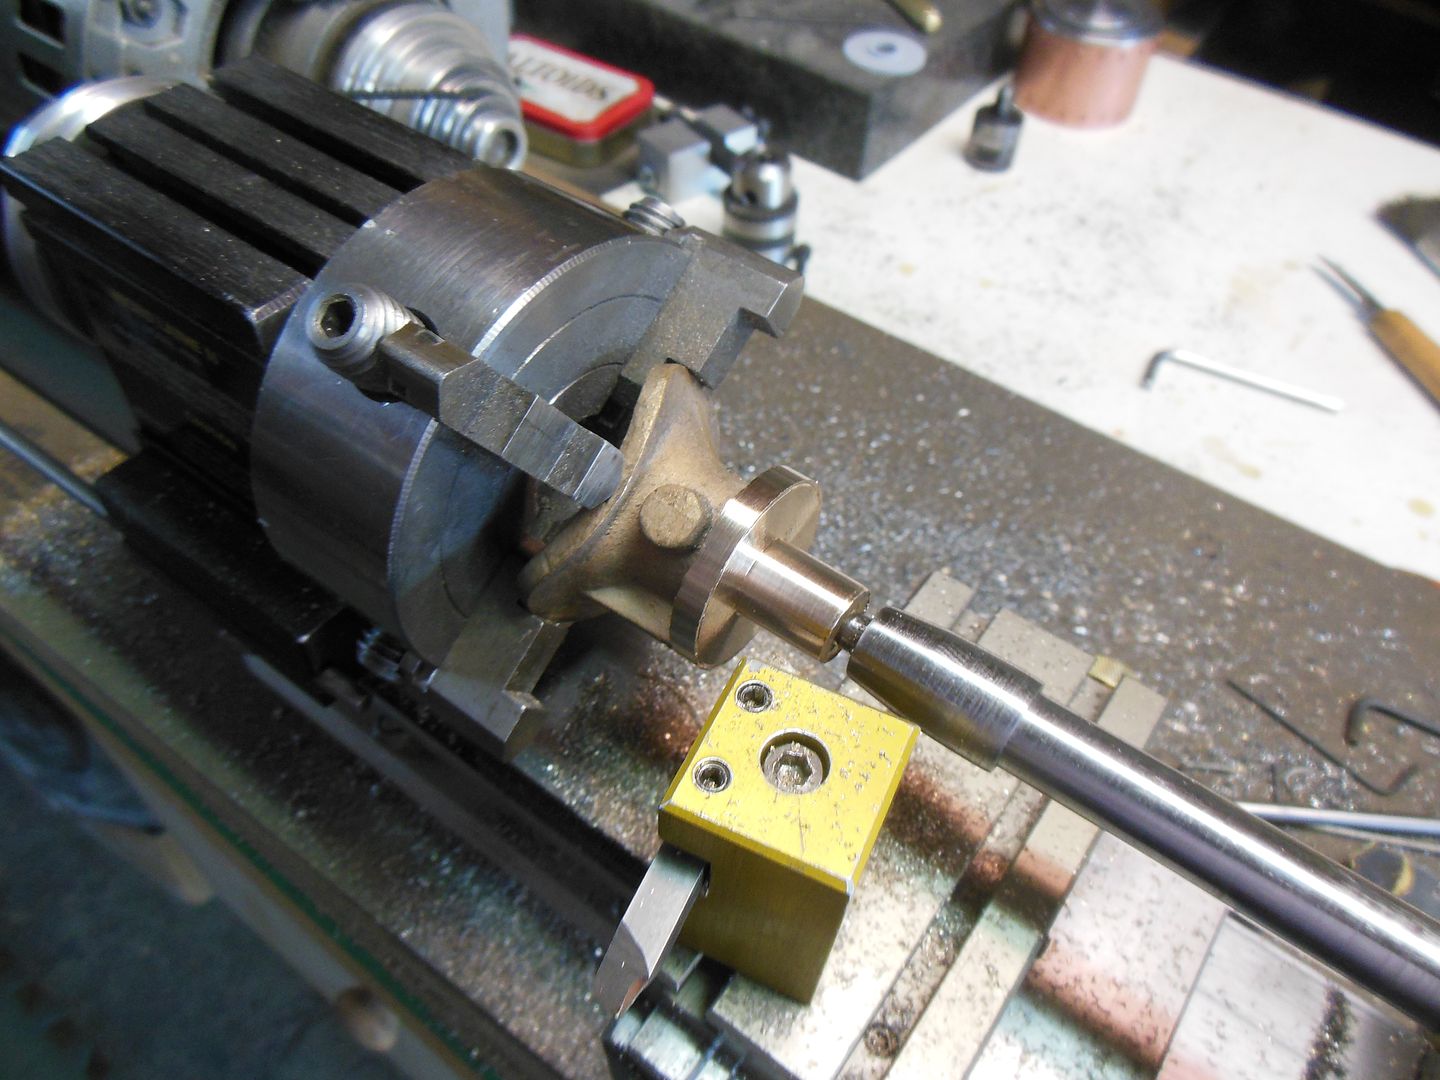
set it up in the mill to shape the curved surface with the boring head


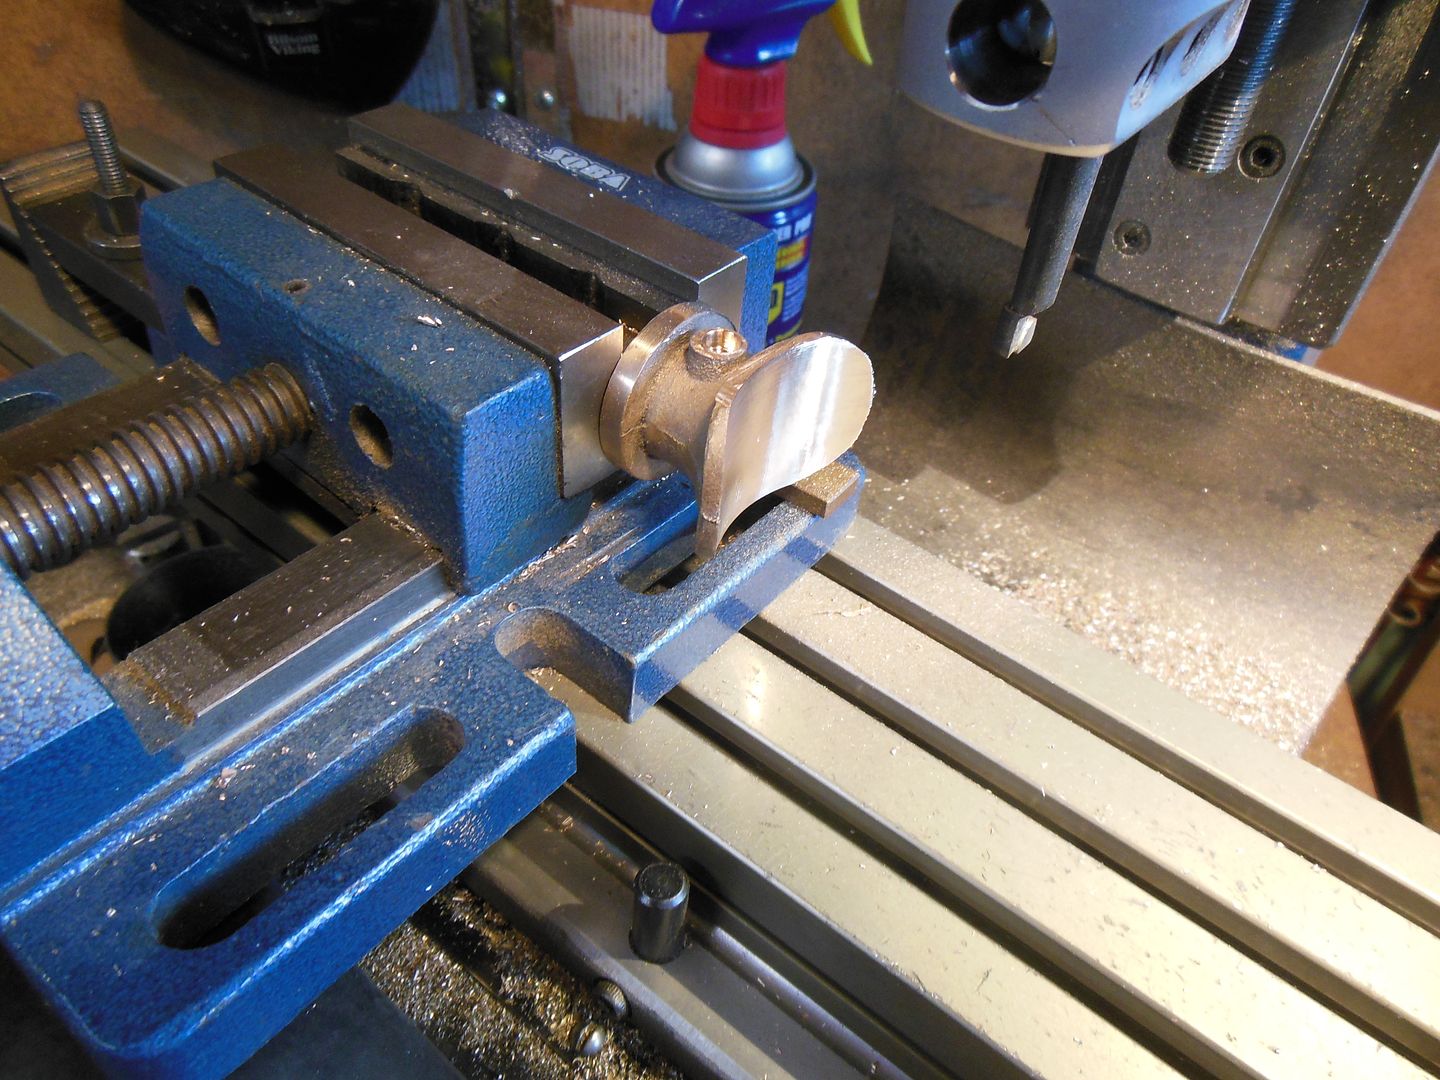
put it back in the lathe to bore through, and then drilled a steam passage up from underneath, that meets a hole in from the face
of the web on the side of the casting.  Here you see the nice plug silver soldered into place on the back of that web since I got a little enthusiastic  and drilled right through instead of just meeting the passage up from the bottom..... :hammer:


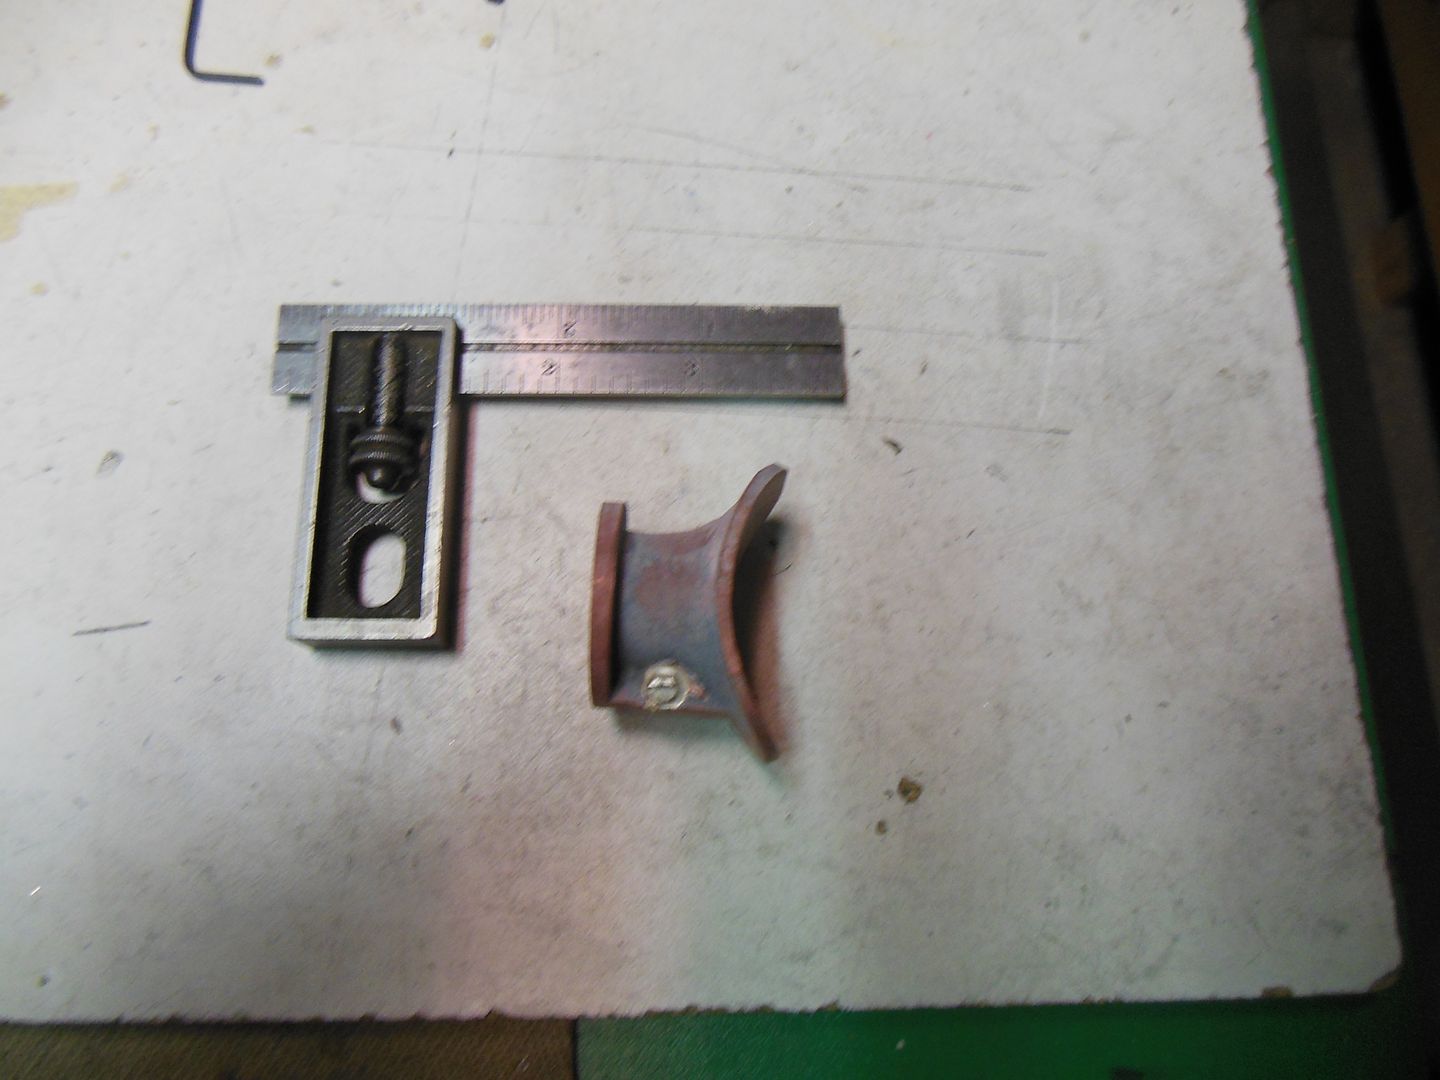
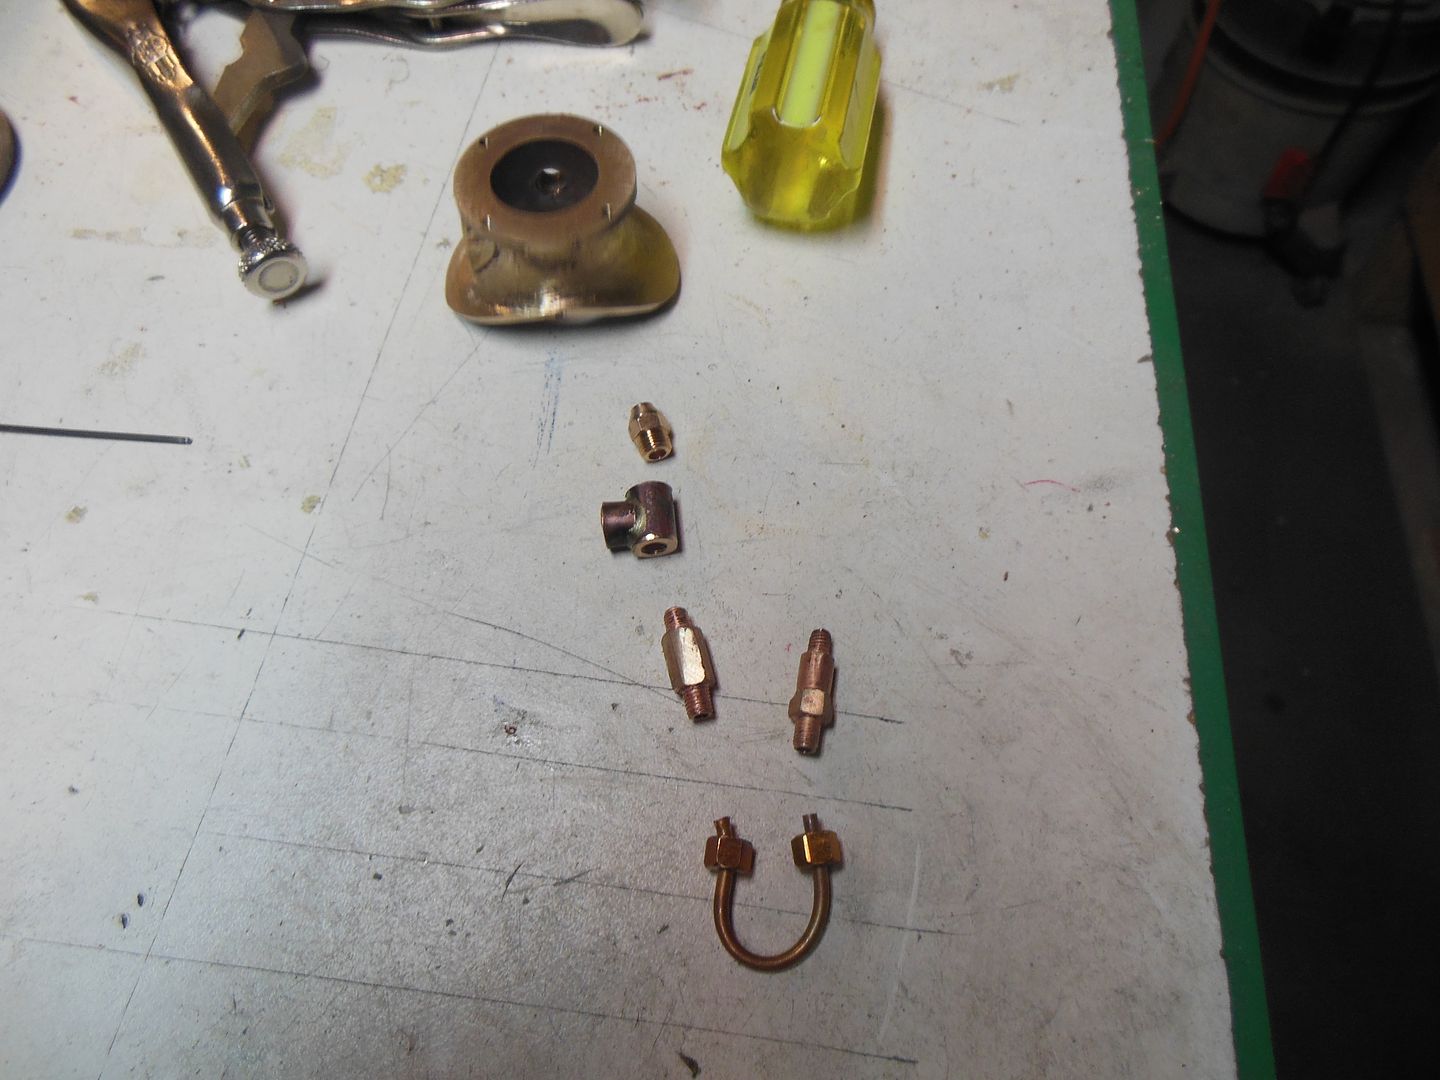
made up the various little fittings for the blower (some obnoxious bronze stock here, pain to turn, broke two drill bits, good thing
there's only 3 more inches of it left...) starting with soldering up a tee


into the mill to reduce the arms to length and drill & tap, turned the various bushes & nuts, & the nozzle,


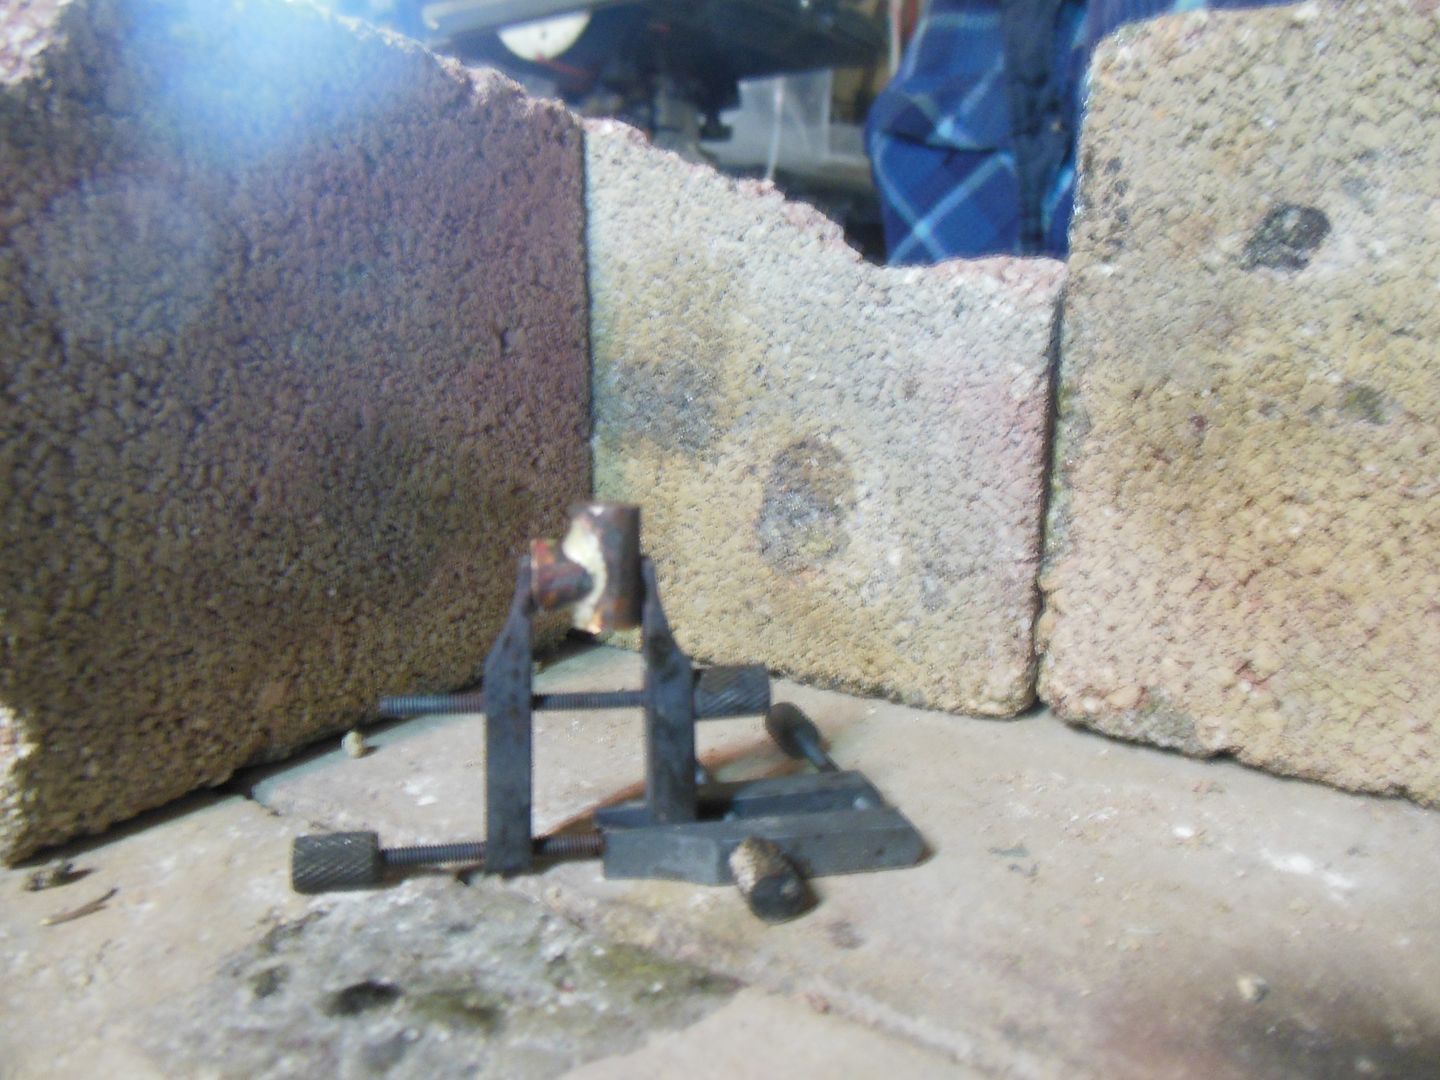
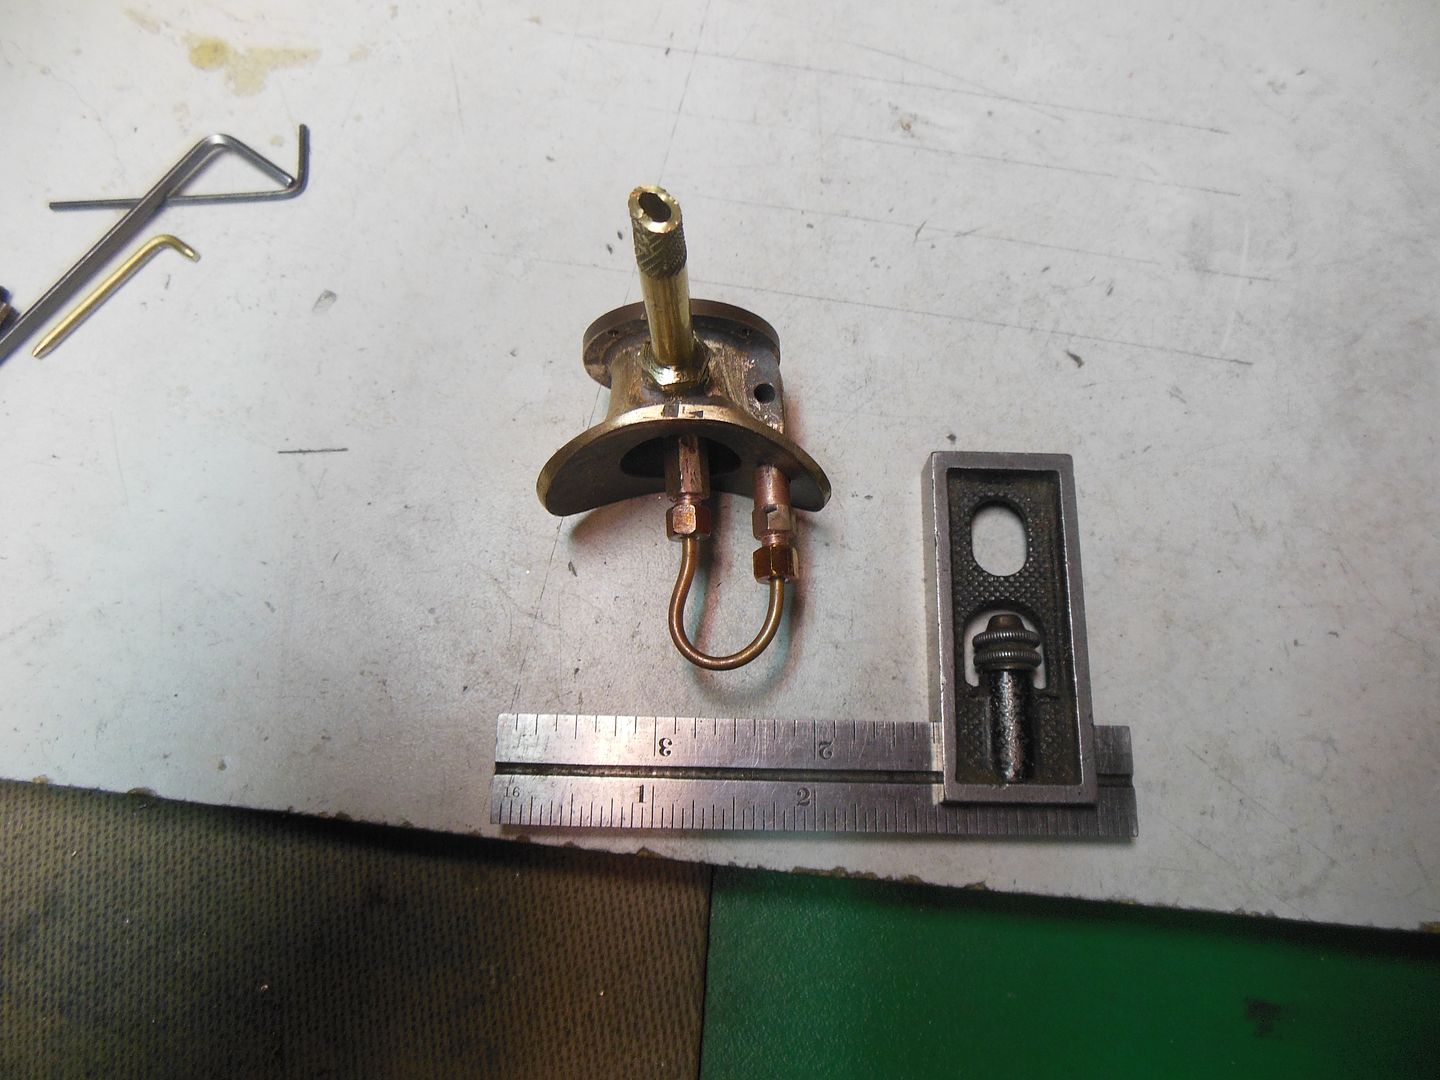
and here it is testing for fit, after a lot of fettling of the casting


So, with this done, I can move on with attaching the smoke box to the boiler.


Offline Ginger Nut

  • Full Member
  • ***
  • Posts: 232
Re: Minnie TE Long term project
« Reply #139 on: April 18, 2015, 08:09:39 PM »
I'll pull up a chair and watch this looks a super build. :thumbup:

Offline Joe d

  • Sr. Member
  • ****
  • Posts: 251
  • Country: ca
Re: Minnie TE Long term project
« Reply #140 on: April 19, 2015, 11:06:31 PM »
Thanks, Ginger.

Got the smokebox temporarily positioned with some 0-80 screws, which let me work out the position of the cut-out for
the chimney


Once that was done, hired the Mrs as a temporary shop assistant to help with riveting, saved me from making a lot of dodgy work holders
if I'd tried to do it on my own,  remains to be seen just how much that is going to cost me  :lol:

all riveted up,   put in the blower ass'y


from above:


side view:


Starting to turn the chimney: 


and that's where it's got to so far.

Joe

Offline Zadig

  • Jr. Member
  • **
  • Posts: 68
  • Country: gb
Re: Minnie TE Long term project
« Reply #141 on: April 20, 2015, 02:18:43 AM »
Still looking good Joe, your workshop looks very cosy and a nice place to work. I have reservations though, regarding the siting of your toilet, a little bit exposed for my liking. I think being able to rivet whilst taking a dump is taking workshop ergonomics - too far!

Edit: I've just realised it maybe your stool I see (no pun...).

Edit (2): No it's definitely a bog!
« Last Edit: April 21, 2015, 01:06:03 AM by Zadig »

Offline Joe d

  • Sr. Member
  • ****
  • Posts: 251
  • Country: ca
Re: Minnie TE Long term project
« Reply #142 on: April 21, 2015, 10:42:43 PM »
Zadig:  I'm a little concerned with your apparent interest in my plumbing arrangements.... :)

You should have stopped when you were second guessing yourself, it's the piano stool that my two eldest sisters sat on for very many hours doing scales.  The piano's long gone, just as well, I can't carry a tune with a handle... but the stool is handy


finished turning the taper on the outside of the chimney, and drilled in preparation for boring the inside taper


made a former and bashed some copper for the chimney cap


made two pieces for the cap, silver soldered them together, and turned it to final dimension


fussed around getting one side of the chimney tube level in the mill to machine a fake lap joint, and drill for decorative rivets


cleaned it up, bashed in the rivets, pressed the cap into place, and voila:


My friendly postman brought me my order of miniature wire rope today, so now will practice wire splicing for the first time in over 25 years...

Joe

Offline Zadig

  • Jr. Member
  • **
  • Posts: 68
  • Country: gb
Re: Minnie TE Long term project
« Reply #143 on: April 22, 2015, 01:44:08 AM »
It was worth getting it wrong just to see the stool, what a beauty, wish it was mine - engine too!

Offline Joe d

  • Sr. Member
  • ****
  • Posts: 251
  • Country: ca
Re: Minnie TE Long term project
« Reply #144 on: April 27, 2015, 10:16:43 AM »
Thanks, Zadig.  Sorry, but that stool isn't going anywhere.  Already fought off the sister- in- law who covets it.

Shifted into rigger mode for a bit:

bent some rod, filed it in half and then filed a groove in it to make a thimble:


Need a shackle to attach whatever to the cable, so started by drilling a bit of rod


bent a piece of smaller stuff, and silver soldered it into the first piece


opened up and shaped the eye with an awl


after filing off the ends of the eye and cleaning up the ends of the larger bit drilled through tapping size and half way clearance size
for the pin


cut out the centre of the large rod and did some filing to shape


Turned and threaded the pin


This is getting long, so will go to another post....

Offline Joe d

  • Sr. Member
  • ****
  • Posts: 251
  • Country: ca
Re: Minnie TE Long term project
« Reply #145 on: April 27, 2015, 10:40:13 AM »
Put a serving on the cable


made a couple of tries to splice it in hand, after enough of that frustration made up a miniature rigger's vice and things went much better


finished it off by serving over the splice, and here it is:


now back to some metal bashing, started shaping the sides of the tender


And that's all for now.

Joe

Offline R.G.Y.

  • Jr. Member
  • **
  • Posts: 44
Re: Minnie TE Long term project
« Reply #146 on: April 30, 2015, 05:09:25 AM »
Just caught up with your build. I see you clamping the "T" together to solder. Obviously it worked, but I use a  different method. I build large scale sailing ships, which need a lot of awkward shaped small parts soldered. I embed the parts in a small lump of fire cement, this sets as soon as heat is applied, and cracks off after. When purchased in a tub put small amounts in polythene bags, put back in the tub with a small amount of water in the bottom. In this way it will keep for years.

Offline Joe d

  • Sr. Member
  • ****
  • Posts: 251
  • Country: ca
Re: Minnie TE Long term project
« Reply #147 on: April 30, 2015, 07:49:25 AM »
RGY

This sounds interesting.  Please expand on "fire cement", not a term I'm familiar with.

I'm certainly keen on something that would be more secure than the clamps, and
less of a heat-sink.

Thanks, Joe

Offline vtsteam

  • Global Moderator
  • Hero Member
  • *****
  • Posts: 6466
  • Country: us
  • Republic of Vermont
Re: Minnie TE Long term project
« Reply #148 on: April 30, 2015, 08:39:26 AM »
Hey great work Joe -- I just caught up! Love the rigging, shackle and thimble construction, and the stack looks great!

Fire cement here, at least, is bought in a tub, and is a mix of fire clay and waterglass (sodum silicate) used in patching the inside of a fireplace or chimney, and sometimes as a mortar for laying firebrick.

https://www.rutland.com/p/104/refractory-cement
I love it when a Plan B comes together!
Steve
https://www.youtube.com/watch?v=4sDubB0-REg

Offline Joe d

  • Sr. Member
  • ****
  • Posts: 251
  • Country: ca
Re: Minnie TE Long term project
« Reply #149 on: April 30, 2015, 10:13:13 AM »
Thanks Steve.

Now that you've shown me, I recognize what RGY is talking about.  I suspect VERY strongly that this will get
tried out,I can see where it would greatly simplify any number of fabrications.  We even have it
here, so I won't have to head south to Rutland :)

Cheers, Joe