Author Topic: Stuart No. 4 Build  (Read 29074 times)

Offline smfr

  • Jr. Member
  • **
  • Posts: 33
  • Country: us
Stuart No. 4 Build
« on: July 18, 2012, 11:43:20 AM »
[Moved from homemodelenginemachinist.com]
I've started work on a set of Stuart No. 4 castings that I was lucky to pick up on eBay:


It has the crank as a casting, which I guess means that it's an older set? As far as I know, all the parts are present. I also have a casting kit for the reverse gear.

Offline smfr

  • Jr. Member
  • **
  • Posts: 33
  • Country: us
Re: Stuart No. 4 Build
« Reply #1 on: July 18, 2012, 11:44:05 AM »
[Moved from homemodelenginemachinist.com]
Step 1! The boxbed:


This is just basic squaring up on the milling machine, though space on my milling table is limited so clamping gets slightly interesting:


There's a shim under the lowest corner to stop it rocking. Once the underside is done, we flip it over and mill the top side flat:


Here I have to move clamps around, because I don't have enough travel. Note the 'L' on the lowest corner (found on the surface plate with a height gauge), so I know what height to start the cutter at.

I was hoping one of the "No. 4" imprints on the castings remains on the final model, but I suspect they all get cut off.


Offline smfr

  • Jr. Member
  • **
  • Posts: 33
  • Country: us
Re: Stuart No. 4 Build
« Reply #2 on: July 18, 2012, 11:44:26 AM »
[Moved from homemodelenginemachinist.com]
Next up, the soleplate. Again I had to get creative with clamping due to limited table space:


Note the stacked clamps! It's suboptimal because the whole thing could swivel around the one bolt, but the rotational forces are minimal when just trimming the bottom.

Once the bottom was flat, I flipped it over and went over the top surface, then cut the bearing slots. Here I messed up slightly: rather than center the slots on the entire casting, I started by centering them on the bearing bosses, but then found that those bosses are not centered, so I had to correct slightly. The slots are a bit oversize, but it's not an issue as I just cut the bearings to fit.


While it was clamped down, I also drilled and spotfaced the holes for the corner bolts. The plan doesn't show the spotfacing, but it's certainly required for the nuts to sit flat.

In the photo above I've completed one bottom bearing, making it a snug fit to the slot. Here's the other bearing being squared up:


I swear this gunmetal squirms under the cutter. I was pretty sure I'd cut the slots on these bearings within a thou or so, but the slot ended up about 2.5 thou too narrow. I took these to final size by filing, since I wanted them to be a snug fit to the soleplate.

Offline smfr

  • Jr. Member
  • **
  • Posts: 33
  • Country: us
Re: Stuart No. 4 Build
« Reply #3 on: July 18, 2012, 11:44:47 AM »
[Moved from homemodelenginemachinist.com]
The top bearings are a little more tricky. First I cleaned up the lower surface in the 4-jaw:


I then glued the two together, planning to turn the bosses. However, I realized that I had no true surface I could use to ensure that the join was aligned the turning axis, and in the center. So after some application of heat to undo the Superglue, I used a chuck spider in the 4-jaw to put a small flat on top of each bearing, with the bearings having the same thickness:


and then I could glue them together again:


The boss is then a simple turning job:


I also drilled a small hold down the center to I had a reference to re-center when I flipped it around. However, even with the best of plans...

At some point in the hole drilling, the Superglue gave way and the two sides separated. >:(

Also, look at that hole! It's all over the place, and (I think) not just after separation:


After some futzing around trying to get the halves aligned properly, I attached them together with solder this time, and was able to complete the other side, and open up the hole to 1/4":


I'm wondering how to ensure that things are lined up when I drill and ream the hole to size. My plan is something like this:

1. Sweat the two lower bearings together and drill to 1/4", so that both upper and lower bearings have 1/4" holes in roughly the right spot. Separate the halves.
2. Sweat the tops and bottoms together in pairs, aligning the holes
3. Drill to 27/64"
4. Drill and tap the soleplate for the hold-down bolts, and bolt the bearings down
5. Ream in place with a spiral 7/16" reamer

Does that sound reasonable?

Offline smfr

  • Jr. Member
  • **
  • Posts: 33
  • Country: us
Re: Stuart No. 4 Build
« Reply #4 on: July 18, 2012, 11:45:17 AM »
[Moved from homemodelenginemachinist.com]
Not too much progress over the past week. I think I've got as far as I can with the bearings until I receive the 7/16" spiral reamer I got on Ebay. Here's where I'm at:


The upper bearings were separated, then spot-faced with a 7/16" end mill and drilled. I have yet to tidy up the ends, but know that I'll use the rounding table, and pivot around the opposite bolt hole.

I still need to sweat the two lower bearings together to start the hole. Then I think I'll sweat uppers and lowers together and clean up the hole, then put them in the sole plate to see if things line up. I have a feeling that if I drill and ream them in place in the sole plate, the lower bearing is going to be oversize or misaligned. Maybe I'll do a dry-run or two at a smaller diameter to see how things work out.

Offline smfr

  • Jr. Member
  • **
  • Posts: 33
  • Country: us
Re: Stuart No. 4 Build
« Reply #5 on: July 18, 2012, 11:45:45 AM »
[Moved from homemodelenginemachinist.com]
I thought I'd take a break from the bearings, and made some progress on the standard over the weekend. After some cleanup with a file, I wrung it onto lap that I had lying around:


which allowed me to do some initial cleanup on the feet. This setup isn't rigid enough to do a good job, but I just wanted to get the feed good enough for the next step. I'll finish them off later.

I made a couple of feet clamps:


and used them to attach the standard to a faceplate. Now I used the same lap to get it mostly centered:


I could then take a facing cut across the top. However, when trying to take the top diameter down to size, I was getting a lot of chatter, because things weren't rigid enough, so some support with a live center in the tailstock was used which helped a lot.


Now came the part that I was a bit nervous about: boring. I pretty soon found out that chatter was a serious issue here too, but worse because the boring bar has some flex also. I bolted some 1-2-3 blocks to the faceplate, and to each other with some Al bar spacers. This worked pretty well, once I'd adjusted things to avoid pulling the standard out of alignment.


I also tried to reduce resonance in the boring bar by wrapping it in electrical tape, but that didn't seem to do much. (I suspect that chatter often results not simply from lack of rigidity, but also from the part and tools resonating or "ringing".)

The new setup worked pretty well, though the interrupted cut in the middle of the standard taught me that not all carbide inserts are created equal ;D (Yeah, I know, I should't be using carbide for an interrupted cut, but I have no HSS boring tools or inserts.)

After boring to a few thou undersize, I made an Al lap:


My poorly conceived plan was to screw a pipe tap into the lap to expand it, but that didn't really work very well. Luckily the lap was tight enough at the start to still be useful.

I applied the lap with a couple of grades of diamond paste:


which resulted in an acceptable bore.


This bore is spot on 1 1/8", but I would have liked to be able to take perhaps another thou off by lapping to improve the finish. Maybe I'll figure out a way to make the lap work better and apply it again.

Next is to flip the standard around on the faceplate and finish off the feet to take it to final height. I'm noodling over the best way to hold the thing to keep those feet nice and rigid.

I'm also not sure if I should clean up the windows in the bore with a mill, or just leave them as-is.

Simon

Offline smfr

  • Jr. Member
  • **
  • Posts: 33
  • Country: us
Re: Stuart No. 4 Build
« Reply #6 on: July 18, 2012, 11:46:04 AM »
[Moved from homemodelenginemachinist.com]
I decided to clean up the feet bottom on the mill. A bolt down through the bore was a convenient way to hold it down, and I used a heavy angle plate and some clamps just to add a bit of mass at the feet to avoid vibration:


I did quite a bit of checking with the indicator to make sure that everything was straight, since my milling table has 50 years of wear on it ;)

I took off 18thou with a sharp 1/2" end mill, and the final height is pretty close.

The flange around the feet also needs some cleanup, which I'll just do with a file, and I'm using this setup to make sure that the ends of the feet are roughly equidistant from the center line. The arbor I used to lap the bore makes a convenient holder, in a V-block. I held it down by hand while scribing the top foot, then swiveled it 180° and scribed again.


That's the standard almost done, other than drilling some holes and cleanup with files.

Offline smfr

  • Jr. Member
  • **
  • Posts: 33
  • Country: us
Re: Stuart No. 4 Build
« Reply #7 on: July 18, 2012, 11:47:18 AM »
[Moved from homemodelenginemachinist.com]
Did some work on the cylinder today, and in the process, discovered an error in my machining of the standard >:(

When I bought this casting set, it came with a photocopy of the original plans (dated 8-12-53). Since parts of those were dark and hard to read, I bought a new set of plans from Stuart Models, which, of course, go with the more modern castings. Well, it turns out that some parts have changed!

The 1953 cylinder is 2" long, whereas the modern one is 2 1/8" long. The 1953 cylinder flanges have a 2 3/8" diameter, and the modern one is 2 9/32", etc.

What this means is that my cylinder is too long, and the top flange on the standard is a bit small. Nothing I can't make up for, but annoying nonetheless :-\

Anyway, on with the build. I'll work from the old plans from now on!

The cylinder was chucked up in the 4-draw, and the non-critical top surface faced off. Then I flipped it around, taking care to seat it so that the ends would be parallel, and faced the bottom end, taking it close to what I thought was the correct length ;) [Not enough care taken, apparently; the ends aren't parallel, but the bottom end is perpendicular with the bore, which is what matters.]

Without removing it from the chuck, I then did the bore with a boring bar with carbide insert. I was trying to hit about 1.498", but I think I ended up with the tool just rubbing when I was trying to take the final few cuts. Still being undersize, I went to remove another thou, and the tool then started taking off material again, resulting in a bigger cut than I wanted. It ended up around 1.499" before lapping:


Not a great finish or diameter, but not too bad.

I'd earlier splashed out on an expending brass lap for this build, so then spent some time lapping the cylinder with 3 grades of diamond paste:


The cylinder is held by hand and gentled moved to and fro, so the lap extends about half way out on each side, trying to avoid making a bell-mouthed bore. After perhaps 45 minutes of lapping, and 3 grades of paste, the result is reasonable:


and measures about 1.502".

I think to get a really smooth finish I'd have to go to about 1.505", and it would take forever with a lap. Maybe a cylinder hone would be better for this? I would also worry when going much larger about whether the piston rings will still fit OK. I think I'll leave it as-is for now.

So, because of my plan mix-up, I need to take 1/16" off each end of the cylinder. I'm going to have to be really careful to keep the bottom face perpendicular to the bore, so I'm thinking of making an arbor, and using that to trim the ends. Hey, at least that lets me correct the non-parallel ends :)

Offline smfr

  • Jr. Member
  • **
  • Posts: 33
  • Country: us
Re: Stuart No. 4 Build
« Reply #8 on: July 18, 2012, 11:47:34 AM »
[Moved from homemodelenginemachinist.com]
I also cleaned up the port face today. First I set up the cylinder on a nice angle plate that I got recently, with the base of the cylinder against the plate, so that the face is parallel with the bore:


Not ideal workholding with with just one bolt, but it worked fine. I'm using the square to set the rotation correctly.

I also left a bit of cylinder bore peeking out so that I can pass a small bar though that and through a hole in the plate, which lets me pick up the top of the bore with a height gauge. I can then use that to scribe a line so I know how much to take off the face.

Over on the mill, I used a older end mill to get through the crust, then a sharper one to take it down to final level:


That was it for today.

Now the plans call for the cylinder flange diameter to be reduced to 2 3/8", and they should flow nicely in to the inlet and exhaust port faces. I guess I'll trim up the flanges using a rounding table, but blending with the faces is going to be tricky! Also, the ports in the casting are already a bit oversize, so I'm not sure how to account for that in cutting the exhaust port.

It's too bad that the top of the standard is 3/32" undersize because of my earlier boo-boo with the plans, but I don't think I want to reduce the cylinder and cylinder cover diameters to match. Or do i?

Offline smfr

  • Jr. Member
  • **
  • Posts: 33
  • Country: us
Re: Stuart No. 4 Build
« Reply #9 on: July 18, 2012, 11:48:01 AM »
[Moved from homemodelenginemachinist.com]
Today I made an expanding arbor to use for trimming the cylinder casting down (I made it too long after reading the modern plans, which are different from the older ones).

This was my plan for the arbor:


There's a tapered section of the bore, to take a tapered plug that would push out the sides. The drawing doesn't show it, but I had an M8 bolt going down the middle, which I could clamp down.

Luckily I had a bit of 1.5" Al stock lying around, but I only had to skim it before the cylinder slipped on. I wish I'd had a bit more to remove:


Once the outside diameter was close, I started on the bore. Time to get out the big drills :)


After drilling to 7/8", I used a boring bar to do the rest of the bore, leaving material for the taper. It was a pain to get behind that shoulder, and a lot messier inside than in the diagram. Oh well, no-one will see it ::)

Lastly I set my compound to about 7°, and did the tapered section. I then removed the chuck, with the workpiece still in place:


Then I put in the 3-jaw and do the plug. Here I'm cutting the tapered plug to the same taper as the arbor:


The plug was a bit of scrap that was already tapped 3/8", which was fortuitous; I drilled it out to 17/64" for clearance for an M8 bolt, but that left enough of the 3/8" thread that I could screw in a 3/8" bolt to pull the plug out of the arbor. Here are the final bits:


I was expecting to have to cut slits, but actually it expanded just enough to hold the cylinder without them. So, finally, I could slip on the cylinder, tighten it up, and work on the cylinder. I checked the previously "good" end to see how far out it was, and saw less than half a thou wobble on the end.


I don't think it was that good after I'd done one end and flipped the cylinder around; I suspect that not being able to skim more off the arbor allowed the cylinder to sit slightly askew. I'll be careful to find the "best" end, and make that the one that attaches to the standard, since being perpendicular to the bore is what matters.

Offline smfr

  • Jr. Member
  • **
  • Posts: 33
  • Country: us
Re: Stuart No. 4 Build
« Reply #10 on: July 18, 2012, 11:48:41 AM »
[Moved from homemodelenginemachinist.com]
OK, after mucking about with chucks and soft jaws, I got back to the Stuart this weekend. I'm waiting for some tooling to arrive to finish the cylinder covers, so I started on the crankshaft. I've been somewhat dreading this, but it's turned out fine so far.

The first job is to set it up with the steady rest, in order to face and center-drill each end. I used a bit of bar stock of a similar diameter to get the steady rest fingers in roughly the right spot. Just the tip of the casting is gripped in the 3-jaw, since we can't assume that the shafts of the casting are aligned (and they are not!).


I'd cleaned up the spot under the steady rest with a file, but this thing was still wobbling all over the place. However, I managed to face and center drill:


even though the drill was flexing. With one end done, I flipped it around and did the other. From now on, it will be turned between centers.

I used a sharp-tipped HSS tool to take off the bulk of the material. I only worked right-to-left, so flipped it around for the other side.


I figured this sharp tool would place less stress on the casting, but the finish was lousy. I also used it to rough out the throw sides and ends. Cleanup was done with some indexable tooling, including a radius insert on a Nikcole mini-system tool, which gave a great finish. I used wet-and-dry backed by a parallel to get to final diameter, and was able achieve a nice finish.

Next up was making a couple of fixtures for the offset turning. One is longer than the other to act as a lathe dog. I actually made up these fixtures after finishing one end of the crankshaft, so I could use the longer fixture as a lathe dog to avoid marring my just-finished shaft.


Making these gave me a chance to try the 7/16" reamer that I'll use for the main bearings. Good thing too; it's a spiral hand reamer, and I discovered that it has a significant taper over about half of its length. I won't be able to go straight through both bearings with it, but I think it should be fine to finish them off by hand.

You can see my awful wandering hacksawing (I had to use a junior hacksaw when starting from the reamed hole). Holes were drilled, part clearance-drilled and part tapped M6 for the socket screws to clamp the fixtures.

What you can't see is that I messed up when center-drilling the points that will be used to turn between centers. I forgot that these fixtures needed to be mirror-imaged. I'm not sure yet whether to center-drill the other side, or shim the few thou of offset when I flip one of the fixtures over as I clamp them onto the crankshaft. It's pretty critical that everything is lined up when turning the journal.

I also hope that the Al isn't too soft for these fixtures; I'm using a live center in the tailstock, but there's a chance the cutting forces will cause things to loosen up. I'll have to keep an eye on the tailstock pressure.

Before turning the journal, I think I'll mill the throws to thickness (using the fixtures to keep things square). That's for tomorrow!

Offline smfr

  • Jr. Member
  • **
  • Posts: 33
  • Country: us
Re: Stuart No. 4 Build
« Reply #11 on: July 18, 2012, 11:49:09 AM »
[Moved from homemodelenginemachinist.com]
Well, I ploughed ahead with the crankshaft, using the fixtures I made already. First up was to clean up the throws on the mill:


This is the part where I go through my small end mill selection, looking for one that hasn't been blunted already :)

With one side done, it was flipped over and the other side done. I was careful to clamp on the non-slit ends of the fixtures, since those remain square. Now we end up with this (with some tape to protect the spindle):


Next comes the critical setup, to get the journal parallel with the main axis. Since my fixtures were milled as a pair, I can be pretty sure that the ends are square. So I used a square to align the crankshaft with the fixtures:


To check the setup, I used an indicator once the assembly was set up between centers. Indicating on the main bearing journals, I checked with the crank in the upright position on either side of the crank webs.


Any error here would indicate that my fixtures had mismatched distances between the bearing hole and the center-drilled spot. Luckily, error here was under half a thou. I then turned it 90°, and checked again. Offset here indicates that my fixtures are not aligned with each other, and I had about 1.5 thou offset, so I loosened one of the fixtures, tapped to rotate it on the shaft until the delta was under half a thou, tightened it up again and re-checked.


The next thing that was tricky here was the tool setup. Because of the bulk of the right-hand fixture, you can't get the tool post close in, so the tool needs to stick out quite a bit:


This is an HSS bit that I purchased partially ground already, but had to modify on the grinder for more clearance. Since this was the first time I've done any tool grinding, the result wasn't very pretty. My attempts at radii on the corners was particularly bad, so I had to resort to other tools for final cleanup.

Anyway, with this tool I reduced the crank webs to almost the required 3/8", and took the journal to size. The finish on the sides of the webs was pretty bad, so I swapped in a Nickole tool with a radius insert, which gave a great finish but could only be used on the left side. This forced me to undo the fixtures and flip the crankshaft around to clean up the other inner face, which then meant that I wasn't quite concentric on the journal. It's not a critical surface, however, so I think it's OK.

The webs needed quite a bit of cleanup on the file to remove the milling marks, and the edges were deburred. Here's the end result:


Not too bad for a first crankshaft, but I sure need to work on my tool grinding skills!

Offline smfr

  • Jr. Member
  • **
  • Posts: 33
  • Country: us
Re: Stuart No. 4 Build
« Reply #12 on: July 18, 2012, 11:49:33 AM »
[Moved from homemodelenginemachinist.com]
I finally got some time to finish off the main bearings. First job was to clamp the soleplate to an angle plate, taking care to get it aligned, and ensure that the bearings were screwed in tight.

Then onto the mill, lined up and drilled in increments:


I stoned the drills to reduce the tendency to grab in gunmetal, which mostly worked. I was careful to drill slowly, and keep pressure on the quill feed to avoid the drill getting pulled in too fast.

After drilling to 1/64" undersize, I switch to the reamer.


This is a right-hand rotation, left-hand spiral reamer. It's a hand reamer, which means it has a taper. [Please note warning in later reply about using hand reamers in the mill.] Because of that I can't go through both bearings from the same side, so I went as deep as I could from one side, flipped over the entire setup (one of the G-clamps had to be moved, but the other kept the soleplate aligned), and relocated on the hole:


I then reamed from that side, and cleaned up the edges with a light touch of the countersink. Now for the acid test: did I mess up the alignment?


Phew, things seem to line up!

Now the crankshaft still doesn't fit because of the radii:


Oddly the plans show zero clearance between the bearings and the crank throws, but I'd reduced the bearings a little to leave some room, and the radii keep the crankshaft from moving side-to-side. However, the bearings needed some relief to fit the radii, which I did by hand with a countersink and some wet & dry:


Then I did some initial settling in with some Brasso as abrasive, turning the crank by hand:


The final fit seems pretty good.

Offline smfr

  • Jr. Member
  • **
  • Posts: 33
  • Country: us
Re: Stuart No. 4 Build
« Reply #13 on: July 18, 2012, 11:50:04 AM »
[Moved from homemodelenginemachinist.com]
Made some good progress today. I'd roughed out the bottom cylinder cover earlier, and today almost finished it. I made use of the soft jaws I made for my newly acquired 3-jaw. First I clamped the jaws down onto a bit of bronze of a diameter which put the jaws roughly in the right location, then faced the jaws, and bored a step which will hold the part. I could then clamp down on the part, and have it accurately centered.


In this setup I did the upper faces, with a 1/16" step which gives a close fit to the cylinder. I also took the outside diameter down to size. Since alignment of this face with the center hole is critical, I drilled and reamed the center hole 1/4" in this setup. I'm deviating from the older plans, which call for a 9/32" piston rod and using 1/4", since I have the 1/4" tooling already. Stuart moved to a 1/4" rod on the newer models, presumably because the material and tooling is more readily available.

Then I removed the part from the chuck, and re-bored the chuck jaws to fit the step in the part I just made, then flipped the part around and put it back in the chuck. I then took a light facing cut, and checked that the flange had a similar thickness in three spots:


That tells me that the part is aligned in the chuck. I also checked for concentricity with a dial indicator on the rim, which was within a thou.

The steps on the lower side of the cylinder covers where then turned to size, fitting to the standard. The boss for the packing gland was drilled for threading, but my BSB taps and dies are lost somewhere between Devon and California, so I wasn't able to cut the threads today :(

Here's the cylinder with both covers:


and everything in place:


Here you can see my earlier boo-boo of turning the top flange of the standard to the wrong size. I'm not quite sure if I want to do anything to rectify that.

While I had the lathe covered in cast iron dust, I roughed out the piston casting. The piston has a groove in one face, and a recess in the other, which gave me an excuse to work on my tool grinding skills ::)


Here's my attempt at a cutter for these kinds of face grooves. It worked OK, but I got a fair amount of chatter because of large cutting area, since it's radiused.

I'll finish off the piston when I've made the piston rod. Sadly all my 1/4" precision-ground stainless is curved, so I need to get some better material.

Offline smfr

  • Jr. Member
  • **
  • Posts: 33
  • Country: us
Re: Stuart No. 4 Build
« Reply #14 on: July 18, 2012, 11:50:29 AM »
[Moved from homemodelenginemachinist.com]
Flywheel time! While the lathe was covered in cast iron dust, I thought I might as well tackle the flywheel.

I started out in the 4-jaw, gabbing the hub and adjusting until things were running as true as I could get them.


The outer edge of the casting was pretty messy, and dulled an HSS tool pretty quickly, so once I got the skin off, I switched to my trusty insert tool (from http://www.latheinserts.com/).

The (older) plans the hub flush with the rim on one side, and 3/16" proud of the rim on the other, so that's what I did. Stupidly I left the hub proud on the more wobbly side :( I'll probably skim the hub, and I need to do the inner edges of the rim to make things pretty. I left some material on for a later finish pass, once it's mounted on a shaft.

The hub was drilled and reamed 7/16", which was uneventful.


I pondered for a while how to attach the flywheel to the shaft. The older plans call for a keyway, and the newer ones a grubscrew. I hate grubscrews, so it was either a keyway or something like a taper hub (discussed here http://www.homemodelenginemachinist.com/index.php?topic=11471.0). A taper hub wouldn't look very authentic on a Stuart model, unless fancied up somehow, so I went with the keyway.

First up was a practice run with the woodruff cutter on some spare 7/16" drill rod, which worked pretty well. I'm doing conventional cutting here (part moves right to left).


With that experience, I made a collared broach bushing from some easy-machining stainless. It was a simple case of turning down a section of 1/2" rod to 7/16", then cutting the slot as in the photo above (noting that the back of the broach is 4 thou over the nominal size). I did the math to compute how deep the channel needed to be to give me the correct final depth of keyway on the flywheel, and figured that I only need to do two passes with the broach, first without the shim, and then with the shim. Finally it was parting off leaving a collar, and cleaned up with a file.


Now for the broaching step. There's no need to clamp things down, since the broach is held in place by the bushing. Care needs to be taken to align the bushing to start off with (the slot aligns with one of the flywheel spokes), and mine was a light push fit so it stayed in place. I used an angle plate with a large hole in it to give clearance for the broach, and used the mill quill feed with an old saw arbor in a collet to push down on the broach. It took some amount of force, but I didn't feel that it was enough to harm the mill.


One pass without the shim, and a second pass with the shim gave a slot of about the right depth.


Phew! I was worried about the broaching, but it actually turned out well. I'm tempted to go back and apply the same technique to my Stuart Beam.

Offline smfr

  • Jr. Member
  • **
  • Posts: 33
  • Country: us
Re: Stuart No. 4 Build
« Reply #15 on: July 18, 2012, 11:50:46 AM »
[Moved from homemodelenginemachinist.com]
Hi Don

Nominal diameter of the flywheel is 4.5".

I built up the courage to cut the keyway in the crank:


and it went smoothly. I had enough room to fit the flywheel and check the depth of the cut, and adjust accordingly.

A test fit:


The flywheel has a bit of play, but I'll be able to fix that when I make the actual key.

Offline smfr

  • Jr. Member
  • **
  • Posts: 33
  • Country: us
Re: Stuart No. 4 Build
« Reply #16 on: July 18, 2012, 11:51:10 AM »
[Moved from homemodelenginemachinist.com]
Work on this project ground to a halt for a bit, partially because I was annoyed at myself after http://www.homemodelenginemachinist.com/index.php?topic=18463.msg190483, and also because of interior decorating and lots garden work in the spring. But I've managed a couple of weekends in the garage, and the saga of the connecting rod continues!

Here's where we left off when I used a blunt saw, and insufficient clamping to cut the top off the gunmetal conrod casting:


The cut is crooked in both axes. I tried to silver-solder the parts back together, but that was a disaster as well. Not having done any silver soldering before, I didn't practice enough beforehand, and the solder penetration was terrible. So, plan B:


That's a hunk of 12L14 and two bronze rounds. The plan was to build up a conrod with a split bronze bearing from this lot. So, here we go! I have to hold the split bearing and steel together with bolts, so I need some bolt-holes. The end of the steel rod was cleaned up, and holes drilled accurately either side of center:


Then I formed what would become the cap on the big-end of the conrod:


and parted it off:


That insert parting tool actually does a reasonable job on my Emco Maximat "Standard".

The bronze disks also get reduced to the right thickness, and drilled:


Now I can hog out some material on the main part of the conrod, which reveals the ends of the holes drilled earlier, and allows for the bronze disks to be bolted together.


Now I can turn between centers. At this point I'm reducing the overall diameter to what will be the largest width of the big end.


I'm turning both ends to the same diameter at this point, so that I can easily clamp it down to mill some flats later. After a bit of turning we end up with this:


Still a lot of metal to remove!

At this point I realize that the bolt heads get in the way of finishing the taper on the center section, so I take it apart, and locate and center drill at a point which will be hidden under the bearing on the finished part:


Now I can turn this section alone between centers, and form the taper. Hmm, does everything seem right here? Whatever, soldier on!


Offline smfr

  • Jr. Member
  • **
  • Posts: 33
  • Country: us
Re: Stuart No. 4 Build
« Reply #17 on: July 18, 2012, 11:51:25 AM »
[Moved from homemodelenginemachinist.com]
We stop for a second to admire the work so far:


Now to mill some flats. The consistent diameter allows me to clamp it in some V-blocks:


Clamping down on the thinner center section is iffy since it could pull the rod out of true, but I didn't tighten that clamp down much. By shifting clamps around I could reduce both ends to the same thickness; it was then flipped over, clamped to the table, and the other side milled down. I took it down to the distance across the "Y" of the little end (11/16"). Now we can drill and ream both ends in the same setup, ensuring that they are parallel:


Of course the hole at the big end has its center on the seam between the two bronze pieces.

Next I take off some excess material on the little end, which was a successful slitting saw operation (yay!):


Feeling pleased at the progress, I put it to bed for the night.

Next day, I pick it up, wondering how best to set it up to saw some more off the little end. Then it hits me. The taper goes in the wrong direction! Headdesk. >:( Time to leave the garage and find something else to do for the rest of the day!

Offline smfr

  • Jr. Member
  • **
  • Posts: 33
  • Country: us
Re: Stuart No. 4 Build
« Reply #18 on: July 18, 2012, 11:51:50 AM »
[Moved from homemodelenginemachinist.com]
Now to clean up the big end with the split bearing. This is where it starts looking more like a connecting rod.

First I made an expanding arbor; chucked up some 1/2" cold-rolled rod, and turned down 1/2" at the end to 7/16", which is the bore diameter of the bearing. Then I drilled and tapped for M6, and countersunk. I'm going to use a countersunk screw to make it expand. I sawed cuts at 90° to allow for expansion (another successful slitting saw operation!).


Now the conrod is attached to the arbor and can be turned. Here I've started to clean up one side.


It's so satisfying seeing the casting and the split bearing merge into one as they get turned down together!

I have to be careful to take the right amount of each side; here again I wish I had some better setup for measuring.

After turning both sides, here's where I'm at:


Sadly I can't test the fit on the crankshaft yet, because the crankshaft journal has a pretty significant radius that I need to replicate on this bearing. I need to think about whether to grind a tool to cut the radius, or do it some other way.

Offline smfr

  • Jr. Member
  • **
  • Posts: 33
  • Country: us
Re: Stuart No. 4 Build
« Reply #19 on: July 18, 2012, 11:52:12 AM »
[Moved from homemodelenginemachinist.com]
This is almost where I left off last time:


but I've done some hand filing on the end cap, and drilled and reamed what will become the bottom of the yoke. I regret not leaving a bit more material at the small end of the taper, but I think it will be OK. I decided to form the bottom of the yoke because I wanted to shape the shoulders, and to know what the profile will end up like.

I broke out the ball-turner to form the shoulders, turning between centers of course:


It's always a bit of a puzzler to work out the combination of placement and rotation with this thing, and I usually end up doing it by eye.

Next up was cut out the center of the yoke. For most of the material removal, I had the part clamped in a screwless vise. However, as soon as I broke through the bottom, the part loosened and moved slightly; not a big deal but stupid here then decided to just tighten the vise, which squished the Y, pushing the sides of of alignment ;D. Some judicious hand-bending with some 1/4" drill rod through the crosshead pin holes got it back into shape!

So to finish off the Y, I clamped it down securely:


Then it was onto the rounding table to finish off the radius on the end:


The top arm is flapping in the breeze a bit with this setup, and had enough flex that I think it was getting pulled up by the end mill, resulting in a non-square profile. I was able to flip the part over and tidy that up, however.

A bit of draw filing, and the part is almost done:


What remains is still to put a radius on the journal bore to fit the crankshaft.

Offline smfr

  • Jr. Member
  • **
  • Posts: 33
  • Country: us
Re: Stuart No. 4 Build
« Reply #20 on: July 18, 2012, 11:52:31 AM »
[Moved from homemodelenginemachinist.com]
It's been a few weeks since I've managed to get time in the shop (garage!), but I got a few things done today.

Here's my setup for the crosshead milling:


I have the crosshead on the piston rod in a V-block, because I want the milled parts to be parallel with the piston rod. The angle plate etc. is just there to line things up. I clamped my screwless vise on its side around the crosshead for milling, which made things a little cramped:


After doing one side, I had to tear down the setup, turn the part around (making sure that the side to be cut is parallel with the part I just milled out, using the height gauge). Had I been thinking more clearly, I would have had the V-block on its side for the first part, then I could have just flipped it over.

Once both sides were milled, the crosshead pin hole was drilled and reamed in the same setup:


Here's the result, with its companion connecting rod:


Before milling, the crosshead was a nice sliding fit in the standard, but the milling pushed those skinny flaps out (this being bronze), and tightened everything up. A bit of fussing around was required to get it sliding in the standard again.

After that I drilled and tapped the boxbed for the studs that hold down the soleplate. The alignment of the soleplate on the boxbed was mostly by eye/feel. I transferred the holes by positioning the two parts under the mill, with the clearance drill bit just dropping into the existing hole in the soleplate. I then switched to the smaller tapping drill size, and drilled down into the boxbed. The 4 holes were then tapped 2BA.

One annoyance here is that the stud holes in the soleplate go down the inside corners of the casting, which ends up pushing the drill out of line, and causing the studs to catch. To fix that I milled out some room on each corner, centered on the holes:


I'm close to being able to have this thing crank the crosshead up and down! I spent some time fitting the split bearing on the connecting rod to the crankshaft journal, but it still needs some wearing in.


I just need to drill and tap the studs for the standard, and make the crosshead pin, and then I can have it turn over.

Offline smfr

  • Jr. Member
  • **
  • Posts: 33
  • Country: us
Re: Stuart No. 4 Build
« Reply #21 on: July 18, 2012, 11:52:53 AM »
[Moved from homemodelenginemachinist.com]
Got some shop time in today, since it's a holiday!

First up, I marked out and drilled the bolt holes in the standard:


and drilled and tapped the soleplate for these bolts. I had left this until now because I was worried about getting the alignment right, and wanted to be able to assemble the crosshead and conrod with the crankshaft to make sure everything lined up. Luckily things fitted just fine.

Next up was the crosshead bolt (which I called a pin earlier, but the plans refer to it as a bolt). This started as a bit of stainless from the scrap bin; the first part is a simple turning job, taking care to get a nice 1/4" fit to the conrod and crosshead:


Checking the fit on the conrod:


It's important here that the nut will bear down on the shoulder of the bolt, rather than the conrod arm, otherwise the nut may loosen when the engine runs. I have a bit to take off the yoke of the conrod by filing, but it's close.

Then it's threaded 2BA, with an undercut at the end of the thread so that the nut seats nicely:


I flipped it around, held it in a 1/4" collet, and carefully parted off the excess:


then turned the head. Almost done:


I'm using temporary fasteners for everything so far, hence the ugly nut. Oddly, the fastener set that came with these castings has been blackened. I'm not sure if Stuart shipped them that way for a while, or whether the previous owner did it. Or maybe it's just from storage?

There's one more bit on this bolt/conrod to do, and that's a 1/16" pin that prevents the bolt from rotating. This sits right on the edge of bolt's shaft. Here I've drilled the corresponding hole in the conrod:


I took care with the setup, using an edge finder on some 1/4" rod situated in the hole, then offsetting to find the center of this pin. I was worried about the teeny drill wandering into the main hole, but it was OK.

Without changing the setup, I then dropped the crosshead bolt in, tightened the nut on the other end, and clamped it down to prevent it spinning. Then I could drill a matching 1/16" hole for the pin, and guarantee alignment:


Final crosshead/conrod/bolt parts:


I need to find a 1/16" pin somewhere. Any ideas?

After some more fiddling to fit the conrod bearing to the crankshaft journal, I was able to put everything together and give it a spin on the lathe. It's all pretty tight, so needs a good bit of running in:

http://www.youtube.com/watch?v=5z6fSfN6XRc

(Sorry about the crappy vertical video.)

Offline smfr

  • Jr. Member
  • **
  • Posts: 33
  • Country: us
Re: Stuart No. 4 Build
« Reply #22 on: July 18, 2012, 11:53:31 AM »
[Moved from homemodelenginemachinist.com]
Guess what I found in the old fixings jar? Not one, but two 1/16" pins :D The newer fixings set that I got recently from Stuart for this engine didn't have any, so I'm glad these castings came with their own fixings set.

Made some good progress today. I'd been putting off milling the exhaust steam passage, but did so uneventfully, after carefully marking out the exhaust slot, and the exhaust hole on the side (with the same center height, of course). The two inlet holes were pretty wonky in the casting, and one is a bit wider than the other, so I tried to center the exhaust as best I could between them. Milling was starting with a 3/16" end mill, and finishing off with a 1/8", then the corners were filed square.


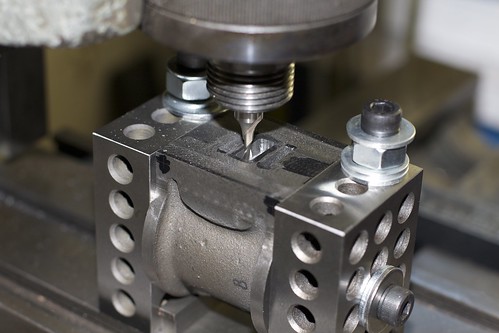
I probably should have drilled the 1/4" exhaust hole first so I could just mill down until I hit it, but did it the other way around, and it worked out OK.

Given that the steam ports aren't quite equally spaced, I wonder how smoothly the engine will reverse once complete. One possible solution would be to make a plate with accurate ports, mill a recess in the casting and silver solder it in, but I'm not keen on doing that unless I absolutely have to.

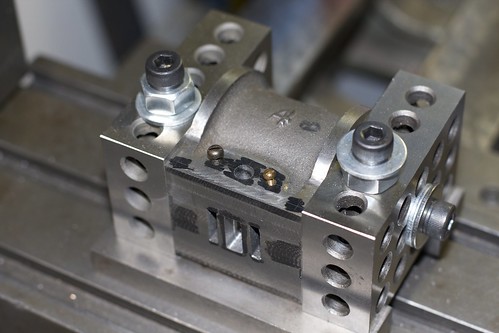
While I had the cylinder set up, I also drilled and tapped the holes for the exhaust manifold thing, and the lagging screws. Interestingly, the older models used a 5BA lagging screw (left side below), and the newer ones a 7BA (right side; the screws are in the exhaust manifold holes; I'm just trying to compare them visually here); I chose 7BA for now.


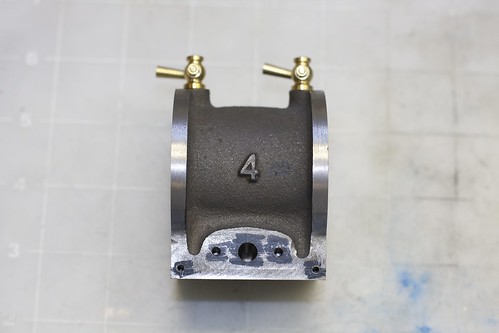
Now to drill for the drain cocks: spot-face, center drill, drill through and tap 3/16" 40TPI:


and the cylinder done except for the stud holes on each end:


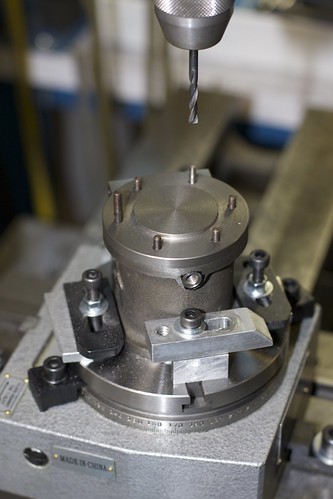
So, lots of stud holes to drill and tap: 6 on one end, and 4 on the other. I broke out my recently purchased 4" Phase II rotary table, centered the table under mill (via an MT2 arbor in the center hole), then centered the cylinder casting on the table. Boy, clamping things on this teeny table is tricky!


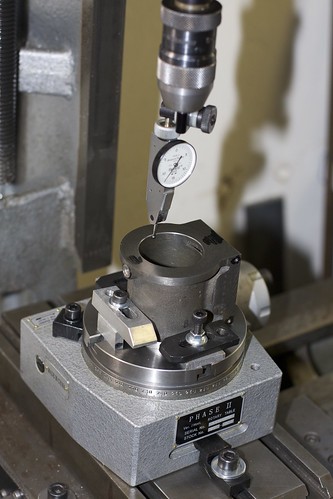
Once everything was aligned I cranked the carriage along by half the bolt hole diameter, and I'm ready to go!

I drilled the top cover and the tapping holes at the same time (the cover was clamped for drilling), turning in 60° increments, then enlarged the holes in the cover to clearance size. Then I went back around the holes for tapping; I found that the rotary table was precise enough that I could accurately return to a hole position, which is nice. I started the taps in a chuck in the mill (turning by hand) to keep things straight.

6 holes tapped, and the moment of truth: does the cover fit?


(Spot the odd stud out!) Yay! In fact it fits in any orientation, so I guess I counted the rotations right :D

After that I did the 4 stud holes on the base on the cylinder. 4 holes this time, so line things up, rotate 45°, drill, crank 90°, drill, crank 90°etc. I jotted down the angles, and used those to double-check my handle-turning count.

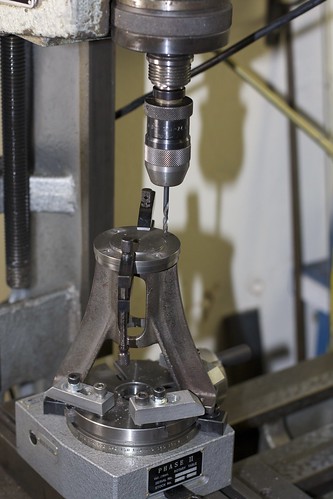
Drilling the standard really pushed the limits both of clearance on my mill, and clamping on the rotab. I could just get the drill into the chuck, and don't look too closely at my clamping job here :D


I was relieved when all the drilling and tapping was complete without any broken-through holes and broken taps. Now for the fun part, assembly:


Wow, this thing is beginning to look like an engine 8)

Next up will be the piston rod gland. I'm a bit concerned about alignment there, having read another recent thread here about that. I have the right taps and dies (1/2" 26 TPI), but I wonder if single-point threading would be something to consider, having never done it before?

Thanks for following along,
Simon

Offline smfr

  • Jr. Member
  • **
  • Posts: 33
  • Country: us
Re: Stuart No. 4 Build
« Reply #23 on: July 18, 2012, 11:53:49 AM »
[Moved from homemodelenginemachinist.com]
Dave, the packing gland is screwed in (with a hard-to-find 1/2" 26TPI BSB thread!). I actually made a quick tail post die holder for the die, and cut the thread already:


but I did that after reaming for the piston rod, and I'm wondering if it would have been better to tap the bottom cylinder cover, screw it down onto something to simulate packing, and then ream it in place. The risk is that it then only lines up at that particular orientation. I think it's OK for it to be a little oversize though.

Steve, I'm pretty happy with the Emco. The main limitation for milling is the tiny table (about 5" by 9", and deep rather than wide). Not even enough room for a decent 4" vice! I wish I'd kept the spare carriage that I had, so I could have ganged the two carriages together somehow.

Simon

Offline smfr

  • Jr. Member
  • **
  • Posts: 33
  • Country: us
Re: Stuart No. 4 Build
« Reply #24 on: July 18, 2012, 11:54:18 AM »
[Moved from homemodelenginemachinist.com]
I plucked up the courage to thread the bottom cylinder cover for the piston rod gland today this evening. To hold the cover, I put the soft jaws onto the 3-jaw chuck, clamped the jaws down onto a bit of stuck, and cut a lip to fit the cylinder cover, then removed the stock and clamped down on the part. Here I'm checking with the dial indicator; runout was about a thou, which seemed reasonable.


Then I put a small bevel on the bore so that the tap would start concentrically:


I was concerned about tap alignment, so fiddled around for a bit with shims under the leading edge of tailstock, and the drill in the chuck that I'd use to drill the part earlier, and got the drill sliding nicely into the hole. Then it was replaced with the tap, and tapping started under hand power, with the taper tap:


With this size tap it wasn't long before the tap was starting to rotate in the chuck (despite backing out the tap often to clean the chips), so more desperate measures were called for! The steady rest made a handy way to keep the tap straight so I could apply more force with the tap wrench:


I switched to the bottoming tap, then back to the taper tap, then back to the bottoming tap, and by the end was using two wrenches to turn the thing (but carefully!), and finally was done.

Hey, I can make it finger-tight, and the piston rod still slides through :D


The threads in the cast iron look terrible, but I'm not sure how much of that is my fault. These are HSS taps from Tracy Tools in Devon, UK, but they don't seem to cut as nicely as the HQS taps I have from Tap & Die.

Simon