Author Topic: Machining order and method for this part?  (Read 13593 times)

Offline raynerd

  • Madmodder Committee
  • Hero Member
  • *****
  • Posts: 2893
  • Country: gb
    • Raynerds Projects - Raynerd.co.uk
Machining order and method for this part?
« on: November 17, 2011, 05:20:04 PM »
Hello, I`ve not posted on here in a while. My clock is running but I`ve had some problems, I (my wife!!)  smashed the three glass dials that I had water jet cut and I can`t afford these to me remade until after Christmas. I also gave up a little on the woodwork and a friend of mine is now onto building a case for me. So I`m having a break and I`m trying to repair a Synchronome clock that I purchased a month or so ago.

I need to make the pallet using the following plans here:
http://raynerd.co.uk/wp-content/upLoads/PalletMachined.pdf

I really can`t get my head around the machining process. I can obviously start by machining up a solid block of brass to maximum dimensions and then I guess start by drilling the top centre hole but I`m not sure where to go from there. I am particularly stuck on the best method to cut the radius concentric with the centre bore as shown!!

Don`t get me wrong, I`m sure I could plunge into cutting this down, whittling in a trial and error method, but I`d like any suggestions as to the best order and the best machining methods. There seems quite a lot of new faces on here from when I was posting in the last months and so just to recap, I have a Boxford Mod A and an X2 mill with cnc rotary table for my use!

Any help or suggestions would be welcomed.

Chris

Offline sparky961

  • Hero Member
  • *****
  • Posts: 844
  • Country: ca
Re: Machining order and method for this part?
« Reply #1 on: November 17, 2011, 10:09:11 PM »
If I saw that part come across my desk for quoting, I'd decline to quote. :P

As for process, I'm sure others will chime in but I think "whittling" is the right idea.  Certainly multiple setups, I'd think, done very carefully to avoid any stack-up errors.

As for the interestingly-shown radius, why not leave that until last and clamp the part onto a rod chucked in the lathe?  It seems pretty clear this is the intended purpose of the vertical hole and slit anyway.  You could either cut the profile with CNC if available, or with a ground form tool, nice and slow.  I'd either leave the slit until second last or make sure you have something that fits snug so that you can keep clamping on the front/back without the part deforming.

Before that, a 3/4" ballnose endmill for the 3/8 rad, some angle blocks to set it on while you machine that top angle, but make sure that you cut the sides with a straight endmill and those chamfers with a chamfer mill before cutting the top angle off (they didn't do you any favours by not including the angle, by the way) - that way you can still lay the part on it's side.  Probably want to drill those freakishly small holes while it's there too.

Seems to me a few dimensions of the "body" part are missing as well.  That certainly doesn't help matters.

I'll see about some pictures to illustrate what's in my head...

-Sparky

Offline sparky961

  • Hero Member
  • *****
  • Posts: 844
  • Country: ca
Re: Machining order and method for this part?
« Reply #2 on: November 17, 2011, 10:53:09 PM »
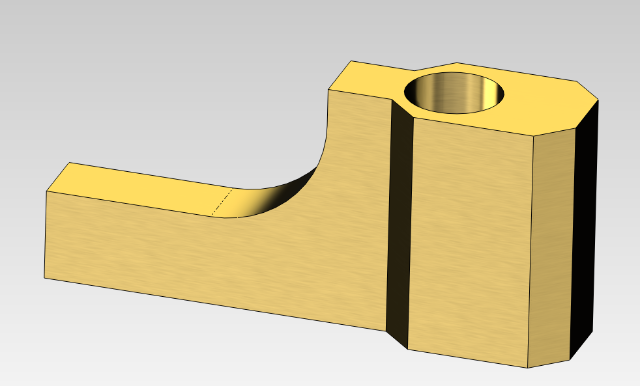
Ok, a bit more thought and here's the order that I'd attempt it if I were doing it myself....

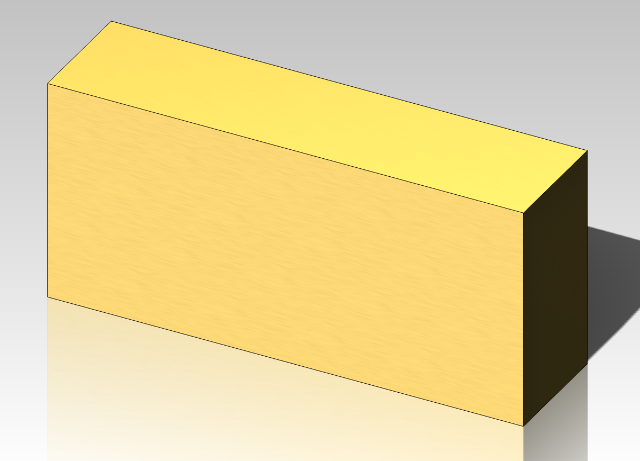
Machine your block to overall dimensions:


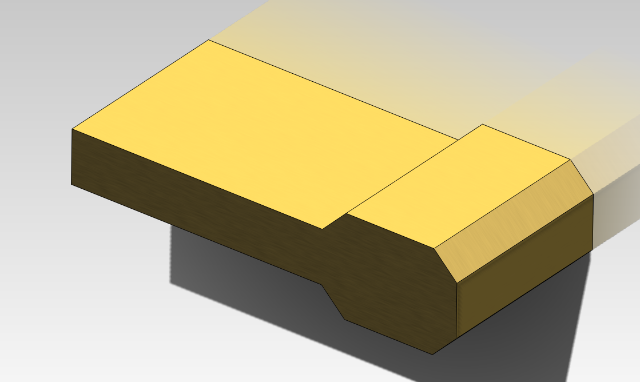
Clamp laying down in vice on parallels, use end mill and chamfer mill:


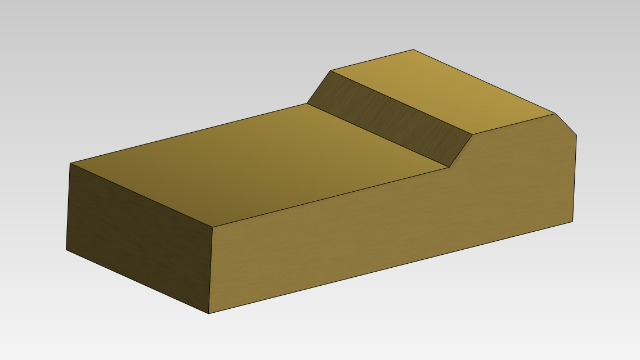
Flip and do the same on the other side.  Drill your freakishly small holes while it's laying down this way.  Tap them before you get too far along as well:


Stand part up in vice, gripping on thinner section and cut radius with 3/4" ballnose (or whatever is at hand, as many wouldn't have one of these)


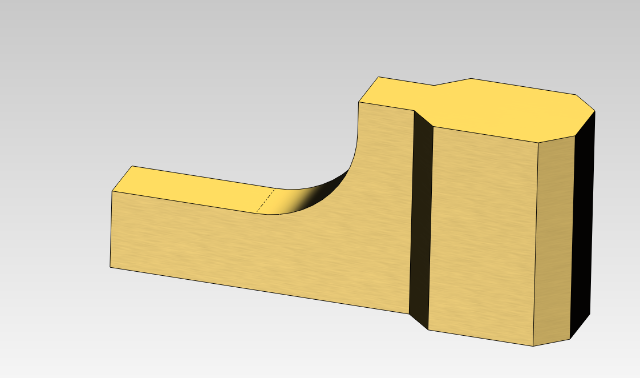
Same setup, drill/ream the vertical hole:


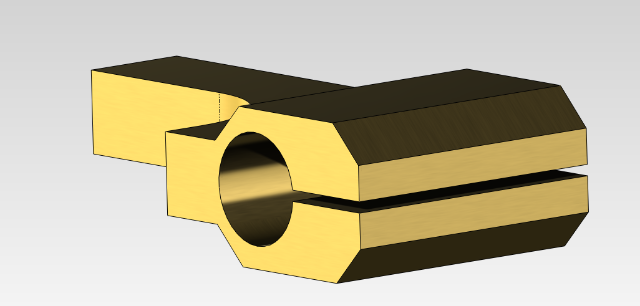
Lay flat again, use slitting saw to cut the slit:


Place on angle block or whatever you come up with to set the part at the same angle as the top should be milled.  Again, clamp on the thin section and hang the "body" out the side of the vice.  Depending how floppy it is and how heavy you want to cut, you may have better success clamping on the main body using a 3/8" rod in the vertical hole so it doesn't compress:


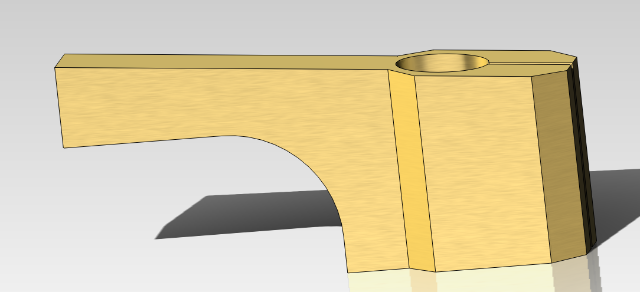
Clamp to a 3/8" rod, chuck in a lathe and use a ground form tool with the correct radius.  Or use CNC to profile the radius:


How did I do? :)  With a bit more thought, the number of setups might be less but this seems a pretty step-by-step foolproof way.

-Sparky

Offline sbwhart

  • Global Moderator
  • Hero Member
  • *****
  • Posts: 3530
  • Country: gb
  • Smile, Be Happy, Have Fun and Rock Until you Drop
Re: Machining order and method for this part?
« Reply #3 on: November 18, 2011, 02:06:34 AM »
Wow thats interesting.

First thing you have to do is study the job and ask yourself what does it do what are the critical to function features, looks at the drawing I'd say these were curved radius that the drawing shows being made like do nut on the 1.296 rad the designer wouldn't have draw it like that unless it was important.

So I'd make it out of a of a slice of 3" dia bar, drill and ream ,313" bore and mount the slice on a mandrell made to fit the job, then I'd swap the chuck over to the RT on the mill and with a .75mm end mill find the corect location for the centre of the rad and generate it using the end mill. Getting these features correct I guess would be the most important job the rest could be hacked out as best you can and making it out of a slice you'd get more than one go's at it.

If you didn't fancy doing it in the RT you could grind youself up a .75 form tool and form the rad on the lathe but getting it in the correct position would be dificult.

Stew
A little bit of clearance never got in the road
 :wave:

Location:- Crewe Cheshire

Offline DaveH

  • Hero Member
  • *****
  • Posts: 1413
  • Country: za
  • Kempton Park, South Africa
Re: Machining order and method for this part?
« Reply #4 on: November 18, 2011, 03:29:25 AM »
Sparky,

Nice :clap: :thumbup:
 :beer:
DaveH
(Ex Leicester, Thurmaston, Ashby De La Zouch.)

Offline raynerd

  • Madmodder Committee
  • Hero Member
  • *****
  • Posts: 2893
  • Country: gb
    • Raynerds Projects - Raynerd.co.uk
Re: Machining order and method for this part?
« Reply #5 on: November 18, 2011, 07:19:47 AM »
I really appreciate your reply and sparky, thanks for the drawings! I`m at work, so must admit I`ve only had time to skim read the answers but will digest this afternoon.

Just to give a bit of background on what this piece is for for those that don`t know. This piece is clamped to the pendulum rod and every 30 seconds, a trigger is pulled and an "arm" falls down by gravity and a bearing fitted to the gravity arm, rolls down the end of the pallet (on that critical radius as Stew mentioned) and gives it a push (i.e the pendulum a push). At which point an electromagnet kicks in to knock the arm back into a set position ready for it to happen again.

I still can`t get my head around how to cut the end radius in the lathe but I think I just need to sit down and consider it more. My initial idea was to put the piece sideways in the vice and just use a large end mill or boring bar correct 0.75dia to cut the radius at the end of the rod but I realised this wouldn`t keep it concentric with the centre of the bore in the main body.

Thanks again for all the adivce. I`ll be back to reply tonight as to my progress...or lack of it!

Online BillTodd

  • Hero Member
  • *****
  • Posts: 1101
  • Country: 00
  • Colchester Essex (where the lathes were made)
Re: Machining order and method for this part?
« Reply #6 on: November 18, 2011, 08:54:54 AM »
Nice job Sparky!  :bow:
Bill

Offline sparky961

  • Hero Member
  • *****
  • Posts: 844
  • Country: ca
Re: Machining order and method for this part?
« Reply #7 on: November 18, 2011, 09:07:50 AM »
The idea for the last step is that you clamp it to a rod, same as you would to the pendulum and use that to chuck the assembly.  You could to this on a lathe or maybe have a chuck or collet block on a rotary table. 

With the lathe, you'd need a tool ground with a 3/4" 3/8" radius ground on the end, but you'd only need about 45 degrees worth of the complete circle to get the job done.

On a rotary table, which now that I'm thinking about it might actually be easier, you set it up as described above and use a fly cutter set to 1.5" 3/4" to cut that last bit.

No problem with the drawings.  It was a fun and engaging challenge!  I find that when I model a part in CAD, I'm always thinking about the order of machining operations and that helps out a lot when go to make that part.

-Sparky

Offline philf

  • Hero Member
  • *****
  • Posts: 1115
  • Country: gb
Re: Machining order and method for this part?
« Reply #8 on: November 18, 2011, 11:51:10 AM »
Hi Chris,

I was surprised that the drawing calls for the surface to be concentric to the pendulum rod so I've just had a look at mine and you can see a witness line down the centre of the impulse surface which confirms that the drawing is correct.

It would be relatively easy to do on a vertical mill with a dividing head (or rotary table mounted vertically).
Personally, I'd use my boring head set to the correct radius and centre height.

If you get stuck or would like to get any measurements off mine you can pop round any time.

I can't quite decide how you adjust the height of the gathering pallet on the LBP INC design (unless you do it by bending the pallet support wire). It's certainly different to the original. The original is a pain because the adjustment is around the back of the block so you can't see what you're doing.

I believe that the original pallet was a jewel. Mine is made from pot hard silver steel and has been running for perhaps 10 years without any sign of wear.

Cheers.

Phil.
Phil Fern
Location: Marple, Cheshire

Offline raynerd

  • Madmodder Committee
  • Hero Member
  • *****
  • Posts: 2893
  • Country: gb
    • Raynerds Projects - Raynerd.co.uk
Re: Machining order and method for this part?
« Reply #9 on: November 20, 2011, 03:38:52 PM »
Hello one and all. Unfortunately I`ve been laid up in bed all weekend with man flu. I made an effort to get in the workshop last night but felt rubbish after 10 minutes and gave up!

Thanks for the offer Phil. I can actually get a jewel from Cousins website for £10 but I agree, people with less machining experience have had their synchronomes working using a bent paper clip with no problems! I might just go for silver steel!

One thing that a few of you have refered to, is the radius on the edge (which is labeled - "Leave edge sharp" on the plans) Apparently this small radius concentric with the centre bore for the rod is important as it reduces wobble of the pendulum due to misalignment on impact with the gravity arm. So the method I had in my head of maching the piece as described by sparky and then I was going to mount on an arbor as Stew said, turn it on its side and use a mill or boring head to cut the curve. But this will generate a flat top and slope to the impact radius. I still can`t get my head around how this could be done on the lathe but in a wierd way can see how it will generate the radius needed!!  I guess I`d mount it in an arbor and then would I just put it in a 3 jaw centred and use a 3/4" radius profile tool to cut the end radius (which would naturally generate the radius at the top concentric with the centre rod)

Perhaps this is a very basic question, but other than marking it out well and cutting to the whitness marks, I can`t see any better way of controlling feed with a profile tool.

I still can`t see how you could generate this profile using a rotary table and mill, despite the messages that have been posted here!

Hummm, this is a tricky bugger!

Offline John Hill

  • The Artful Bodger
  • Madmodder Committee
  • Hero Member
  • *****
  • Posts: 2016
  • Country: nz
Re: Machining order and method for this part?
« Reply #10 on: November 20, 2011, 03:58:48 PM »
At the risk of betraying my almost total ignorance and inexperience amy I suggest that the tricky ramp be done in the lathe as the first operation while you still have a big chunk of metal to hold securely in the 4 jaw.  A swing tool (i.e. inverse of a ball turner) could be used to get the 0.75 diameter.  You would drill and bore/ream the pendulum hole on the same mounting.

John
From the den of The Artful Bodger

Offline Pete.

  • Hero Member
  • *****
  • Posts: 1075
  • Country: gb
Re: Machining order and method for this part?
« Reply #11 on: November 20, 2011, 07:46:56 PM »
I'm a novice but if I had to make that I'd start with a blank 2" x .75" x .44" (which is over-length), drill all of the holes first inc the pivot hole, then thin&bevel the sides and cut the slot but leave the extended 1/4"end full thickness so I can still lay it flat and work on it without risk of tipping. Then I'd mill off the bottom with a 3/4" endmill to get the .38 radius. I'd also rough out the top curved bit on the same setup.
To get the top curved face to the profile described by the toroid I would probably turn an arbor to put in a collet chuck in my dividing head and clamp the piece to that pivot and hand-turn it against a 3/4 endmill in my vertical mill to make the double-curve, feeding in the y-axis gently to bring it up to the mark.

I'd then transfer the collet chuck and part to my lathe, hack-saw off the excess from the end, turn the radius on the tip then set the compound to machine the 6 degree angle on the top last of all.

Offline philf

  • Hero Member
  • *****
  • Posts: 1115
  • Country: gb
Re: Machining order and method for this part?
« Reply #12 on: November 21, 2011, 06:52:47 AM »
Hi Chris,

I needed to put the dividing head on the miller this morning so I thought I'd take a few pictures to illustrate the method for cutting the radius concentric with the pendulum rod hole.

The first pic shows a piece of brass mounted on an arbor. The cutting tools is set to the centre height of the dividing head and to approx 3/8" radius.

The second pic shows it mid cut - the cut being applied by rotating the dividing head.

The third pic is the block with the rad finished.

Hope the pics explain it better than words.

Cheers.

Phil.
Phil Fern
Location: Marple, Cheshire

Offline sparky961

  • Hero Member
  • *****
  • Posts: 844
  • Country: ca
Re: Machining order and method for this part?
« Reply #13 on: November 21, 2011, 10:19:26 AM »
Very nice, Phil.  This is exactly what I was trying to describe.

As they say, a picture is worth 1000 words!

-Sparky

Offline raynerd

  • Madmodder Committee
  • Hero Member
  • *****
  • Posts: 2893
  • Country: gb
    • Raynerds Projects - Raynerd.co.uk
Re: Machining order and method for this part?
« Reply #14 on: November 21, 2011, 07:15:02 PM »
God like - I owe you one, those pictures are perfect and I now get it 100%!!!

I am going to give this method a go either tomorrow or Wednesday. I`ll let you know how I get on.

I really appreciate the effort. Hey, by the way, I`ve just set up a more permenant stand (based on the stand you gave me) for the stereo microscope (you gave me!!) over my boley lathe. Ohhhh, man, how could you work on watch parts without one!!! I turned down some blued steel to 0.2mm before it snapped. Some chaps over on NAWCC forum recon you can get down to 0.1mm but that would be real tricky. Anyway, I owe you another with respect to that one as well.

Cheers
Chris

Offline sbwhart

  • Global Moderator
  • Hero Member
  • *****
  • Posts: 3530
  • Country: gb
  • Smile, Be Happy, Have Fun and Rock Until you Drop
Re: Machining order and method for this part?
« Reply #15 on: November 22, 2011, 02:25:23 AM »
Yep that's what I was on about Phil, nice one  :thumbup:

Stew
A little bit of clearance never got in the road
 :wave:

Location:- Crewe Cheshire

Offline raynerd

  • Madmodder Committee
  • Hero Member
  • *****
  • Posts: 2893
  • Country: gb
    • Raynerds Projects - Raynerd.co.uk
Re: Machining order and method for this part?
« Reply #16 on: November 24, 2011, 05:48:14 PM »
Well chaps, thanks for all the help I got on here. I was intending to attempt this earlier than this evening but I`ve been feeling rubbish for over a week now and in honesty, still don`t feel great. I`ve got like a never ending cold!!

Anyway, thanks to all your words, help, diagrams and pictures...I managed to more or less complete the part. I just need to assemble the pawl wire.

So no words needed as I just followed the method given above!!   :mmr: :bow: :bow:


Offline philf

  • Hero Member
  • *****
  • Posts: 1115
  • Country: gb
Re: Machining order and method for this part?
« Reply #17 on: November 24, 2011, 06:50:05 PM »
Well done Chris - looks just like the real thing.  :beer:

Cheers.

Phil.
Phil Fern
Location: Marple, Cheshire

Offline raynerd

  • Madmodder Committee
  • Hero Member
  • *****
  • Posts: 2893
  • Country: gb
    • Raynerds Projects - Raynerd.co.uk
Re: Machining order and method for this part?
« Reply #18 on: December 04, 2011, 05:14:25 PM »
Hi Phil, sorry, never replied to your message although we did speak via pm. Hope all is well.

I finished the entire clock today and rather than put it in a new thread, I just thought some of you might be interested so here you go...

Well the pallet was finished and I made up a gathering click. The part looks well with the rest of the clock in my opinion:


Just need to sort the electrics out now ....


Any my wife even likes it...it has made it onto the wall!!


Thanks again for all the help with the original issue...I couldn`t have made it without your suggestions, help and advice..  :mmr:

lordedmond

  • Guest
Re: Machining order and method for this part?
« Reply #19 on: December 05, 2011, 03:36:55 AM »
Well Chris that sight of the complete clock has brought back memories for long ago, I first came across a single unit in 1962 at Stanton Ironworks main office ( it was in the electrical sub )  1962 was when I started work as a elec apprentice we used to regulate it with small washers on the pendulum. the next time I came across a pair (master &  Slave ) at Nat West comp centre at Kegworth in 1972 

the setting up was quite complex and had to be done with gauge blocks and feeler gauges


congrats on getting the old war house back in working condition


Stuart

Offline raynerd

  • Madmodder Committee
  • Hero Member
  • *****
  • Posts: 2893
  • Country: gb
    • Raynerds Projects - Raynerd.co.uk
Re: Machining order and method for this part?
« Reply #20 on: December 05, 2011, 05:02:31 AM »

Hi Stuart, thanks for your reply. Yes, I intend to regulate using washers or similar. Infact, I`m considering making a little weight tray but believe the same effect can be had just dropping them ontop of the pendulum bob itself!

It was 10:15pm when I made the post last night, but I couldn`t help but go and have a look at the electrics. I hooked up 2x AA batteries and removed the actual dial as I just wanted to test if the escapement and impulse was working. It has been running all night but it makes one hell of a CLUNK! I`m going to have to work on it as I doubt I`ll be able to live with such a noise, never mind my wife! Don`t get me wrong, I`ve not even tried to "tune" the setup and I can tell the gravety arm is dropping too far and the contacts are too far apart, so hopefully I can do something with it. I know they are never  silent but they are certainly quieter than mine!!

Offline philf

  • Hero Member
  • *****
  • Posts: 1115
  • Country: gb
Re: Machining order and method for this part?
« Reply #21 on: December 05, 2011, 05:20:34 AM »
Hi Chris,

It looks great!   :thumbup:

The electrics are straightforward. I run mine from a 12v lead-acid that's always on charge. I can't remember what current it's adjusted to on the rheostat.

There looks to be something untoward with the fish hook shaped piece - it looks to have been bent upwards. The picture of mine shows how it should be. The idea is that if you set the N/R/A lever to A then the gathering pallet will catch on the 'barb' of the hook and operate the slave on every swing of the pendulum to advance the slaves rapidly.

The case looks really nice in black. Mine is a varnished light wood finish but with quite a bit of damp staining at the bottom where it was stood on a damp floor for many years before it was rescued and given a good home. I think a tin of black paint will go on the shopping list.

Cheers.

Phil.
Phil Fern
Location: Marple, Cheshire

Offline raynerd

  • Madmodder Committee
  • Hero Member
  • *****
  • Posts: 2893
  • Country: gb
    • Raynerds Projects - Raynerd.co.uk
Re: Machining order and method for this part?
« Reply #22 on: December 05, 2011, 06:47:58 AM »
Cheers Phil,
I`ve have a look at the lever tonight.

I really must do something about the sound of it, I remember yours was more a gentle thump, mine sounds like a CLATTER/BANG with a horrible double knock sound!

I`ll play around tonight and perhaps will do a video if I don`t get anywhere.

Does yours have any carpet or padding wedged in the back between wall and rear panel? Also, I believe it can be a good idea to change the fibre pads to reduce the noise!

Offline philf

  • Hero Member
  • *****
  • Posts: 1115
  • Country: gb
Re: Machining order and method for this part?
« Reply #23 on: December 06, 2011, 04:20:25 PM »
Chris,

Mine is fastened to battens fixed to the stone wall. I never did anything with the fibre pads - but then I'm not too worried about the noise in my workshop.

Have you had time to try adjusting it according to the set-up instructions?

Cheers.

Phil.
Phil Fern
Location: Marple, Cheshire