Author Topic: Stuart No 4 Build  (Read 11548 times)

Offline kwackers

  • Sr. Member
  • ****
  • Posts: 356
Stuart No 4 Build
« on: December 22, 2010, 06:19:00 AM »
Not quite a build log - since I'm half way through and have taken no photos (until now), but I thought I show it anyway

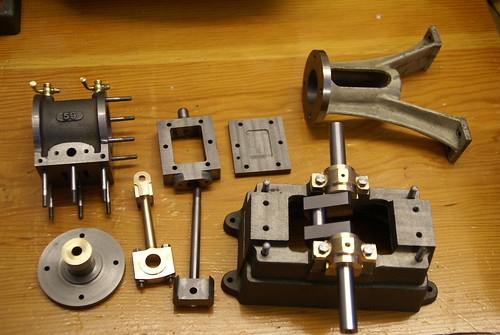
Base, sole plate, standard, cyclinder, crank, mains, bottom cylinder cover & gland, piston rod and con rod have all been machines (as per pic below).
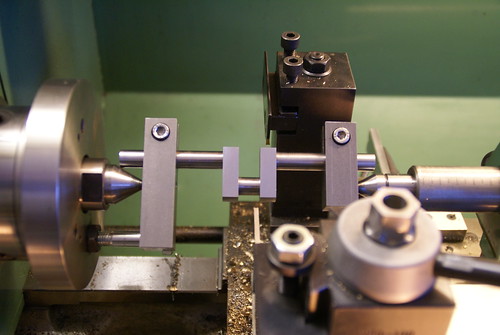
Also a pic of the jig I used to machine the crank main (crankshaft is a casting on this engine, ends are centred and main shaft machined to size both sides, then a pair of holders are made up and clamped to the shafts to allow the crank to be offset to machine the bottom end).

Most of the rest of the machining is fairly standard, holes have all been drilled using a mill with DRO, cylinder holes drilled using PCD on DRO. The steam chest has been drilled to take the reversing gear. Next task is piston and top cylinder cover - then the core of the engine is done. I'll then start on the reversing gear. (Pics to follow).

I'm quite pleased with progress so far, I'm slowly but surely finding my ability to machine parts accurately improves. In fact I've a set of castings for a Stuart Major beam and I'm feeling fairly confident about starting them (I'll definitely do a build log for that).
Engine before this was a Stuart No8 - once I've nailed it to a piece of wood I'll post some pics.

Parts machines so far.


Crankshaft machining jig.


« Last Edit: December 22, 2010, 06:23:04 AM by kwackers »

Offline DavidA

  • Hero Member
  • *****
  • Posts: 1219
  • Country: gb
Re: Stuart No 4 Build
« Reply #1 on: December 22, 2010, 07:20:53 AM »
Kwackers,

Looking at the bottom picture.

I've not done this myself,  but soon will need to. But I do recall reading somewhere that you should insert 'jacking screws' in the gaps in line with the centres, between the webs.   The idea being that it prevents any distortion when you apply pressure to the tailstock centre.
Have you considered this ?

Not trying to tell you how to do it,  how could I if I haven't done it myself ? but it looks like a potential problem area.

Dave.

Offline kwackers

  • Sr. Member
  • ****
  • Posts: 356
Re: Stuart No 4 Build
« Reply #2 on: December 22, 2010, 07:39:37 AM »
Hi Dave,

The jacking screws sound like a good idea (I did worry about distortion). I checked to see what sort of movement I was getting and came to the conclusion that it was acceptable (bear in mind it mainly flexes the webs). I think (iirc) the bar I've made the holders out of is 3/4" so I don't think there'd be much 'racking' of the shafts.
It's a fairly large crank and not held too tightly and the finished item seems spot on, my previous engine (No 8) had a much smaller crank that was made in the same way, I reckon that would probably have benefited from screws (again, I'm not aware of any issues with it).

Thanks for your comments, something learned I hadn't considered. I've another No 4 to build so I'll seriously consider adding jacking screws to the jig, at the very least it'll take away any worry of something 'bad' happening!

Steve.

Offline NickG

  • Madmodder Committee
  • Hero Member
  • *****
  • Posts: 1890
Re: Stuart No 4 Build
« Reply #3 on: December 22, 2010, 09:23:58 AM »
Steve nick work on those castings, the No 4 is quite big isn't it?
Location: County Durham (North East England)

Offline arnoldb

  • Hero Member
  • *****
  • Posts: 515
  • Country: na
  • Windhoek, Namibia
Re: Stuart No 4 Build
« Reply #4 on: December 22, 2010, 11:12:51 AM »
Thats a nice job you're doing Steve  :thumbup:
I especially like the drain cocks on the cylinder!

 :beer:, Arnold

Offline raynerd

  • Madmodder Committee
  • Hero Member
  • *****
  • Posts: 2893
  • Country: gb
    • Raynerds Projects - Raynerd.co.uk
Re: Stuart No 4 Build
« Reply #5 on: December 22, 2010, 12:51:28 PM »
Looks really smart Kwackers - makes my 10V look tiny.


Offline scrapman

  • Full Member
  • ***
  • Posts: 114
Re: Stuart No 4 Build
« Reply #6 on: December 23, 2010, 07:05:56 AM »
Looking great so far  :thumbup: , i was thinking of the No4 maybe as a next build from the 10V,


Ray.

Offline Brass_Machine

  • Administrator
  • Hero Member
  • *****
  • Posts: 5504
  • Country: us
Re: Stuart No 4 Build
« Reply #7 on: December 23, 2010, 07:26:02 PM »
Hiya Steve,

Looking good so far. You are gonna love it when it runs the first time.

Eric
Science is fun.

We're all mad here. I'm mad. You're mad.

Offline madjackghengis

  • Hero Member
  • *****
  • Posts: 717
  • big engine
Re: Stuart No 4 Build
« Reply #8 on: January 03, 2011, 09:58:50 AM »
Hi Steve, that's quite a fine looking bit of machining you've been doing, what is the bore and stroke, if you don't mind my asking?  It is looking very close to fixing to a mount and steaming, I'm looking forward to hearing it run.  Very nice all around.  mad jack

Offline cidrontmg

  • Full Member
  • ***
  • Posts: 229
  • Country: pt
Re: Stuart No 4 Build
« Reply #9 on: January 03, 2011, 12:05:59 PM »
Hi Kwackers, looking real good so far. A Stuart 4 is a big engine. I once built one, and to this day I canīt say how fast it might have ran. I didnīt, and still donīt, have a compressor big enough to keep it going for very long with a serious pressure, and even less a boiler to match. It was leaky, admittedly, and needed more pressure and air volume because of that. But it also had ball bearings, and was quite free running (of course, with a sloppy piston...  :lol: ).
Did Stuart supply piston rings for it? I built mine > 20 years ago, and it was supposed to have 2 cast iron rings, but they were missing in the package, and I never got them. So I ended up using graphite yarn packing, which frayed in no time at all, because the piston was made under size, for the rings, and the cylinder honed. It spat out the graphite yarn with the exhaust in small bits of oily lint, making an awful mess... I hope your engine behaves better!
 :wave:
Olli
Penafiel
Portugal

Offline kwackers

  • Sr. Member
  • ****
  • Posts: 356
Re: Stuart No 4 Build
« Reply #10 on: January 03, 2011, 04:34:35 PM »
Hi Madjack - bore and stroke are 1.5" x 1.5"

@cidrontmg, I dropped lucky with my castings, I picked up 2 sets from the local engineering club for 50ukp each(about $75), both sets were unmachined and both had two sets of piston rings each but given their history I can't say how old they were (one set at least looked to be 20 years or so old).

I've done some more work on the reversing gear but I'm on hols at the mo so will post pics when I'm back and have a bit more done.
The eccentric was giving me some grief, the material is supplied as two pieces - neither of which is big enough to make the pair as one unit, but the plans show it as one unit... Whilst I could make it in two pieces there's no obvious way the (cast iron) parts could be joined to make a single unit!
If I don't figure it out then expect a post asking for help...  :scratch:


Offline Stilldrillin

  • Global Moderator
  • Hero Member
  • *****
  • Posts: 4972
  • Country: gb
  • Staveley, Derbyshire. England.
Re: Stuart No 4 Build
« Reply #11 on: January 04, 2011, 04:36:16 AM »
Hi Steve.
That's big.... And very nice!  :D

Good luck with the rest of the build.  :thumbup:

David D
David.

Still drilling holes... Sometimes, in the right place!

Still modifying bits of metal... Occasionally, making an improvement!