Author Topic: Optical punch  (Read 17743 times)

Offline Tinkering_Guy

  • Jr. Member
  • **
  • Posts: 51
Optical punch
« on: July 19, 2010, 09:10:19 PM »
I saw this idea on one of the Yahoo! groups, or someone's site, or something.  Anyway, the idea is

  • insert one of the optics in the through-hole,
  • peer through the optic and move the thing around until it's right where you want a punch mark,
  • hold it firmly in place while you remove the optic and replace it with the punch, and
  • give the punch a tap with a hammer.


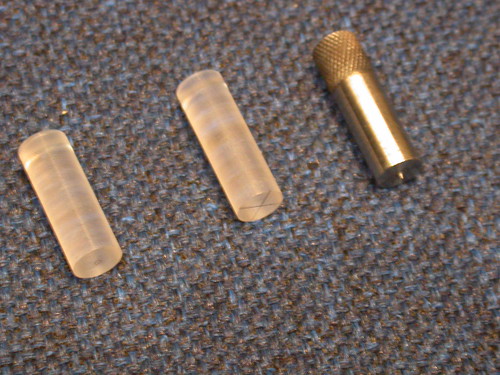
There are two optics, both 3/8" acrylic.  Each has a flat end and a lens end.  One has a crosshair etched in the flat end, and the other has a small circle.  Both etches are filled in with Sharpie.  The punch is 3/8" water-hardening drill rod, with one end knurled and a small point turned on the other, hardened and tempered.


The aluminum body of the punch has one through hole and three not-quite-through holes drilled and reamed to 3/8", for keeping the pieces.


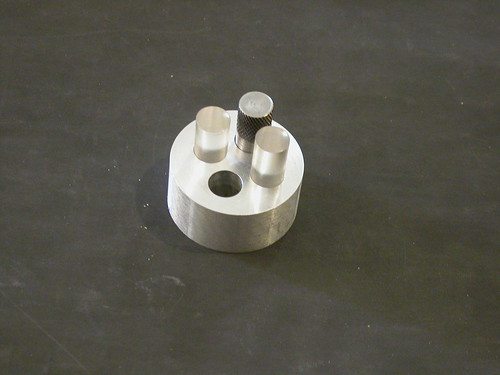
Gluing a piece of non-stick rubber sheet to the bottom would complete it by making it frictionful when positioning.

Making the optics was arguably the most challenging part.  I had to calculate the appropriate radius for the lens based on the length of the optic and the refractive index of the material, and then make a tool to cut that curve (since I don't have a radius cutter -- yet):


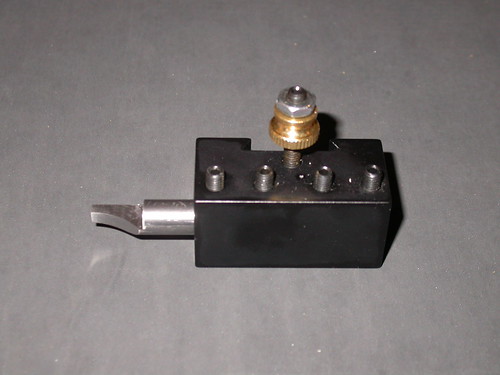
In retrospect, I should have made the cutter from normal square cross-section turning tool stock rather than boring-bar stock, since the latter is a right bugger to get leveled before tightening in the toolholder.

After cutting the lenses, I used #1000 wet/dry sandpaper, followed by #1200 and #2000, and finally Meguiar polish to make both ends nicely transparent.  (I also discovered the hard way that you do not try to polish acrylic at high revs.  ::) )
Tinkering_Guy
Hobbyist machinist, electron-pusher, software dude, and experimental chemist

Offline Stilldrillin

  • Global Moderator
  • Hero Member
  • *****
  • Posts: 4972
  • Country: gb
  • Staveley, Derbyshire. England.
Re: Optical punch
« Reply #1 on: July 20, 2010, 03:09:52 AM »
That looks a handy Tinkering tool.......  :clap:

Ideal for when you`re wearing the wrong pair of specs!  :thumbup:

David D
David.

Still drilling holes... Sometimes, in the right place!

Still modifying bits of metal... Occasionally, making an improvement!

Offline Bernd

  • Madmodder Committee
  • Hero Member
  • *****
  • Posts: 3688
  • Country: us
  • 1915 C Cab
    • Kingstone Model Works
Re: Optical punch
« Reply #2 on: July 20, 2010, 09:48:19 AM »
Very nice little write up on making that optical punch. :thumbup:

Thanks Tinkering_Guy. Could you did a little write up how you made that cutter for making the optical curve. :bow:

Bernd
Route of the Black Diamonds

Offline Brass_Machine

  • Administrator
  • Hero Member
  • *****
  • Posts: 5504
  • Country: us
Re: Optical punch
« Reply #3 on: July 20, 2010, 10:33:55 AM »
I agree with Bernd.

Very nice. I would like to try my hand at one, but I think the optics would give me fits.

Eric
Science is fun.

We're all mad here. I'm mad. You're mad.

Offline andyf

  • In Memoriam
  • Hero Member
  • *****
  • Posts: 1795
  • Country: gb
    • The Warco WM180 Lathe - Modifications
Re: Optical punch
« Reply #4 on: July 20, 2010, 12:00:16 PM »
I agree with Bernd.

Very nice. I would like to try my hand at one, but I think the optics would give me fits.

Eric

The optics aren't that difficult; you don't need perfection, as long as the middle is OK. I made mine by trial and error, putting a very steep "coolie hat" taper on the end of a Perspex (= Lucite) rod, and then filed it over using a slight rocking motion to get a shallow dome, followed by fine grade sanding, metal polish and finally toothpaste.  

The shoulder on my "magnifying rods" is positioned such that, when placed in the central hole in the base, the end of the rod is about 0.5mm above the bottom. The three outer blind holes are for storage. The lower slightly fuzzy pic shows the circles (about 2mm and 1mm) inscribed on one of the rods. They are off-centre in the photo, because I couldn't see them through the viewfinder and thus couldn't get the camera exactly vertical above the lens. What is surprising is how much light gets down via the lens through the base to illuminate the job.


Andy
« Last Edit: July 20, 2010, 01:07:18 PM by andyf »
Sale, Cheshire
I've cut the end off it twice, but it's still too short

Offline raynerd

  • Madmodder Committee
  • Hero Member
  • *****
  • Posts: 2893
  • Country: gb
    • Raynerds Projects - Raynerd.co.uk
Re: Optical punch
« Reply #5 on: July 20, 2010, 04:02:25 PM »
Could someone explain what the optics are exactly, reading AndyF's post, I take it they are simply perpex tubes with a slight dome? This is an excellent idea! I`ve just come back from punching some holes and this little tool would have really helped!!

Chris

Offline andyf

  • In Memoriam
  • Hero Member
  • *****
  • Posts: 1795
  • Country: gb
    • The Warco WM180 Lathe - Modifications
Re: Optical punch
« Reply #6 on: July 20, 2010, 05:21:20 PM »
Could someone explain what the optics are exactly, reading AndyF's post, I take it they are simply perpex tubes with a slight dome? This is an excellent idea! I`ve just come back from punching some holes and this little tool would have really helped!!

Chris

That's right, Chris, though cylinders rather than tubes. Have a look here for a bit more detail:
http://www.gadgetbuilder.com/OpticalPunch.html
Andy
Sale, Cheshire
I've cut the end off it twice, but it's still too short

Offline John Stevenson

  • In Memoriam
  • Hero Member
  • *****
  • Posts: 1643
  • Nottingham, England.
Re: Optical punch
« Reply #7 on: July 20, 2010, 05:41:29 PM »
I have a bought one, bought it ages ago but it wasn't cheap, about £50 at the time.
It only has a single holder for the perspex rod and you  swap for the punch. It all lives in it's own little padded jewellery type box

I feel safer with this one as I'm sure with the double holder type I'd smack the wrong bit with the hammer  :doh:

One nice thing on mine is the fact it has an 'O' ring let into the base so it stay put on the job, simple but works well.

John S.
John Stevenson

Offline Tinkering_Guy

  • Jr. Member
  • **
  • Posts: 51
Re: Optical punch
« Reply #8 on: July 22, 2010, 04:56:55 PM »
Very nice little write up on making that optical punch. :thumbup:

Thanks Tinkering_Guy. Could you did a little write up how you made that cutter for making the optical curve. :bow:

Bernd

Well, it's as was said: it's not real critical.  However, if you're a perfectionist, you want to decide a) how long your optic is going to be, and b) where the focal point is going to be.  It's pretty safe to work with a refractive index of 1.0 for items this small.

Look at the diagram.  The focal point is 1.5mm beyond the bottom of the optic, and you want the focal point to be at 1.5".  (The narrow 1" section fits into the .375 hole in the base; the base is ~ 1" deep.)

I went through this, only with a lot more math, and set my boring bar to a radius of 1.5".  I faced off the end of the cutter-to-be, lined it up with 0 on the X axis of the mill, and 'bored' a half-saddle in the end of the rod.  (Which was actually .375 drill rod, not boring bar stock.)  Then I milled down to the midpoint of the rod.

The result was a cutter with the right curve, but with zero relief in any direction.  (Not a problem, really, for working with acrylic.)  Hone it up, put a stop on the cross slide of the lathe so the end of the cutter won't advance beyond the centre of the acrylic, and shave it down until you have a clean dome on the end at your 1.5" mark.  (If you advance the cross slide too far, you'll get a pointed dome, which will introduce distortions out the wazoo.)

I actually set the focal point of mine to be the end of the optic, because I want the optic to actually rest on the work piece.  If it doesn't touch, you'll have plenty of parallax problems with your crosshair or circle reticle.
Tinkering_Guy
Hobbyist machinist, electron-pusher, software dude, and experimental chemist

Offline Bernd

  • Madmodder Committee
  • Hero Member
  • *****
  • Posts: 3688
  • Country: us
  • 1915 C Cab
    • Kingstone Model Works
Re: Optical punch
« Reply #9 on: July 22, 2010, 07:08:33 PM »
Thanks much Tinkering_Guy for taking the time to post that info. Really apprciate it.  :beer:

Bernd
Route of the Black Diamonds

Offline Tinkering_Guy

  • Jr. Member
  • **
  • Posts: 51
Re: Optical punch
« Reply #10 on: July 23, 2010, 02:49:27 PM »
Since the first one I made was pretty much ad hoc, and I like the radial design andyf has, and I intend to make another one at some point that's a bit more professional, I drew up plans for my next version.  A pic of the plans is attached, but I've also saved them online:


Now, if I were to make up construction steps, they'd look something like the following.  (I reserve the right to amend these later, when I actually make the thing, and have photos of the process.)

  • Turn down the base to the appropriate diameter, face it off, centre-drill, and drill/ream the centre hole.  If you have an 'over' reamer for 3/8" (i.e., a 0.376" reamer), use that.
  • Part the base off, leaving a few thousandths for the next steps on the mill.
  • Mount the base on parallels in your mill, faced side down.  Flycut or mill it down to the correct thickness.
  • Position the base to bore the first keeper hole.  Since these are blind holes, you don't need to leave space underneath for drill-through.  (Unless you're a klutz like me.)
  • Centre-drill and work up to the 1/8" drill for the dimple at the bottom of the keeper hole.  Drill that one down to a depth of 0.940 or so.
  • Bore and ream the keeper hole to a depth of 0.875.
  • Lather, rinse, and repeat for the other two keepers.  Put the 1/8" dimple in the bottom of each so it doesn't matter in which one you put the punch.
  • Glue some thin rubber or fine sandpaper to the bottom of the base and set it aside.  Don't worry about the through hole at this point.

Now the punch.

  • Mount up some 3/8" drill rod (or some slightly larger and turn it down), and face it off.
  • Turn the point onto the punch, and make a clean shoulder. Don't break the edge; you want it sharp for now.
  • Part it off at about 2".
  • Put the base with its now-dry glue, friction side down, on a flat slightly-yielding surface, like a scrap of Formica or hardwood.
  • Insert the punch into the centre hole, punch end down.  Hold the base firmly against the surface, and give the punch a rap with a hammer and it should nicely cut out the hole in the rubber or sandpaper.  You can now break or file the edge of the punch end if you like.  Put the base aside.
  • Mount the punch back in the lathe, parted (rough) end out.  Add knurling if you like (I recommend it), face it off, and break the edge.
  • Hone the punch tip and heat-treat the punch.  Set it aside.

Now the optics.  Use whatever transparent material you can get; Lucite®, acrylic, whatever.  Just be sure to read up on how to machine it, because these thermoplastics can be tricky.  Go very slowly and carefully.  (Actually, I suspect you're probably better off not using Lucite® because of its curious internal reflection properties.  I suspect acrylic is better at light-gathering in this situation.)

  • Mount up a few inches of your plastic rod, face it off, and turn it down to 0.550" for about 2".  I recommend a shear tool that cuts at the tangent point.
  • Turn it down to 0.375" for 1" from the faced end.  Unfortunately, the shear tool doesn't let you cut to a shoulder, and you really need a sharp shoulder here.
  • Stop the lathe and make the reticle markings.
    • For a crosshair, put a sharp-pointed bit or scribe in the toolholder, precisely at the height of the spindle axis.  Lock the spindle and scribe across the width of the face.  Unlock the spindle, turn it 90°, and repeat the lock and scribe.
    • For a circle, use a tool with a very small nose radius, and etch the tiny circle in the face
    In both cases, you want the etched lines to be very narrow.
  • Polish up the face and the body of the optic.  Very light touches up to about 1000-grit sandpaper (2000-grit if you can get it), followed with Meguiar's plastic polish.  Very light touches, very low revs.
  • Remove the work and clean it up; wash all the polish off.  Turn it around and insert it in the chuck/collet up to the shoulder (protect it with some shim brass or paper or the like.)
  • Make a tiny mark at 0.525" from the shoulder, and another ar 0.550".  Face down almost to the latter.
  • If you have a radius cutter, mount it and set it to a radius of 0.155".  If you have to make your own cutter, that's the radius you want.
  • Radius-face to the 0.525" mark.  You should now have a dome about 0.025" high on the end of the rod.
  • Repeat the polishing steps.
  • Remove the optic, rub across the reticle face with a Sharpie or other permanent marker, and rub off the excess.  This should leave ink in the reticle etch.
And that should do it.  Your optics and punch should fit snugly in the keeper holes, and freely -- but not loosely -- in the centre hole.  The punch is longer than the optics, so you should be able to insert it and tap it without hitting the optics if they're in their keepers.
« Last Edit: July 23, 2010, 02:58:20 PM by Tinkering_Guy »
Tinkering_Guy
Hobbyist machinist, electron-pusher, software dude, and experimental chemist

Offline Bernd

  • Madmodder Committee
  • Hero Member
  • *****
  • Posts: 3688
  • Country: us
  • 1915 C Cab
    • Kingstone Model Works
Re: Optical punch
« Reply #11 on: July 23, 2010, 03:45:20 PM »
WOW  :bugeye:

Nice write up and plans. Thanks very much.

Just added another project to that never ending list of shop projects.  :lol:

Bernd
Route of the Black Diamonds

Offline DeereGuy

  • Full Member
  • ***
  • Posts: 203
    • D1 Adapter Solutions
Re: Optical punch
« Reply #12 on: July 29, 2010, 01:42:09 PM »
Nice job on the drawings and great write up..thanks!

Rob.Wilson

  • Guest
Re: Optical punch
« Reply #13 on: July 30, 2010, 04:35:13 PM »
Cracking Job Tink  :clap: :clap: :clap: :clap: :clap:

Great thread  :thumbup:


Rob

Offline Artie

  • Sr. Member
  • ****
  • Posts: 293
  • Country: au
  • Down here in the Aussie sunshine/heat :-)
Re: Optical punch
« Reply #14 on: July 30, 2010, 09:46:23 PM »
Holy crap! ANOTHER one of those things that I HAVE to have...... thanks guys, this thing is so simple yet looks to be so effective.... Im doing it today.... Howdy Wilso....

Thanks for starting the thread... very  very interesting.

Rob T

As an aside, this thing looks to be particularly useful for those of us who's eyes arent what they were last year....  :(  :lol:
South Wales, wait...NEW South Wales... Batemans Bay.

Offline Artie

  • Sr. Member
  • ****
  • Posts: 293
  • Country: au
  • Down here in the Aussie sunshine/heat :-)
Re: Optical punch
« Reply #15 on: July 31, 2010, 06:56:31 AM »
And I made one... it really is a great concept....

Does anyone have an old wrecked clear handle screwdriver? I never throw this stuff away, you never know.... well this philips head unit chipped a shoulder off and as such just wouldnt grip. Today it was put to use. It supplied the required plastic and it even came attached to a mandrel.


Sorry to hijack Tinker.. Ill be gone in a moment... as per the directions on here but I used a piece of brass bar, yet to be profiled and polished...


Works GREAT! Thanks for the idea... :headbang:

Rob
South Wales, wait...NEW South Wales... Batemans Bay.

Rob.Wilson

  • Guest
Re: Optical punch
« Reply #16 on: August 01, 2010, 05:58:04 AM »
Hi Rob
 :med:  ,, good bit of recycling  :med:  ,,,,,,,,,,,,,,,,,,,,,, just binned two of though's   screwdrivers  :doh:


Rob

Offline tony ennis

  • Jr. Member
  • **
  • Posts: 7
Re: Optical punch
« Reply #17 on: September 11, 2010, 10:32:33 AM »
I hope it isn't against the rules to link to another forum.

This Evan guy seems to know how to do everything, and has done much of it.  Here's a thread on 'chemical polishing' wherein he uses chemicals to put a finish on certain plastics to make them remarkably clear - directly applicable to this discussion.

chemical polishing

Offline Lew_Merrick_PE

  • Hero Member
  • *****
  • Posts: 690
  • Country: us
Re: Optical punch
« Reply #18 on: September 11, 2010, 11:05:17 AM »
The company behind the Novus windshield repair companies sells a 2-part chemical buffing system that works quite nicely for most common plastics.  I get mine (they come in foil pouches) from either Interstate Plastics (http://www.interstateplastics.com/) or Plastics International (http://www.plasticsintl.com/ -- who also have the best listing of plastic material properties).  They are relatively expensive ($5 for one set of pouches the last time I bought some -- call it 2007), but easy to use.  They have paper "wipes" impregnated with their goo.  They come in several grades such that the first "wipe" has an abrasive that will polish out nicks and dings such as are found on well-used Trav-A-Dial lenses.  The second "wipe" has solvent-type compound that will give a very nice gloss to the part being polished.