Author Topic: New Shed build log  (Read 25203 times)

Offline jamoni

  • Jr. Member
  • **
  • Posts: 71
New Shed build log
« on: January 14, 2010, 09:08:53 PM »
Bernd had suggested I do a build log of my new shed.  Since all my other projects are on hold till it's done, why not?
Here are some photos off of the craigslist ad:


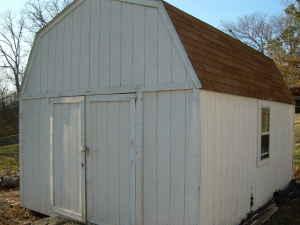
I bought this on New Year's Eve, and began the teardown on New Year's Day  It had to be out that weekend, which is why I got such a good deal on it.  I removed the loft and prepped the roof for disassembly myself, and had a buddy show up to help me lower the roof.  I had intended to lower it in two pieces, to prevent shingle damage.  Shingles are HEAVY.  My plan didn't work.  I got one side down in one piece, by lowering it with a comealong.  The other side was braced, but the second we tried to adjust the bracing, the end walls bowed out and the roof collapsed.  We had considered this possibility, so no one was in any danger when it occured.  If I had it to do over again, I'd simply scrape the shingles off and take the roof panels down one by one.  Now, I have to rebuild the trusses, since I removed the middle braces to take the roof down.  Stupid.
Anyway, The next day I had some friends, a truck, and a flatbed trailer out.  We removed the walls, then loaded everything but the floor onto the flatbed and took it home.  The next day I came back with my tiny little truck, tore up the flooring, then loaded it up and took it home.  It took three loads to get the complete floor, joists, and skids, round trip of about 60 miles.  The last load was dicy, carrying 16' x4"x4" skids on a Mazda B2200.  :)  I was a little too busy to take photos.
Regardless, I got it all done in the alloted time, then went out and bought a giant tarp to cover it all.
Did I mention it was about 3*F the whole weekend?

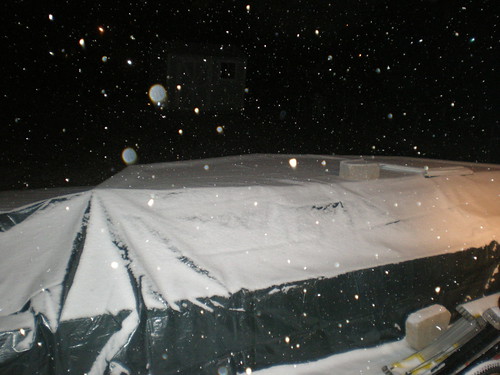
The neighbors must love the giant tarp mess on the back porch.  C'est la vie.
So, the ground pretty much froze solid, which made placing the footings a little tough.  Today, however, it got up to 50 degrees! The melting snow and the warm temps made for relatively easy digging, so after work I went out and sunk the concrete paving stones down for the footings.  I measured off the perimeter and drove stakes at each corner.  I then attached a line at the height I wanted the top of the pavers, and leveled it using a line level.  I sunk each stone to a little above this line, then tamped it down to fit.  I ran a line diagonally to get the center stone.
I SHOULD pour concrete footings, but I rent, and can't just go putting concrete wherever I want it.
So here is the shed as it stands (lays?) right now:
 
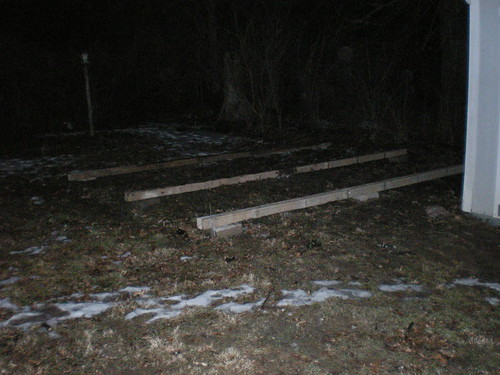
I plan to add some brick under the runners before I build the floor, to prevent sagging.  I expect a bit of settling, which I will offset by shims, to keep my shed level.
Here you can see the size difference between old and new sheds:

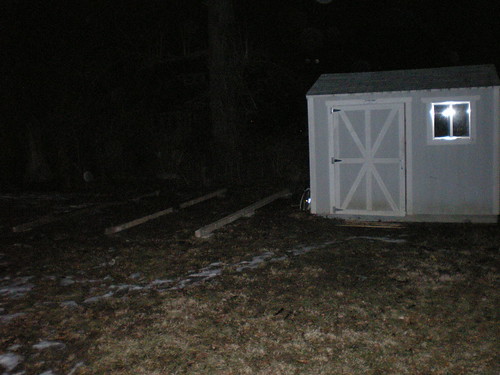
It's nearly 8 times the volume!
This weekend I'd like to get the floor joists on, and lay the flooring.  The joists are just 2x4s, and the flooring is 3/4" tongue and groove plywood.  This thing is pretty sturdy.  :)  I expect my hammering arm will be a bit sore.
That's all for now!

Offline websterz

  • Sr. Member
  • ****
  • Posts: 415
Re: New Shed build log
« Reply #1 on: January 14, 2010, 09:11:57 PM »
That's not a shed man...that's a barn! Nice open space, I am a little jealous.  :wack:
"In the 60's, people took acid to make the world weird.  Now the world is weird and people take Prozac to make it normal."
 :med:

Offline Darren

  • Madmodder Committee
  • Hero Member
  • *****
  • Posts: 3795
  • N/Wales
Re: New Shed build log
« Reply #2 on: January 14, 2010, 09:20:55 PM »
Nice shed, even if it does have a funny shaped roof ...  :)

Be a handy roof though  :thumbup:

Don't envy working it those temps though  :coffee:
You will find it a distinct help… if you know and look as if you know what you are doing. (IRS training manual)

Offline jamoni

  • Jr. Member
  • **
  • Posts: 71
Re: New Shed build log
« Reply #3 on: January 14, 2010, 09:40:44 PM »
I climb cell phone towers for a living, so I know how to dress for the cold.  If you think it's cold on the ground, try being above the treeline with a handful of steel.  :)
I do prefer nicer weather, though. 
As for the roof, I'm thinking about putting in an 8' ceiling over the main area, to hold heat in.  So the back part would have the loft (which is just over 6') and the front would have a little half loft.  Insulation would go in the roof, walls, and ceilings. Not going to bother with the floor.  Next year I'll be able to get some work done in the cold!

Offline dsquire

  • In Memoriam
  • Hero Member
  • *****
  • Posts: 2275
  • Country: ca
  • Kitchener, Ontario, Canada
Re: New Shed build log
« Reply #4 on: January 15, 2010, 02:11:41 AM »
jamoni

An ambitious project for sure but I am confident that you will have it up and closed in in plenty of time to reap the benefits of a nice shed for you tools while the snow is flying around outside.
 :ddb: :ddb:

 I am glad to see that your used to working outside in the winter but it doesn't mean you have to like it. :lol: :lol:

Cheers  :beer:

Don
Good, better, best.
Never let it rest,
'til your good is better,
and your better best

Offline Stilldrillin

  • Global Moderator
  • Hero Member
  • *****
  • Posts: 4972
  • Country: gb
  • Staveley, Derbyshire. England.
Re: New Shed build log
« Reply #5 on: January 15, 2010, 03:46:45 AM »
Wow! That`s some shed, and a half!   :bugeye:

Good luck with the build!  :thumbup:

David D
David.

Still drilling holes... Sometimes, in the right place!

Still modifying bits of metal... Occasionally, making an improvement!

Offline kellswaterri

  • Jr. Member
  • **
  • Posts: 68
  • Country: gb
Re: New Shed build log
« Reply #6 on: January 15, 2010, 09:06:22 AM »
Hi Jamoni, I have a ''Vague idea''   ::)from where you are coming with regard to the cold, having built my shop extension in late November, the temperature hovering around 5 degrees...this would look to be a cracking good shop when finished.
Best of luck with it,
                         John.
« Last Edit: January 15, 2010, 09:08:45 AM by kellswaterri »

Offline Bernd

  • Madmodder Committee
  • Hero Member
  • *****
  • Posts: 3688
  • Country: us
  • 1915 C Cab
    • Kingstone Model Works
Re: New Shed build log
« Reply #7 on: January 15, 2010, 09:33:08 AM »
jamoni

Neat project. I just can't believe somebody would do something like that in the cold. But I see that job job that you do you aren't afraid of the cold.  :)

You mentioned not putting insulation in the flooring. I'd advise to put insulation in. The shop is small enough were it shouldn't be to great of an expense. Believe me your feet and legs will thank you for it.

Darren, that's called a gambrel roof. Gives you a bit more storage. American barns are built with roofs like that. More room to store hay and straw in.

Bernd
Route of the Black Diamonds

Offline websterz

  • Sr. Member
  • ****
  • Posts: 415
Re: New Shed build log
« Reply #8 on: January 15, 2010, 09:57:48 AM »
jamoni

Neat project. I just can't believe somebody would do something like that in the cold. But I see that job job that you do you aren't afraid of the cold.  :)

You mentioned not putting insulation in the flooring. I'd advise to put insulation in. The shop is small enough were it shouldn't be to great of an expense. Believe me your feet and legs will thank you for it.

Darren, that's called a gambrel roof. Gives you a bit more storage. American barns are built with roofs like that. More room to store hay and straw in.

Bernd

And more room for your heat to rise up and fill in as well. They can be a bear to heat.
"In the 60's, people took acid to make the world weird.  Now the world is weird and people take Prozac to make it normal."
 :med:

Offline jamoni

  • Jr. Member
  • **
  • Posts: 71
Re: New Shed build log
« Reply #9 on: January 15, 2010, 09:41:31 PM »
Thanks, guys.  Frankly, I can't believe I'm doing it either.   :doh:
I just got too good a deal to pass up ($600, and I've priced these sheds new at around $4000).  Even if you factor in gas, new shingles, tools, hardware, etc, I'm still way ahead. So I jumped on it.
Bernd, I think you're probably right about the insulation.  I'm just concerned about moisture under the shed turning the insulation to a gooey mess.  Even if I use a vapor barrier, I don't have any way to secure the ends.  Hmm.... Unless I cut it extra long on all sides, place the floor panels, fold up the vapor barrier, and tack it to the floor.  Put the walls on, then cut at the joint between walls and floor.  Great, now I get to go buy insulation, on top of the nails and screws and pricey framing hammer I just got.   :hammer:
Tomorrow, me and my kid are going to hit this floor with a vengeance.  Well, I'm going to hit it, he's going to make fun of me and chase the dog around, occasionally handing me tools or holding a board.  More pics soon!

Offline Bernd

  • Madmodder Committee
  • Hero Member
  • *****
  • Posts: 3688
  • Country: us
  • 1915 C Cab
    • Kingstone Model Works
Re: New Shed build log
« Reply #10 on: January 16, 2010, 09:01:13 AM »
Actually I was thinking a subfloor. 2 X 4, styrofoam, radiant floor heating tube, floor. Just a thought if you wanted to keep your feet warm.

But spending somebody elses money is way to easy  :lol: , so I guess you need to do what you feel is right.

Bernd
Route of the Black Diamonds

Offline jamoni

  • Jr. Member
  • **
  • Posts: 71
Re: New Shed build log
« Reply #11 on: January 16, 2010, 10:33:09 AM »
That's brilliant, and I think it's how I'll do it.  That way, I can retrofit it after the shed is up. Thanks, Bernd!

Offline Bernd

  • Madmodder Committee
  • Hero Member
  • *****
  • Posts: 3688
  • Country: us
  • 1915 C Cab
    • Kingstone Model Works
Re: New Shed build log
« Reply #12 on: January 16, 2010, 06:42:01 PM »
jamoni,

Here's what the floor looks like in my basement shop.


Unfortunatly it's not working to good. I should have added more coils of the pex tubing.

If your interested in the whole project you can find it here at my Website

Bernd
Route of the Black Diamonds

Offline jamoni

  • Jr. Member
  • **
  • Posts: 71
Re: New Shed build log
« Reply #13 on: January 16, 2010, 09:58:36 PM »
Today I hit the floor.  I had my son taking pictures, and well, he took a LOT.
So I put them together for your enjoyment:

The only issues I had were:
1. I didn't line the joists up perfectly, leaving the ends of two floorboards unsupported.  I just shoved some spare 2x4s under the flooring and nailed down through the flooring, adding a couple of joists where needed.  If necessary I'll drive some super long screws down through the joist into the runners.
2. One of the end joists was about 1/2" out of square at one end.  I just had to pull it up, reposition, and nail it back down.
3. One of the joists was longer than the others.  I think I grabbed a rafter beam by mistake.  I just had to cut it off with my band saw.

Everything was squared up at every step.  This paid off at the end, as the floor is as square and level as you could ask for.
I threw a tarp over the floor to keep it dry, and now I'm nursing my aching hammer arm.  BTW, I bought an Estwing 28 oz framing hammer for twice what the Husky ones were going for.  It was worth every penny.
Next weekend the walls go up!

Offline Bernd

  • Madmodder Committee
  • Hero Member
  • *****
  • Posts: 3688
  • Country: us
  • 1915 C Cab
    • Kingstone Model Works
Re: New Shed build log
« Reply #14 on: January 17, 2010, 09:35:13 AM »
Hey, pretty neat. 1 minute and 27 seconds to build a shed floor.  :lol: Must be some kind of new record.

You must be some were south of the Great Lakes. Don't see any snow.  :bugeye:

Bernd
Route of the Black Diamonds

Offline jamoni

  • Jr. Member
  • **
  • Posts: 71
Re: New Shed build log
« Reply #15 on: January 18, 2010, 12:20:29 AM »
Yup.  St. Louis.  It was hovering in the high fifties all weekend.  Hoorah!
Of course, that meant mud mud mud while this floor went up.  After the shed is up I'll need to throw down some grass seed and hope it grows.
I still need to get some bricks to toss under there for a little more support.

Offline jamoni

  • Jr. Member
  • **
  • Posts: 71
Re: New Shed build log
« Reply #16 on: January 30, 2010, 10:14:08 PM »


The weather has been to bad to work on the shed lately.  Too wet, too cold.  However, this weekend promised to be clear, though cold.  
So I called a bunch of friends over for a barnraising.  In only a couple of hours, we put up the walls and gables.  
The only issue is that the doorframe somehow warped or got tweaked while in storage.  I suspect moisture warped it.  So the door wants to hang a little crooked.  What I need to do is remove one board in the frame and replace it with a straight one.  Then I'll need to shim it level and reset the trim.  Not too big a deal, but annoying.  
Tomorrow's task is to put up the roof joists and the roof.  I'll need to reshingle it, so until that happens, I'm going to have a tarp on the roof for weatherproofing.  Hopefully I'll get to that next weekend.
Then it's just a matter of trim and paint on the outside, plus setting up the inside.  :)
« Last Edit: January 30, 2010, 10:16:53 PM by jamoni »

Offline Bernd

  • Madmodder Committee
  • Hero Member
  • *****
  • Posts: 3688
  • Country: us
  • 1915 C Cab
    • Kingstone Model Works
Re: New Shed build log
« Reply #17 on: January 31, 2010, 08:53:27 AM »
Looking good jamoni.

Weather report for the deep south dosen't sound to pleasant. Doesn't look like you've got a lot of snow. But that damp cold is tuff to take. Hang in there Punxsutawney Phil will give us the weather report for the next 6 weeks. I'm sure he's going to say 6 more weeks of winter.  :lol:

Bernd
Route of the Black Diamonds

Offline jamoni

  • Jr. Member
  • **
  • Posts: 71
Re: New Shed build log
« Reply #18 on: January 31, 2010, 09:00:33 PM »
Well, I didn't quite reach the stage I wanted to today.  I had hoped to have the roof all the way on, but I spent some time with my son this morning, instead of busting my butt on the shed.  Then I had to run to the hardware store for plywood, nails, 2x4s, and a circular saw.  I had to cut out a total of 42 truss plates: 14 at 140* and 28 at 135*:


I then had to take the individual truss pieces, measure out the angles, and nail them to the truss plates:


All done:


Now let's put them in place!


By the time they were all up, it was well past sundown, and the neighbors had probably had enough of hammering.  Also, it was getting real cold, realquick!  So I opted to brace the trusses, and cover up with a tarp, rather than continue on with the roofing:


 Hopefully the weather will hold, and I'll get off early a couple days this week, so I can finish up the roof by next weekend. 

Offline jamoni

  • Jr. Member
  • **
  • Posts: 71
Re: New Shed build log
« Reply #19 on: February 01, 2010, 07:30:56 PM »
Well, we were pretty slow at work today, so I asked off.  I swung by the hardware store to get tarpaper, a hammer stapler, and staples.  More $$$$ gone.  :doh:
Anyway, I got home and hit it pretty hard.  I first had to strip all the old shingles off the roof, then pull all the nails in the boards.  WOW.  That was some hard work.  Once done with that, I put the sheathing on the lower parts of the roof.  I would have done those last, but since there is a roof vent, and the top sheathing doesn't touch in the middle, the only way to get the angles right was to do the bottom ones first, indexed along the sill, then index the top ones to the bottom ones.
I had a pretty hard time placing those by myself.  What I ended up doing was driving a nail in the sill horizontally at either end. I'd rest one end of the sheathing on the nail, then lift the other end up until I could rest it on the second nail.  Then I'd bump it over onto the sill and push it into place.  A little risky, and I did drop one board, but I was ready for it and got out of the way.  I then tacked each board in place. 
Next I had to somehow get the top sheathing on top of the shed.  Since I already had some girders inside, I built a little platform with some scrap wood, and laid it on top of the girders.  I'd stand the sheet up vertically, then climb up to my platfrom and lift it straight up and out the top.  This was just plain TOUGH.  Still, I got it done.  Once I had the sheets on top, I tacked them down as well.

At this point, everything lined up okay, so I climbed up on the roof and went to town with my hammer, driving nails every six inches into the trusses.  That roof is NOT coming off.  :)

At that point I was exhausted, so I opted to do the tarpaper this weekend.  I put up my tarp, cleaned up the yard, and tossed all the shingles into my truck:

Unfortunately I won't be able to get to the dump for a few days.  On the bright side, I'll have excellent traction if it snows!
So, this weekend I need to add the roof peak, tarpaper the roof, fix the doors, trim the whole thing, and caulk all the joints.  Hopefully the weather will hold!

Offline Darren

  • Madmodder Committee
  • Hero Member
  • *****
  • Posts: 3795
  • N/Wales
Re: New Shed build log
« Reply #20 on: February 01, 2010, 08:17:54 PM »
Blimey, you did all that by yourself ... better man than me  :clap:
You will find it a distinct help… if you know and look as if you know what you are doing. (IRS training manual)

Offline jamoni

  • Jr. Member
  • **
  • Posts: 71
Re: New Shed build log
« Reply #21 on: February 01, 2010, 08:34:50 PM »
Darren, until I get this done, I can't do any machining or work on my motorcycles.... so you could say I'm motivated.  :)

Offline dsquire

  • In Memoriam
  • Hero Member
  • *****
  • Posts: 2275
  • Country: ca
  • Kitchener, Ontario, Canada
Re: New Shed build log
« Reply #22 on: February 02, 2010, 12:06:00 AM »
 jamoni

By the looks of your progress today by yourself, I would say that you must be very motivated. Just think how nice it will be in a couple of weeks to be working in a toasty warm shed on your bikes and machines. Just be sure to work safe while finishing the shed.  :ddb: :ddb:

Cheers  :beer:

Don
Good, better, best.
Never let it rest,
'til your good is better,
and your better best

Offline tinkerer

  • Sr. Member
  • ****
  • Posts: 283
Re: New Shed build log
« Reply #23 on: February 02, 2010, 12:22:13 AM »
Super job there. Glad the weather held out for you. It is no longer a shed, it is now a shop. If you can find a horse shoe, hang it over your door with the  "U" up to hold the good luck in.
Tink

The desire accomplished is sweet to the soul.
Prov 13:19

Offline Stilldrillin

  • Global Moderator
  • Hero Member
  • *****
  • Posts: 4972
  • Country: gb
  • Staveley, Derbyshire. England.
Re: New Shed build log
« Reply #24 on: February 02, 2010, 03:51:17 AM »
Very nicely & quickly done there.......  :thumbup:

David D
David.

Still drilling holes... Sometimes, in the right place!

Still modifying bits of metal... Occasionally, making an improvement!