Hi, Happy New Year to you all.
I feel Ive made a pretty big step in the right direction over the weekend. On the off chance that it was open, I rang the metal place on Sat morning as we needed to go into town to find a new internal door. We can feel the draught from the utility room when in kitchen with this cold weather - the previous owners, for reasons only known to themselves took off the door and put it in the garden! Anyway, the metal place was open, so I got enough metal to do a new piston / valve for this engine and make two 'poppin' engines! Not bad for £16 squid, I like the fact that I can just work direct to proven drawings with known materials at that price.
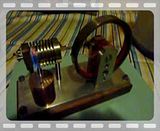
Anyway, digressing again, I will just call the piston and valve pistons from now on as its annoying the heck out of me! I was allowed into the garage on Saturday afternoon to make new pistons from the cast iron bar as I couldnt wait! I made them as good a fit as I could. That was the same dimensions as the alloy ones I made. They felt slightly sticky at first but a few strokes up and down in the cylinder knocked any high spots off. Im sure people have got better fits than me, but I dont think Ill get them any better. The bore of the cylinder and the surface of the pistons werent polished, I didnt do any lapping this time, the bore was reamed with an adjustable reamer with plenty of oil and the pistons were just turned with new carbide cutting tool with the slowest feed. They both have a very smooth feel to them and I think better like that than if I tried to lap them and make them not parallel or round.
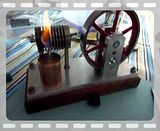
I carefully cleaned and assembled the new components and spun the engine over with a flick of the flywheel it ran very freely but made a nice sucking noise as with the alloy pistons. So I decided to try it. I warmed the cylinder with a pencil torch first then lit the meths burner. I was shocked when the engine started to pick up on its own. This was with the original cast iron flywheel incidentally. I watched in awe for a few seconds then rushed for the camera but by the time I got back it was slowing down and came to a halt. There was now some friction present, the meths I am using seems to put a nasty brown deposit on everything. So I tried some 3 in 1 oil but immediately noticed as a lot of people have said, it caused too much drag.
At this point I had arranged to go to a friends, but I went with a spring in my step and couldnt stop thinking about it I cant be far away.
Ive had another couple of chances to try running it since. One session late that night when I got back, and one on Sunday afternoon, both not totally successful though unfortunately.
Here is a short video from the first:
I seem to have found the optimum flame position for mine, which is very strange its actually the other side of the port which is bizarre. The next best position seems to be where Jan Ridders suggests and Bogs positioned their flames but it doesnt seem as good there, the flame gets blown about more.
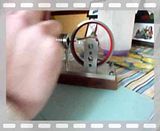
Another thing I tried was changing the flywheel to the alloy one. That doesnt seem to have enough inertia. It wont carry it to the next stroke more than a couple of times and sort of kicks back. But maybe the big one still has too much not sure, I dont think so otherwise it wouldnt run for as long as it did probably? I dont want to take anything off the flywheel anyway because I cant add it back on!
The engine seems to run for only around 30 seconds before it gives up the ghost. I think there are a couple of reasons for that, 1 is the deposit I am getting from the meths. I need to try to get hold of some denatured alcohol which is supposed to be better in that respect. The other thing is, as everybody has mentioned, they are very sensitive to flame position and the flame getting out of shape. Ive noticed that I am using a wick ½ the diameter of what Jan suggests. Only 4mm instead of 8mm. That larger width of flame might give it more stability.
Here are two more runs, please excuse the noise from the kids they werent aware of the significance of this moment in my life! I was going to try and edit these for the best bits but might as well show them warts and all incase anybody picks up on anything.
In the last video, when I start it the final time, you can actually see the engine accelerate a little when I shoved the burner right into that corner in front of the port. This pleased me somewhat. Also in the last two videos I was using some very light oil which worked wonders on my stirling engine. Trouble is, I dont really know what it is, it came with some electric hair clippers! The oil seems to prevent build up of the residue whilst maintaining a good seal and keeping friction down when hot.
So a couple of things I am thinking are:
1. I really need a larger diameter wick, so Ill make a new burner cap with larger wick tube.
2. I need to try some denatured alcohol if possible, hopefully without nasty residues.
3. Could I make a drip feed oil cup at each end of the cylinder like poppin has. The author of that article swears blind the oil feed is necessary, he suggests sewing machine oil. Marv has also backed this up with Poppin. Mine does seem to like the oil. When it stops and I re-apply a couple of drops of oil, it restarts again no trouble and doesnt get snarled up with residue. However, the denatured alcohol may solve that, or a special gas burner like Bogs suggested earlier in the thread.
Im feeling a lot more optimistic now, still some way to go but some encouraging progress. Thanks to all for your interest and input.
All the best.
Nick


