Author Topic: Making a tapping stand  (Read 6853 times)

Offline kvom

  • Hero Member
  • *****
  • Posts: 520
Making a tapping stand
« on: August 07, 2009, 08:42:26 PM »
Based on many comments here and elsewhere, and seeing some others' stands, I decided I need one before tapping one more tiny hole.  While I intend to build a "standalone" stand, today's effort gets me a good part of the way and yields a functional tool.

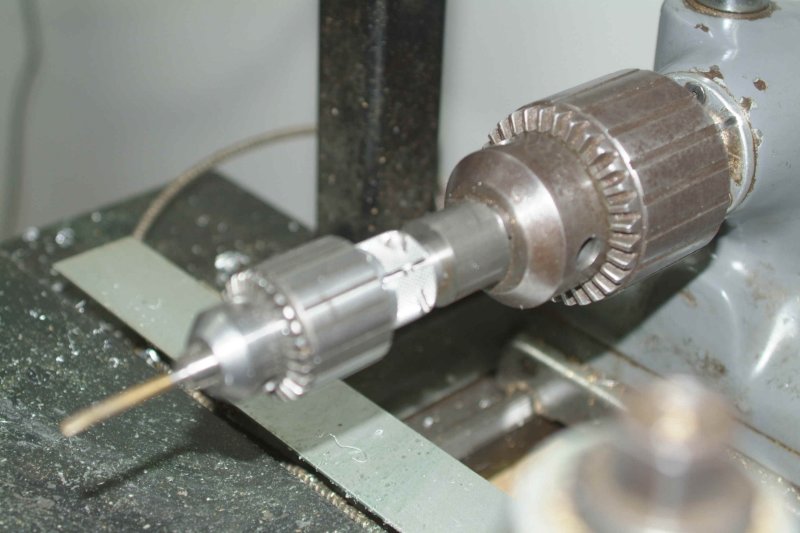
I recently purchased a 0-1/2" keyless chuck for the mill, so I had a spare 0-3/8" keyed chuck available.  It has a straight 1/2" shank that I held in the mill wth a collet.  The first job was to make a way to turn it with a tap chucked.  This was made from 1" aluminum round, knurled and split, with a 6-32 locking screw.  Then I took a 3" piece of 1" aluminum round bar, turned down one end to 3/4" to fit in a R8 collet, and drilled/reamed a 1/2" hole through.  Here's the pieces:


With the round bar held in the mill spindle, I slide the chuck shank up into it and move the piece to be tapped underneath.  Here I'm tapping the top of one of my new engine columns.


The chuck can also be used on the lathe, as the bushing I made for the diestock is also bored 1/2":


The next phase will be to make something similar to what Stew built, shown on another thread.
It might be a bit better if the knurled ring were a bit larger, but

bogstandard

  • Guest
Re: Making a tapping stand
« Reply #1 on: August 07, 2009, 09:43:49 PM »
Very nice indeed Kirk.

You would find that with say a 2" diameter knurled ring, as you are contemplating, the fingertip 'feel' that you get would be much improved.

I have even seen them with instead of a knurl, the ring would be much narrower and have a groove machined in it, and an o-ring fitted as the friction grip.

Here is another one, very similar to yours. Go down to the last article, there are even some plans you can get.

http://www.floridaame.org/HowTo2.htm


John

Offline sbwhart

  • Global Moderator
  • Hero Member
  • *****
  • Posts: 3530
  • Country: gb
  • Smile, Be Happy, Have Fun and Rock Until you Drop
Re: Making a tapping stand
« Reply #2 on: August 08, 2009, 01:53:21 AM »
Hi Kirk

Nice job  :thumbup:

Its well worth the effort making simple tools like this it improves the quality of your work no end, and it saves on tool breakage.

Have fun

Stew
A little bit of clearance never got in the road
 :wave:

Location:- Crewe Cheshire

Offline kvom

  • Hero Member
  • *****
  • Posts: 520
Re: Making a tapping stand
« Reply #3 on: August 08, 2009, 07:20:17 PM »


Phase 2 of the project occupied the afternoon.  Thursday at school I noticed a big chunk of aluminum in the scrap bin, and when I asked to take it home I got it.  Overall it was 6.25" square by 2.5" thick.  I flycut the top and bottom, machined  the 4 sides with a 3/4" endmill to remove saw marks, and then deburred all the edges and filed off the sharp corners.

One face had some holes threaded 1/2-13, which is the same as the rods in clamp sets.  I tried a rod in the holes, but the fit was very loose and not perpedicular.  So I drilled/reamed a 3/8" hole 2" deep to accept a length of drill rod.

The cross bar started as some 1" round rod scrap that had been partially turned.  I turned it down to 7/8" on the lathe so that it would fit in a 5C collet.  Then I was able to mount it in a square collet block with material exposed on each end.  Putting the block in the milling vise the collet block allowed me to drill the 3/8" and 1/2" holes parallel to each other, and the 6-32 clamp screw perpendicular.  I cut the slot with a 1/8" endmill.

It's a very rigid setup, and the base is quite heavy.  I still want to find a knob to screw into the end of the drill chuck's shank.