Author Topic: Electric etching  (Read 45736 times)

Offline Joules

  • Hero Member
  • *****
  • Posts: 1276
  • Country: gb
Electric etching
« on: February 24, 2015, 11:22:40 AM »
Moved from Rob's Forge thread as it was getting off the topic as pointed out  :palm:  Like we ever get side tracked....


Just had 5 mins whilst the wife is out, so etching the dogs bowl in the kitchen was a go.  I used a 12v power supply salt water solution applied with cotton bud.


I just grabbed some packing tape and a blade to make the mask.  I got the polarity wrong so loaded the cotton bud with copper before I reversed polarity and forgot to change bud, hence the copper plate, might be useful in the future ?


Clean up and buff with a Garryflex block.  I really didn't know what result I was going to get so its nothing fancy.   It really was so simple to do, with proper stencils I can see this being useful for marking tooling or even applying a surface finish.  A new skill learn't....   Result   :thumbup:

p.s   Just watch the chlorine fumes coming off.
Honour your mentors, and pay it forward.

RobWilson

  • Guest
Re: Electric etching
« Reply #1 on: February 24, 2015, 12:42:53 PM »
Hi  Joules , was the dog impressed ?  :lol: :lol: :lol:


Good to see you gave it a try  :thumbup:  , vinyl art work would make a good mask .

Are You going to develop  the process ?


I see your a fellow Garryflex user  :dremel: , there great to have around the shop , I cut mine up to make all shapes and stick bits to lolly sticks .


Cheers Rob


PS I dont mined my thread going south  :med:

Offline Joules

  • Hero Member
  • *****
  • Posts: 1276
  • Country: gb
Re: Electric etching
« Reply #2 on: February 24, 2015, 12:54:44 PM »
He wasn't chuffed as he thought he was going to get a bonus feed.  He also looked somewhat suspicious of his Dad hooking his bowl upto cables    :zap:

As it happens I have a vinyl cutter on hand, so YES I will be trying some more fancy stuff and try etching with other acids, citric, vinegar and anything that is less likely to raise eyebrows as I dispose of it.  I even tried a Sharpy to mask but the result was not as good as an etch resistant pen.
Honour your mentors, and pay it forward.

RobWilson

  • Guest
Re: Electric etching
« Reply #3 on: February 26, 2015, 02:17:02 PM »
Hi Joules , this looks interesting , I may make one ,canny wee project  :dremel:.

http://www.logiudicecustomknives.com/knifeshop/etcher/


This video uses same.


Seams to get good results  :thumbup:

Rob

Cheers for fixing vid  Don
« Last Edit: February 26, 2015, 05:12:55 PM by RobWilson »

Offline Joules

  • Hero Member
  • *****
  • Posts: 1276
  • Country: gb
Re: Electric etching
« Reply #4 on: February 26, 2015, 04:36:29 PM »
Cheers for the link Rob,  I have been playing with household acids with mixed results.  Can't beat saltwater on steel for results.


Could I be so cheeky to ask of you a master class in deep etching like you do with your name plates, they are just great and something I would like to do here. 

The above etch tests are on stainless steel using masking tape for the stencil.  The J stencil lifted and got some pitting as I hovered the bud in the water.  If you keep pressure on the tape with your damp cotton bud the etch doesn't creep under the edges as I thought it would.  Literally I only kept the bud on for 3-4 seconds then moved along the mask, did this for a couple of minutes to get a deep etch.  I used a Sharpie to highlight the etch as the above electric spark hardly shows on camera.    Damp is better than wet, use a bit of stainless tig rod to apply current and pressure to the cotton bud, so you don't rot your croc clip.   
Honour your mentors, and pay it forward.

RobWilson

  • Guest
Re: Electric etching
« Reply #5 on: February 26, 2015, 05:08:26 PM »
Hi Joules

That slash looks fairly deep  :thumbup:

I just used a bowl of warm 50 deg C  Ferric Chloride ( no  :zap: needed) , chuck the part in that for an hour  :) . I will do a how to with photos .


Rob

Offline vtsteam

  • Global Moderator
  • Hero Member
  • *****
  • Posts: 6466
  • Country: us
  • Republic of Vermont
Re: Electric etching
« Reply #6 on: February 27, 2015, 10:26:11 AM »
If you're doing an electric etch and using common materials like salt for the electrolyte and the amount of etched surface is large (as on a nameplate) vs small (as initials on a bowl or countertop) immersing the object in a dish of the electrolyte would seem to make sense, rather than using an electrified brush.

Masking is only as good as the mask is, and as the etch goes deeper, there will be a tendency to undercut the mask -- but how much will also depend on the etching method, etchant strength, whether there are bubbles and/or circulation, temperature, time to etch, depth, and in electro-etching, the current flowing. In other words, there's a lot of things to play with, and I bet experience with one or the other will gradually refine towards a method that suits a particular person's aims. You're doing exactly that with experimentation.  :thumbup:

The etches look great, btw!
I love it when a Plan B comes together!
Steve
https://www.youtube.com/watch?v=4sDubB0-REg

Offline Joules

  • Hero Member
  • *****
  • Posts: 1276
  • Country: gb
Re: Electric etching
« Reply #7 on: February 27, 2015, 11:16:38 AM »
A bit of work in progress.  To advance things on a bit from cotton buds I have just printed a carrier on the works 3D printer that uses an O ring to hold a cotton wool pad.  The under side of the carrier takes a stainless steel insert thats wired through the handle.  Just a bit neater and should work nicely with some small stencils I have in mind.


On the to do list is etching a stainless plate in a saline bath to find out what combination of time and voltage works best.   
Honour your mentors, and pay it forward.

Offline vtsteam

  • Global Moderator
  • Hero Member
  • *****
  • Posts: 6466
  • Country: us
  • Republic of Vermont
Re: Electric etching
« Reply #8 on: February 27, 2015, 11:52:52 AM »
Deluxe!  :beer:
I love it when a Plan B comes together!
Steve
https://www.youtube.com/watch?v=4sDubB0-REg

RobWilson

  • Guest
Re: Electric etching
« Reply #9 on: February 27, 2015, 02:02:46 PM »
To advance things on a bit from cotton buds I have just printed a carrier on the works 3D printer . 


 :jaw:  now thats just showing off  Joules :lol: :lol:  ,mmmmm    why haven't I got a 3D printer  :scratch: anyway ,

I have some fines SS mess that would do for backing the cotton pad , willing to stick a bit in the post if you would like some  :thumbup:


Rob


Forgot :   Print looks cracking  :clap: :clap:

Offline Joules

  • Hero Member
  • *****
  • Posts: 1276
  • Country: gb
Re: Electric etching
« Reply #10 on: February 27, 2015, 02:30:58 PM »
Cheers Rob, I will take you up on the mesh...  Why didn't I think of that rather than a slab of 2mm stainless plate that I am etching all over.
Honour your mentors, and pay it forward.

Offline Joules

  • Hero Member
  • *****
  • Posts: 1276
  • Country: gb
Re: Electric etching
« Reply #11 on: March 04, 2015, 09:05:07 AM »
A big thanks to Rob for the stainless mesh he sent me.  Further to my work in progress I cut a strip of mesh folded it and unravelled the weave to twist a stalk together.


This just gets pushed into the gap where I had intended to use a bit of plate.


Fits nice Rob, should offer me plenty of contact area to spread the charge through the cotton swab.


I had intended a fancy brass crimped ferrel that would take a miniature banana plug.  However a pair of needle nose pliers will allow me to put a croc clip on the bundle of wires.   Time to test it all out.
Honour your mentors, and pay it forward.

Offline John Stevenson

  • In Memoriam
  • Hero Member
  • *****
  • Posts: 1643
  • Nottingham, England.
Re: Electric etching
« Reply #12 on: March 04, 2015, 11:24:45 AM »
Laser can't do vinyl but can do other materials so wonder how that would work cutting stencils ?
John Stevenson

Offline awemawson

  • Global Moderator
  • Hero Member
  • *****
  • Posts: 8977
  • Country: gb
  • East Sussex, UK
Re: Electric etching
« Reply #13 on: March 04, 2015, 11:44:50 AM »
Yonks ago there was a kit that you could buy for marking tools that worked much as this process is doing. The 'stencil' was prepared on a conventional typewriter and looked a bit like waxy paper - certainly as I remember it the typewriter used to get clogged up with the bits that came off.

I've always assumed that where hit by the key the stencil became able to pass the electrolyte
Andrew Mawson
East Sussex

Offline John Stevenson

  • In Memoriam
  • Hero Member
  • *****
  • Posts: 1643
  • Nottingham, England.
Re: Electric etching
« Reply #14 on: March 04, 2015, 11:51:27 AM »
They still do them Andrew Etch-A-Matic or some such, some American company.

I was thinking more on logo's than plain type.
John Stevenson

RobWilson

  • Guest
Re: Electric etching
« Reply #15 on: March 04, 2015, 12:53:21 PM »
Looking very professional Joules  :clap: :clap: :clap:

I hope it works a treat .

Laser can't do vinyl but can do other materials so wonder how that would work cutting stencils ?

So that over grown sandwich toaster of yours cant do vinyl John   :palm: , so what about it the object/area  was painted  ,then laser'd  ,removing the paint and leaving bare metal , would that work?


Rob 

Offline Joules

  • Hero Member
  • *****
  • Posts: 1276
  • Country: gb
Re: Electric etching
« Reply #16 on: March 04, 2015, 01:22:22 PM »
John, you can laser cut masking tape.  Or spray the object with etch primer and laser away does work, we have proof when the laser cutter exceeded its limits and burnt the paint off the frame.  Nice shiny metal was the result.

Work and dog keep interrupting play Rob.  I have some masks drawn up in an art package waiting to be printed on glossy magazine paper and then iron onto metal plate.  Vinyl cutter setup, laptop dead so working on a solution for that.  :palm:

Another long winded solution is to silk screen the masks if many objects, then etch them.
Honour your mentors, and pay it forward.

Offline John Stevenson

  • In Memoriam
  • Hero Member
  • *****
  • Posts: 1643
  • Nottingham, England.
Re: Electric etching
« Reply #17 on: March 04, 2015, 02:13:42 PM »
It can do Vinyl [ PVC ] Rob but it gives off Cyanide gas and hydrochloric acid which when mixed with the water vapour in the air rusts everything away so although it can cut it PVC is a no, no.
John Stevenson

Offline Joules

  • Hero Member
  • *****
  • Posts: 1276
  • Country: gb
Re: Electric etching
« Reply #18 on: March 04, 2015, 02:36:12 PM »
Angled mirror on the bed, hang the vinyl on the wall......   She'll be right   :thumbup:
Honour your mentors, and pay it forward.

Offline vtsteam

  • Global Moderator
  • Hero Member
  • *****
  • Posts: 6466
  • Country: us
  • Republic of Vermont
Re: Electric etching
« Reply #19 on: March 04, 2015, 02:37:09 PM »
Cut a paper stencil, coat metal with photo-resist (ebay) expose and wash away, then electro etch -- same as Rob except he's using a pure chemical etch.

Or, no laser in house? Buy decorative stencils (art/craft store) and use one of those tamping stencil brushes, and tamp paint on in letters or patterns.

Or use an exacto and cut out your own stencils, or vinyl letters. Print first using printer on label paper (or spray re-positionalbe contact adhesive on the back of regular paper) and stick down to your stencil material.

Or make woodcut or linoleum block stamps (or even carve a potato)  transfer oil based ink with brayer to block, and stamp on metal.
I love it when a Plan B comes together!
Steve
https://www.youtube.com/watch?v=4sDubB0-REg

Offline Joules

  • Hero Member
  • *****
  • Posts: 1276
  • Country: gb
Re: Electric etching
« Reply #20 on: March 04, 2015, 03:36:48 PM »
First toner stencil test with the new etching tool.


Sorry about the blurry photo, but you get the jist it etched and blew out the mask.  I used the same power settings for the cotton bud, only this time it pulled 1A through the mesh rather than 20-150mA.  I probably had the etch in the first 3 seconds as the cotton swab showed good colour.  As you can't tell the depth of etch I thought to be safe do 3 more 3 second presses.....   WRONG, with the increased current it cut deep and fast.

I needed a lot of heat to get the stencil to stick to the metal having first cleaned it with acetone.  The paper was out of a glossy mag and I set the laser to full toner (not ECO).  I printed a few tests on the page so will try again with just a 3 second press next time, then more at different voltages.  I had to touch up the toner on the metal with some nail varnish to fill holes where the toner didn't stick so this may also have contributed to the pitting around the mask.

All said I have a useable mark, more stencil work required.

The etch is 20mm x 12mm for scale.
Honour your mentors, and pay it forward.

RobWilson

  • Guest
Re: Electric etching
« Reply #21 on: March 04, 2015, 03:44:04 PM »
 :clap: :clap: :clap: :clap: way to go Joules 

Looking good :thumbup:

Rob

Offline Joules

  • Hero Member
  • *****
  • Posts: 1276
  • Country: gb
Re: Electric etching
« Reply #22 on: March 04, 2015, 05:16:05 PM »
OK, I managed two more attempts though I botched the stencil on the last attempt as I was getting tired.


Image on the left is the toner stencil with added nail varnish to help the mask, further mask provided by sellotape.  I did this one for 3 seconds and noted a much lower current.  It hardly etched and wasn't any good, it was also on the back of the plate so oxide may have worked against me.  I went back to the shiny side for next try.  I rushed the stencil and it needed work as it didn't take as well.  However I again noted less current draw so opted for two 6 second presses with the tool.  The result considering the mask was iffy, are good.  Decent etch depth and hardly any burn through despite everything else.

It really is a case of keep practicing till you get it right.  The tool I made is far more efficient at transferring charge than I expected so everything happens much quicker.  I think the next move will be to crank the voltage down below 9v and see what happens.

The stencil is applied using a model aircraft covering iron set to full, and preheat the back of the plate with the iron before applying the stencil then just press the iron onto the paper.  DON'T be tempted to drag the iron like your doing a shirt, the paper shrinks and moves and you obliterate the stencil.
Honour your mentors, and pay it forward.

Offline Joules

  • Hero Member
  • *****
  • Posts: 1276
  • Country: gb
Re: Electric etching
« Reply #23 on: March 05, 2015, 10:33:05 AM »
Another day another idea....

      I wasn't wow'd by the stencil tests.  I was thinking what I suggested for John Stevenson about laser cutting masking tape, then I thought what about if you spot burn the tape like dot matrix lettering.  Well for us without lasers use a pin on the masking tape.  In my case put a signature on the tape in pen, stretch the tape over a glass then use a pin to poke holes in the tape.
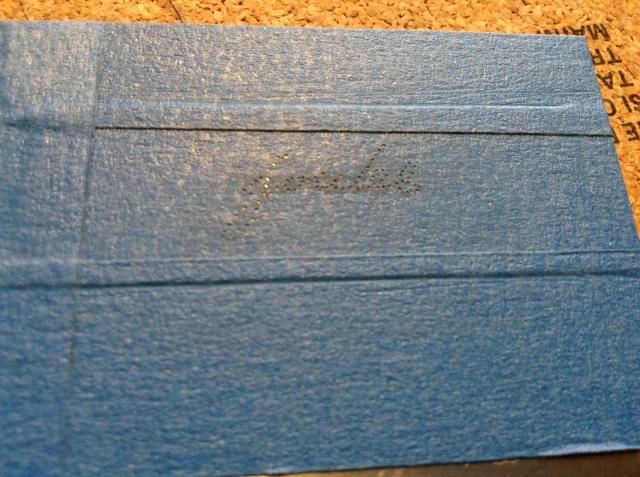


The problem with using a pin is that when you press the tape down, you haven't removed material so the hole can get filled up with tape again.  Still, worth a try.
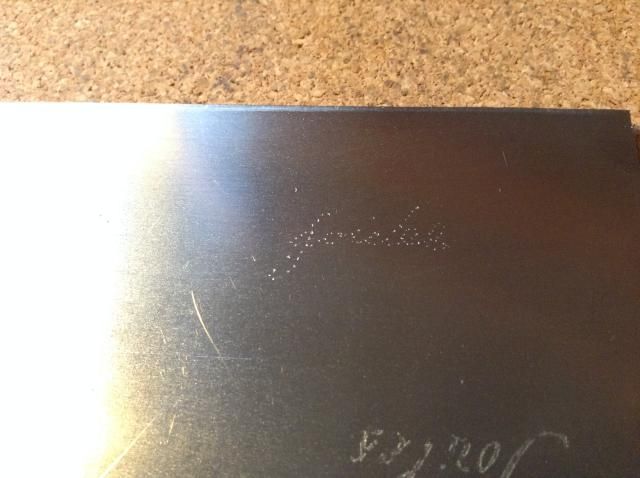


Not too shabby for a first try, you can see some holes failed to etch, but the principle is sound. It took about a minuite to etch in 20 second presses as the contact area is so small.  Having a power supply or meter so you can read current is a must, its the best guide to how your etching is going and what sort of time to apply the tool for.  In this case I was only seeing 10ma, hence the much longer application.   Thinking about it, the wife has one of those fancy sewing machines that can also do a bit or embroidery stitching, including lettering.   Hmmm whilst the cats away could I "empty" stitch the paper tape to make my stencil ???     Sorry guys that isn't going to happen any time soon as you would never get to see the results or ME again.

 
Honour your mentors, and pay it forward.

Offline vtsteam

  • Global Moderator
  • Hero Member
  • *****
  • Posts: 6466
  • Country: us
  • Republic of Vermont
Re: Electric etching
« Reply #24 on: March 05, 2015, 11:03:32 AM »
My mother used to do etching. We lived in a studio and there was a big etching press right in the middle of the living room. Traditional etching uses a ground which is scratched away with a needle. The ground is made to be able to scratch without tearing, to leave a clean line. So Joules you're doing something like that with the masking tape and poking holes in it with a needle, but perhaps there is a way to do that with a better ground. I believe common materials back then were rosin, pitch, beeswax etc. and I'm sure a little research on the art side of things will provide a ton of ideas.
I love it when a Plan B comes together!
Steve
https://www.youtube.com/watch?v=4sDubB0-REg