Author Topic: Cabinets for tooling - restoration  (Read 20649 times)

Offline micktoon

  • Hero Member
  • *****
  • Posts: 797
  • Country: gb
Cabinets for tooling - restoration
« on: August 12, 2014, 07:53:46 PM »
Hi All , I have aquired some tooling cabinets but in a quite rough state so decided to give them the once over, as usual this has lead to a bigger job than first expected, here is the progress so far.
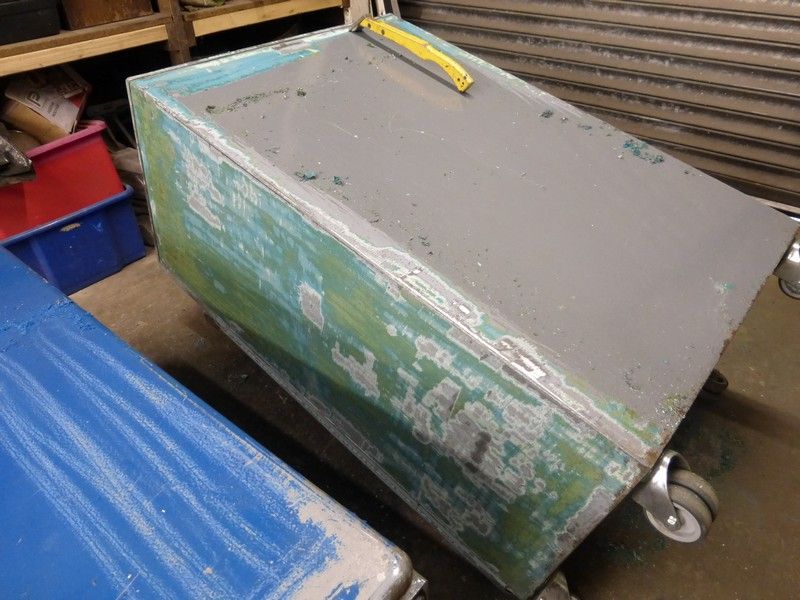
 The photos are after I have steam cleaned about 30-40-50 years of oily crud off them.

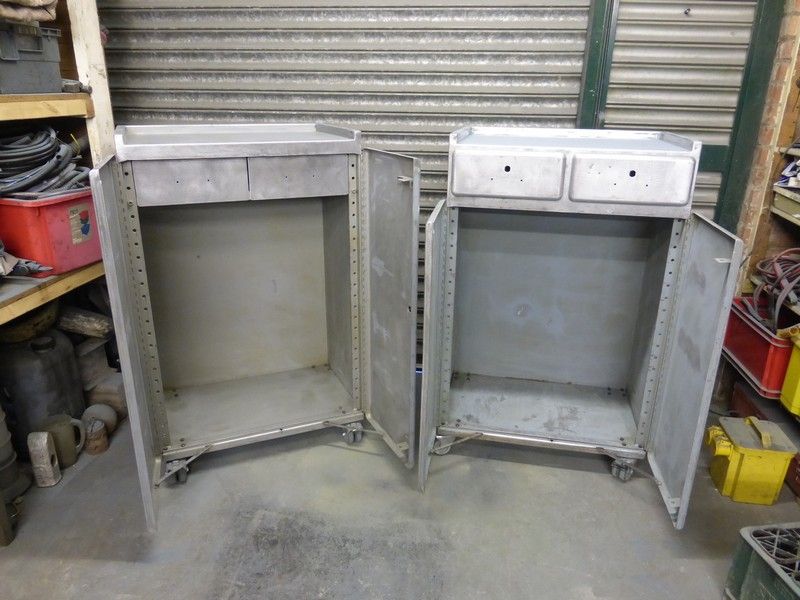
The three cabinets, Grey one far end rough, blue one middle quite rough and the silver one closest not too bad. They are all Versatool cabinets, they seem to go by various names in general. As you can see in the silver cabinet they have swing out shelves, there are boards that fit into the shelf frames with cut outs for collets/ chucks etc, I have shelves and board for all of them. The shelves can also be altered height and gap wise as they fit into the holes on the vertical angle members.


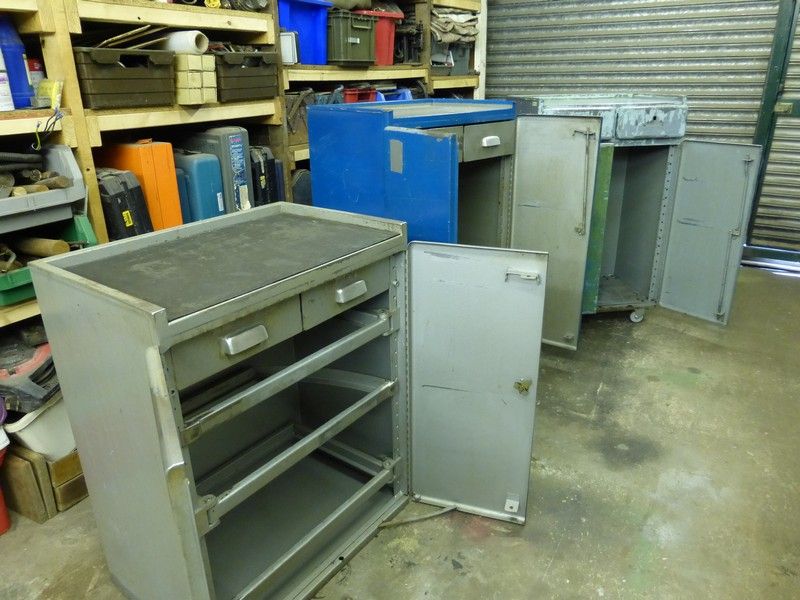
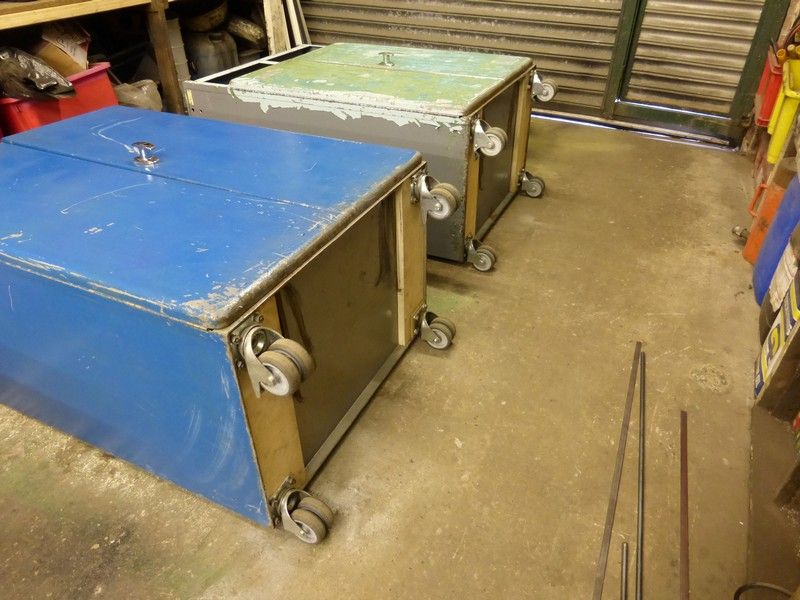
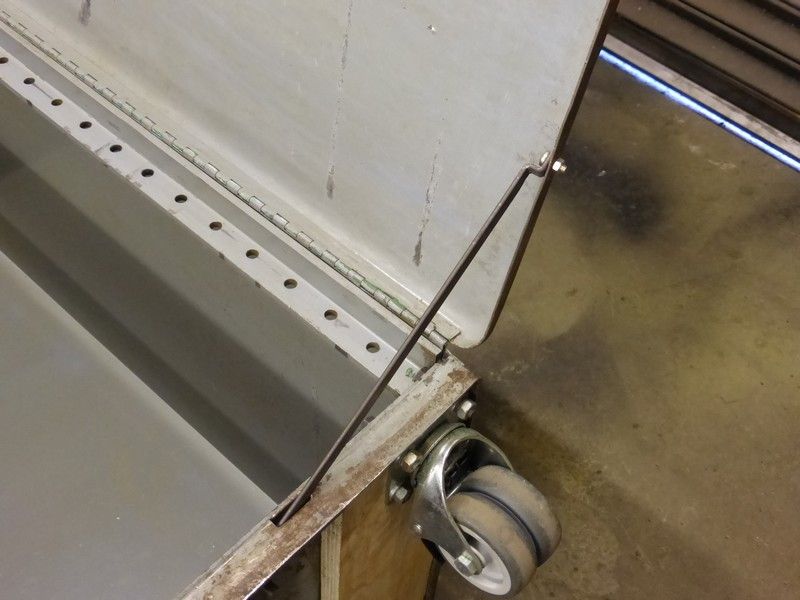
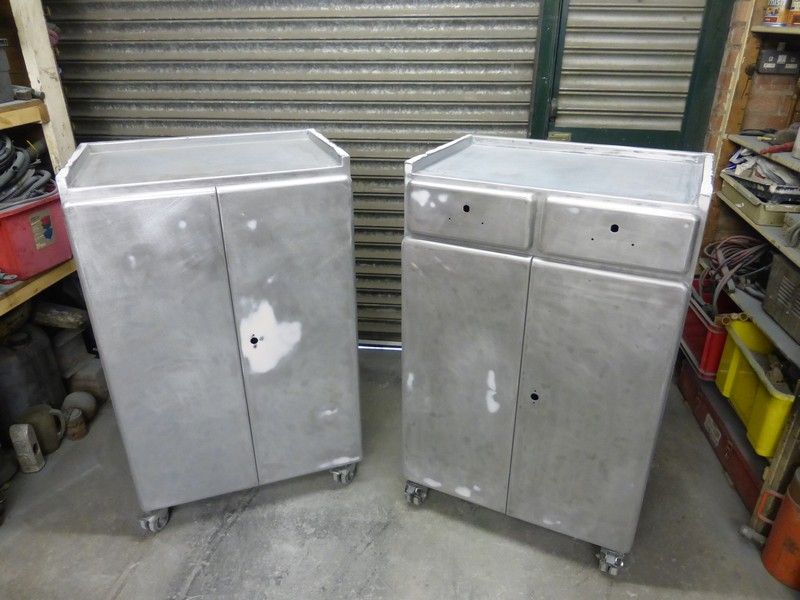
I had got some H/D castors 100KG rating each castor so fitted them to the two tall cabinets, I still need more for the other cabinet, I am trying to get as many things as possible on wheels.


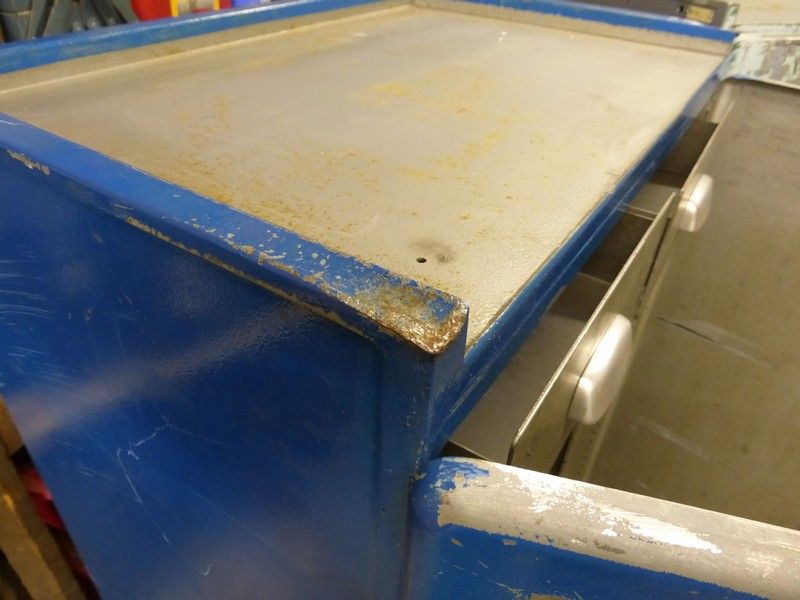
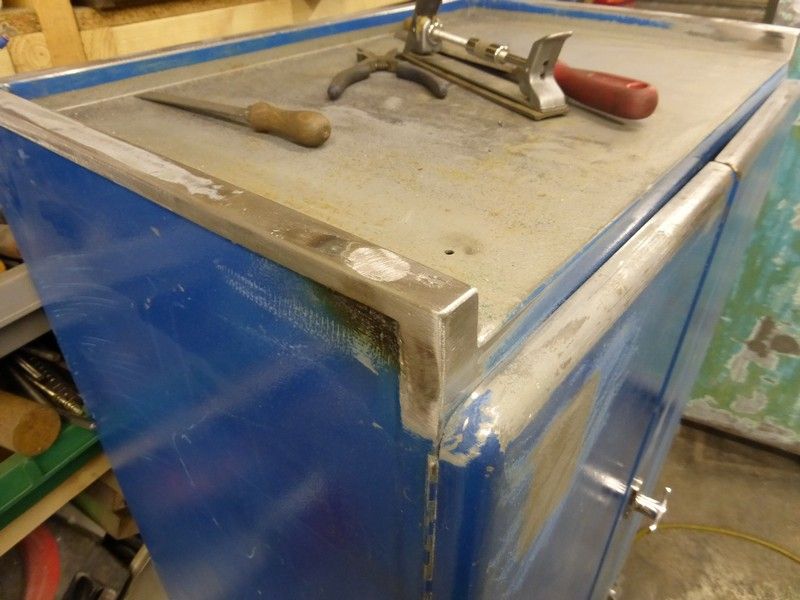
They all have wear and tear issues the worst part being the corners of the blue one, someone has been using the corners as a anvil for removing morse taper tooling probably with a knock out wedge.


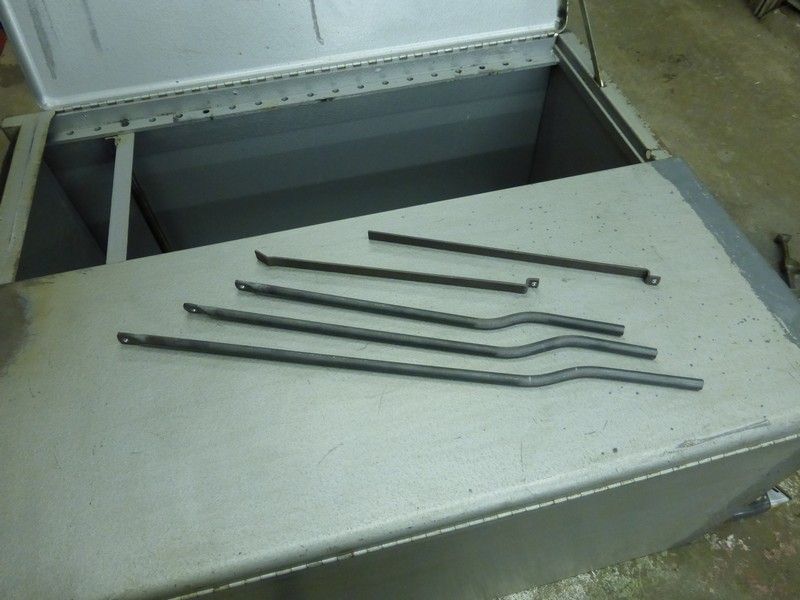
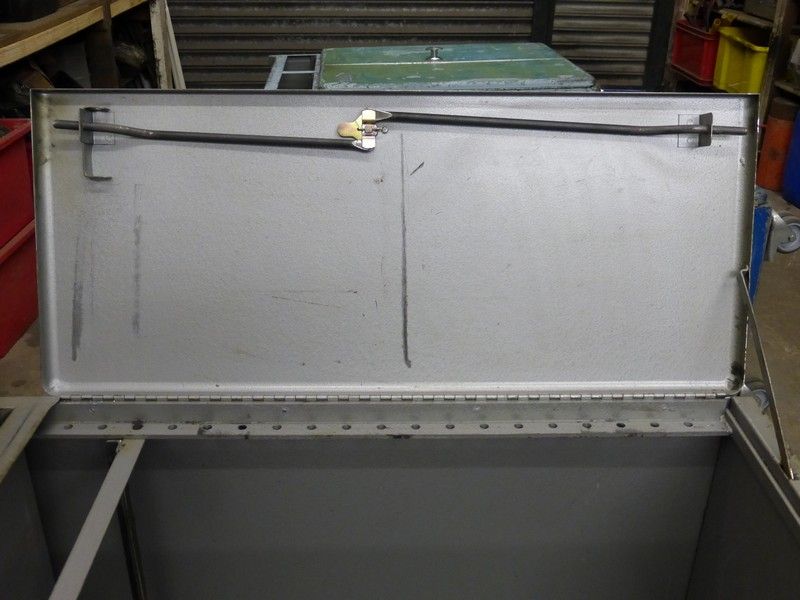
The other thing was missing door locking rods and door stays missing to stop the doors opening more than 90 degrees. I got round and flat bar to make replacements.


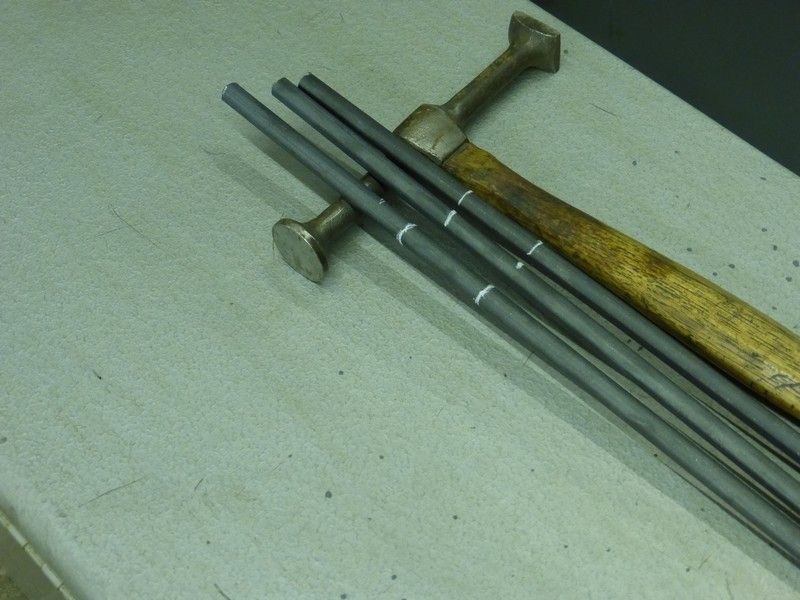
Forged the ends down


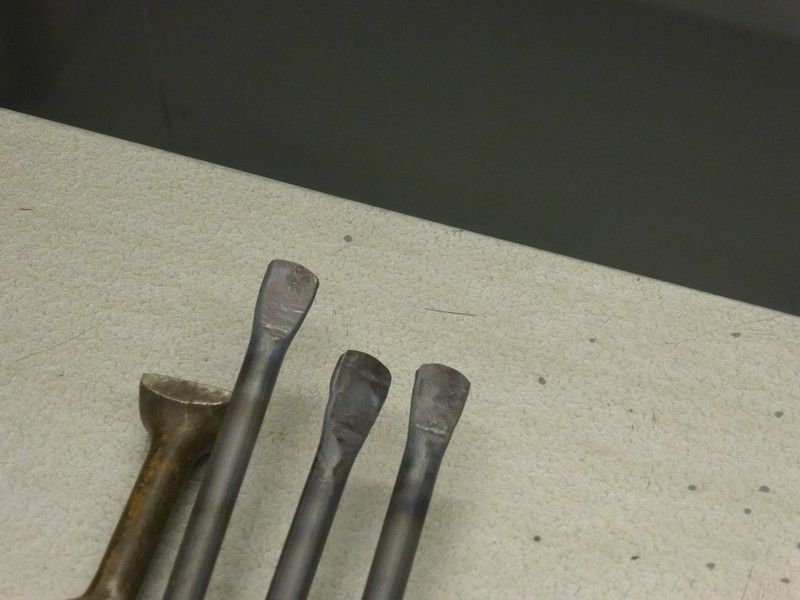
Then bent and shaped the bars to fit.


Seem to do the job ok


Next was the sickening job of paint removal, the grey one had about five layers of old horrible paint, I was going to paint strip it off until I found out the all the nasty chemicals have been removed out of Nitromos paint stripper now so it no longer works. I decided to try a  paint scraper with a carbide tip I got from a car boot sale, it worked but was hard work to say the least.


Next job , pieced in and welded up the damaged corners and a few holes that had been drilled in here and there.


Then hours and hours of DA (dual action) sanding to get all the rest of the paint off, Noisy nasy dirty work but I have had too many nasty surprises with old paint reacting over the years so now just do things that hard way and get to metal when I can.


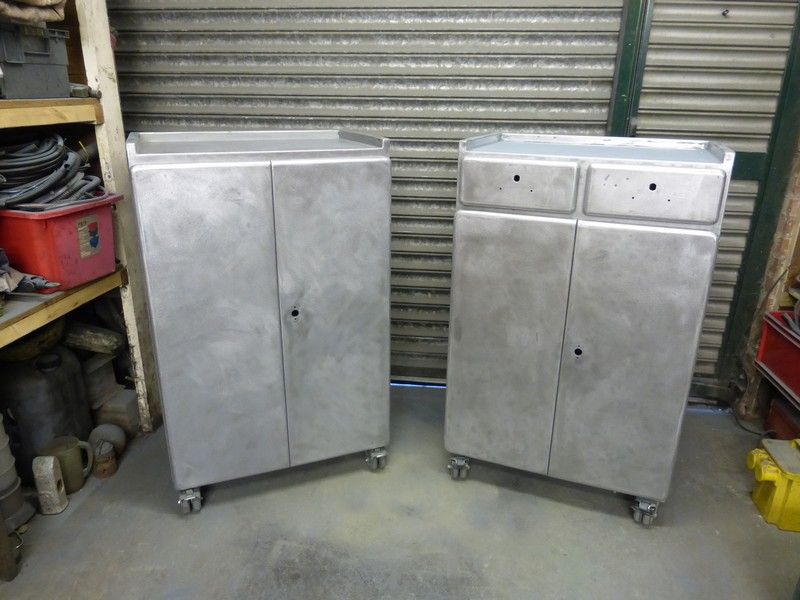
Then filled in any dents and scrapes that were left.


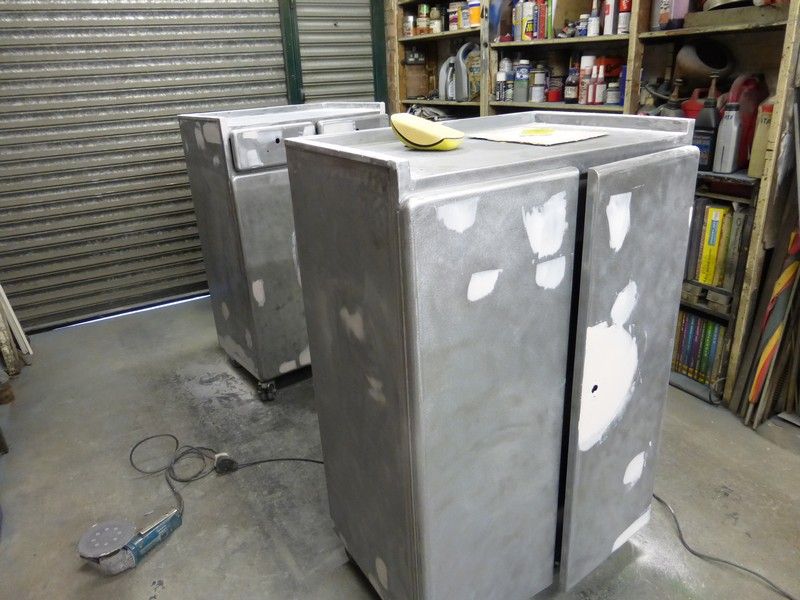
Give them all a sand off and they are ready for primer, well the two tall ones, the smaller silver one is having castors fitted then sanded but this one should just need a good sand off as is in better condition.


I plan to get the last cabinet up to this stage then have a big tidy brush up of all the dust and mess then start painting.
  Cheers Mick.

Offline doubleboost

  • Madmodder Committee
  • Hero Member
  • *****
  • Posts: 1619
  • Country: gb
  • Newcastle Upon Tyne
Re: Cabinets for tooling - restoration
« Reply #1 on: August 12, 2014, 08:00:00 PM »
Cracking job Mick
They are down to bare metal  :jaw: :jaw: :jaw:
As long as you don't paint the Bastard things green  :lol: :lol: :lol: :lol:

Offline vtsteam

  • Global Moderator
  • Hero Member
  • *****
  • Posts: 6466
  • Country: us
  • Republic of Vermont
Re: Cabinets for tooling - restoration
« Reply #2 on: August 12, 2014, 09:51:22 PM »
I really admire the thoroughness of your rebuilds, Mick. Makes me want to do a better job of things than I do.  :beer:
I love it when a Plan B comes together!
Steve
https://www.youtube.com/watch?v=4sDubB0-REg

Offline awemawson

  • Global Moderator
  • Hero Member
  • *****
  • Posts: 8968
  • Country: gb
  • East Sussex, UK
Re: Cabinets for tooling - restoration
« Reply #3 on: August 13, 2014, 02:39:58 AM »
Yes I very much echo Steve's words Mick. I'm afraid my Versatool cabinets just got grit blasted and sprayed, though I did have to do the same blacksmiths job replacing locking bars etc.

There's a thread on here somewhere about it

Nice job.
Andrew Mawson
East Sussex

Offline Bigbadbugga

  • Full Member
  • ***
  • Posts: 141
  • Country: england
  • Whiston (nr Liverpool)
Re: Cabinets for tooling - restoration
« Reply #4 on: August 13, 2014, 07:17:18 AM »

Mick, next time you need to remove paint like that get some of these, they're ace...

http://www.weldequip.com/cleaning-fleece-115mm.htm

They remove paint at a good rate and leave the metal un damaged, with just a light scouring ideal for a key for fresh paint.
Tools: Boxford CSB lathe, Chester 20v mill, Portamig 185. Lots of ideas, No motivation.

Offline Stilldrillin

  • Global Moderator
  • Hero Member
  • *****
  • Posts: 4972
  • Country: gb
  • Staveley, Derbyshire. England.
Re: Cabinets for tooling - restoration
« Reply #5 on: August 13, 2014, 07:52:14 AM »
"Thoroughness"......

He's right, yer know!  :thumbup:

Blummin well done John!  :clap: :clap:

David D
David.

Still drilling holes... Sometimes, in the right place!

Still modifying bits of metal... Occasionally, making an improvement!

Offline micktoon

  • Hero Member
  • *****
  • Posts: 797
  • Country: gb
Re: Cabinets for tooling - restoration
« Reply #6 on: August 13, 2014, 06:04:09 PM »
Evening lads,
             thanks for the comments  :thumbup:, I have looked for you posts Andrew but can not find them , I could remember there had been a thread about a cabinet getting done in the past. Believe me these would have been getting blasted too if I had the chance lol.
 BBB , I will try them discs next time , I did try something that looked similar on an electric drill years ago and it just wore down in about ten seconds lol  :palm: Looks like they must have improved things over the years I am glad to say, thanks for pointing them out , spreading knowledge is a big part of the forums.

 I have ordered some castors for cabinet 3 so will continue once they arrive.
  Cheers Mick.
 

Offline awemawson

  • Global Moderator
  • Hero Member
  • *****
  • Posts: 8968
  • Country: gb
  • East Sussex, UK
Re: Cabinets for tooling - restoration
« Reply #7 on: August 14, 2014, 03:21:47 AM »
Here you go Mick - blasted and sprayed for you  :lol:

http://madmodder.net/index.php/topic,8741.0.html
Andrew Mawson
East Sussex

Offline Bigbadbugga

  • Full Member
  • ***
  • Posts: 141
  • Country: england
  • Whiston (nr Liverpool)
Re: Cabinets for tooling - restoration
« Reply #8 on: August 14, 2014, 05:46:52 AM »

 BBB , I will try them discs next time , I did try something that looked similar on an electric drill years ago and it just wore down in about ten seconds lol  :palm: Looks like they must have improved things over the years I am glad to say, thanks for pointing them out , spreading knowledge is a big part of the forums.


Yes, they are ok on the flat stuff but not so good if you catch an edge or a burr, then they shred. I use them on car body panels mostly.
Tools: Boxford CSB lathe, Chester 20v mill, Portamig 185. Lots of ideas, No motivation.

Offline PekkaNF

  • Hero Member
  • *****
  • Posts: 2523
  • Country: fi
Re: Cabinets for tooling - restoration
« Reply #9 on: August 14, 2014, 06:46:14 AM »
I have been using some of fleece discs and I have really mixed results. To my IMHO normal electric drill does not spin them fast enough and small angle grinder spins them too fast. I bought cheap angle grinder just a little ago to try about 6000 rpm on this small 115mm? disc.

This new Niromorse is really a joke compared to the old one. Old one stripped steel radiator clean in two goes, new one does not even mat the same paint. Got one different brand on spray bottle - it smelled death and did not do anything to old paint. Then I took one of these disk on fast angle grinder (a more than bit over recommended fleese disk rpm.) and flinged the paint all over cleared kitchen. Shredded the firs disk, learned "soft touch" on the second dic, which stripped the two meter long radiator to bare metal. Took only a fraction of the time compared lookin these "paint strippers" do nothing. There was a learning curve. Slightly slower angle grinder seemed to help, maybe even slower is even better.

Pekka
« Last Edit: August 14, 2014, 10:36:33 AM by PekkaNF »

Offline vtsteam

  • Global Moderator
  • Hero Member
  • *****
  • Posts: 6466
  • Country: us
  • Republic of Vermont
Re: Cabinets for tooling - restoration
« Reply #10 on: August 14, 2014, 10:18:13 AM »
Well Pekka, following on my mention of Fast Orange for removing grease and baked on varnish, I found an orange (citrus oil) based paint stripper called Citri-Strip. And it also really does a good job.

I use it a lot for painted small metal bits/scrap I use for building things.
I love it when a Plan B comes together!
Steve
https://www.youtube.com/watch?v=4sDubB0-REg

Offline chipenter

  • Hero Member
  • *****
  • Posts: 909
  • Country: gb
Re: Cabinets for tooling - restoration
« Reply #11 on: August 14, 2014, 12:01:13 PM »
I use a twisted wire cup brush in an angle grinder , shifts paint and rust no probs .
Jeff

Offline Pete W.

  • Hero Member
  • *****
  • Posts: 852
  • Country: gb
Re: Cabinets for tooling - restoration
« Reply #12 on: August 14, 2014, 04:02:32 PM »
I use a twisted wire cup brush in an angle grinder , shifts paint and rust no probs .

I've tried that method on some jobs in the past.  If the metal is very rusty the wire brush burnishes the steel, smearing it closed over the tops of the pits.  It all looks nice and shiny so you proceed with the painting, only for the rust sealed in the pits to break out later on.  On steel, I've come to favour a more abrasive method of rust removal, followed by a chemical rust killer and then by the paint coats. 
Best regards,

Pete W.

If you can keep your head when all about you are losing theirs, you haven't seen the latest design change-note!

Offline krv3000

  • Hero Member
  • *****
  • Posts: 2183
  • Country: gb
Re: Cabinets for tooling - restoration
« Reply #13 on: August 14, 2014, 05:42:25 PM »
good job mick

Offline PekkaNF

  • Hero Member
  • *****
  • Posts: 2523
  • Country: fi
Re: Cabinets for tooling - restoration
« Reply #14 on: August 15, 2014, 02:55:28 AM »
I use a twisted wire cup brush in an angle grinder , shifts paint and rust no probs .

I've tried that method on some jobs in the past.  If the metal is very rusty the wire brush burnishes the steel, smearing it closed over the tops of the pits.  It all looks nice and shiny so you proceed with the painting, only for the rust sealed in the pits to break out later on.  On steel, I've come to favour a more abrasive method of rust removal, followed by a chemical rust killer and then by the paint coats.

I have to agree with this. When I use rotating wire bruch I use face shield. Why? I always use glasses but I got some feedback when wife had to remove twice same evening a piece of wire flung out of rotary bruch: Easy one was stuck on my eyebrow the subborn one (needed needle nose pliers to remove) was stuck on my fore head.

Wirebrushed and sandblasted needs pretty thick antirust paint on top of them.

Pekka

Offline chipenter

  • Hero Member
  • *****
  • Posts: 909
  • Country: gb
Re: Cabinets for tooling - restoration
« Reply #15 on: August 15, 2014, 05:08:37 AM »
I have also used a wire brush in a dia drinder 32000 rpm , plenty of PPE required and a hat , and the wire brush doesn't last very long , a zink based primer as a base coat to start .
Jeff

Offline vtsteam

  • Global Moderator
  • Hero Member
  • *****
  • Posts: 6466
  • Country: us
  • Republic of Vermont
Re: Cabinets for tooling - restoration
« Reply #16 on: August 15, 2014, 07:32:19 AM »
Tough getting into metal cabinet corners and sheet metal bends with a rotary wire brush. Sooner or later (and often there's a lot of sooner) it gets down to hand work with a scraper and paint remover, and maybe little bits of sandpaper.
I love it when a Plan B comes together!
Steve
https://www.youtube.com/watch?v=4sDubB0-REg

Offline awemawson

  • Global Moderator
  • Hero Member
  • *****
  • Posts: 8968
  • Country: gb
  • East Sussex, UK
Re: Cabinets for tooling - restoration
« Reply #17 on: August 15, 2014, 10:45:27 AM »
nah .......   sooner or later you get to realise the joys of a grit blaster . . . .    soooo convenient  :ddb:
Andrew Mawson
East Sussex

Offline vtsteam

  • Global Moderator
  • Hero Member
  • *****
  • Posts: 6466
  • Country: us
  • Republic of Vermont
Re: Cabinets for tooling - restoration
« Reply #18 on: August 15, 2014, 06:01:15 PM »
Well, yah, if I had that I wouldn't be using a sander or brush in the first place!
I love it when a Plan B comes together!
Steve
https://www.youtube.com/watch?v=4sDubB0-REg

Offline DavidA

  • Hero Member
  • *****
  • Posts: 1219
  • Country: gb
Re: Cabinets for tooling - restoration
« Reply #19 on: August 16, 2014, 07:04:52 AM »
Mick,

I take it that the panel beaters hammer,  shown with the steel bars prior to forging,  was just for show. I can't imagine a skilled man such s yourself actually hammering the bars down using a planishing hammer.

The hammer I was always told NEVER to beat anything but a panel with.

Dave :bugeye:

Offline micktoon

  • Hero Member
  • *****
  • Posts: 797
  • Country: gb
Re: Cabinets for tooling - restoration
« Reply #20 on: August 17, 2014, 10:12:19 AM »
Hi David ,
                   You are right I had just been knocking some dents out with that hammer and those bars kept rolling about so just used the hammer to keep the bits of bar in place to take photo I used a heavy blacksmiths type hammer to forge the ends of the bar   :thumbup: 
  I always buy hammers when I see them so have no excuse for using the wrong hammers lol.

 Cheers Mick

Offline micktoon

  • Hero Member
  • *****
  • Posts: 797
  • Country: gb
Re: Cabinets for tooling - restoration
« Reply #21 on: August 18, 2014, 06:41:12 PM »
Hi Lads , got a bit more done with the cabinets. Number 3 cabinet has castors fitted, also been stripped and dents knocked out and filled etc, this was the best condition cabinet but some how seemed to take just as long to do as the other two. I had a major job sweeping dust etc up and getting the loose bits of paint debris blown out/ vacuumed out of the cabinets so there will be a chance of half decent finish without lots of bits in the paint.

  Anyway here are the three lined up all dusted off , blown out with the air line and ready for primer, the draws are balanced on top of them but can not really be painted in place or balanced on the units in any way so will do them on the floor.


 So far so good, all primed inside and out, including the draws. Its not ideal doing all three like this space wise but too much hassle to do them one or two at a time then do it all over again.  The draws will have to be laid out better for top coat, the other round thing is an unbreller stand that was looking rusty so hit that with primer too and will do it black with the shelves.


 Hopefully after a slight sand tomorrow they will be getting top coat on.

 Cheers Mick.

Offline doubleboost

  • Madmodder Committee
  • Hero Member
  • *****
  • Posts: 1619
  • Country: gb
  • Newcastle Upon Tyne
Re: Cabinets for tooling - restoration
« Reply #22 on: August 18, 2014, 06:50:15 PM »
Looking great
Be spot on in Grey  :D :D :D :D :D :D :D :D
John

Offline Ginger Nut

  • Full Member
  • ***
  • Posts: 232
Re: Cabinets for tooling - restoration
« Reply #23 on: August 18, 2014, 07:22:46 PM »
They are looking first class

I reckon a nice camo green/brown might look good Mick

But a bright blue hammer tone, you could go clinical white

Offline awemawson

  • Global Moderator
  • Hero Member
  • *****
  • Posts: 8968
  • Country: gb
  • East Sussex, UK
Re: Cabinets for tooling - restoration
« Reply #24 on: August 19, 2014, 02:31:03 AM »
Iron grey please Mick so they match my pair. Then put them on a pallet and I'll get them collected  :lol:
Andrew Mawson
East Sussex

Offline PekkaNF

  • Hero Member
  • *****
  • Posts: 2523
  • Country: fi
Re: Cabinets for tooling - restoration
« Reply #25 on: August 19, 2014, 03:40:03 AM »
Looks really nice.

What paint, gun and setting you used? Normal fogger or HVLP?

How did the inside corners go, I always have trouble with them.

I like light colors inside the cabinets, othervice is too damn gloomy to find anything without good light.

Pekka

Offline micktoon

  • Hero Member
  • *****
  • Posts: 797
  • Country: gb
Re: Cabinets for tooling - restoration
« Reply #26 on: August 19, 2014, 04:16:28 AM »
Hi Pekka, the spray set up is normal Devilbliss JGA type gun at about 60 psi I think , to be honest I just alter settings until it feels right, the paint is 2 pack primer which sprays on nice and 'wet' so goes into the corners quite well. Something I have found to work quite well is to turn the pressure down a bit and close the fan pattern down on the gun so its more of a large spot you are spraying and go around the corners first as it will not blow back as much so will go into the corners, once you have them done put your settings back to normal and spray the rest sort of ignoring the corners. The corners will already be covered and the surrounding paint should do the remaining surfaces and blend into the corners. Hope this helps.

Cheers Mick

Offline PekkaNF

  • Hero Member
  • *****
  • Posts: 2523
  • Country: fi
Re: Cabinets for tooling - restoration
« Reply #27 on: August 19, 2014, 06:16:15 AM »
Thank you, That helps a lot.

You have a really nice gun. It's real HVLP, isn't it?
http://www.devilbiss.com/products/spray-guns/manual-spray-guns/hvlp/jga-510-suction-feed

Heard nice things about it.

I still have old school paint gun that needs a lot of fiddiling with fan control to spray well corners. I normaly start with hose pressure 3 bars (closer to 2 bars on gun after watertrap, hose, connectors and such), adjust the fan until get right "look". You are right on inside corners, but on old gun when you reduce fan you get really big droplets flung on surface, I need to get down on pressure and such....

Pekka

Offline micktoon

  • Hero Member
  • *****
  • Posts: 797
  • Country: gb
Re: Cabinets for tooling - restoration
« Reply #28 on: August 20, 2014, 10:14:27 AM »
 Hi Pekka, Yes that looks like the one, as you can see mine is an old one , I think I will have had it 25 years, the needle and air cap do make a difference, I have three guns two like this one and one is a blantant copy of this gun with no name on it but still is a good gun. That one his used for primer and has standard needle and air cap, this one is for top coat and has standard needle but alternative air cap that gives finer particles in the spray ( its in the pot steeping , in storage ) the third one is for metalics and has another diffrent needle in it but uses the same air cap as the top coat one.
  I was recommended these set ups years ago from a paint sprayer and it seems to work well, I used to get too much orange peel effect on the top coat and patchiness on metalics until I used these needles and air caps.


 hope this helps you

 Cheers Mick

Offline micktoon

  • Hero Member
  • *****
  • Posts: 797
  • Country: gb
Re: Cabinets for tooling - restoration
« Reply #29 on: August 20, 2014, 10:49:41 AM »
Well the top coat is on.......John will be gutted but its Machine Green not grey :bugeye: , I have most shelves , cupboards and quite a few things this green in the workshop so am sticking to it, except for a few machines that should be grey like the Harrison lathe, anyway the world is too grey in general so green is more cheerful and classy  :thumbup:

  One thing with the green is its a nightmare to get a photo showing what the colour actually looks like, I dont think any of these shots are spot on colour wise and these are the best of the bunch.

 All cabinets , lightly sanded, wheels masked off and the floor swept then wet to try to keep the dust down.


 I was getting pushed for space really as I was close to the next cabinet when spraying so had to be carefull where I was and also the air line and I use a lamp to shine on the area as the light not too good for spraying, The draws were also a bit dodgy for balance and getting knocked so it was just a case of be careful and keep to the system of working around the items. This is the first light coat of green.


Looking a bit more green after two coats.


This is them after three coats and the draws have dried enough to be carefully balanced back into the cabinets, I had a 5 litre tin of paint and its used 4 litres to do the three cabinets ! , spraying the insides and draws seems to eat the paint but at least they won't rust. The other shots are of the corners that were musroomed over and damaged. Overall they have came out fine , not as good as you would like if it was your classic car pride and joy but they are green and shiny.


I have sprayed the door locking rods silver and got them fitted along with the draw handles , locks etc.  I have to work out the best way to do the shelves now , I think I might spray the shelf frames and drill / cut the old wood shelf incerts to fit collets etc then if they work well, I will make some new wood ones. The other thing they need is new plywood tops.

 The phtotos here are more like the colour but still not right really they are actually somewhere in between the last shots above and these more bright ones in reality. Things always look better with a few parts put back on too.


I like the tall cabinet with the external top draws the best as it has a more classic look about it, it would make a nice drinks cabinet for Doubleboost to keep his red wine and Brown ale in !

  Cheers Mick.


Offline vtsteam

  • Global Moderator
  • Hero Member
  • *****
  • Posts: 6466
  • Country: us
  • Republic of Vermont
Re: Cabinets for tooling - restoration
« Reply #30 on: August 20, 2014, 11:25:39 AM »
They look great Mick!!  :bow: :beer:
I love it when a Plan B comes together!
Steve
https://www.youtube.com/watch?v=4sDubB0-REg

Offline Arbalist

  • Hero Member
  • *****
  • Posts: 673
  • Country: gb
Re: Cabinets for tooling - restoration
« Reply #31 on: August 20, 2014, 11:53:20 AM »
Very nice job!  :thumbup:

Offline PekkaNF

  • Hero Member
  • *****
  • Posts: 2523
  • Country: fi
Re: Cabinets for tooling - restoration
« Reply #32 on: August 20, 2014, 01:08:52 PM »
Looks really nice. In some pictures it looks Kelly green.

Pekka

Offline awemawson

  • Global Moderator
  • Hero Member
  • *****
  • Posts: 8968
  • Country: gb
  • East Sussex, UK
Re: Cabinets for tooling - restoration
« Reply #33 on: August 20, 2014, 05:04:55 PM »
Excellent Mick - they really look the business. I've not seen the style before where the drawers are behind the doors. Did that one have the Versatool label on the back with key numbers or is it a clone perhaps?

Andrew Mawson
East Sussex

Offline doubleboost

  • Madmodder Committee
  • Hero Member
  • *****
  • Posts: 1619
  • Country: gb
  • Newcastle Upon Tyne
Re: Cabinets for tooling - restoration
« Reply #34 on: August 20, 2014, 05:10:15 PM »
Very nice Mick :thumbup: :thumbup: :thumbup:
I also like the tall one  :drool: :drool: :drool: :drool:
John

Offline Stilldrillin

  • Global Moderator
  • Hero Member
  • *****
  • Posts: 4972
  • Country: gb
  • Staveley, Derbyshire. England.
Re: Cabinets for tooling - restoration
« Reply #35 on: August 20, 2014, 05:45:16 PM »
Classy, Mick!  :clap: :clap:

David D
David.

Still drilling holes... Sometimes, in the right place!

Still modifying bits of metal... Occasionally, making an improvement!

Offline micktoon

  • Hero Member
  • *****
  • Posts: 797
  • Country: gb
Re: Cabinets for tooling - restoration
« Reply #36 on: August 20, 2014, 05:54:49 PM »
Thanks for the comments lads  :thumbup: ,
                        Andrew they all had the Versatool tags on the back with key numbers, there are two with the internal draws , the shorter of the two had a Bridgeport by Versatool label the other two just had Versatool on the labels. I think the external 'domed' type draws were the oldest and they were probably a cost cutting exercise having the internal flat draws , easier to make and only one lock needed ?

 Cheers Mick.

Offline micktoon

  • Hero Member
  • *****
  • Posts: 797
  • Country: gb
Re: Cabinets for tooling - restoration
« Reply #37 on: August 21, 2014, 06:17:27 PM »
 I have moved onto the next stage of the cabinets, the shelves , which looked not bad until I looked harder, various faults on them some needed shims to tighten up the swing out part so it would not drop when opened , general bent edges etc to be knocked out, the two heavier shelves both had the tabs that stop them swinging too far back into the cabinet snapped off so welded some new stronger tabs on them two.

 You can see the tab on the thinner shelf at the top of the photo but the wider shelves both had these missing, so I cut two bits of plate to make replacements and welded them on beofre starting to prepare for painting.


Most of shelves were finsihed in black crinkle finish paint that was scraped and flaking off on all the front faces, three of them were silver hammer finish that was also coming off, 13 shelves in total to do( 13 unlucky for some , aye me the mug that had the tedious job of preparing these loll ). I hit the flaking bits with a grinder with soft flap wheel type disc on then went over with a DA sander. Took more doing than you would think as fiddly to hold etc. Eventually they were all clean sanded and de greased.


I was then deciding how to paint them ?  due to the frame like nature it was putting me off spraying as too much paint misses the object , you have to keep moving them about etc and lots of mess, I decided to brush some of the areas and then do the rest with small roller. This was a job that you wish you had an apprentice you could get to do. I painted them with two pack primer, so after a good while they looked like this.


I have decided I will spray the black on as could not go through all the brushing again lol thats a job for tomorrow .

 Cheers Mick.


Offline Ginger Nut

  • Full Member
  • ***
  • Posts: 232
Re: Cabinets for tooling - restoration
« Reply #38 on: August 21, 2014, 08:26:50 PM »
Mick they look smik you could always ask the kids to brighten them up a bit and hand them some spray cans let them go to town on them. :poke:


Quote
Hi Pekka, Yes that looks like the one, as you can see mine is an old one , I think I will have had it 25 years, the needle and air cap do make a difference, I have three guns two like this one and one is a blantant copy of this gun with no name on it but still is a good gun. That one his used for primer and has standard needle and air cap, this one is for top coat and has standard needle but alternative air cap that gives finer particles in the spray ( its in the pot steeping , in storage ) the third one is for metalics and has another diffrent needle in it but uses the same air cap as the top coat one.
  I was recommended these set ups years ago from a paint sprayer and it seems to work well, I used to get too much orange peel effect on the top coat and patchiness on metalics until I used these needles and air caps.

Mick this is why I love/d my Sampson one gun one needle one cap does all except heavy undercoat.  I still have the gun but I have sneaking suspicion some mongrel swiped my cap and needle or dropped it. Its done everything from spraying a Mini couple of VW's to a number of buses n coaches one which was Metalic.

Online jb3cx

  • Jr. Member
  • **
  • Posts: 86
Re: Cabinets for tooling - restoration
« Reply #39 on: August 22, 2014, 03:19:05 PM »
Micky looking great ,from the last time I saw them in lambys place ,why don't I just bring my 3 over to you  minus the tooling that's in them and do a swap,as you have more space to clean and paint than me ,and save me the job ,hate painting
Peter

Offline micktoon

  • Hero Member
  • *****
  • Posts: 797
  • Country: gb
Re: Cabinets for tooling - restoration
« Reply #40 on: August 24, 2014, 06:32:15 PM »
Hi Peter , I am sure you will be able to do yours one at a time and manage with the space you have  :ddb: , your new conservatory would make a good spot to do some spraying in too, just wait till your wife is out , she will never know as long as you get cleaned up before she gets back in   :thumbup:
 Hi GingerNut, These guns will do all with the basic air cap and needle too , just do it better with the various other ones , I used mine for everything until I was informed of the additional ones by a full time paint sprayer.
  Well I have got the shelves done , I sprayed them with Cellulose satin finish black, I had some , it dries fast and is not too messy. I turned the pressure down and closed the fan pattern up and they were not as bad to do as I thought, still fiddly to turn over etc, anyway this is them painted .


Once dry I have put the shelves back in , mainly so they are not lying about. I have put them back in not spaced out in the final places, I am going to fill one with all the tooling for the bridgeport so will have to see what needs to fit in and then make some wod shelf incerts with fixtures to hold the chucks and collets etc. Any advice or photos of what others have found to work out well are welcome.
 This is the cabinets done except for the shelf incerts and the plywood tops.


Cheers Mick

Offline Meldonmech

  • Hero Member
  • *****
  • Posts: 933
Re: Cabinets for tooling - restoration
« Reply #41 on: August 25, 2014, 07:38:53 AM »

    Very smart Mick, I like the contrast.

                                                           Cheers David

Offline caskwith

  • Jr. Member
  • **
  • Posts: 71
  • Country: gb
Re: Cabinets for tooling - restoration
« Reply #42 on: August 25, 2014, 08:08:56 AM »
Damn fine job there!

Offline BillTodd

  • Hero Member
  • *****
  • Posts: 1101
  • Country: 00
  • Colchester Essex (where the lathes were made)
Re: Cabinets for tooling - restoration
« Reply #43 on: August 25, 2014, 09:18:04 AM »
They'd be too good for my workshop  :clap: :thumbup:
Bill

Offline krv3000

  • Hero Member
  • *****
  • Posts: 2183
  • Country: gb
Re: Cabinets for tooling - restoration
« Reply #44 on: August 25, 2014, 02:01:22 PM »
well dun mick  :headbang: :headbang:

Offline Ginger Nut

  • Full Member
  • ***
  • Posts: 232
Re: Cabinets for tooling - restoration
« Reply #45 on: August 25, 2014, 07:54:29 PM »
Don't forget to show us the shelf inserts when done. Timber would look great but sheet metal more practical I think takes less room, can be folded to just slip into the cavity for quick easy removal for cleaning. Can be made to suit depth much easier.

Ray

Offline Pete W.

  • Hero Member
  • *****
  • Posts: 852
  • Country: gb
Re: Cabinets for tooling - restoration
« Reply #46 on: August 26, 2014, 04:31:45 AM »
Hi there, Mick,

They'd be too good for my workshop  :clap: :thumbup:

I wouldn't have room to open the doors in my workshop!   :)   :)   :)   

They're very smart, though.   :bow:   :thumbup:   :bow:   :thumbup:   :bow:   :thumbup:  well done. 
Best regards,

Pete W.

If you can keep your head when all about you are losing theirs, you haven't seen the latest design change-note!

Offline vtsteam

  • Global Moderator
  • Hero Member
  • *****
  • Posts: 6466
  • Country: us
  • Republic of Vermont
Re: Cabinets for tooling - restoration
« Reply #47 on: August 26, 2014, 07:57:24 PM »
Cabinets to be proud of. And from what many would have thrown out. They will really add to your workshop's appearance! Pleasant to work around nice things.  :thumbup: :thumbup: :thumbup: :thumbup: :beer:
I love it when a Plan B comes together!
Steve
https://www.youtube.com/watch?v=4sDubB0-REg

Offline mfletch

  • Jr. Member
  • **
  • Posts: 86
  • Country: gb
Re: Cabinets for tooling - restoration
« Reply #48 on: August 27, 2014, 04:35:43 AM »
Nice job good as new I will give you £5 each mick delivered

Online jb3cx

  • Jr. Member
  • **
  • Posts: 86
Re: Cabinets for tooling - restoration
« Reply #49 on: August 31, 2014, 02:54:43 PM »
All you need now mick is some nice tools to fill them up with, :)

Offline micktoon

  • Hero Member
  • *****
  • Posts: 797
  • Country: gb
Re: Cabinets for tooling - restoration
« Reply #50 on: August 31, 2014, 04:39:51 PM »
Mfletch , even the price of a new cabinet would'nt buy one now lol.

 Peter that sounds like a cryptic way of saying you have some tooling for me  :thumbup: :clap:....................... what you got lad ?????????

  Cheers Mick.