Author Topic: Mini Mill Modifications  (Read 14602 times)

Offline RussellT

  • Hero Member
  • *****
  • Posts: 520
  • Country: gb
Mini Mill Modifications
« on: January 23, 2014, 07:33:47 AM »
Here is yet another mini mill modification thread.  I don’t expect it to be the best or even original but I hope it may interest a few people.

I bought the mill from another madmodder  :beer: a few months ago.  None of what follows is a criticism of him in any way.

I have been slow at getting to grips with the mill. Other tasks and burning out the motor  :zap: have caused some delays so my first modification after replacing the motor (using the money I had planned to spend on a milling vice) was to add a cooling fan.

There was plenty of space under the motor cover for a fan and some hunting in a box of old fans produced a circular fan that sat nicely on top of the motor.  It needed 12V DC.  The mill already has a built in 12V lamp which runs off a 12V electronic transformer.  I decided not to rectify the AC at the transformer as the diode voltage drop would make the light dimmer, so I used a rectifier that would sit on top of the fan motor and wired it in to the lamp 12V AC.  I needed to add a capacitor to smooth the rectified AC.  The value was chosen by increasing the size until there was no improvement in the fan’s performance.

The fan was secured to the top of the motor with a bead of silicon sealant.  The rectifier was secured to the fan in the same way.

I considered adding some more cooling slots to the motor cover.  There are already some in the back, but decided to wait and see how much difference the improved airflow made.

I also reduced the fuse rating in an effort to protect the new motor.  The new one hasn’t blown yet so I may reduce it some more.  An occasional blown fuse is a trivial amount of cost and effort compared to a replacement motor.

Russell
Common sense is unfortunately not as common as its name suggests.

Offline John Rudd

  • Hero Member
  • *****
  • Posts: 2526
  • Country: gb
Re: Mini Mill Modifications
« Reply #1 on: January 23, 2014, 08:49:31 AM »
Russ,
Good idea using the 12v feed from the lamp to power the fan......but, if it is 12 v ac or more, your capacitor is not long for this world.....

12*1.414 gives a peak voltage of nearly 17vdc.....not good for a 16 v cap.....you may want to consider changing it..before the cap expires and it starts snowing..... :zap:
eccentric millionaire financed by 'er indoors
Location:  Backworth Newcastle

Skype: chippiejnr

Offline RussellT

  • Hero Member
  • *****
  • Posts: 520
  • Country: gb
Re: Mini Mill Modifications
« Reply #2 on: January 23, 2014, 10:08:23 AM »
Hi John

You're quite right.  I had overlooked the RMS factor.  However if I push the margins to the limits there are two diodes in the circuit at any one time so presumably the peak voltage would be 1.4 volts less.  Or is that just bad practice?

Russell
Common sense is unfortunately not as common as its name suggests.

Offline RussellT

  • Hero Member
  • *****
  • Posts: 520
  • Country: gb
Re: Mini Mill Modifications
« Reply #3 on: January 23, 2014, 11:01:14 AM »
Well I don't think it's good practice so I changed it.  I had a 50V one salvaged from something I threw away, and although slightly larger it still fits under the cover OK.

Thank you John for pointing it out.

Russell
Common sense is unfortunately not as common as its name suggests.

Offline RussellT

  • Hero Member
  • *****
  • Posts: 520
  • Country: gb
Re: Mini Mill Modifications
« Reply #4 on: January 23, 2014, 11:23:15 AM »
When I bought the mill it had the inexpensive digital readouts from Arc Euro Trade on the Y and Z axes.  I decided I would like one on the X axis.  However as I’m a cheapskate I decided to take the Z axis readout off and use it on the X axis.  Then I could buy a shorter (aka cheaper) one for the Z axis.

I looked at lots of other installations on the internet. To my surprise lots of them put DROs on the back of the table.  I decided that it had to go on the front because it would reduce table travel if it were on the back – although arguably installation was easier.  Buying a mill with extra table travel is expensive so it seemed better not to restrict it.

Here’s a picture of the original arrangement.  Table stops slide in the groove on the front of the table and are supposed to stop the table when  the stop contacts the pointer in the centre.  Actually they just push the pointer to left or right before stopping the table so I decided that removing them would be no great loss.  That meant that I could use the table groove for mounting the DRO scale.


The next issue was how to mount the reading box.  Clearly it has to attach to the base of the table slide but offering it up shows that it won’t fit between the X axis clamp screws.


I thought about several options. I considered filing away a bit of the plastic box, or only using one of the clamps.  While I thought about it I put some grubscrews in the clamp holes so I could carry on with the rest of the fitting.  I realised that I could still turn the grub screws with an allen key even when the read head was in place.  So I made some special screws for the clamps.  Here’s a picture of a new one next to an old one.


I carefully made the new ones the same length as each other, only to find that the blocks at the bottom of the hole which bear on the gib strip were different sizes, so I made a small spacer to go under one of the screws.

The clamps to hold the scale to the table were more complicated than I expected.  I made them with a raised portion to fit the table groove so that they would line up with the table.  I had to cut away some extra metal on the back to clear the rivets holding the measuring scale to the front of the table, and I also had to cut away some more so that they didn’t foul the base of the slide.


After all my efforts to make these identical I discovered that the groove in the front of the table wasn’t parallel to the top of the table so I modified the clamp at the low end by opening out the slot for the scale and adding a grub screw so that the scale could be adjusted parallel to the top (and travel) of the table.


A piece of scrap was cut to fit the back of the read head.  The screw mounting holes were chosen so that the screw heads would fit in the groove in the table.  A washer was used behind the plate to avoid any twisting effect on the scale or read head and it was fastened using one of the original scale pointer holes and screws.


Here’s a picture of the installation so far.  I plan to add a guard at the front of the table to keep chips away from the scale, so I’ll come back to that later.


Russell
Common sense is unfortunately not as common as its name suggests.

Offline John Rudd

  • Hero Member
  • *****
  • Posts: 2526
  • Country: gb
Re: Mini Mill Modifications
« Reply #5 on: January 23, 2014, 11:26:55 AM »
Good that you changed the cap..... :zap:

Nice job on the scales....shame all machines weren't as easy to adapt to.....
eccentric millionaire financed by 'er indoors
Location:  Backworth Newcastle

Skype: chippiejnr

Offline Meldonmech

  • Hero Member
  • *****
  • Posts: 933
Re: Mini Mill Modifications
« Reply #6 on: January 23, 2014, 12:51:21 PM »

     I agree with you re. fitting the scales to the front of the machine, on all milling machines I have used there is always a time when you are stuck for room at the back of the cross slide.  The scales look well on the front of the machine, and making new screws retains the functionality.

                                                                       Well Done    David

Offline RussellT

  • Hero Member
  • *****
  • Posts: 520
  • Country: gb
Re: Mini Mill Modifications
« Reply #7 on: January 23, 2014, 07:55:46 PM »
Thank you John and David.

One of the major causes of delay after buying the mill and before I could use it was finding somewhere to put it.  After moving some stuff around this is what I came up with.


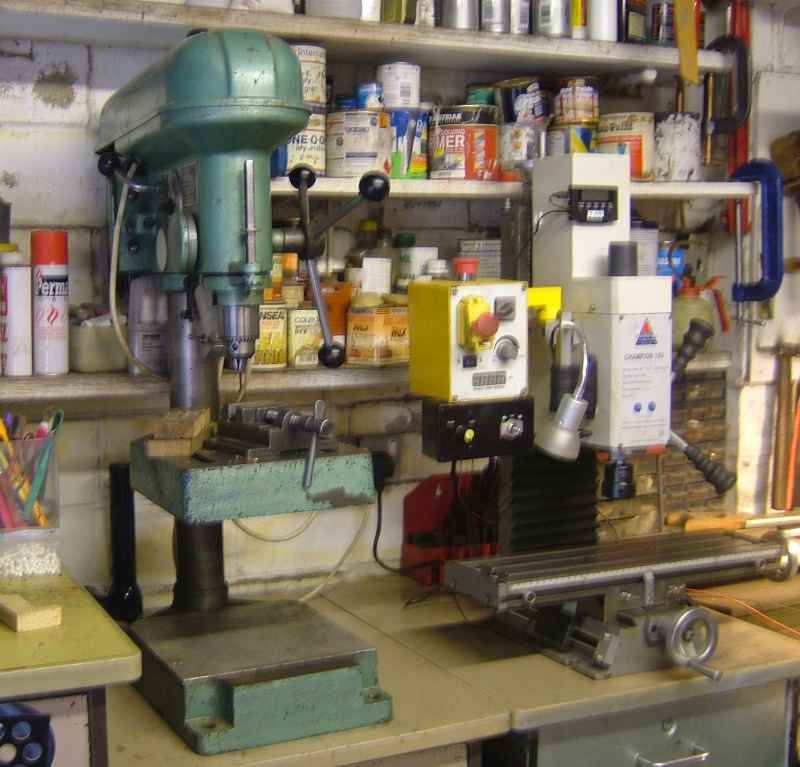
Before I got the mill, the drill was on the right but if I had put the mill on the left then the table couldn’t move to the left because of the cabinet there, and it couldn’t move to the right because the handwheel fouled the base of the drill.  So the drill had to be moved as well.  That meant one of the shelves had to be moved too. :bang:

Then I discovered that the x axis power feed (not shown) fouled the base of the drill.  I considered raising the mill so it would go over the base of the drill, but that still wouldn’t give full x axis travel because it would foul the column of the drill.  I could have had the mill overhang the end of the workbench but the workbench is quite full enough already.  I decided that I would have to alter the power feed.

After some research on the internet I decided to try and do it using an old cordless drill.  Unfortunately I didn’t have one, so I bought one off ebay for £3.50.  It was local so there was no post to pay and the seller even dropped it in for me.


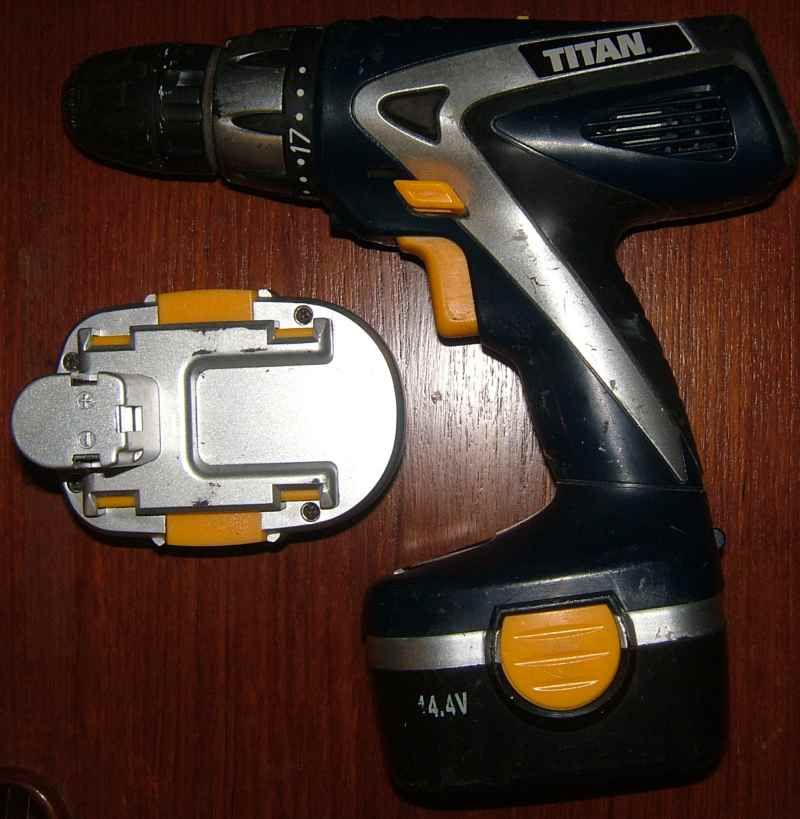
When I had a look at it I decided it was far too good to break up for the motor even though there was no charger.  I charged it using another charger and some leads with croc clips and the batteries hold charge better than the cordless drill I’ve been using.

I put a wanted ad on freecycle and was offered a 14.4V drill within an hour, which I picked up the following morning.  I tried it with a 12V power supply and a socket to fit the x axis handwheel and it would move the table to and fro quite happily and quite fast enough drawing about 2.5A on starting.  That meant that I could use the existing 3A controller.

The drill also provided a suitable contact clip for me to use for charging the batteries for my ebay drill – fastening it to an L shaped piece of plastic prevents it from being connected incorrectly.

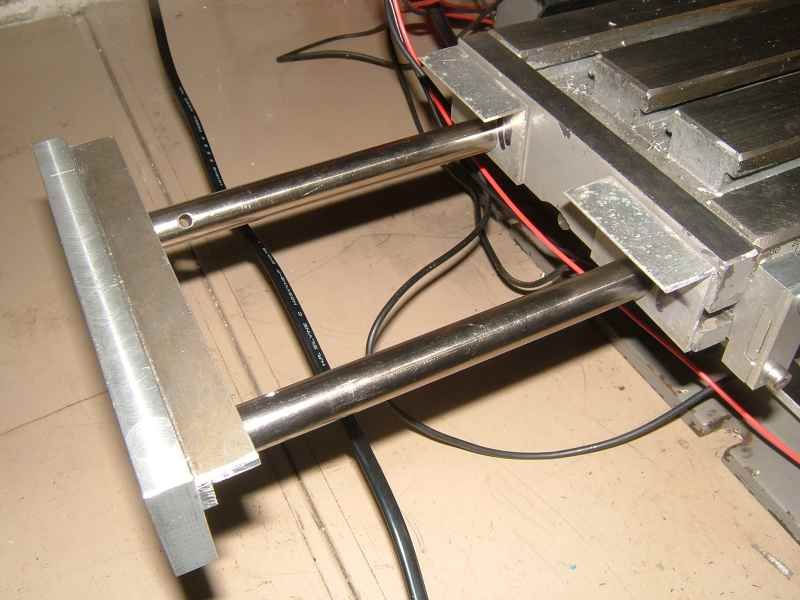
I took the drill to pieces and the motor looked like it would be perfect for the job.  All I had to do was work out how to fasten it on. I decided to screw a couple of rods into the end of the table to hang it on – that’s what most people seem to do.

I tried a couple of 3/8 rods but discovered that these weren’t very parallel, and weren’t very consistently non parallel either.


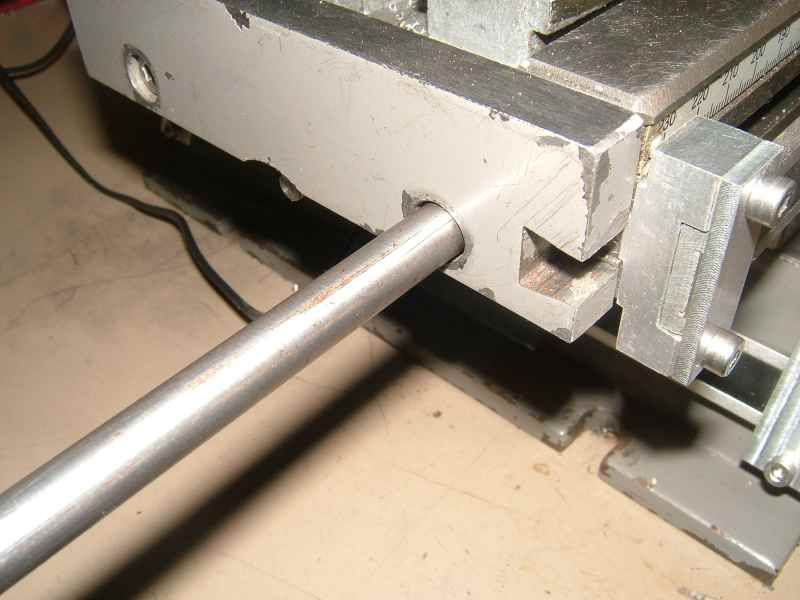
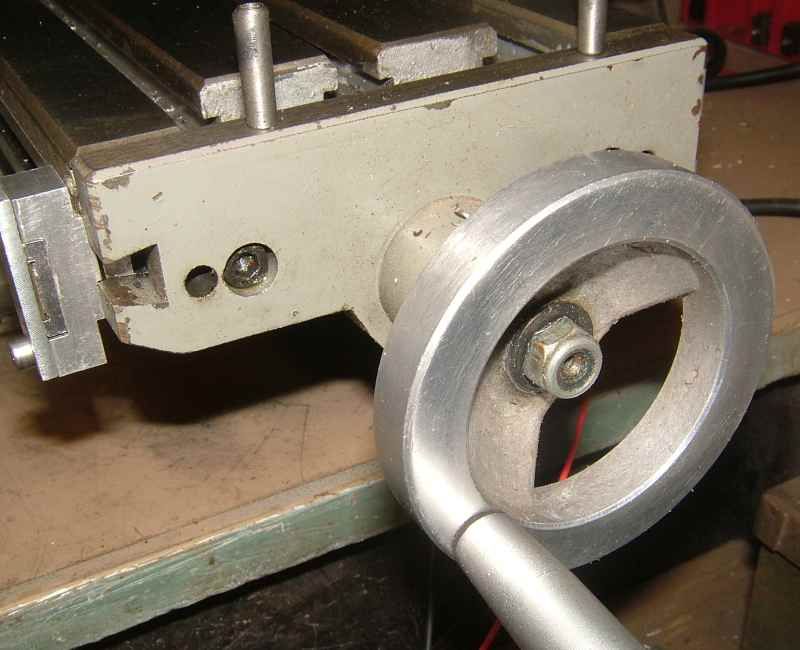
I could have added a couple of washers to make them seat on the flat surface rather than the counterbore but decided to use a cut up half inch rod from an old printer.


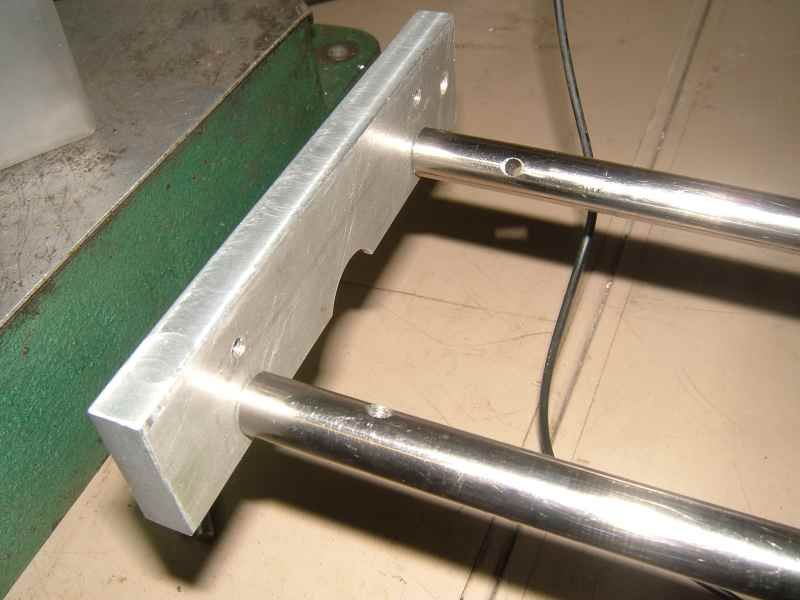
The half inch rods were consistently less than 0.15mm off parallel when I tried them and by fastening a plate to the outboard ends I could get them to stay parallel.  The plate was salvaged from the previous power feed.


The motor mount was designed by empirical evolution.
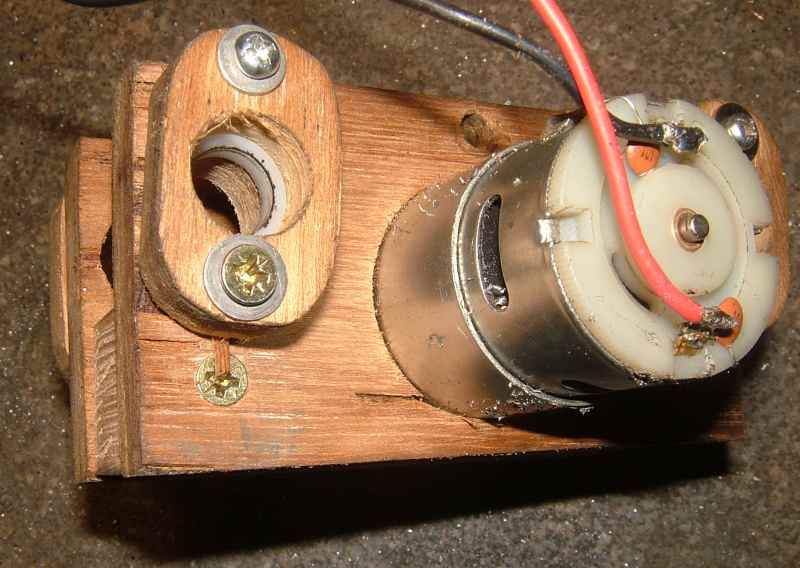
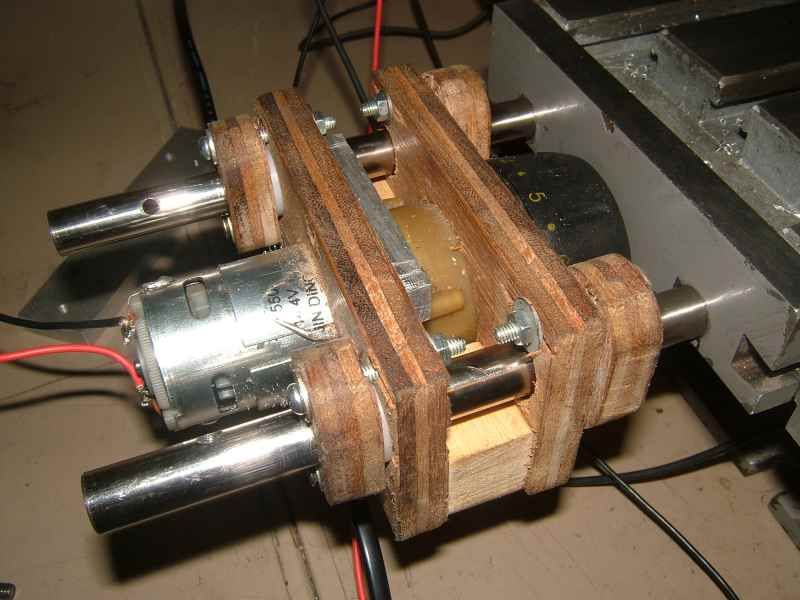
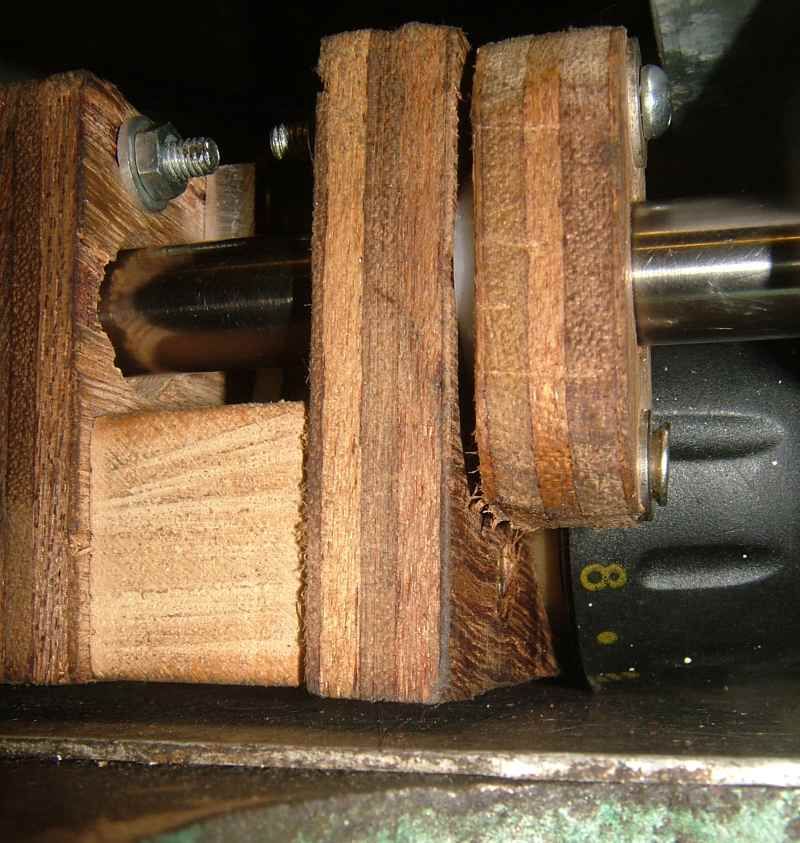
  :smart:   I used plywood because I wasn’t sure it was going to work and so I wouldn’t have wasted any expensive materials.  I cut a couple of holes in two pieces of plywood using a hole saw and opened them out using a small sanding drum so that I could fit one on each end of the motor.  They were then fastened to a block of wood and I drilled some oversize holes so I could adjust the position of the sliding bearings.  A small piece of alloy was screwed on to locate the tab on the gearbox which takes the torque reaction in the drill.  This also shows my failure to plan ahead as I had to drill a hole in it later. :doh:


Four delrin bearings were mounted in blocks of wood and fastened using oversize holes for adjustment.


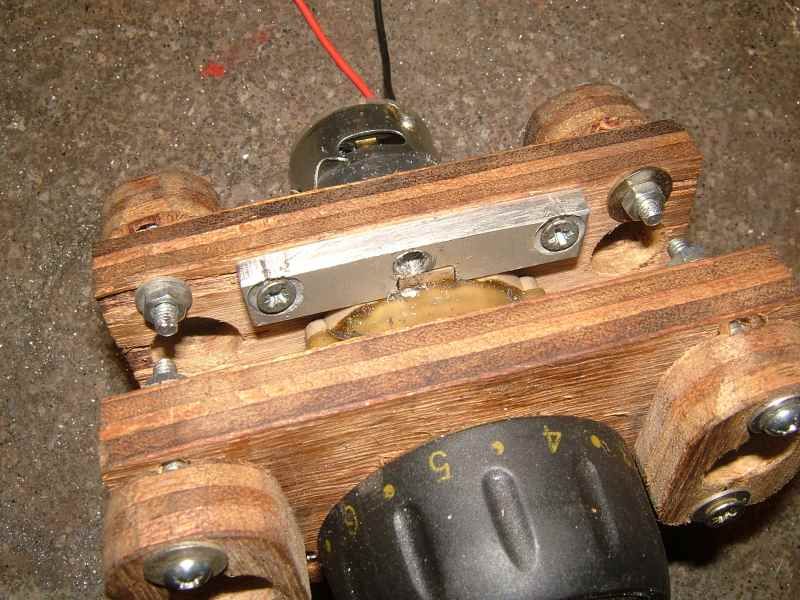
This is what the assembly looks like.


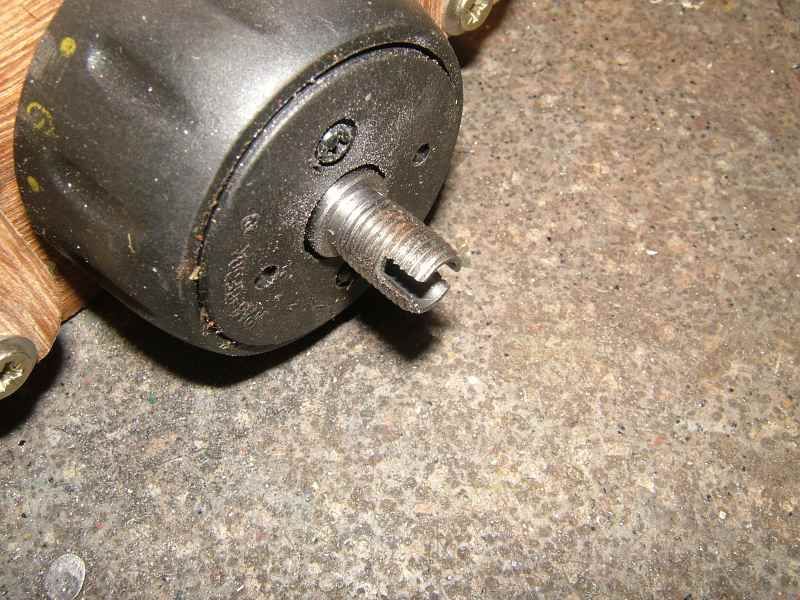
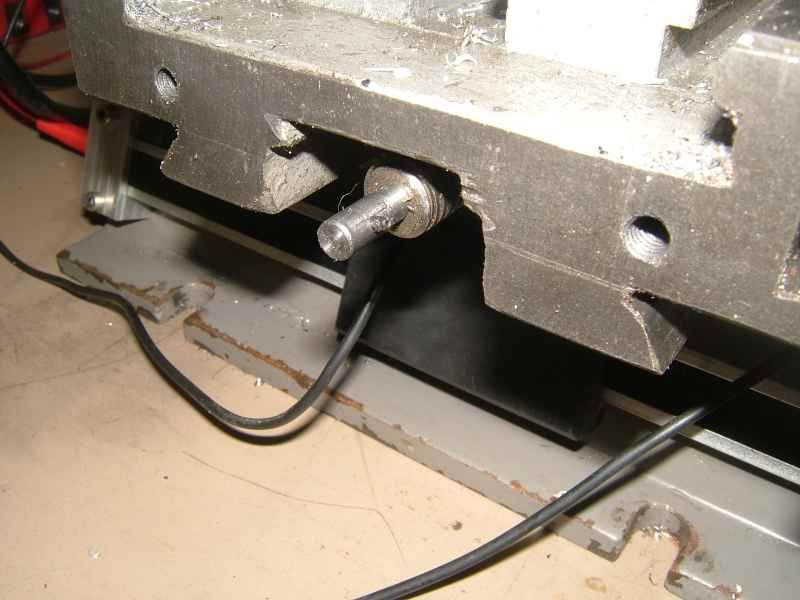
To get it to drive the table I drilled the thread out of the spindle and cut a notch in the end.


I had hoped that the existing hole in the spindle would be enough to guide the drill but it wasn’t and the hole ran well off true, so I dismantled the drill motor's gearbox and put the spindle in the lathe to bore it true.  I made a short adapter piece to fit in the existing hole in the end  of the x axis feed screw and fastened it with a 2mm roll pin salvaged from a printer.  A second pin from a printer provided the cross piece to engage with the dog on the drill motor.


I spent some time adjusting the feedscrew to run true.  Removing the dowels holding the end plate to the other end of the table allowed me to move the handwheel bearings enough to get the left hand end running reasonably true over the whole travel of the table.  I also tried reversing the table nut – which did make difference – it made it worse.


First tests with the motor on the mounts were successful and the motor could be slid in and out of engagement easily.


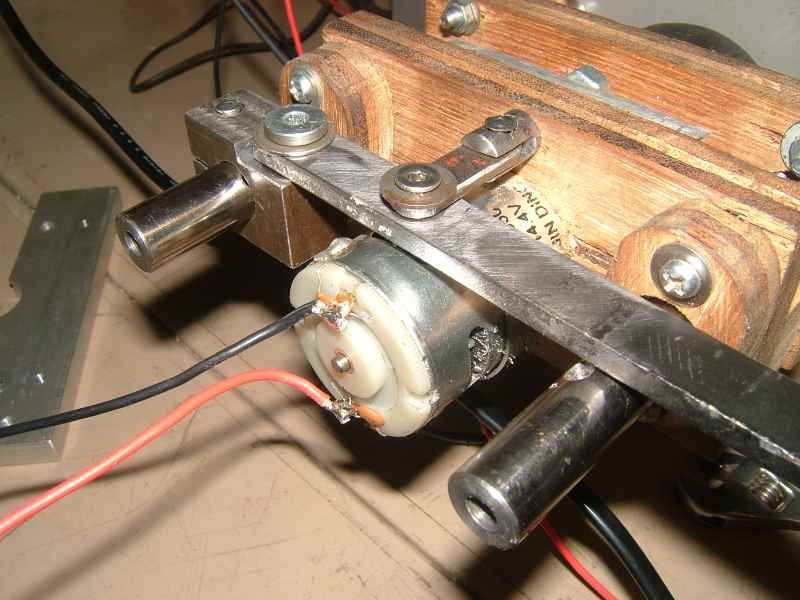
A clamp on the rear bar stops the motor spindle from completely disengaging from the feedscrew extension but allows the dog to disengage and provides a convenient point to mount an operating lever.  I had a little trouble  :scratch: getting the lever and operating links at the right levels, which explains the corner milled off the clamp and the use of the thinnest washers I could find.


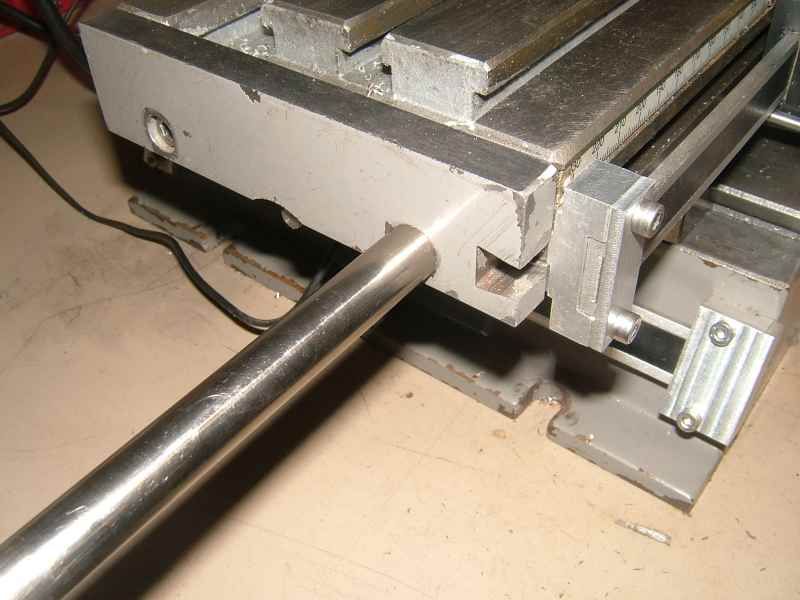
A test at this stage shows that the table will traverse quite happily over the drill base, although there is no detectable clearance.  However I could make some clearance here with a chip tray under the mill, or taking away the aluminium plate which stops the drill base filling with rubbish.


Next were some mounting brackets for a cover.  The left hand cover mount was a bit of aluminium angle from the scrap pile.  The right hand bits also came from the scrap pile and were a handily shaped bit of extrusion from a greenhouse which has a lip on the bottom edge to keep them square.


The cover was made from an old computer case.


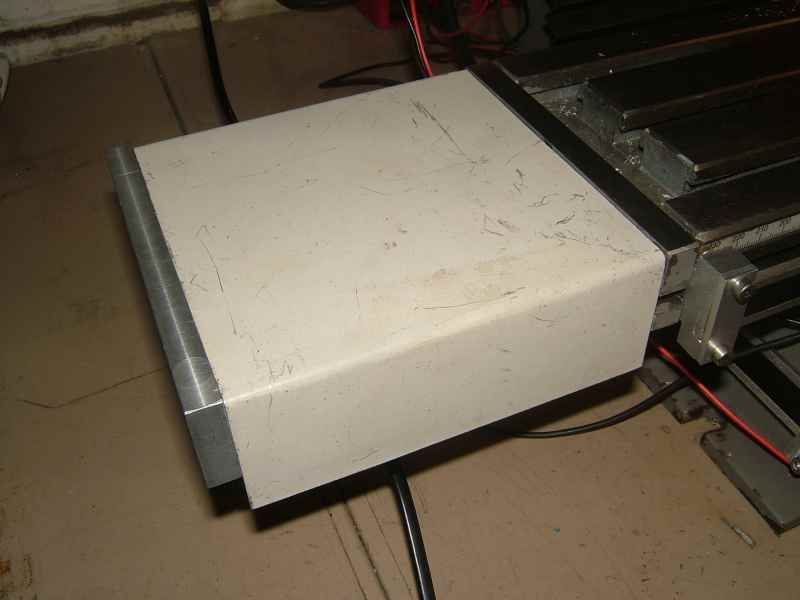
I am still undecided about how to finish the cover off.   :scratch: It needs a slot for the operating lever and I think it looks wrong hanging down below the end plates.  However if I shorten it to the same level as the bottom of the end plates then that ugly plywood becomes visible.

There'll be more when I've done it. :wave:

Russell
 
Common sense is unfortunately not as common as its name suggests.

Offline SwarfnStuff

  • Hero Member
  • *****
  • Posts: 588
  • Country: au
Re: Mini Mill Modifications
« Reply #8 on: January 24, 2014, 01:06:25 AM »
Good project, well thought out and described with great photos. Thanks for posting. Now, How long do you think the (temporary  :lol:) ply wood mounting will be in use before you make it in metal??  :scratch: My experience says a Looooong time - after all it is working aint it? So one day, when I get one of those round tuit things?   :clap:
Congrats,
John B
Converting good metal into swarf sometimes ending up with something useful. ;-)

Offline Meldonmech

  • Hero Member
  • *****
  • Posts: 933
Re: Mini Mill Modifications
« Reply #9 on: January 24, 2014, 04:09:39 AM »
 
         An interesting project, I do like to see things recycled. I have a tired drill and am now thinking what I can use it for.

                                                              Well Done    David

Offline RussellT

  • Hero Member
  • *****
  • Posts: 520
  • Country: gb
Re: Mini Mill Modifications
« Reply #10 on: January 24, 2014, 05:48:24 AM »
Thanks John B and David.

Clearly the plywood will have to be replaced at some stage.  We all know how plywood rots and delaminates :lol:, but a permanent version is not at the top of my priority list.

No new materials were harmed during this project.  The 3/8 rod I tried for the slides was previously unused stock but I got it free with the lathe some years ago so I don't count that.  An old cordless drill was ideal for this project.  Another aspect I hadn't mentioned is that the screwdriving clutch is set to minimum and it drives the table quite happily, but if it reaches the end of the travel then the clutch slips.

At maximum speed it feeds the table faster than I can wind it by hand and it'll slow down to less than 2 ipm before it stalls.  At that slow speed though it's clear that the alignment still isn't perfect as there is some variation in speed with each rotation of the feed screw.  I have some ideas how to improve that. :scratch:

Russell
Common sense is unfortunately not as common as its name suggests.

Offline John Rudd

  • Hero Member
  • *****
  • Posts: 2526
  • Country: gb
Re: Mini Mill Modifications
« Reply #11 on: January 24, 2014, 07:16:04 AM »
Russ, to get over the misalignment issue causing the speed variation, you need an Oldham coupling fitting between the motor and lead screw....this should take care of any misalignment issues
eccentric millionaire financed by 'er indoors
Location:  Backworth Newcastle

Skype: chippiejnr

Offline RussellT

  • Hero Member
  • *****
  • Posts: 520
  • Country: gb
Re: Mini Mill Modifications
« Reply #12 on: January 24, 2014, 07:54:09 AM »
Hi John

As it happens I have an Oldham coupling on a salvaged motor, but that would be a last resort because the space it takes would need a complete redesign.

Actually the speed variation probably isn't enough to worry about - except for the fact that I have perfectionist tendencies.

This is one of the reasons I made the motor position adjustable, so I may be able to improve it by more fiddling.  I don't intend to do that until last.  It would be wasted time if I then had to dismantle it.  However at the moment the shafts are fairly well aligned and if I disengage them completely I don't see more than a fraction of a millimetre misalignment in any position I've tried.  That tells me that the problem is probably that the outer end of the drill motor is out of position and the issue is when there is a bending load on the joint.  If adjustment doesn't work I could also probably sort that out by putting a slight taper on the shaft that slides into the drill spindle.  It would still be located by the full diameter at the end but would have some freedom to move under bending loads.

I have more ideas, but I'll leave them for now.  It is possible to overthink these things. :loco:


Russell
Common sense is unfortunately not as common as its name suggests.

Offline ieezitin

  • Hero Member
  • *****
  • Posts: 662
Re: Mini Mill Modifications
« Reply #13 on: January 25, 2014, 09:04:12 AM »
Dammit man……. That mills like black hole for recycled parts, they get scooped in spiral down never to be seen again.. :bugeye:

Nice project… well done.

Anthony.
If you cant fix it, get another hobby.

Offline RadRod67

  • Jr. Member
  • **
  • Posts: 15
  • Country: au
  • .
Re: Mini Mill Modifications
« Reply #14 on: January 25, 2014, 12:22:53 PM »
Very cool.

Offline BaronJ

  • Full Member
  • ***
  • Posts: 243
  • Country: gb
  • Grumpy Old Git !
Re: Mini Mill Modifications
« Reply #15 on: January 25, 2014, 03:53:11 PM »
Neat !  Interesting use of plywood...
Best Regards:
                     Baron

Offline RussellT

  • Hero Member
  • *****
  • Posts: 520
  • Country: gb
Re: Mini Mill Modifications
« Reply #16 on: January 28, 2014, 05:59:15 PM »
Thanks Anthony, RadRod and Baron. :thumbup:

The mill's not a black hole for recycled parts - but I think my garage might be.  :lol:

Thomas Edison said, "To invent, you need a good imagination and a pile of junk."  I've got at least one of those.

Russell
Common sense is unfortunately not as common as its name suggests.

Offline krv3000

  • Hero Member
  • *****
  • Posts: 2183
  • Country: gb
Re: Mini Mill Modifications
« Reply #17 on: January 29, 2014, 01:56:40 PM »
hi thats cuming a long nice

Offline RussellT

  • Hero Member
  • *****
  • Posts: 520
  • Country: gb
Re: Mini Mill Modifications
« Reply #18 on: February 08, 2014, 12:01:55 PM »
Thanks krv3000.

A bit more progress today.


Russell
Common sense is unfortunately not as common as its name suggests.

Offline RussellT

  • Hero Member
  • *****
  • Posts: 520
  • Country: gb
Re: Mini Mill Modifications
« Reply #19 on: February 17, 2014, 10:48:36 AM »
I've made a little more progress.  I've added a chip guard to keep chips away from the DRO scale, and the mounting brackets for the chip guard also mount a bar across the front of the table.  That's there in case I want a table stop to replace the original ones that were in the way of the DRO.  I haven't decided yet what the stops that fasten to the bar will look like yet - possibly something like a clothes peg.


Russell
Common sense is unfortunately not as common as its name suggests.

Offline superc

  • Full Member
  • ***
  • Posts: 104
  • Country: us
Re: Mini Mill Modifications
« Reply #20 on: March 29, 2014, 04:10:43 PM »
LoL, one of the really neat things about all the mini mills is the more stuff we strap on to them, more mass we add to the unit, the better it all works.   :beer: