Author Topic: South Bend 10K Ball Turner - Project and Pics  (Read 7595 times)

Offline Lost Pup

  • Jr. Member
  • **
  • Posts: 7
  • Country: us
South Bend 10K Ball Turner - Project and Pics
« on: June 16, 2013, 09:23:27 PM »
New member here and thought I would post up my current project.

A ball turner for my South Bend 10K

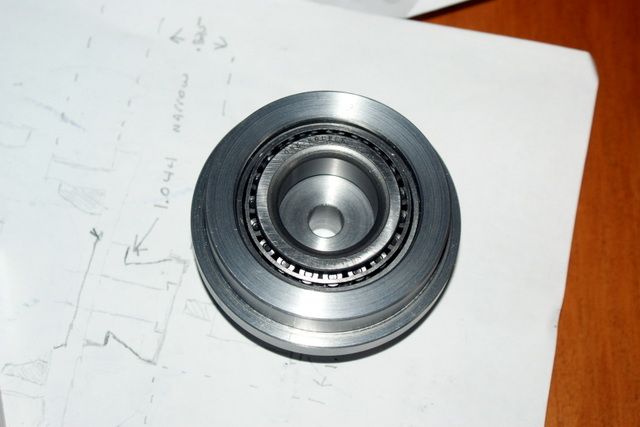
Purchased the Tapered Roller Bearing from local Advanced Auto Parts.
Driveworks S-A-4 seemed about the right size.

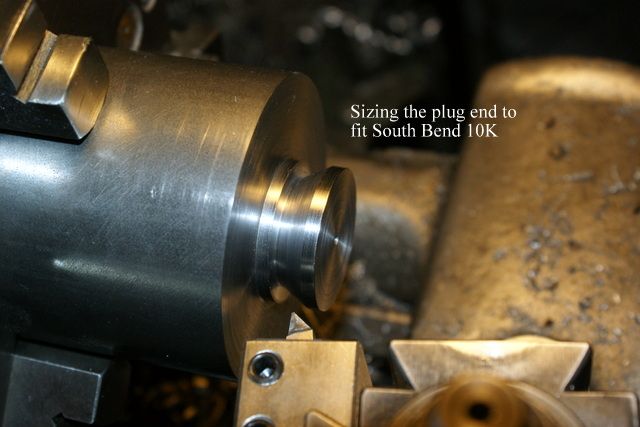
Purchased a 3" diameter x 3" long piece of 1018 steel. Dimensioned the plug or spigot end to fit the South Bend 10K. I had a set of HSS
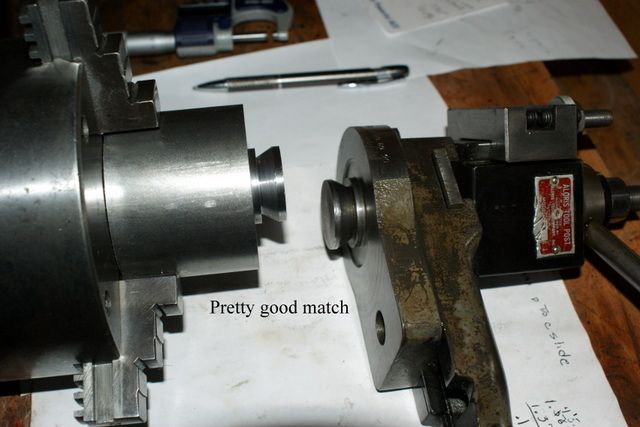
bits made for dovetails using my Logan shaper so I used one to cut the plug end dovetail. Worked perfectly. Checked the fit with the chuck still attached to just reach that snug fit.

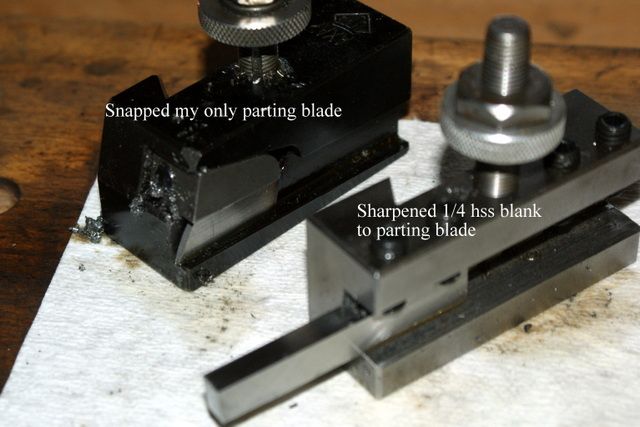
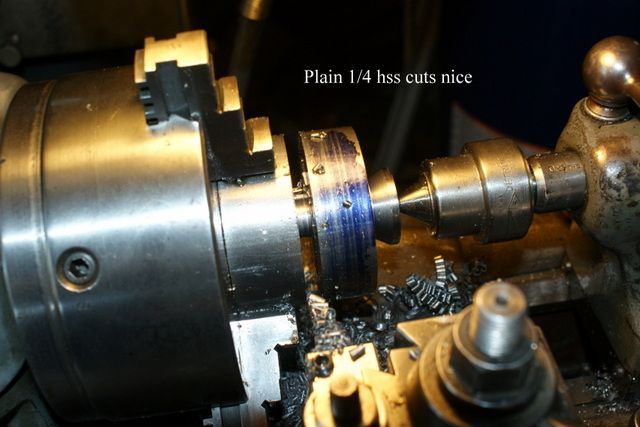
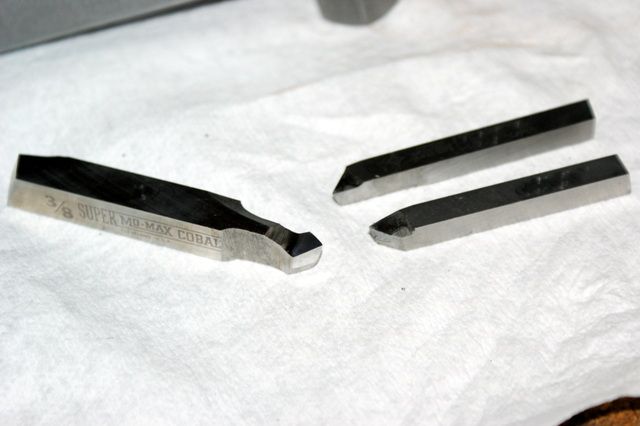
A slight cleanup cut of the diameter and I was ready to part the piece. OOPS....snapped my only cut off blade when I just started the cut. Stupid mistake and no injuries. I used a 1/4 HSS tool bit and ground about 5 degrees on the front. I just touched the sides a bit for relief and final sharpened all the faces by hand on a ceramic stone. Set it in an AXA holder, placed just low of center and gave it a try. Backgear was engaged and adjusted speed via my VFD. Surprised that it cut so smoothly and cleanly with the ribbons just pealing
out. Did not step it in at all, feeding it in until about 1/2 to 3/4 was left to pull the center and hacksaw off.

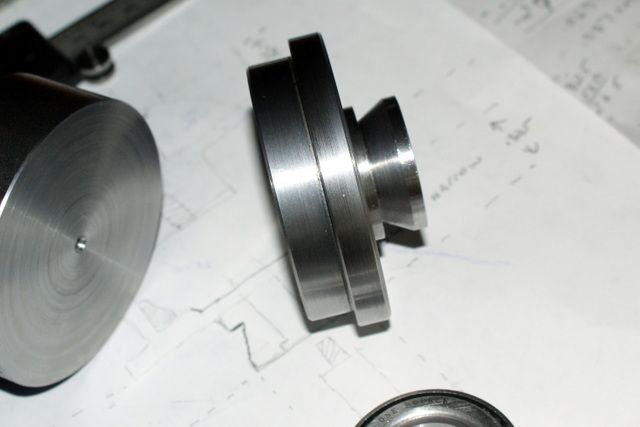
Faced off the piece and used another shaper tool to rough out the center for the bearing race. Picture of the tool below along with my dovetail bits. Nice when you have a shaper the tooling can be used on the lathe so easily. I just plunged in the diamond shaped tool for a cut then engage the crossfeed to cut to center. A short boring bar trued up the outer shoulder to fit the bearing race. Not shown but I did drill 3 1/8" holes through the body to tap out and remove the bearing race as needed. Also their is a slight recess inside the radius of the bearing race to clearance the bearing cage. The race is light tap fit and I did remove it quite a few time as I fit the bearing and designed on the fly as I progressed.

Next up I am up to my Logan shaper to machine the 1/2" tool slot and face the round so I can drill for the set screws.

Comments Always Welcome


Offline Lost Pup

  • Jr. Member
  • **
  • Posts: 7
  • Country: us
Re: South Bend 10K Ball Turner - Project and Pics
« Reply #1 on: June 16, 2013, 09:24:39 PM »
Work continues

Marked 1/2" wide tool slot centered on the round. A square nosed 1/4 bit plowed the slot stepping the way down then to full width. Grooving with a shaper requires constant steady attention to the downfeed to stay ahead of chatter but my old Logan 7" shaper handles it well. You really have to keep the tool feeding just right to keep the chips pealing till complete.   

I had M8 x 20 set screw on hand so I set the width to face off the front edge to drill and tap for them. Finished the shaper work.

3 M8 x 20 set screws were spaced 3/4" apart. Drilled and tapped same.
Same allen wrench can be used for both my AXA tool holders and tool holder here. Easier to have one size when possible.

The upper section was machined in the lathe to fit both the center of the bearing(just snug no play) and then to clear the outer lower section. Test fit showed my error here as I did not readjust my dimensions when I first parted the lower plug section away with the 1/4 tool. I pushed the bearing race down a little deeper and raised the bearing into the upper section as well but not enough to bring the gap home.

I can just remove the lower section land completely if I wish later.

Drilled and tapped the upper section to receive the shoulder bolt to hold the unit together. The through hole in the lower section is 3/8 D. I bored a recess into the base of the plug side for the head of the shoulder bolt to rest in.

With the unit together I checked for binding and it just rool so smoothly. The shoulder section of the bolt with be just over 1 inch long so I will start there and just keep cutting the shoulder down until I reach the preload desired.

Have to decide on a handle location drill and tap for that. Still thinking about the toolholder a bit. The insert choice or a plain hss bit for the cutter. Double sided insert or two single inserts and even seen on with the round insert as well.

Pics Follow:

Comments Always Welcome


Offline vtsteam

  • Global Moderator
  • Hero Member
  • *****
  • Posts: 6466
  • Country: us
  • Republic of Vermont
Re: South Bend 10K Ball Turner - Project and Pics
« Reply #2 on: June 17, 2013, 08:29:48 AM »
A tapered roller bearing ball turner -- well that's pretty interesting!  Welcome to the forum!  :beer:

I was just starting to wonder if we were getting any new members since the welcome thread has been kinda quiet lately.

Glad to see your project, Lost Pup, and it looks like it's going to be a good one.  :thumbup: :clap:
I love it when a Plan B comes together!
Steve
https://www.youtube.com/watch?v=4sDubB0-REg

Offline Lost Pup

  • Jr. Member
  • **
  • Posts: 7
  • Country: us
Re: South Bend 10K Ball Turner - Project and Pics
« Reply #3 on: June 17, 2013, 10:53:02 AM »
A tapered roller bearing ball turner -- well that's pretty interesting!  Welcome to the forum!  :beer:

I was just starting to wonder if we were getting any new members since the welcome thread has been kinda quiet lately.

Glad to see your project, Lost Pup, and it looks like it's going to be a good one.  :thumbup: :clap:

Thanks for the welcome.
I stop over in  the welcome thread in a bit.
Fun project so far.


Offline Lost Pup

  • Jr. Member
  • **
  • Posts: 7
  • Country: us
Re: South Bend 10K Ball Turner - Project and Pics
« Reply #4 on: June 17, 2013, 11:02:56 AM »
I just had to close that gap a bit.

Had enough section depth to machine the lower section and place the race deeper. Tapped out the bearing race, the 1/8 holes were perfectly placed. Chucked the lower section and zeroed both planes the best I could. The Buck True Adjust 3 jaw makes it easy and I had a registration mark on the lower section to place to the number one jaw. Cut the bore deeper with a slight recess for the bearing cage. Tapped the race in and cut rim outer section till the center bearing section protrudes abve it. Then the lower outer rim section was gently cut to reveal the final gap. Quite happy with it.

Dropped in into the South Bend 10k to measure up for the tool arm.

Approx. 1.5 inches from top of tool to lathe center.
Approx. 2 inches from bottom of the arm slot to lathe center.

I will size the tool arm piece first and then scribe the tool (insert) height to it while place on the lathe.

Measured up the max plug clearance available on the South Bend 10k,
approx. .671 inches.
Measured my actual plug depth on the lower section itself,
approx. .566 inches.

Room enough for a 3/8 thrust needle bearing and a shoulder bolt. I will adjust the recess in the plug to hold the thrust needle bearing, maybe the two washers and maybe part or all of the custom shoulder bolt. The platen revolves so smoothly that I thought why not.

Ordered the thrust bearing and washers from Grainger. A day or two at best to pick it up.

   
Pics Follow:

Comments Always Welcome


Offline micktoon

  • Hero Member
  • *****
  • Posts: 797
  • Country: gb
Re: South Bend 10K Ball Turner - Project and Pics
« Reply #5 on: June 17, 2013, 06:54:39 PM »
Hi Lost Pup , welcome to the forum :beer: , and thanks for a good post , you look to making a real nice job of the ball turner  :thumbup:

  Cheers Mick

Offline Brass_Machine

  • Administrator
  • Hero Member
  • *****
  • Posts: 5504
  • Country: us
Re: South Bend 10K Ball Turner - Project and Pics
« Reply #6 on: June 17, 2013, 11:38:02 PM »
Hi ya lost pup!

That looks to be a very well engineered and executed ball turner.  :headbang:  Nicely Done!

Head on over to the welcome section and give us a little info about yourself.

Eric
Science is fun.

We're all mad here. I'm mad. You're mad.

Offline andyf

  • In Memoriam
  • Hero Member
  • *****
  • Posts: 1795
  • Country: gb
    • The Warco WM180 Lathe - Modifications
Re: South Bend 10K Ball Turner - Project and Pics
« Reply #7 on: June 18, 2013, 12:26:47 AM »
You're making a great job of that! Very much the de luxe version of a ball turner  :thumbup:.

If you will be using a carbide insert, there's an unconventionally positioned one in the last two pics at the bottom of this page < http://mikesworkshop.weebly.com/ball-turner.html >.  It can be swung further round the back of the ball before your knuckles gripping the handle damage the chuck jaws. Apologies if you have already thought of that.

Andy
Sale, Cheshire
I've cut the end off it twice, but it's still too short

Offline Arbalist

  • Hero Member
  • *****
  • Posts: 673
  • Country: gb
Re: South Bend 10K Ball Turner - Project and Pics
« Reply #8 on: June 21, 2013, 10:42:50 AM »
Don't know what the insert designation is but this type has worked ok on mine so far.


Rob.Wilson

  • Guest
Re: South Bend 10K Ball Turner - Project and Pics
« Reply #9 on: June 21, 2013, 12:10:17 PM »
Hi and welcome Lost Pup

Cracking wright up  :thumbup:  , good to see some one else that still uses a shaper  :dremel:


Rob

Offline Lost Pup

  • Jr. Member
  • **
  • Posts: 7
  • Country: us
Re: South Bend 10K Ball Turner - Project and Pics
« Reply #10 on: June 21, 2013, 10:43:29 PM »
Thanks for all the kind comments.

I really like using the Logan Shaper. Mill was just not in my budget.

Offline Lost Pup

  • Jr. Member
  • **
  • Posts: 7
  • Country: us
Re: South Bend 10K Ball Turner - Project and Pics
« Reply #11 on: June 21, 2013, 10:46:37 PM »
Project continues:

Picked up the 3/8 thrust needle bearing and washers. Adjusted the bore in the plug end to suit. More than enough clearance to the max depth. Cut a shoulder bolt onto the end of 3/4 bar. Test fit to a loose fit then I parted it off. Slotted the head over at the shaper and began the test fit. The 3/8 diameter of the shoulder bolt I adjusted to the light side as I did not see the need for a snug fit as the tapered roller bearing would carry the side to side movement (support). 

Marked up the bolt and the body with marker to gauge my progress as precise cuts were made on the shoulder bolt. Cut and fit cycle and was perfect on the 8th try. Did not want to waste the shoulder bolt so only a few thousands were cut at a time.

At final fit up I did notice that the upper bearing had the smallest amount of movement. I peened the outer edges with a center punch and tapped the bearing back on. Perfect fit up a this point, the shoulder bolt locks down snugly and the movement is smooth.

Handle and toolholder up next.

   
Pics Follow:

Comments Always Welcome


Offline Lost Pup

  • Jr. Member
  • **
  • Posts: 7
  • Country: us
Re: South Bend 10K Ball Turner - Project and Pics
« Reply #12 on: August 23, 2013, 05:06:40 PM »
Finally got back to this project. Used the scrap metal I had at hand to
make the toolholder. I just wanted to see how it worked. Threaded
a short piece of 1/2 hex to a 1/2 square of CRS. Marked the cutting height with a center in the tailstock.
A piece of 1/2 CRS for the handle and I was all set.

Aluminum cuts easily and the result was perfect. I oiled the bearings and set the preload and it turns smoothly with no hint of rocking movement.

The small aluminum chess piece was the result.

Need to pick up some 1/2 flat stock to make a one piece tool holder and also some 1 to 1 1/2 round rod to really test it out.

   
Pics Follow:

Comments Always Welcome