Author Topic: Minnie TE Long term project  (Read 116231 times)

Offline vtsteam

  • Global Moderator
  • Hero Member
  • *****
  • Posts: 6466
  • Country: us
  • Republic of Vermont
Re: Minnie TE Long term project
« Reply #200 on: January 08, 2016, 10:38:07 AM »
Just catching up Joe --- you're such an inspiration. You make it all look easy, and it just keeps coming, part after part, little bits of art. I love watching this project.  :beer:
I love it when a Plan B comes together!
Steve
https://www.youtube.com/watch?v=4sDubB0-REg

Offline Joe d

  • Sr. Member
  • ****
  • Posts: 251
  • Country: ca
Re: Minnie TE Long term project
« Reply #201 on: January 17, 2016, 11:10:14 PM »
Thanks, Steve.  That's how I've been regarding your lathe project.... time for some updates there, my friend!

Started work on the steering gear, turning the drum for the steering chains.  I have a bolt-on chuck,
so I can run the lathe in reverse to use the ball-end mill "upside down" to make the curve on the right end of the stock


Once the other end was done, parted it off and moved to the taig lathe to finish it off, the steady on the big lathe is way too big for this job


Moved to the mill to cross-drill for the chain bolts, and milled a flat for the nuts, you can see one of the mounting brackets, straitforward
drilling and filing, with a bronze bushing soldered in, and the worm with it's shaft which will be locked in place by  the eyebolt


here it is with the chains rigged


and here with the steering shaft installed


Sad to say that the worm and wheel which are some of the very few parts I've bought ready made, do not in fact mesh...seems to be a slight difference in pitch.  So, will have to replace them, or learn to cut my own....

Cheers, Joe

Offline Joe d

  • Sr. Member
  • ****
  • Posts: 251
  • Country: ca
Re: Minnie TE Long term project
« Reply #202 on: January 21, 2016, 11:15:20 AM »
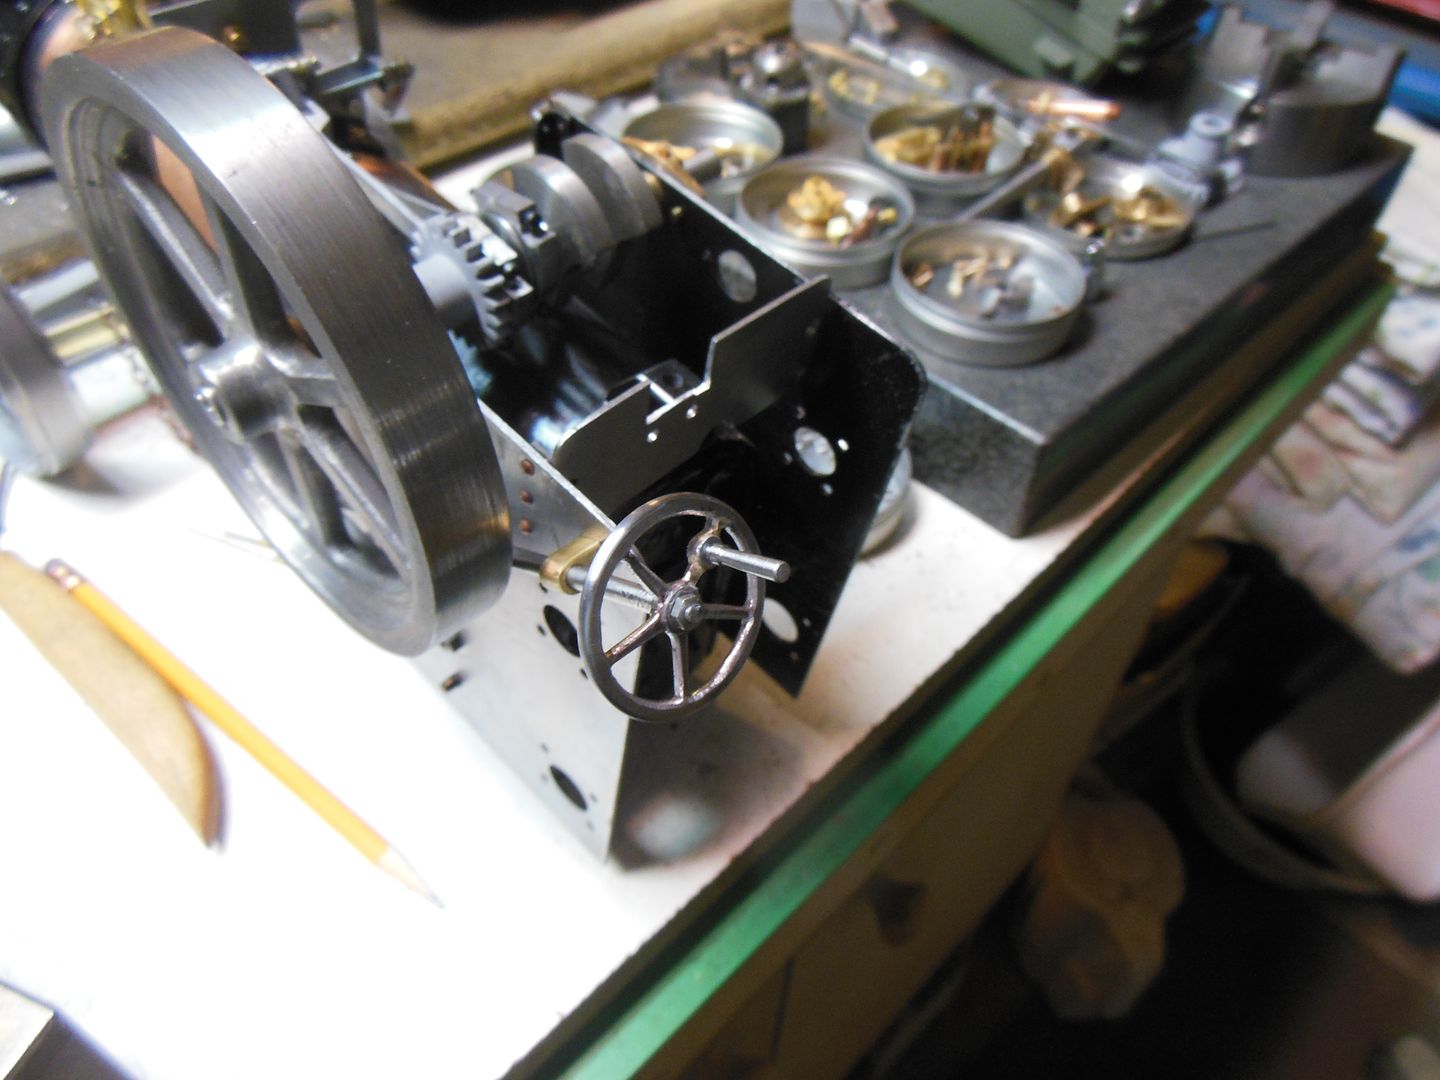
Finishing off the steering business, need a steering wheel...

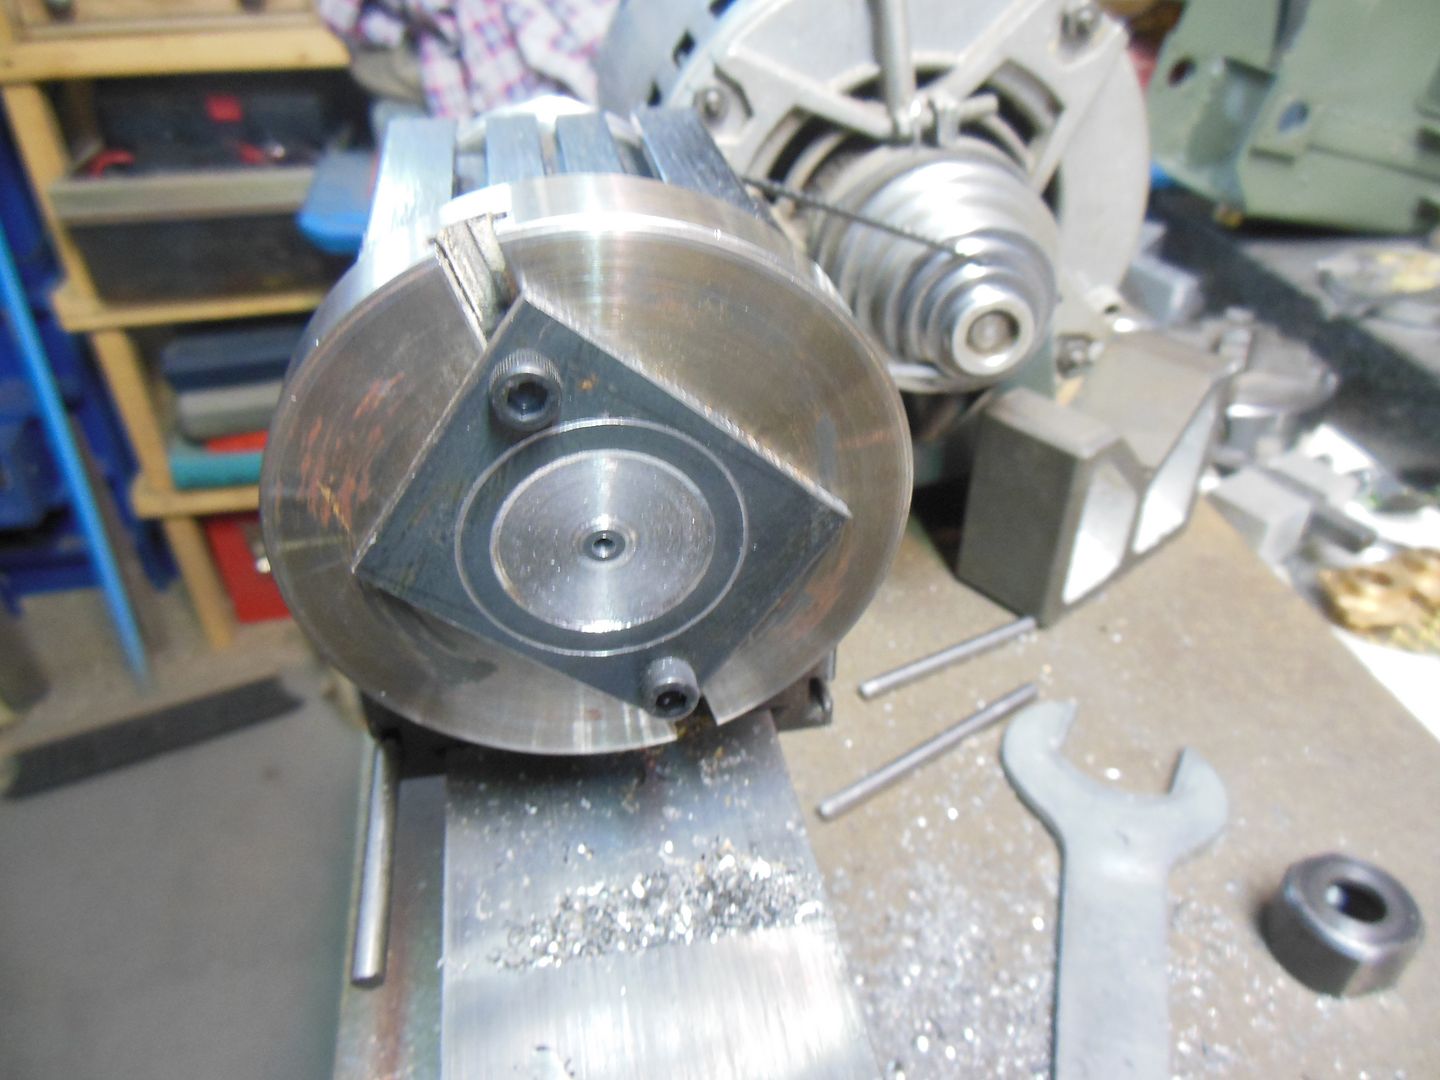
Some faceplate turning:


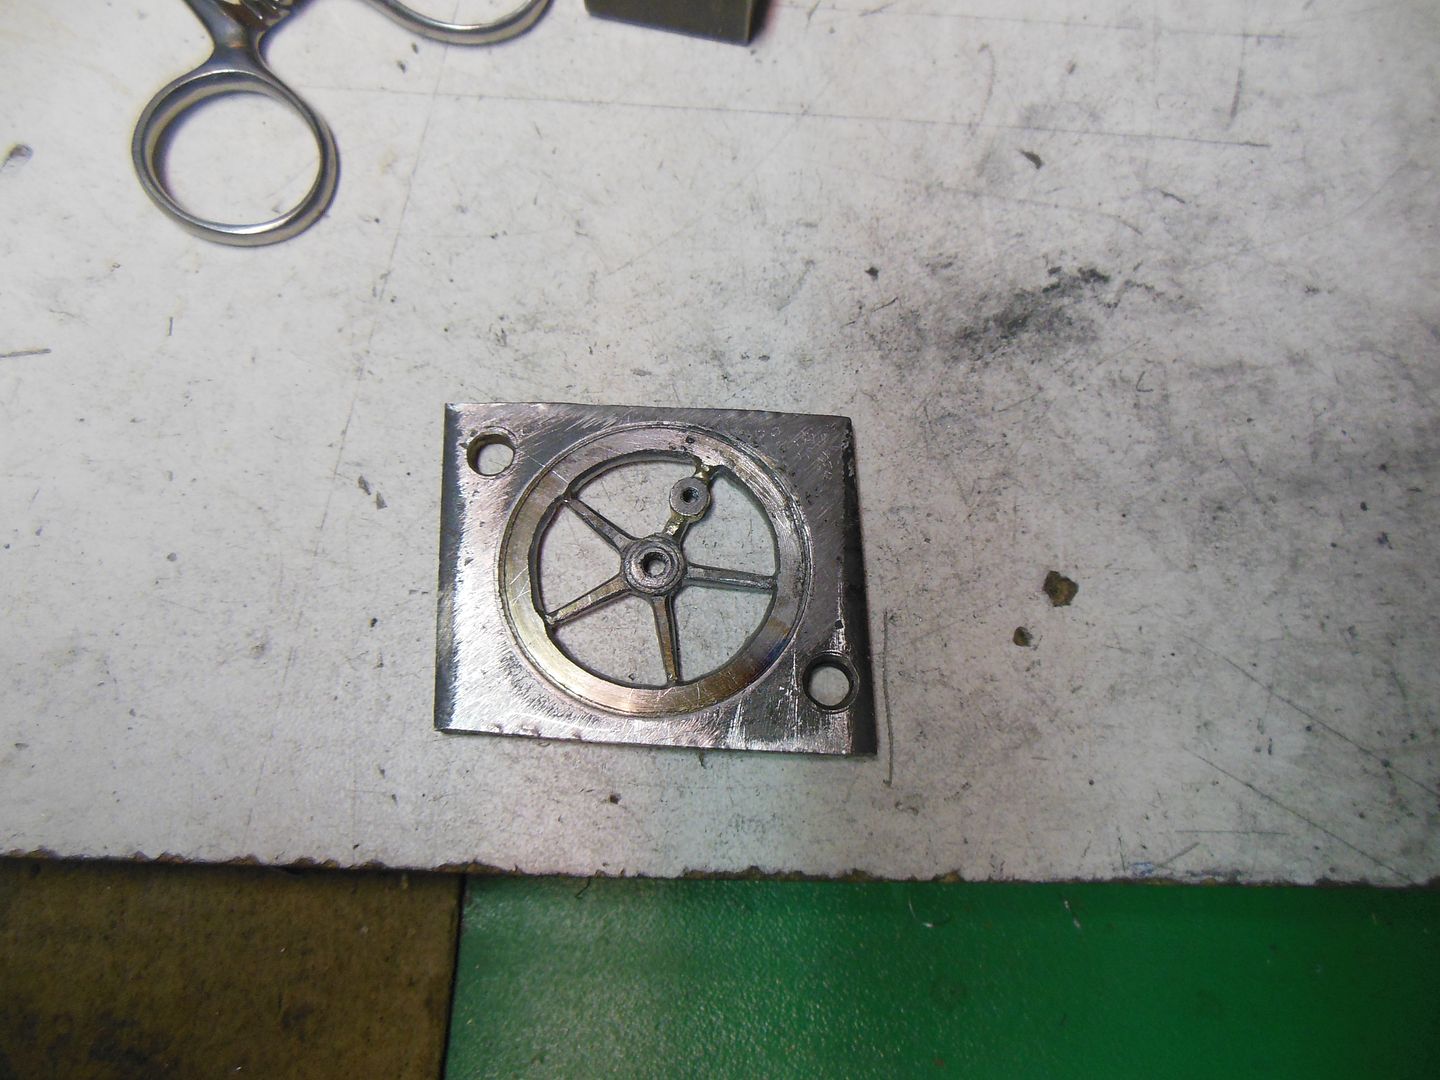
off the faceplate, cut out the bits that don't look like spokes, soldered in a small piece of round stock
to act as the boss for a handle


Hacksawed off the greater part of the excess on the outside of the rim, mounted the wheel on a little stub of rod threaded to
fit, into a collet on the taig lathe and a lot of very small cuts to true it up


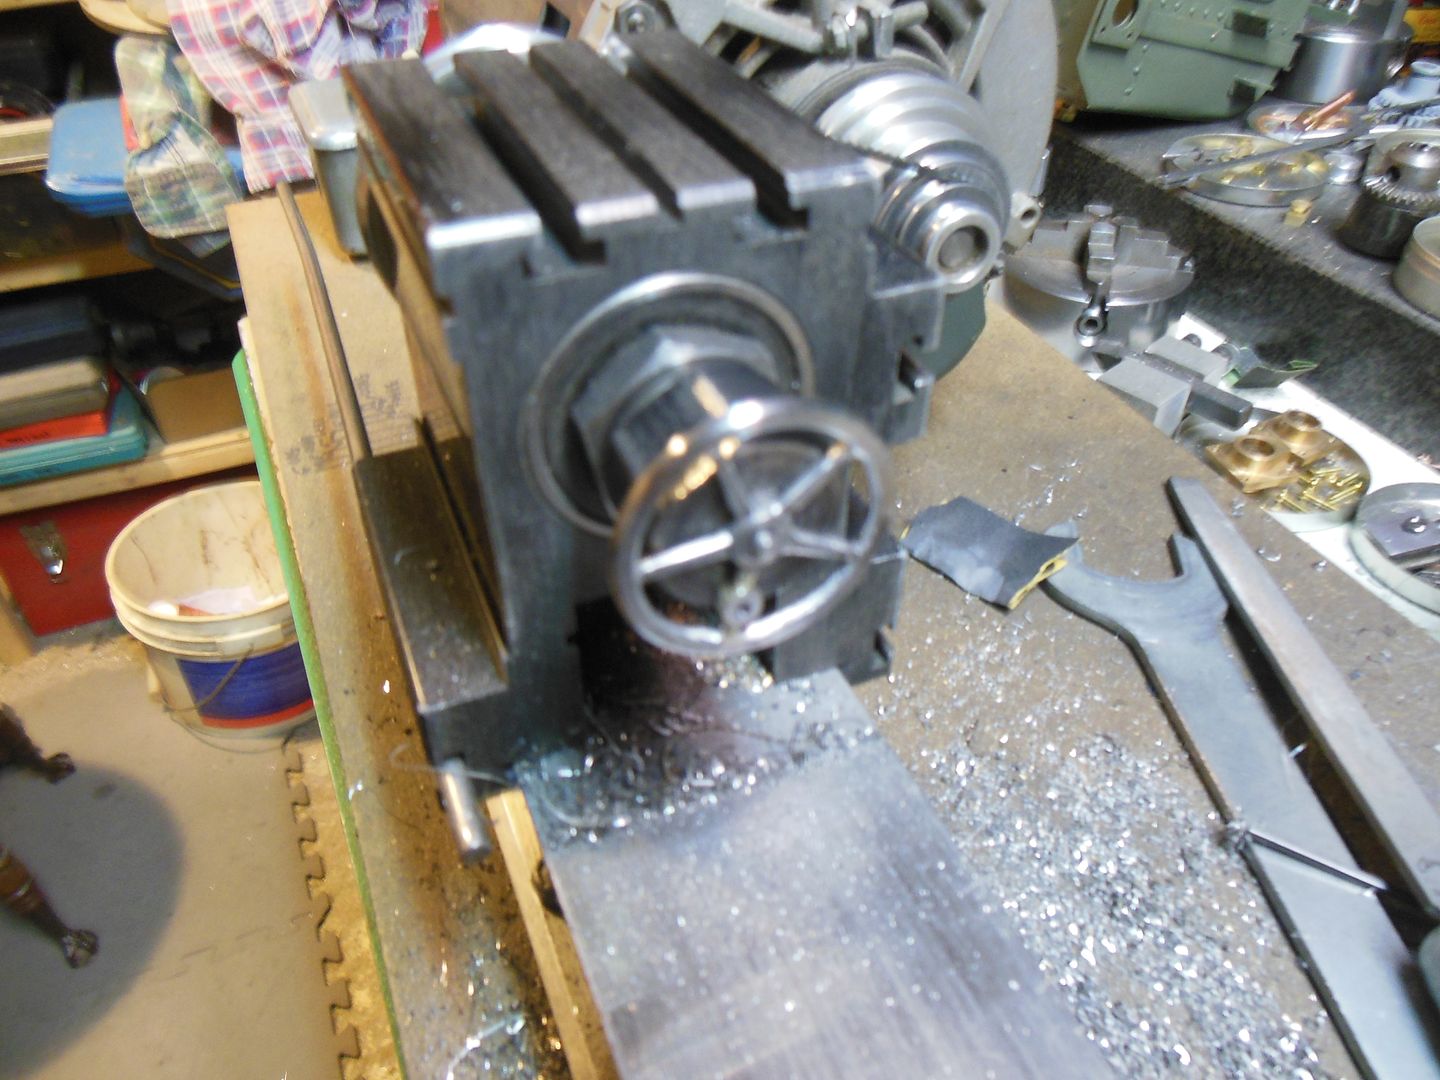
a quick little bit of turning and threading for the handle, and here it is


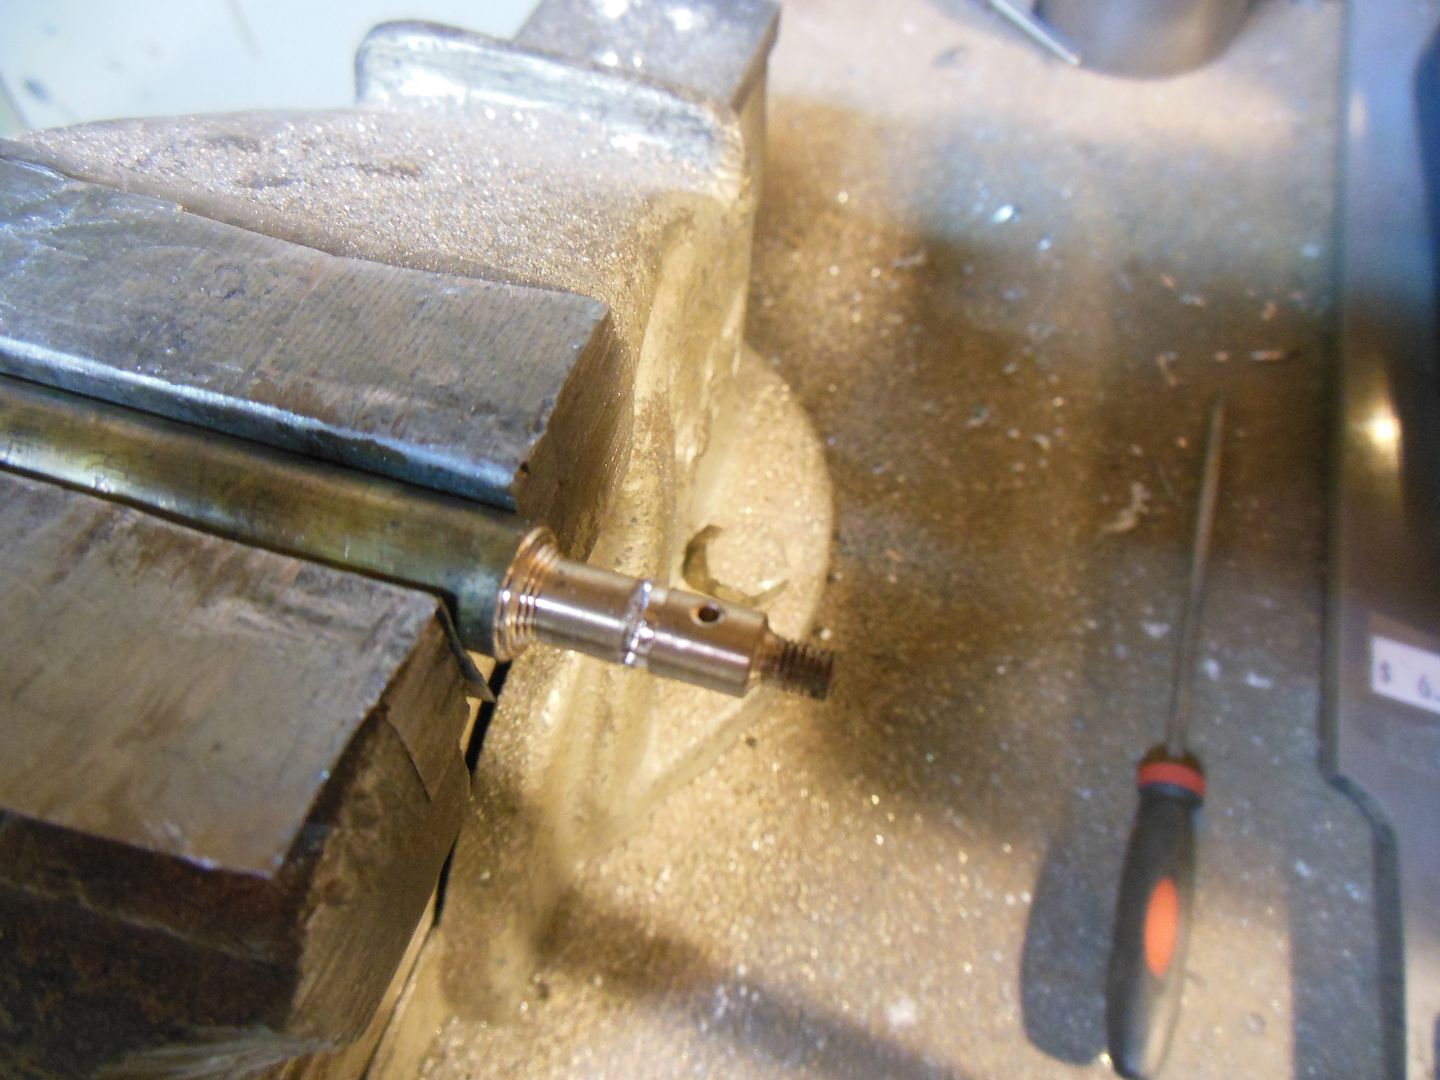
Moved on to the blower valve, turned a bit of bronze to size, threaded the outside for the bonnet, drilled and tapped it for the spindle,
and moved to the mill to cross-drill for the inlet and outlet while still on the parent material


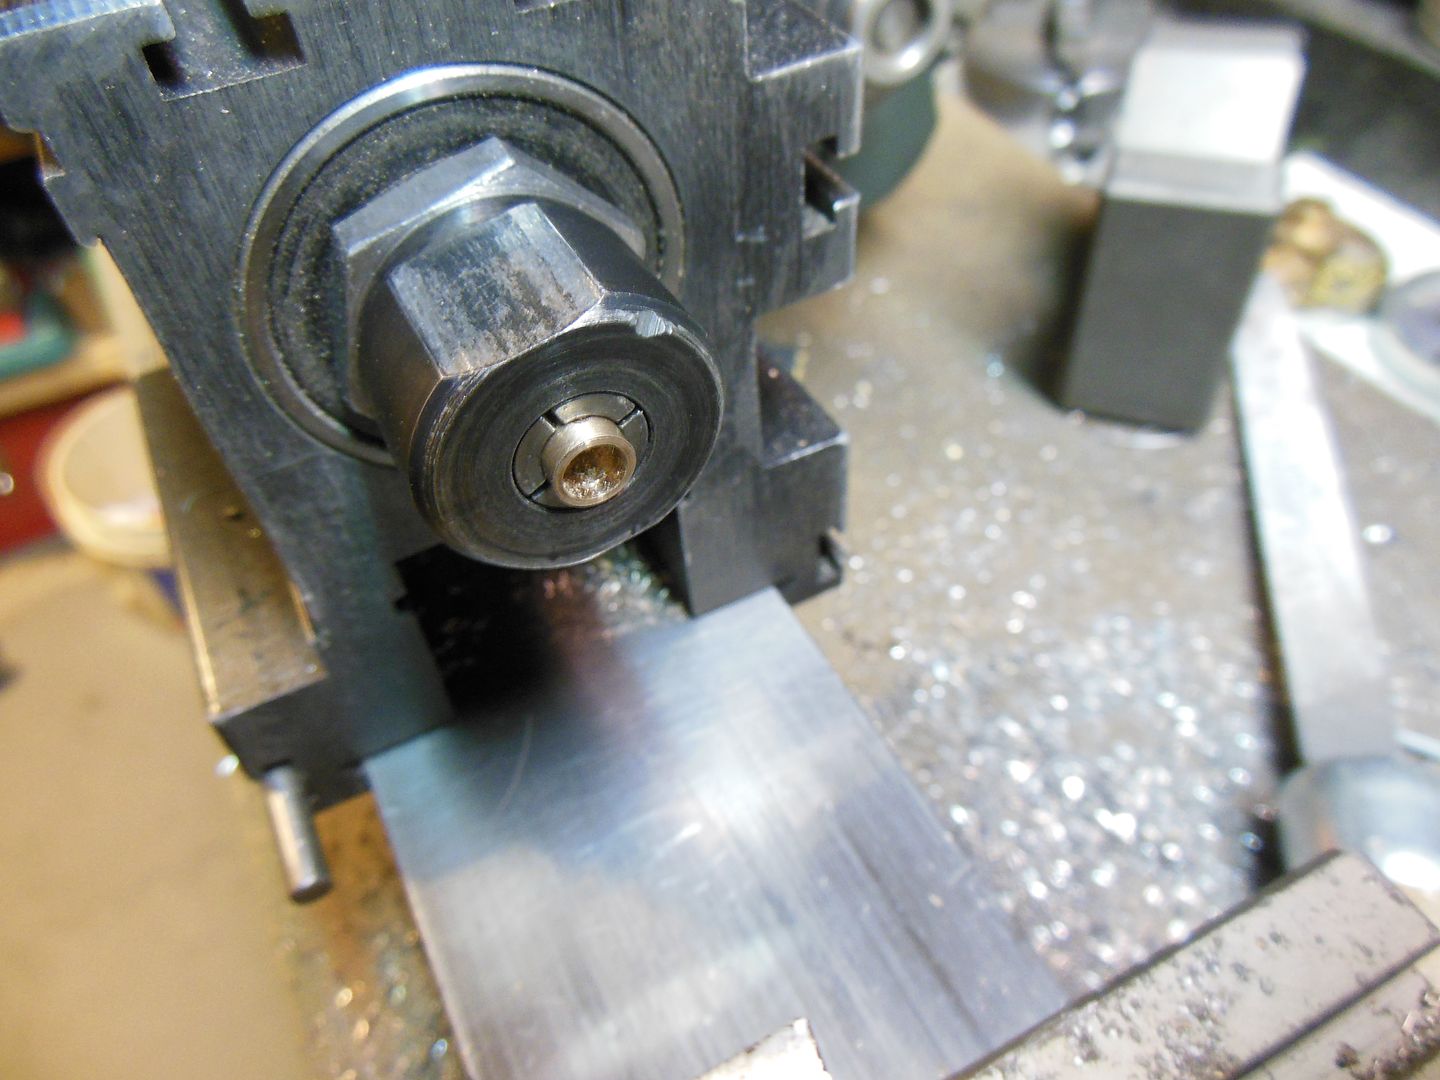
Cut it off, and put it in a collet to trim to size and drill it out for the insert with the various passages required


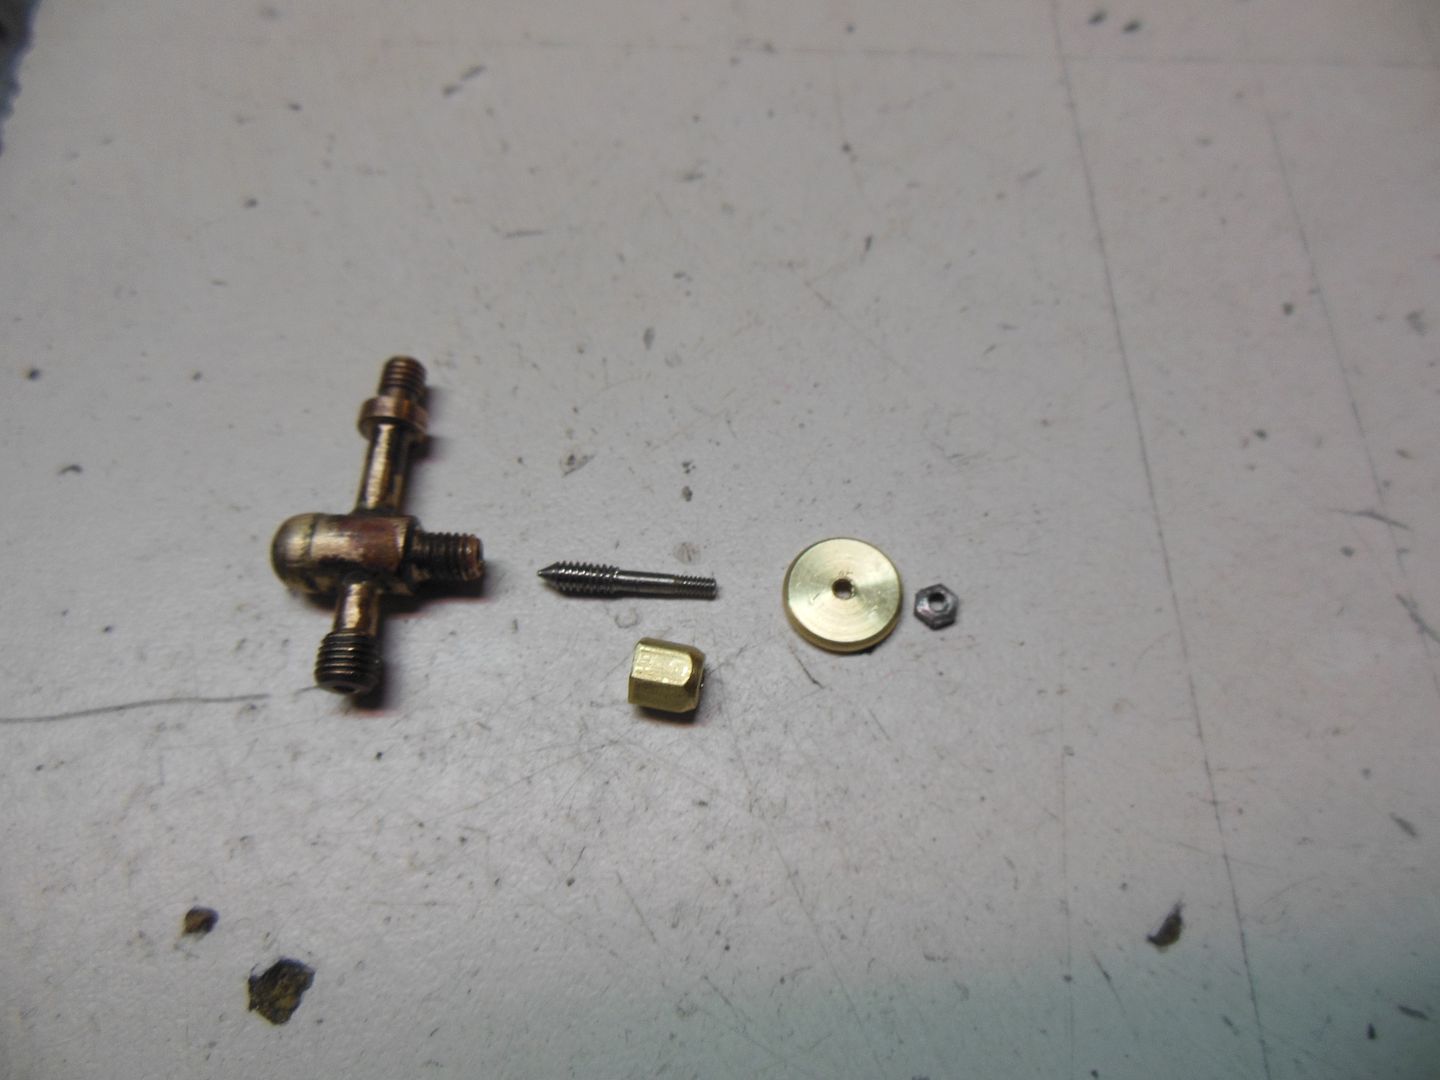
Having neglected to take any pictures of the inserted bit, here it is with the insert and the inlet/outlet pipes (simple turnings, threaded
and through drilled) silver soldered in place, and the bonnet nut, the spindle turned from some stainless, and the handwheel & nut


Those of you familiar with the "words and music" as written by Mason will recognize that I'm really going back and forth with
regards to the order of construction here, simply a question that I tended to skip ahead when missing the material for various bits.
I've now received what should be the LAST order of material for the project, so am catching up... will now go to the valve & piston rods, a piston, and then we'll be in the happy position of running the first test on air!

Joe


Offline Joe d

  • Sr. Member
  • ****
  • Posts: 251
  • Country: ca
Re: Minnie TE Long term project
« Reply #203 on: January 25, 2016, 07:54:17 AM »
made up the rod for the valve ... just a question of threading it on each end with a lock nut


and installed it


and then 2 pieces for the regulator


fitted up the crosshead guide bars, simply some flat stock with a threaded bit on one end to fit into the flange on the cylinder head


Turned the piston from cast iron, I've grooved it for some piston rings as somehow I neglected to get the correct size
of O ring (can always go back and redo if I don't like how it works with the rings)


turned and parted off  some rings


The piston rod is just a bit of Stainless threaded on both ends, here's the family shot:


and where it belongs:


Chasing down a little binding with the crosshead, once I've got that sorted out, have to make up a temporary inlet fitting and fire up the compressor !

cheers, Joe

Offline Joe d

  • Sr. Member
  • ****
  • Posts: 251
  • Country: ca
Re: Minnie TE Long term project
« Reply #204 on: February 10, 2016, 10:09:32 PM »
   :update: :update:  We have a RUNNER!

After a fair bit of mucking around with valve settings and leaking gaskets,
it works... :D :D


It's all downhill from here... once I stop grinning enough to get back to work.

Cheers, Joe
« Last Edit: February 11, 2016, 05:14:00 PM by Stilldrillin »

Offline JD

  • Full Member
  • ***
  • Posts: 154
  • Country: england
  • Gosport Hampshire UK
Re: Minnie TE Long term project
« Reply #205 on: February 11, 2016, 03:04:37 AM »
Joe, the running video comes up as "the video is no longer available the YouTube account associated with this video has been closed"
JD
If you cant fix it hit it with a bigger hammer

Offline Stilldrillin

  • Global Moderator
  • Hero Member
  • *****
  • Posts: 4972
  • Country: gb
  • Staveley, Derbyshire. England.
Re: Minnie TE Long term project
« Reply #206 on: February 11, 2016, 07:44:16 AM »
Looking forward to watching all those parts, running together in harmony, Joe.  :thumbup:

David.
David.

Still drilling holes... Sometimes, in the right place!

Still modifying bits of metal... Occasionally, making an improvement!

Offline Joe d

  • Sr. Member
  • ****
  • Posts: 251
  • Country: ca
Re: Minnie TE Long term project
« Reply #207 on: February 11, 2016, 09:51:42 AM »
JD, David:  The video should be back... For unknown reasons, youtube shut it off,
 for equally unknown reasons, they've turned it back on...

Joe

Offline Stilldrillin

  • Global Moderator
  • Hero Member
  • *****
  • Posts: 4972
  • Country: gb
  • Staveley, Derbyshire. England.
Re: Minnie TE Long term project
« Reply #208 on: February 11, 2016, 11:44:24 AM »
That's a fine sight!  :thumbup:

Well done, Joe.......  :clap: :clap:

David.
David.

Still drilling holes... Sometimes, in the right place!

Still modifying bits of metal... Occasionally, making an improvement!

RobWilson

  • Guest
Re: Minnie TE Long term project
« Reply #209 on: February 11, 2016, 12:24:54 PM »
 :clap: :clap: :clap:  Nice one Joe  :thumbup:


Rob

Offline tom osselton

  • Hero Member
  • *****
  • Posts: 1256
  • Country: ca
Re: Minnie TE Long term project
« Reply #210 on: February 11, 2016, 04:21:20 PM »
Well done!

Offline Joe d

  • Sr. Member
  • ****
  • Posts: 251
  • Country: ca
Re: Minnie TE Long term project
« Reply #211 on: February 12, 2016, 08:19:41 AM »
 :beer:  David, Rob, Tom; have one on me!  Thanks guys.

Dug out the casting for the boiler feed pump that has been gently maturing on the workbench
for a couple of years now.

A couple of passes with a fly-cutter to start squaring up the sides


once done, flipped it over and did the other side, then cleaned up the face of the flange for the pump ram


Cleaned up the top face with an end mill, and drilled several through holes for various water passages. While there, drilled and reamed for the ram


You can see where the pattern maker
lost track of the idea that the boss on the bottom of the casting SHOULD be in line with the flanged bit...


So, cut off the boss, which at least let me use a flycutter to clean up the bottom face, counter bored the hole


Turned, drilled, tapped  a bit of bronze,


and silver soldered it in place


It's been in the pickle overnight, so will get back at it later today.

Cheers, Joe

Offline awemawson

  • Global Moderator
  • Hero Member
  • *****
  • Posts: 8968
  • Country: gb
  • East Sussex, UK
Re: Minnie TE Long term project
« Reply #212 on: February 12, 2016, 08:24:54 AM »
A nice recovery there Joe  :thumbup:
Andrew Mawson
East Sussex

Offline Joe d

  • Sr. Member
  • ****
  • Posts: 251
  • Country: ca
Re: Minnie TE Long term project
« Reply #213 on: February 12, 2016, 10:59:29 AM »
Thanks, Andrew.

On a completely unrelated note, now that the first winter has nearly passed by, how are
the pigs making out in that palace of a shelter you made them?  Fit for the task, as well
as a good-looking building?

Cheers, Joe

Offline awemawson

  • Global Moderator
  • Hero Member
  • *****
  • Posts: 8968
  • Country: gb
  • East Sussex, UK
Re: Minnie TE Long term project
« Reply #214 on: February 12, 2016, 11:55:45 AM »
Well Joe, Blossom the Sow had her boyfriend Robert to stay for a couple of months, their nuptials being in the new sty  :thumbup:

He's now gone home and hopefully we'll hear the patter of tiny trotters end of March / early April. I now need to pressure washer / steam clean out the original sty, as it's been unoccupied during that time and without their constant nuzzling has gone rather green. It wont be used until the latest batch of offspring are ready for weaning.

Apparently Robert got his picture on the local news where he lives, as he sired a litter that was born on Christmas Day  :clap:
Andrew Mawson
East Sussex

Offline Joe d

  • Sr. Member
  • ****
  • Posts: 251
  • Country: ca
Re: Minnie TE Long term project
« Reply #215 on: March 31, 2016, 10:34:03 PM »
Well... seems it's been a while.  Few bits of life getting in the way of shop time, but it's getting back to normal now.

Picked up with the water pump;

another bit of not-quite on pattern making left one of the bolt holes for securing the pump to the boiler hanging out in the air
so I counter-bored it,


and soft-soldered in a bit of round stock


sawed off the excess, and ran the flycutter over it all to even it out.  You can see the result here, where I am drilling the flange for the
gland using the gland to spot the holes


then filed down the flange to match the gland, made up some bronze bolts and some simple turning of some stainless
for the ram


and here it is in place


The pipe unions and the square headed valve cover screws were made up of some bronze, this occasioned some delay as the die I used for the unions broke threading the very first one... the new one works just fine...

Started on the eccentric strap earlier today and buggered it already, so will start over tomorrow.

Cheers, Joe

Offline Joe d

  • Sr. Member
  • ****
  • Posts: 251
  • Country: ca
Re: Minnie TE Long term project
« Reply #216 on: April 05, 2016, 09:37:10 AM »
Well, second time was the charm...

Set up in the lathe for boring out the centre...(never got this far on the 1st attempt, I'd split the material and then drilled
for the fasteners, and went off all squint with the holes, nothing matched up.  This time I drilled first and then split the
material, cleaned up the mating faces and carried on)


hacksawed off most of the waste, then cleaned up in the mill


some sawing,  filing, and drilling for the arm and then riveted in place (I had turned the eccentric when I did the ones for the valves)


And where it all goes


Joe

Offline Joe d

  • Sr. Member
  • ****
  • Posts: 251
  • Country: ca
Re: Minnie TE Long term project
« Reply #217 on: April 10, 2016, 10:35:03 PM »
Made up the valve for the tender tank feed to the boiler pump...

first turned various bits from bronze


silver soldered the inlet & outlet pipes to the valve body, then into the mill to drill and tap for the valve top, which is internally threaded for
the spindle


Then drilled through the inlet and outlet pipes, that I had not yet through drilled when they were soldered into place


and then some straightforward turning and threading of a bit of stainless for the spindle, which then had some piano wire soldered on
as an extension so that it will reach over the top edge of the tender.  Once in place, and with the brake handwheel assembly installed,
the end of the extension will be bent over to horizontal to act as a handle


Cheers, Joe

Offline Joe d

  • Sr. Member
  • ****
  • Posts: 251
  • Country: ca
Re: Minnie TE Long term project
« Reply #218 on: April 11, 2016, 11:48:04 AM »
Bent up a little bracket from some brass, tinned the back face, drilled the tender and applied a bit of flux, and secured it with some scale lag bolts that cheerfully acted as self-tapping sheet metal screws.. which were well coated with flux before screwing into place.
Then gently heated until the soft solder flowed.  All that as I neglected to realize I had this bracket to install back when I was making the tender,
where it would have been less worrying that I might bugger the seal in the tender's bottom joint with more soldering...
From the outside at least, all appears well


Threaded the end of some steel rod, and then using the collet as a depth stop (which you can't see on the other end of the vise), machined a flat on opposite sides, and drilled through to fit
the extension on the valve spindle


Cut the above from it's parent stock, rounded the cut end, drilled the tender side for it, and here we are:


Really starting to close in on the end now!

Joe

RobWilson

  • Guest
Re: Minnie TE Long term project
« Reply #219 on: April 11, 2016, 01:06:10 PM »
 :clap: :clap: Looking great Joe  :thumbup: 

I am looking forward to seeing the engine complete .


Rob

Offline krv3000

  • Hero Member
  • *****
  • Posts: 2183
  • Country: gb
Re: Minnie TE Long term project
« Reply #220 on: April 11, 2016, 03:30:01 PM »
hi that's shaping up nice

Offline Joe d

  • Sr. Member
  • ****
  • Posts: 251
  • Country: ca
Re: Minnie TE Long term project
« Reply #221 on: April 11, 2016, 03:40:29 PM »
Rob, KRV, Thanks lads.

About time you got back to yours, eh Rob? :wack: :wack:

Joe

RobWilson

  • Guest
Re: Minnie TE Long term project
« Reply #222 on: April 11, 2016, 04:50:42 PM »

About time you got back to yours, eh Rob? :wack: :wack:

Joe

Maybe one day Joe ,I  must admit I more interest in watching  your build  progress :thumbup:

Do you have a name for her ?


Rob


Offline Joe d

  • Sr. Member
  • ****
  • Posts: 251
  • Country: ca
Re: Minnie TE Long term project
« Reply #223 on: April 17, 2016, 11:06:12 PM »
Hi Rob... Haven't nailed it down yet, but probably will go all traditional and name it GEORGE after my Dad...

Made up the throttle lever and rod, didn't take any piccys, just straight forward turning of one threaded bit to fit the valve rod, and
mill out a clevis for the other end, the lever is flat bar with a turned handle soldered on, and the bracket was a soldered together fabrication
of flat bar as well. In place here, with some temporary fasteners


moved on to the blow-down valve, turned and threaded a bit of bronze, parted it off and screwed it into a bit of spare ali in the small lathe (that was drilled and tapped in place so it is concentric with the spindle) turned down the now exposed other end, threaded it, moved the
chuck to the dividing head in the mill to mill the flats to form a hex (all this as I didn't have any hex bronze in the pile)


Turned, threaded, and parted off the spindle, also a bit of bronze


some straight forward turned and tapped bits as well,


soldered together,


assembled, and in place:


and now it's time for a cuppa and a smoke....

Joe

Offline Joe d

  • Sr. Member
  • ****
  • Posts: 251
  • Country: ca
Re: Minnie TE Long term project
« Reply #224 on: May 12, 2016, 10:58:32 PM »
Well, squeezed in some shop time,  got to work on the grate and the ash pan

sliced up some stainless, drilled, turned some spacers, cut some rod to assemble it all on


Stacked up with the ends of the rods peened over


The ash pan was folded in the bench vise, and the corners silver soldered, riveted in supports for the grate, made up the damper and soldered on some hinges filed up out of sheet steel, and soldered heads on some rods as pins
The control rod for the damper is piano wire with a slotted bit of flat stock soldered in


And here it is where it lives:


I'm not to crazy about the locking handle as drawn, so I will most likely make up something a little more in keeping with the look of the engine


And now have turned to some of the brown stuff: need to make up the blocks for the brake

turned some nice dry hard maple:


Set up my handy-dandy toolpost that lets me turn stuff to the extreme edge of the Taig's envelope, and parting off a ring of the maple


and here it is


this will be cut into small segments and fastened to to the brake band....

Joe