Author Topic: Dry sump pump build  (Read 12382 times)

Offline jones

  • Jr. Member
  • **
  • Posts: 31
Dry sump pump build
« on: September 10, 2012, 09:31:20 AM »
Hi everyone, long time no post.

Over the past year I've been working on transplanting a 2.5L V6 into my Mazda MX-5 (I'm a slow worker). I've just started to make a dry sump conversion for it and thought it might be of interest to a few of the members here.

On with the pics!
I started with this block of aluminium which I bought from a scrapyard for $15. I think it's 7075 or similar because of the dark corrosion on the surface and the fact it doesn't machine like regular aluminium, it's much, much harder.


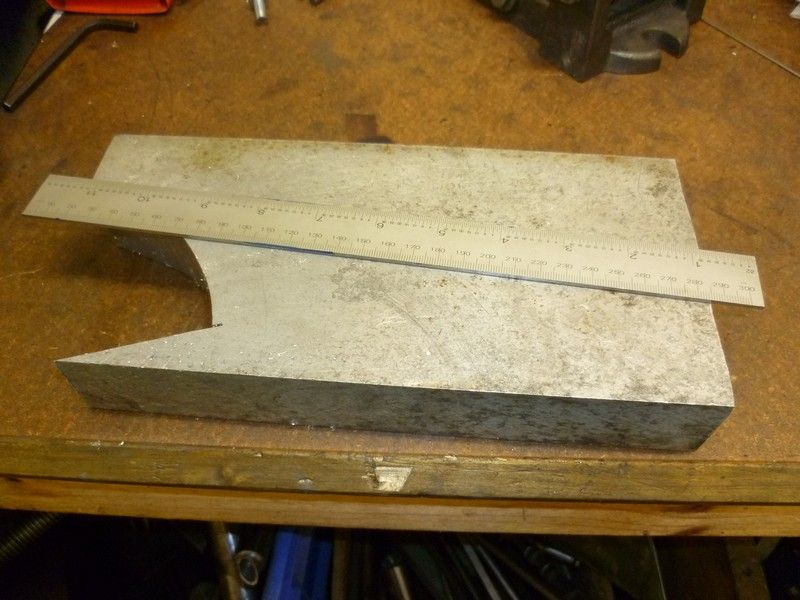
(the missing chunk was used for an oil filter relocation kit I made)

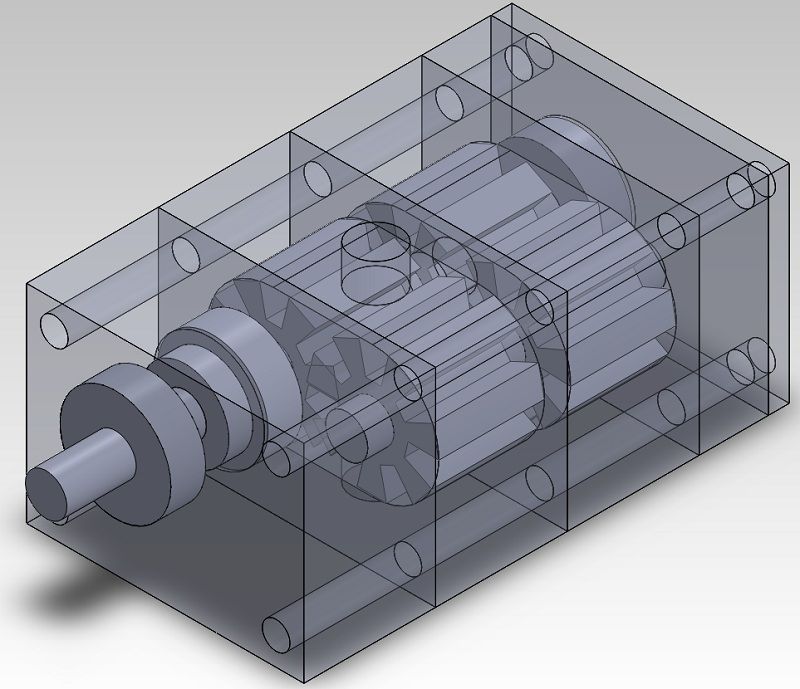
I made a model of the pump in CAD to check clearances and make sure everything would work properly. I'm using two sets of pump gears from a Holden 308 V8 engine.


I then made a few drawings and cut the bigger piece roughly to size


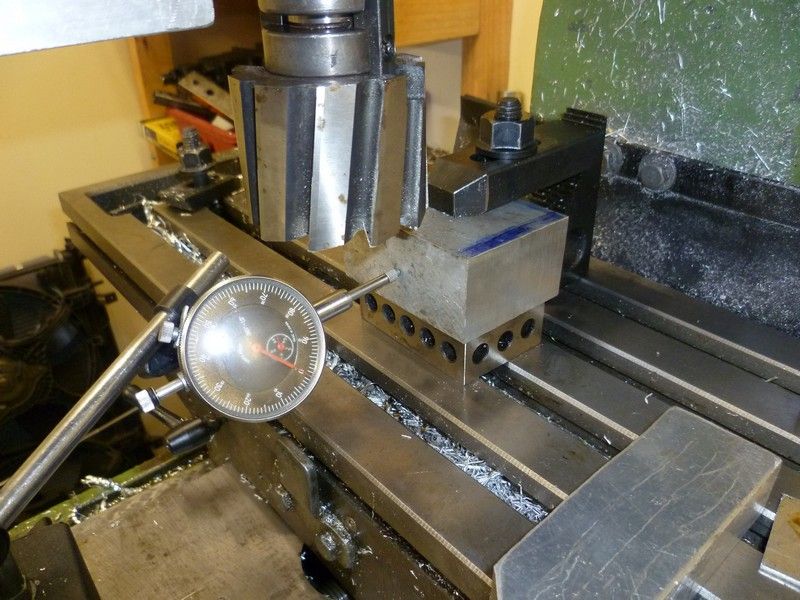
Initially I tried to square up the blocks on my mini-mill using this crazy shell mill cutter, but it didn't give a very good finish.


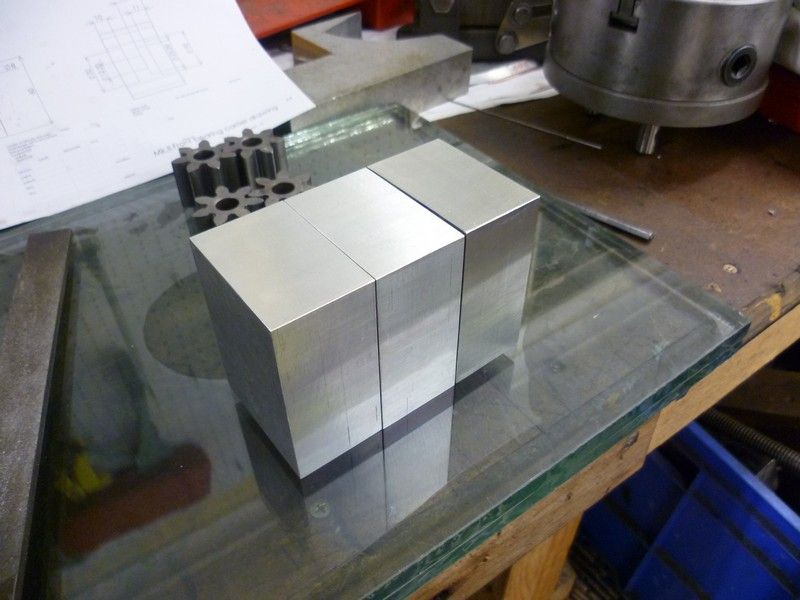
So I decided to dust off my least used machine and give it another try.


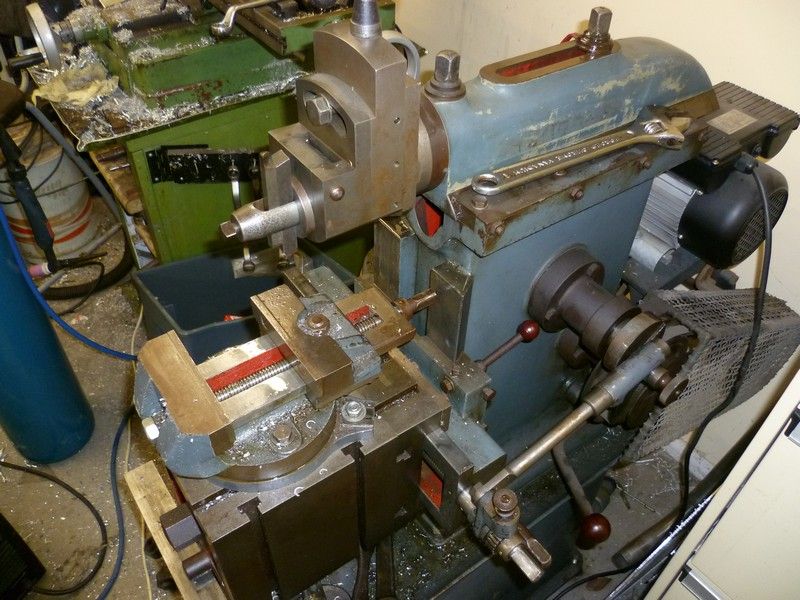
It's absolutely amazing, after a good solid hour of setting up and probably another couple watching it machine the blocks they're very square and with a very good surface finish (except the one done on the mill).


Tomorrow I'm going to try to make a jig to hold the blocks on the lathe for machining. It's critical the bores are exactly the same distance apart on both blocks. I might also try to cut the internal keyways for the gears while I've got the shaper working.

Comments, questions and (hopefully constructive) criticism welcome :)

Cheers,
Andrew
Andrew
More sideways = more fun!

Offline AdeV

  • Madmodder Committee
  • Hero Member
  • *****
  • Posts: 2434
  • Country: gb
Re: Dry sump pump build
« Reply #1 on: September 10, 2012, 12:01:58 PM »
Well, you've definitely got my attention on this one  :wave: - as you may know, I've made a dry sump pan, but there's no way I'd have risked making the pump... hopefully your project will inspire me to try.
Cheers!
Ade.
--
Location: Wallasey, Merseyside. A long way from anywhere.
Occasionally: Zhengzhou, China. An even longer way from anywhere...

Offline Brass_Machine

  • Administrator
  • Hero Member
  • *****
  • Posts: 5504
  • Country: us
Re: Dry sump pump build
« Reply #2 on: September 10, 2012, 12:13:36 PM »
This is going to be a cool build to watch!

I see you have the gears (impellers?) in the 2nd and last picture. Did you source those or make them?

Eric
Science is fun.

We're all mad here. I'm mad. You're mad.

Offline PekkaNF

  • Hero Member
  • *****
  • Posts: 2523
  • Country: fi
Re: Dry sump pump build
« Reply #3 on: September 10, 2012, 01:04:47 PM »
Brass: Holden. Australian for a car :clap:
http://en.wikipedia.org/wiki/Holden_V8_engine

That "crazy shell mill cutter" looks like a rotabroach to me.
http://www.rotabroach.co.uk/cutters

Interesting project. Interesting to get clearances right.

PekkaNF

Offline AndreasL

  • Jr. Member
  • **
  • Posts: 28
Re: Dry sump pump build
« Reply #4 on: September 11, 2012, 06:58:20 AM »
This one will be on top of my "to follow list".  :thumbup:

Offline Pete.

  • Hero Member
  • *****
  • Posts: 1075
  • Country: gb
Re: Dry sump pump build
« Reply #5 on: September 11, 2012, 12:08:03 PM »
Well, you've definitely got my attention on this one  :wave: - as you may know, I've made a dry sump pan, but there's no way I'd have risked making the pump... hopefully your project will inspire me to try.

Pumps are easier to make than you think, if you already have the gears. I've made a few from epicycloid gear sets taken from small engines, to scavenge oil from turbochargers on bikes. Clearances are looser than you might expect.

Offline jones

  • Jr. Member
  • **
  • Posts: 31
Re: Dry sump pump build
« Reply #6 on: September 12, 2012, 07:41:57 AM »
Thanks for the feedback guys. I haven't done much more on the pump yet, just made another of the blocks and marked out the 4 holes around the edge.

What sort of clearance should I have on the gears to the housing? And between the gears? I figure oil is pretty thick so it shouldn't need to be TOO tight.

Due to the lack of progress photo's, here are a couple of other things I've made for the car :D

Oil filter relocation


Intake manifolds


Airbox


Exhaust bits


Adapter plate


:D
Andrew
More sideways = more fun!

Offline Darren

  • Madmodder Committee
  • Hero Member
  • *****
  • Posts: 3795
  • N/Wales
Re: Dry sump pump build
« Reply #7 on: September 12, 2012, 08:39:09 AM »
I love these sort of threads, any more info on the oil filter housing?
You will find it a distinct help… if you know and look as if you know what you are doing. (IRS training manual)

Offline jones

  • Jr. Member
  • **
  • Posts: 31
Re: Dry sump pump build
« Reply #8 on: September 12, 2012, 09:26:25 AM »
Sure, it has a 3/4" NPT threaded inlet port and an AN-10 outlet. The filter is a Ryco Z9 which is HUGE compared to the original tiny Mazda filter and is quite cheap because it's used in Holden V8's and some Fords.


And here are my 3 attempts at the engine side adapter


The first was too long, the second had -10 fittings made from 12L14 so they cracked when I welded it, and the third is all stainless and is what's on the car at the moment.


Andrew
More sideways = more fun!

Offline v7guy

  • Newbie
  • *
  • Posts: 1
Re: Dry sump pump build
« Reply #9 on: September 29, 2012, 07:01:48 AM »
It looks relatively simple and in general a good plan.  I like the use of the oil pump gears used in this application,  really looking forward to updates.
What kind of clearances are you using for the housing for the gears... just mimicking the stock oil pump housing clearances?

Offline jones

  • Jr. Member
  • **
  • Posts: 31
Re: Dry sump pump build
« Reply #10 on: October 03, 2012, 11:08:53 AM »
Thanks V7 guy :)

I haven't had much time over the last few weeks to work on the pump, uni work is really starting to mount up :bang:

I've machined the final block to size and drilled the 4 outer holes in each of the blocks for bolting them together. I've also made a jig to hold the gears so I can ream them 1/2" (when my reamer arrives).

As for clearances I really have no idea. I was going to aim for 1.501" diameter for the 1.500" gears and try to get the width within a thou. as well. As the aluminium expands the clearances will increase so I don't want to have too much slop in the system, though oil is fairly viscous so I think it would still pump even with much looser clearances.
If anyone has any input on clearances I'm all ears :)
Andrew
More sideways = more fun!

Offline Pete.

  • Hero Member
  • *****
  • Posts: 1075
  • Country: gb
Re: Dry sump pump build
« Reply #11 on: October 03, 2012, 01:49:03 PM »
I went with 2 thou on the lobes and on the side clearance but my pump is just a scavenge so not pressure-critical.

Offline jones

  • Jr. Member
  • **
  • Posts: 31
Re: Dry sump pump build
« Reply #12 on: October 03, 2012, 09:35:54 PM »
Thanks Pete, this pump is only scavenge as well. I'm using the stock oil pump for pressure and feeding it straight from the dry sump tank.
Andrew
More sideways = more fun!

Offline andre

  • Jr. Member
  • **
  • Posts: 18
Re: Dry sump pump build
« Reply #13 on: November 04, 2012, 08:44:30 PM »
 Nice project any updates also where about in Australia are you from?

Offline jones

  • Jr. Member
  • **
  • Posts: 31
Re: Dry sump pump build
« Reply #14 on: November 05, 2012, 02:59:16 AM »
Hi Andre,

I'm in Sydney but currently in the middle of exams and then moving house so no real updates on the pump. I enlarged the holes in the gears from 12.2mm to 12.7mm (1/2") but that's all really. I should be set up at the new place by the 16th or so, so after that it'll be straight back into it :) The next step is to put a keyway in two of the gears using the shaper.
Andrew
More sideways = more fun!

Offline andre

  • Jr. Member
  • **
  • Posts: 18
Re: Dry sump pump build
« Reply #15 on: November 07, 2012, 08:55:45 PM »
G'day Jones I also live in Sydney. I am in year 12 I am building a cnc lathe Out of curiosity what Cad are you using?

Offline jones

  • Jr. Member
  • **
  • Posts: 31
Re: Dry sump pump build
« Reply #16 on: December 06, 2012, 03:46:50 AM »
Hi Andre, all CAD is done in Solidworks :D

:worthless:

Not too much progress to report, other than that I've got the new workshop sorted to a level where I can continue work on the pump :)

The jig for machining the bores for the gears:


This ensures they're all the same. I've only machined one of the bores but to do so I had to make a new boring bar.


It's pretty rough but it did the job. The pocket for the gear is bored to 38.12mm for a 38.10mm diameter gear and 30.50mm depth for the 30.48mm width of the gear. The aluminium will expand more than the steel gears so the clearances should increase and it shouldn't seize (well, that's the theory. I might have not given it enough clearance, we'll see once I've got it assembled)


Now that I've got the boring bar, 1/2" reamer and faceplate jig sorted I hope the pump won't take too long to make. It really is not a complicated part but each piece needs to be fairly accurate for it to work properly. I don't think I've ever made anything with tolerances this tight, it's interesting.
Andrew
More sideways = more fun!

Offline jones

  • Jr. Member
  • **
  • Posts: 31
Re: Dry sump pump build
« Reply #17 on: December 07, 2012, 10:13:25 PM »
Found time to bore another of the gear housings. The gears mesh pretty well, I'm happy with how it's going.


I've got the process down now so it shouldn't take long to finish off the other housings.
Andrew
More sideways = more fun!

Offline jones

  • Jr. Member
  • **
  • Posts: 31
Re: Dry sump pump build
« Reply #18 on: December 10, 2012, 07:25:59 AM »
I'd say the pump is around 70% done now, not including the mounts or pulley. I've bored out all the gear pockets and most of the bearing ones.


The bottom right piece shown in the last pic slipped in the jig after the last cut. The hole is the right diameter and depth but now has a huge burr at the bottom. I might be able to fix it, I'll try tomorrow.

To finish the pump I have to drill and tap the inlets and outlets, bore out the end piece for it's second bearing and oil seal, put a keyway in two of the gears and make the drive shafts, pulley and mounting bracket.
Andrew
More sideways = more fun!