Author Topic: PeterE Tries to Build a Trojan ...  (Read 22649 times)

Offline Jasonb

  • Sr. Member
  • ****
  • Posts: 451
  • Country: gb

Offline PeterE

  • Sr. Member
  • ****
  • Posts: 458
  • Country: se
  • Gothenburg
Re: PeterE Tries to Build a Trojan ...
« Reply #26 on: August 21, 2012, 03:50:14 PM »
Hi again Jason,

A really big thank you for the links, they are great and now added to my list  :thumbup:

BR

/Peter
Always at the edge of my abilities, too often beyond ;-)

Offline saw

  • Hero Member
  • *****
  • Posts: 1003
  • Country: se
  • lucky amateur
    • Svenssons AckordsWerkstad
Re: PeterE Tries to Build a Trojan ...
« Reply #27 on: August 21, 2012, 04:05:42 PM »
Even here you have a good shop http://www.pmresearchinc.com/store/home.php  :D
_________________________
Greetings / Benni
http://myprojecty.wordpress.com/category/steam-engine/

Offline andyf

  • In Memoriam
  • Hero Member
  • *****
  • Posts: 1795
  • Country: gb
    • The Warco WM180 Lathe - Modifications
Re: PeterE Tries to Build a Trojan ...
« Reply #28 on: August 21, 2012, 04:30:53 PM »
Peter,

I appreciate your reluctance to use simple soft solder, though it would probably be OK unless you were using superheated steam.

Rather than going in for the fully-fledged roasting involved in "real" silver soldering, you might consider Cupalloys "Comsol", which melts at 295C. That should be high enough to avoid any problems. It's on this page
 http://www.cupalloys.co.uk/soft-solders-c41.html

Andy
Sale, Cheshire
I've cut the end off it twice, but it's still too short

Offline PeterE

  • Sr. Member
  • ****
  • Posts: 458
  • Country: se
  • Gothenburg
Re: PeterE Tries to Build a Trojan ...
« Reply #29 on: August 21, 2012, 04:52:56 PM »
Hi Andy,

Thank you for the link to Cupalloy, very interesting as I also make MR models in brass requiring solder joining. I will read through very carefully and see where I get.

I have also done real silver soldering a good bunch of years ago. I then did I think four or five semesters in a silver smithing coarse. The only soldering done there was done on sterling silver using true silver solder and Borax as flux. Borax which was very nice to work with as it first dried when heqted and could then "glue" the small silver solder chips to the joint to keep them in place til they were molted. Did a fair bit of soldering then so I have the gear already. But I guess the 750 degrees is a tad too high for this, or?

The solders at Cupalloy seemed to flow att about two thirds of that temp.

BR

/Peter
Always at the edge of my abilities, too often beyond ;-)

Offline PeterE

  • Sr. Member
  • ****
  • Posts: 458
  • Country: se
  • Gothenburg
Re: PeterE Tries to Build a Trojan ...
« Reply #30 on: August 24, 2012, 01:13:54 PM »
While waiting for delivery of both some tooling (taps etc) and material I decided that I would only be dis-satified if I "fixed" the goofed parts. I would only see the errors and not the rest, so I made some new bits from some brass bar stock I have. First a new top cap ...

Compared with the original it is only the colour differing.

Then the bottom cap is in the 4-jaw...

... and it will stay there until I have all things ready like piston rod bore (4 mm) and the gland socket (1/4"x40) as the underside is the datum side.  When the gland bore and thread is done I will narrow down the "spigot" somewhat and then I can simply fit the whole thing in my ER-32 collet holder to make sure that the other side becomes correct and true.

I also read ahead in the documentation I found, and it seems like Mr Bertinat liked to make the different bits to measure as one chain and then make the holes and threads as a second round, hence nothing mentioned at this stage on how to machine and thread the bits as one go.

So, being a beginner with this, I find it suitable to follow the build description before doing it my way  :)

BR

/Peter
Always at the edge of my abilities, too often beyond ;-)

Offline saw

  • Hero Member
  • *****
  • Posts: 1003
  • Country: se
  • lucky amateur
    • Svenssons AckordsWerkstad
Re: PeterE Tries to Build a Trojan ...
« Reply #31 on: August 24, 2012, 01:43:10 PM »
Good work Peter  :thumbup: :thumbup:
_________________________
Greetings / Benni
http://myprojecty.wordpress.com/category/steam-engine/

Offline PeterE

  • Sr. Member
  • ****
  • Posts: 458
  • Country: se
  • Gothenburg
Re: PeterE Tries to Build a Trojan ...
« Reply #32 on: September 07, 2012, 03:55:13 PM »
Finally got delivery of a set of Imperial ME taps and dies which will make it easier to make the sensitive bits. Thereby I could also finalize the drilling and threading for the gland nut in the lathe. Now it is perfectly in line with the piston bore!  :D


Next step was to turn to thickness and make the little seat positioning (centering) the cover in the cylinder bore. I used the spigot to set it up in the collet to guarantee that it was centered and true and it worked beautifully.


The flange is still far too big but I will wait to saw/file it to shape until the necessary holes are in place. Then I can easily copy the original piece.

So, this means that I am back on track again!

BR

/Peter
Always at the edge of my abilities, too often beyond ;-)

Offline saw

  • Hero Member
  • *****
  • Posts: 1003
  • Country: se
  • lucky amateur
    • Svenssons AckordsWerkstad
Re: PeterE Tries to Build a Trojan ...
« Reply #33 on: September 07, 2012, 05:44:02 PM »
Nice done PeteE and it was a good deside that you bought the Imperial, I think that you will be more pleased with that when you are threading.  :headbang:
Nice to see youre progress  :clap: :clap:
_________________________
Greetings / Benni
http://myprojecty.wordpress.com/category/steam-engine/

Offline PeterE

  • Sr. Member
  • ****
  • Posts: 458
  • Country: se
  • Gothenburg
Re: PeterE Tries to Build a Trojan ...
« Reply #34 on: November 03, 2012, 07:20:00 PM »
 :update:
Hi all,

Finally I did get some shop time which resulted in one new item - the trunk guide - the material for which I waited for quite some time.


Made from one single piece of BMS. Turned out quite nicely, and I am pleased with it. Waiting to mark out and drill the holes until all bits are made.

Furthermore I took the plunge and set up to mill the port face holes, and they turned out well too  :bugeye:   :ddb: :ddb: :ddb:
Also the steam outlet hole landed in the correct place.  :D


Here we can see both the port face and the steam outlet.


After reading up I saw a useful tip on how to get the angle of the steam inlets from the port face to the ends of the cylinder at the right angle and in the correct place. the text said to mark out on the side using a pencil which will help determining the angle. Good idea, now it is time to see if I manage to do it right as well. The channel between the ports and the cylinder end shall be two 2mm dia holes. In the cylinder end there shall be a land of the same width as the ports (9/32 or 7,2 mm) and just over the 2 mm in breadth.

Will be back with pics on both my setup, the milling, and the result.

BR

/Peter
Always at the edge of my abilities, too often beyond ;-)

Offline andyf

  • In Memoriam
  • Hero Member
  • *****
  • Posts: 1795
  • Country: gb
    • The Warco WM180 Lathe - Modifications
Re: PeterE Tries to Build a Trojan ...
« Reply #35 on: November 03, 2012, 08:59:05 PM »
...The channel between the ports and the cylinder end shall be two 2mm dia holes. In the cylinder end there shall be a land of the same width as the ports (9/32 or 7,2 mm) and just over the 2 mm in breadth.

Will be back with pics on both my setup, the milling, and the result.

BR

/Peter


I like the positive thinking, Pete! "Shall be" rather than "should be". Forget the the subjunctives and just go for it  :dremel:

Andy
Sale, Cheshire
I've cut the end off it twice, but it's still too short

Offline NickG

  • Madmodder Committee
  • Hero Member
  • *****
  • Posts: 1890
Re: PeterE Tries to Build a Trojan ...
« Reply #36 on: November 04, 2012, 06:30:24 AM »
I've heard this way too - should have done it on the flat side though! You should if you've marked and measured it correctly you'll be able just to line it up with the drill in the vice. That's the theory, never tried it myself yet!  :thumbup:

edit: What am I on about? There is no flat side like a loco cylinder - ignore me  :lol:
Location: County Durham (North East England)

Offline PeterE

  • Sr. Member
  • ****
  • Posts: 458
  • Country: se
  • Gothenburg
Re: PeterE Tries to Build a Trojan ...
« Reply #37 on: November 04, 2012, 01:54:04 PM »
More updates!  :update:

Having thought about the setup before going to sleep, I kind of felt like it would work out the way I thought it out. So here´s the setup.

First I clamped the cylinder in my smallest machine vice. To avoid getting odd angles, I placed a packing at the back of the cylinder and nipped up the vice.


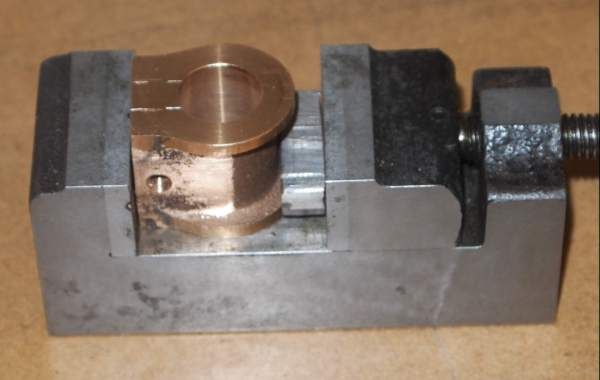
Then I placed this small vice in the big one which resulted in the small one facing correctly so I could see what I was doing, and with a 2 mm drill in the collet chuck I aimed by eye what angle should be used (and wished for the best  :med: )

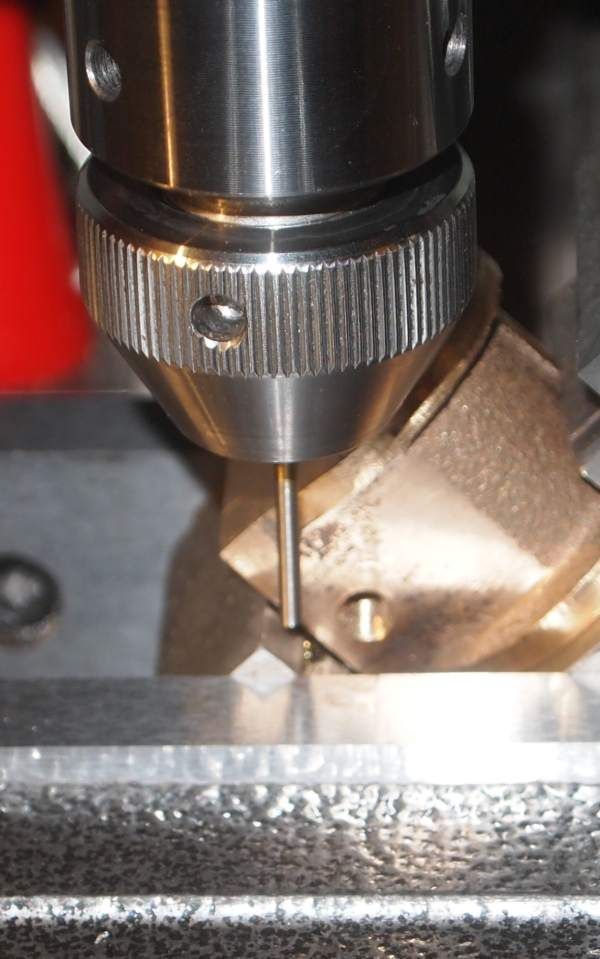
My point of aim was the edge of the cylinder bore and the front edge of the port face with the pencil line showing where the lower edge of the inlet port is.

Then secured the smaller vice in the bigger one, put a new 2 mm FC3 cutter in the milling collet and away it went.
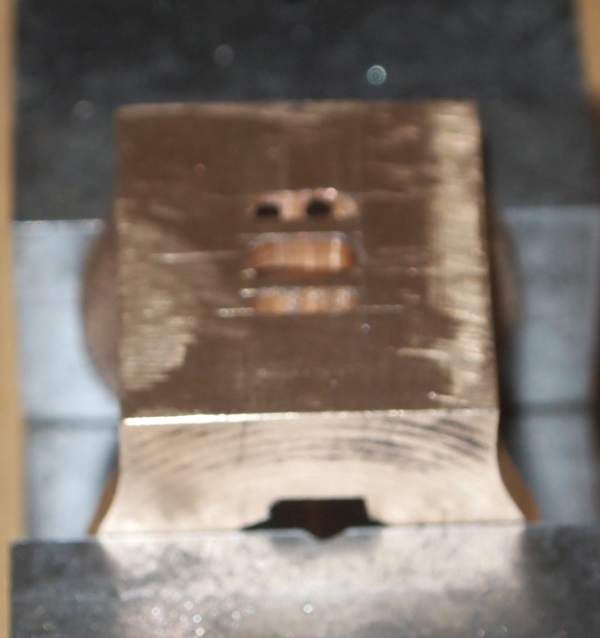
I milled a land large enough to accomodate two 2 mm holes which became about 3 and a bit mm long and 2 and a bit mm wide. After that I placed the milling cutter a short distance from the edge and plunged it down a few mm to give the drill a good and straight start, lifted the mill and re-positioned a bit from the other edge and plunged it for the next hole.

Then change to the drill and drill through to the inlet port.


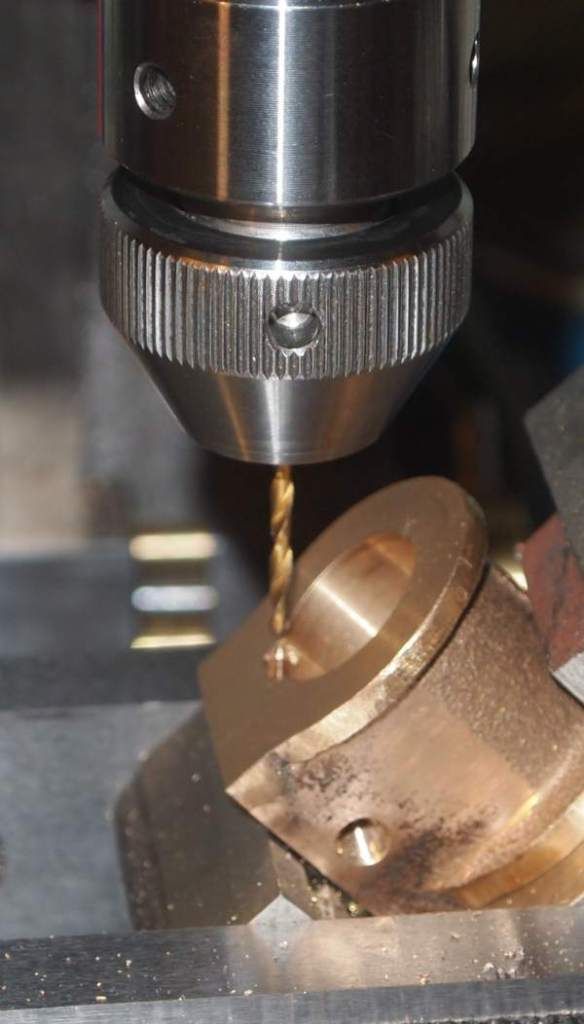
I was a bit worried that I would pass the port as the feeling was not very clear when using the geared feed on the mill instead of the lever feed, but I could actually feel enough to sense when  I broke through. Up with the drill and down the next hole.

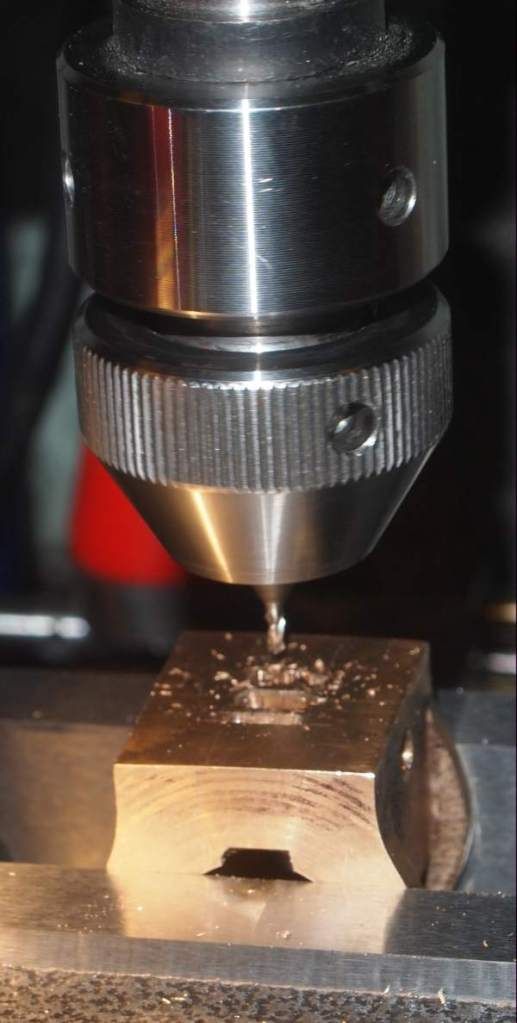
Then turn the cylinder over and do it all again for the other side. The back on the back to clean the ports out with the 1.5 mm FC3 cutter.


Success !  :ddb: :ddb: :ddb: :ddb: :ddb:

All holes came out nice and clear right into their respective port inlet as can be seen from the example below.


This will mean that the cylinder is done and now only requires a bit of cleaning up.

Work continues ...

BR

/Peter
Always at the edge of my abilities, too often beyond ;-)

Offline AussieJimG

  • In Memoriam
  • Sr. Member
  • *****
  • Posts: 381
  • Country: au
Re: PeterE Tries to Build a Trojan ...
« Reply #38 on: November 04, 2012, 03:54:50 PM »
Well done Peter, a good result

Jim

Offline dsquire

  • In Memoriam
  • Hero Member
  • *****
  • Posts: 2275
  • Country: ca
  • Kitchener, Ontario, Canada
Re: PeterE Tries to Build a Trojan ...
« Reply #39 on: November 04, 2012, 04:31:53 PM »
Peter

Nice job on that, now one of the trickiest pieces is behind you.  :thumbup:  :D

Cheers  :beer:

Don
Good, better, best.
Never let it rest,
'til your good is better,
and your better best

Offline PeterE

  • Sr. Member
  • ****
  • Posts: 458
  • Country: se
  • Gothenburg
Re: PeterE Tries to Build a Trojan ...
« Reply #40 on: November 04, 2012, 04:47:03 PM »
Thanks Jim and Don!

For me every step is tricky as this is the first engine build ever for me.


BR

/Peter
Always at the edge of my abilities, too often beyond ;-)

Offline NickG

  • Madmodder Committee
  • Hero Member
  • *****
  • Posts: 1890
Re: PeterE Tries to Build a Trojan ...
« Reply #41 on: November 05, 2012, 01:49:43 PM »
Well done - I'll use that method now!  :lol:
Location: County Durham (North East England)

Offline krv3000

  • Hero Member
  • *****
  • Posts: 2183
  • Country: gb
Re: PeterE Tries to Build a Trojan ...
« Reply #42 on: November 05, 2012, 04:08:45 PM »
cuming a long nicely

Offline Meldonmech

  • Hero Member
  • *****
  • Posts: 933
Re: PeterE Tries to Build a Trojan ...
« Reply #43 on: November 08, 2012, 02:42:49 PM »
Hi 
      Well Done,  Like the method.

                                                     Cheers David

Offline PeterE

  • Sr. Member
  • ****
  • Posts: 458
  • Country: se
  • Gothenburg
Re: PeterE Tries to Build a Trojan ...
« Reply #44 on: November 08, 2012, 04:22:57 PM »
Thanks a lot!

Cannot claim any originality about the method since I read it somewhere, but it felt as it would be the right method for me - and it was.

Anyway, managed to get two thirds way through another fiddly little piece today, the gland nut for the piston rod in the lower cover.

After turning a piece of brass and threading it 1/4"x40 it needed six small slots around its circumference. 2 mm wide slots, hmmmm, time for the small FC3 cutter again.

I set it up in the mill using my six-sided collet adapter to mill the small slots axially. (I missed making the rod long enough to allow machining square to the axis  :palm:  ) Here it is ready for milling.


There is not much clearance as the mill is very short.


It worked out fine and no broken mill this time - phuhhh. The little nut parted off and will be faced off to size and properly finished as soon as I have a suitable mandrel.

Next up is the piston (CI), piston rod (BMS) and guide part to which the crank attaches (brass), but that is for another day.

BR

/Peter
Always at the edge of my abilities, too often beyond ;-)

Offline NickG

  • Madmodder Committee
  • Hero Member
  • *****
  • Posts: 1890
Re: PeterE Tries to Build a Trojan ...
« Reply #45 on: November 09, 2012, 04:08:43 AM »
Nice 1 - those stevenson hex and square collets are on my xmas list!
Location: County Durham (North East England)

Offline PeterE

  • Sr. Member
  • ****
  • Posts: 458
  • Country: se
  • Gothenburg
Re: PeterE Tries to Build a Trojan ...
« Reply #46 on: November 09, 2012, 01:41:35 PM »
Nick,

A very good choice for x-mas present. Also good precision I might add.

My two are often in use and they are ER-32 size. I also have the lathe collet holder as well as an MT2 holder for the mill.
In the picture you can actually also see my ER-16 collet holder originally bought for the MJ-189 lathe. Right here I have mounted the collet holder to an M14x1-MT2 adapter so I can use it on the mill. I also have the same lathe adapter which is going to get a back plate to fit the C3. That way I have useful collets from 1 mm up to 20 mm even if they come from two different sizes. Only the 10 mm collet is found in both series.

BR

/Peter
Always at the edge of my abilities, too often beyond ;-)

Offline NickG

  • Madmodder Committee
  • Hero Member
  • *****
  • Posts: 1890
Re: PeterE Tries to Build a Trojan ...
« Reply #47 on: November 09, 2012, 02:03:20 PM »
That's what I need as my mill collets are ER32. They were out of stock last time I checked! A lathe collet holder would be handy, I can put the MT3 holder in my lathe but you can't pass stock through it then / are limited to length.

Good what you have done there, made it a very versatile system.  :thumbup:
Location: County Durham (North East England)

Offline PeterE

  • Sr. Member
  • ****
  • Posts: 458
  • Country: se
  • Gothenburg
Re: PeterE Tries to Build a Trojan ...
« Reply #48 on: November 09, 2012, 04:52:59 PM »
The ability to pass the material through the collet is one of the main reasons for me to choose ER-collets and the lathe collet chucks.

BR

/Peter
Always at the edge of my abilities, too often beyond ;-)

Offline PeterE

  • Sr. Member
  • ****
  • Posts: 458
  • Country: se
  • Gothenburg
Re: PeterE Tries to Build a Trojan ...
« Reply #49 on: November 11, 2012, 01:46:42 PM »
Slowly advancing the build. Thought I would give the piston go. So, I cut out a small squarish lump of cast iron from a left-over piece and set it up in the 4-jaw to get a suitable circular stem to move into the collet chuck instead. As you can see, the stem for the collet chuck became fairly big in comparison to the piece that is going to be the piston  :palm:  (the photo angle lies somewhat though.)


As said, set it up in the collet chuck and turned to size. Then drilled the little center hole (3 mm) and made the groove for the graphite yarn to act as piston ring.


Finally a test assembly on a short piece of what was intended to be the piston rod, but allowing too little over length it became too short so I stopped.


Anyway, It became a good test and it seems to work out. I made the piston fit the cylinder with ease but no rattle, Any angle and it sticks. I hope this is the correct fit.

Before re-doing bits I am now again waiting for more material and a few more tools  :D

BR

/Peter
Always at the edge of my abilities, too often beyond ;-)