Author Topic: PeterE Tries to Build a Trojan ...  (Read 22656 times)

Offline PeterE

  • Sr. Member
  • ****
  • Posts: 458
  • Country: se
  • Gothenburg
PeterE Tries to Build a Trojan ...
« on: July 29, 2012, 05:11:14 PM »
OK, having seen so many nice engines I got inspired to start working on the one I have had in my project box for about 10 years  :bugeye:

I wanted to try to build a steam engine and got the advice that this type is suitable for starters. I therefore got myself a set of Trojan Mk 1 castings. Since then I have understood that the Trojan was updated to a Mk 2 version as I found the J P Bertinat build instructions on the web some years ago. The same instructions I now use for the build.

It says to start out with the cylinder which I promptly did ...

Here it is with smooth and parallell flanges as well a a nice bore. Even the valve face got a clean-up at the same time as I needed a surface to measure from. The casting is bronze and very nice to work with.

Having come this far I saw that it is time to make the flanges round and smooth which I thought is best done in the mill. I therefore made a small "tower" to act as rotation centerfor that work. A simple piece of steel that will be mounted on the milling table.

I also made sure I have a washer as bottom "bearing" and a thicker washer to hold the complete package together.

When all fitted this is how it will look.

This setup I think will work. I aim to use a welding pliers to hold the cylinder while taking small cuts to avoid too much risk of the whole thing flipping round. I might also rig a small stop to avoid the cylinder to snap the mill if it runs away.

Please note, progress will be slow but I hope steady.

BR

/Peter
Always at the edge of my abilities, too often beyond ;-)

Offline saw

  • Hero Member
  • *****
  • Posts: 1003
  • Country: se
  • lucky amateur
    • Svenssons AckordsWerkstad
Re: PeterE Tries to Build a Trojan ...
« Reply #1 on: July 29, 2012, 05:30:54 PM »
Looks good, I will be folling your'e progress  :D :D
_________________________
Greetings / Benni
http://myprojecty.wordpress.com/category/steam-engine/

Offline krv3000

  • Hero Member
  • *****
  • Posts: 2183
  • Country: gb
Re: PeterE Tries to Build a Trojan ...
« Reply #2 on: July 29, 2012, 05:35:37 PM »
looking good so far

Offline PeterE

  • Sr. Member
  • ****
  • Posts: 458
  • Country: se
  • Gothenburg
Re: PeterE Tries to Build a Trojan ...
« Reply #3 on: July 30, 2012, 01:24:47 PM »
Thanks benni and krv.

Set it up on the mill this afternoon and fixed the flanges.

The thought-out way of doing it worked very well. I was able to feel a clear drag from the mill during climb milling so small cuts and slow work seems to be the way. You can also see the cobbled up stop block to prevent the thing to snap the mill if I lost control. That also worked good and the pip left was easy to blend out with a small file.


This way I get perfect centering of the flanges on the cylinder core. The milling threw up some burr, but nothing that was difficult to correct. Bronze is sweet to machine.

At this stage the description says that I shall mount the cylinder on an angle plate fixed to the lathe face plate as this is the common way to do it. I donīt have one of those yet so here will be the first detour in the making of the machine ...

BR

/Peter
Always at the edge of my abilities, too often beyond ;-)

Offline PeterE

  • Sr. Member
  • ****
  • Posts: 458
  • Country: se
  • Gothenburg
Re: PeterE Tries to Build a Trojan ...
« Reply #4 on: August 08, 2012, 04:48:50 PM »
Detour done!  :D

Dug up an oldish angle plate casting I had. Came from College Engineering Supplies if I remeber correctly. I thought of using a piece of my large T-bar but settled for the cast iron one. I made it 90 mm long, 50 mm high, and 40 mm deep to suit the C3 face plate.

Here it is cut to size and flattened using the mill.

What size for the slots? The face plate ones are 12 mm wide which I think are too much on such a small plate so I settled for 8 mm like the T-slot width on the mill. That seemed more appropriate.

Good enough for me and it got some paint as well.

To finish this off I also made some round T-nuts to suit the plate out of a brass bar from the scrap bin and here we see all the bits.

The cylinder to the right. Yes, I did skim the face plate because it was very rough as delivered and I could not resist to fill in the circles with the shop colour ...

So all put together and the cylinder fixed so that it is perpendicular to the plate which would make the port face at right angle to the cylinder ends.

Perhaps some small counter-weight as well to make machining less jumpy.

Well, so far so good. Now back on the steam track again, but we will see for how long ...

BR

/Peter
Always at the edge of my abilities, too often beyond ;-)

Offline saw

  • Hero Member
  • *****
  • Posts: 1003
  • Country: se
  • lucky amateur
    • Svenssons AckordsWerkstad
Re: PeterE Tries to Build a Trojan ...
« Reply #5 on: August 08, 2012, 04:55:51 PM »
Good progress keep up the good work  :clap:
_________________________
Greetings / Benni
http://myprojecty.wordpress.com/category/steam-engine/

Offline doubleboost

  • Madmodder Committee
  • Hero Member
  • *****
  • Posts: 1619
  • Country: gb
  • Newcastle Upon Tyne
Re: PeterE Tries to Build a Trojan ...
« Reply #6 on: August 08, 2012, 05:00:14 PM »
Looking good peter :thumbup: :thumbup:
Like you say
Some counter weights would be a good idea (change wheels work great ) :lol: :lol:
Bronze is really nice to machine :drool:
Alloy bronze can be a pain to drill & tap  :lol: :lol:

Offline OldMetaller

  • Jr. Member
  • **
  • Posts: 8
  • Country: gb
Re: PeterE Tries to Build a Trojan ...
« Reply #7 on: August 12, 2012, 09:17:46 AM »
Hi Peter, I've just bought a set of castings for this engine, so I will be following your build thread with great interest!

Regards,

John.

Offline PeterE

  • Sr. Member
  • ****
  • Posts: 458
  • Country: se
  • Gothenburg
Re: PeterE Tries to Build a Trojan ...
« Reply #8 on: August 13, 2012, 12:42:24 PM »
Thank you for kind words benni and rob!

John, I hope you can find some useful info, even if only to avoid my mistakes ...

Rob, Yes bronze is nice to machine and this casting also seems good to drill and tap but it is good to know that it can be a problem to take into account.

Have been occupied with the last phase of replacing the old and worn-out roof tiles on my garage/storage/hobbyarea. Found some time for metal work and thought that after this I would be ready with the main dimensions of the cylinder.

Started off well, but at the second cut the toolbit dug in into the quite soft bronze  :bang: Not a complete disaster but enough to make me re-think the setup. Obviously the cylinder had moved under load even though I tightened the screws quite hard.

In an attempt to correct the errors, I set the cylinder up using the 4-jaw instad. The jaws are big enough to grab the cylinder on the flat sides and thus keep the port face perpendicular to the lathe axis, like below.


The setup was better but I did not get it absolutely correct  :bang: :bang:

The port face is now at the correct distance from the cylinder bore when measured on the centerline which is good. The question is if I can live with the fact that the port face and then the valve "box" leans very slightly to one side. Since the centerline is OK it will not affect the centerline of the valve rod even though slightly skewed.

Well, well, I will see where this goes. In the worst case I have to get a new cylinder.

Always at the edge of my abilities, too often beyond ;-)

Offline NickG

  • Madmodder Committee
  • Hero Member
  • *****
  • Posts: 1890
Re: PeterE Tries to Build a Trojan ...
« Reply #9 on: August 14, 2012, 01:50:27 PM »
This will be an interesting project Peter, I often used to look at trojan castings when I was younger.

I must admit, I preferred your first setup but with another angle at the other end ... or, the same way on the milling machine but with a piece of packing under the other end.

Difficult to get things lined up in the 4 jaw like that and the chances are you'll leave big marks from the chuck jaws in the gun metal.

Nick
Location: County Durham (North East England)

Offline PeterE

  • Sr. Member
  • ****
  • Posts: 458
  • Country: se
  • Gothenburg
Re: PeterE Tries to Build a Trojan ...
« Reply #10 on: August 14, 2012, 03:46:07 PM »
Hi Nick,

The Trojan is supposed to be easy and as far as I see it will not be difficult by being complicated, just that I am still not very much experienced with metal machines and different materials. I hope it will turn out good in the end.

I have actually seen both setups, the angle plate on the face plate, as well as the 4-jaw setup. I have tried both and the first time I used the 4-jaw it just came out good. The risk of marking the faces with the chuck jaws is of course present, but I donīt force the jaw screws that much nowadays as I did in the beginning, it works well anyway.

Using two angle plates on the face plate like a vice-type setup would of course be even more rigid.

Doing it in the mill instead would probably be just as good. I will use that kind of setup when milling the ports so then we will see where it goes.

Time to read the next section and proceed with the machining ...

BR

/Peter
Always at the edge of my abilities, too often beyond ;-)

Rob.Wilson

  • Guest
Re: PeterE Tries to Build a Trojan ...
« Reply #11 on: August 14, 2012, 04:51:32 PM »
Following along Peter  :thumbup:

Looks like your making good steady progress  :clap: :clap:


Rob

Offline PeterE

  • Sr. Member
  • ****
  • Posts: 458
  • Country: se
  • Gothenburg
Re: PeterE Tries to Build a Trojan ...
« Reply #12 on: August 19, 2012, 01:52:16 PM »
Good and steady progress, well I do not know really, I definately feel like a beginner with this.

First I made the top end cap from the supplied casting. It had a cast-in spigot so it could be gripped in the chuck and that way the "inside" towards the cylinder bore was made. Carefully approaching the fit diameter of the cylinder I succeeded to achieve an easy fit without slop.  :D

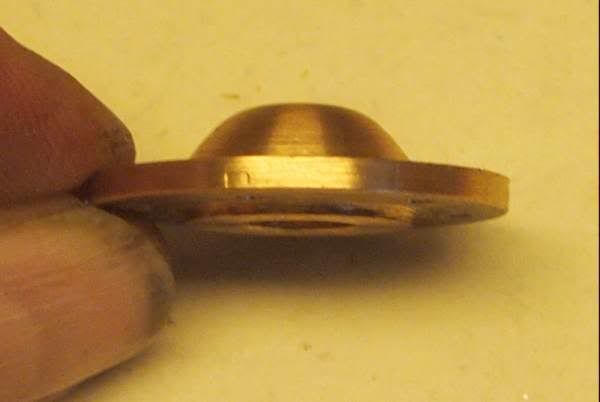
Turned the cap round to remove the spigot and take down the thickness to drawing measure. Succeeded with this as well but "re-designed" the cap to become domed instead of just "cut off". Worked out fine so far.  :D


Then marked out for the six fasteners and now I got into problems. The marking out was OK but after drilling the first guidance holes, one of them was misplaced as the tip of the drill decided to walk outside of the punch mark  :bang: OK It was a pilot hole and as this is the first engine I can live with it  :doh: When then trying to chamfer the holes using a countersink bit, the bit grabbed the cap and threw it out from my vice = one hole destroyed  :bang:

Heavy sigh,  :Doh: if I shall save this I have to think a bit.  Will be back on this. Perhapsd I decide to redo the cap as I have a 10 mm thick brass flat bar.

Well I turned my attention to the bottom cap instead. It also had a cast-in spigot to use, which I did. The same first stage went fine and I managed to achieve the same nice fit in the cylinder with this cap. When it all was set up I drilled all the way through for the piston with a 4 mm drill. Now the casting is made for the bottom cap Mk 1 which means that it is necessary to remove some of the casting to make room for the Mk 2 piston guide (tube). Also this went fine even if it was thight for space.

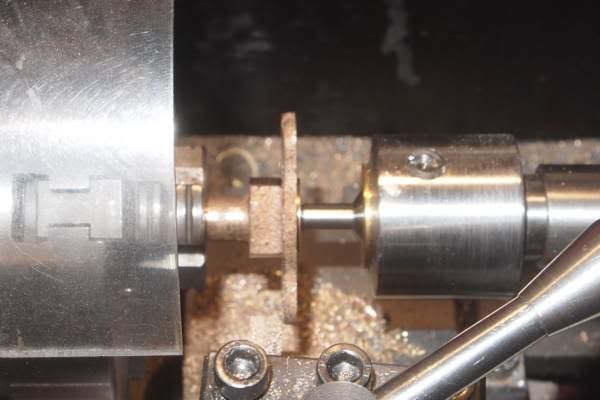
I made use of my newly made tailstock support using the smallest center in the 4 mm hole, worked well. I also found that well sharpened and honed HSS tools were actually better for this soft gunmetal than the usual triangular carbide inserts. It should probably be those aluminium tips instead, they look sharper than the ordinary CCMT bits.

Anyway, it went fine and I could come to measure and cut off the spigot as intended. Time to open up the 4 mm hole to 5 mm to make the packing gland nut thread. As I work in metric I went for M6x1 which was OK up to the point where I tried a screw for fit, new disaster  :bang:
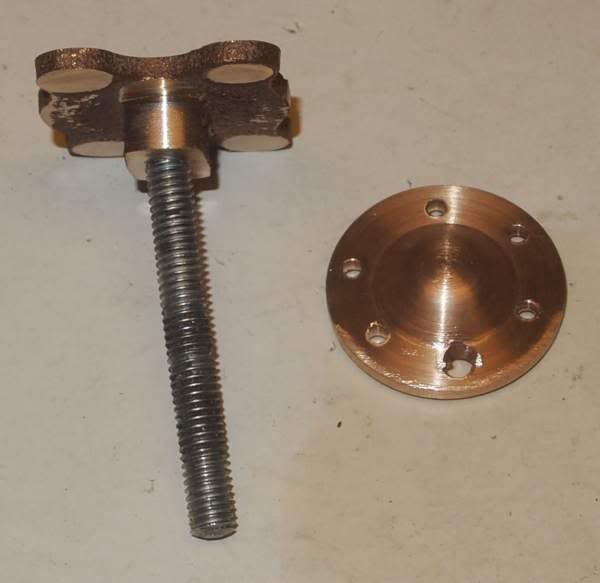
It turned out that the cap had tipped in the vice when opening up the 4 mm hole and becoming angled instead if straight along the center axis. I did do the other holes in the bottom cap and they went fine all of them.

So, after today I have two half-ruined bits  :bang:


Now I am thinking of how to save these errors so I donīt have to get new bits.  :scratch:  I can of course make plugs from the left over spigots and solder them into the respective holes and then re-drill and tap as required, but I am not sure this is the best way forward.

BR

/Peter
Always at the edge of my abilities, too often beyond ;-)

Offline saw

  • Hero Member
  • *****
  • Posts: 1003
  • Country: se
  • lucky amateur
    • Svenssons AckordsWerkstad
Re: PeterE Tries to Build a Trojan ...
« Reply #13 on: August 19, 2012, 02:49:59 PM »
Peter, wellcome to my world. I have done this a couple of times and it is not so fun, but the fun part is to calcylate how to cheat it together so it looks really out.
If I was you, I would use my lathe and turn some piceses that fits that holes and solder them together, and then do a fresh start.
About the bottom cap, why diden't you use youre lathe to drill the hole. If you set it up correctly you are garanti that the hole and the threading will be in the correct line
Otherwize I think that you are doing well.  :D
_________________________
Greetings / Benni
http://myprojecty.wordpress.com/category/steam-engine/

Offline PeterE

  • Sr. Member
  • ****
  • Posts: 458
  • Country: se
  • Gothenburg
Re: PeterE Tries to Build a Trojan ...
« Reply #14 on: August 19, 2012, 03:26:23 PM »
Hi Saw/Benni,

Thanks for comforting words, I guess I am not the first to goof it. When it comes to the holes in the top cap it is really a question of whether I want to keep the gun metal casting or make a new cap from brass. If I decide to keep the gunmetal one, I will go the way you describe by making plugs and solder them in place.

The bottom one is trickier actually as the supportive spigot is not possible to use as this is where the hole and thread shall be placed. My first thought is to use one of the left-over spigots and turn a short piece of spigot and thread with M6 and solder it in place. Then re-drill the 4 mm hole properly in line and then in some way try to turn the cap and open up and thread again.  Another way to do it is to set it up in the lathe and open the bad hole to a plain 6 mm hole for threading using a "french" M7x1 thread instead. This is for the gland nut so it is a one-off anyway and the odd thread does not matter.

Coming to think about threads, All the drawings state imperial ME threads typically 1/4"-40. Normally I would happily translate them into metric, but a -40 thread would translate into 0,5 mm which is not a common one = expensive. Just because of that I wonder if I shall go for the stated ME threads instead?

BR

/Peter
Always at the edge of my abilities, too often beyond ;-)

Offline saw

  • Hero Member
  • *****
  • Posts: 1003
  • Country: se
  • lucky amateur
    • Svenssons AckordsWerkstad
Re: PeterE Tries to Build a Trojan ...
« Reply #15 on: August 19, 2012, 05:22:37 PM »
PeterE, my advize is, don't change to 6mm becource it's coarse thread. Stick with 1/4-40". The threading is more nicer and fine threaded.
You can find tap and die on eBay for a cheap money.  :med:
_________________________
Greetings / Benni
http://myprojecty.wordpress.com/category/steam-engine/

Offline PeterE

  • Sr. Member
  • ****
  • Posts: 458
  • Country: se
  • Gothenburg
Re: PeterE Tries to Build a Trojan ...
« Reply #16 on: August 20, 2012, 01:11:43 PM »
Benni,

I guess your'e right about staying with the imperial threads due to the small thread.

ebay you say, do you know any company selling good stuff preferable HSS through ebay? Otherwise I am looking for a set with the ME-taps and dies but WITHOUT the wrenches and handles as I already got more of those than I use in both metric and imperial dimensions.

BR

/Peter
Always at the edge of my abilities, too often beyond ;-)

Offline saw

  • Hero Member
  • *****
  • Posts: 1003
  • Country: se
  • lucky amateur
    • Svenssons AckordsWerkstad
Re: PeterE Tries to Build a Trojan ...
« Reply #17 on: August 20, 2012, 01:49:46 PM »
PeterE.
There are lots of good company selling dies and taps, but I usualy buy from RDGTOOLS becource I think they are very greate. When you shell buy taps, try to find a set for t ex 1/4-40, with that I mean one for tap, one middle tap and one finish tap. That will give you the very best result.
Be also very carefull when you are drilling the hole for threading so you drill the right size of the hole.  :coffee:
_________________________
Greetings / Benni
http://myprojecty.wordpress.com/category/steam-engine/

Offline PeterE

  • Sr. Member
  • ****
  • Posts: 458
  • Country: se
  • Gothenburg
Re: PeterE Tries to Build a Trojan ...
« Reply #18 on: August 20, 2012, 02:00:09 PM »
Hi again Benni,

Thanks a lot! I will look into your suggestions. I usually make a group of the taps, the die and the appropriate core drill for each. It is easier to find them that way.

BR

/Peter
Always at the edge of my abilities, too often beyond ;-)

Offline Jasonb

  • Sr. Member
  • ****
  • Posts: 451
  • Country: gb
Re: PeterE Tries to Build a Trojan ...
« Reply #19 on: August 20, 2012, 02:03:28 PM »
You may also want to think about using M6x0.75, this is the metric fine range and is used on quite a lot of European made steam fittings if you should ever have a need to buy them you will then have suitable taps & dies.

It also means you can still use standard 6mm diameter materials, if you go to ME threads then you will also need 1/4" round stock.

Also when you come to redrill the gland hold the work in the 4-jaw so it will stay true.

J

Offline PeterE

  • Sr. Member
  • ****
  • Posts: 458
  • Country: se
  • Gothenburg
Re: PeterE Tries to Build a Trojan ...
« Reply #20 on: August 20, 2012, 04:18:35 PM »
You may also want to think about using M6x0.75, this is the metric fine range and is used on quite a lot of European made steam fittings if you should ever have a need to buy them you will then have suitable taps & dies.

It also means you can still use standard 6mm diameter materials, if you go to ME threads then you will also need 1/4" round stock.

Also when you come to redrill the gland hold the work in the 4-jaw so it will stay true.

J
Hi Jason,

Thanks for the info, very good! I actually do have an M6x0,75 tap and die but only the first, I need to add the second and bottom taps to complete the set.  :D

I was also a bit surprised to hear that there are steam fittings in metric, havenīt heard that before. Must google that.

Yes, I will cobble something up so I can hold the cap properly in the 4-jaw for correcting the gland goof.

By the way, is soft soldering enough or should I go for silver solder?

BR

/Peter
Always at the edge of my abilities, too often beyond ;-)

Offline saw

  • Hero Member
  • *****
  • Posts: 1003
  • Country: se
  • lucky amateur
    • Svenssons AckordsWerkstad
Re: PeterE Tries to Build a Trojan ...
« Reply #21 on: August 20, 2012, 04:37:13 PM »
By the way, is soft soldering enough or should I go for silver solder
You have to go with silver solder.  :headbang:
_________________________
Greetings / Benni
http://myprojecty.wordpress.com/category/steam-engine/

Offline PeterE

  • Sr. Member
  • ****
  • Posts: 458
  • Country: se
  • Gothenburg
Re: PeterE Tries to Build a Trojan ...
« Reply #22 on: August 20, 2012, 04:49:31 PM »
OK, good to know. Time to revive my silver soldering skills.

BR

/Peter
Always at the edge of my abilities, too often beyond ;-)

Offline Jasonb

  • Sr. Member
  • ****
  • Posts: 451
  • Country: gb
Re: PeterE Tries to Build a Trojan ...
« Reply #23 on: August 20, 2012, 05:45:37 PM »
If you are only going to run on air then soft solder would do, silver would be advisable for steam.

I'll dig out. Link for the steam fittings when i'm on my other computer tomorrow.

J

Offline PeterE

  • Sr. Member
  • ****
  • Posts: 458
  • Country: se
  • Gothenburg
Re: PeterE Tries to Build a Trojan ...
« Reply #24 on: August 21, 2012, 01:38:31 PM »
Hi Jason,

OK, I guess that the steam temp will be high enough to challenge the soft solder joints. I think I will go for silver soldering anyway. 

BR

/Peter
Always at the edge of my abilities, too often beyond ;-)

Offline Jasonb

  • Sr. Member
  • ****
  • Posts: 451
  • Country: gb

Offline PeterE

  • Sr. Member
  • ****
  • Posts: 458
  • Country: se
  • Gothenburg
Re: PeterE Tries to Build a Trojan ...
« Reply #26 on: August 21, 2012, 03:50:14 PM »
Hi again Jason,

A really big thank you for the links, they are great and now added to my list  :thumbup:

BR

/Peter
Always at the edge of my abilities, too often beyond ;-)

Offline saw

  • Hero Member
  • *****
  • Posts: 1003
  • Country: se
  • lucky amateur
    • Svenssons AckordsWerkstad
Re: PeterE Tries to Build a Trojan ...
« Reply #27 on: August 21, 2012, 04:05:42 PM »
Even here you have a good shop http://www.pmresearchinc.com/store/home.php  :D
_________________________
Greetings / Benni
http://myprojecty.wordpress.com/category/steam-engine/

Offline andyf

  • In Memoriam
  • Hero Member
  • *****
  • Posts: 1795
  • Country: gb
    • The Warco WM180 Lathe - Modifications
Re: PeterE Tries to Build a Trojan ...
« Reply #28 on: August 21, 2012, 04:30:53 PM »
Peter,

I appreciate your reluctance to use simple soft solder, though it would probably be OK unless you were using superheated steam.

Rather than going in for the fully-fledged roasting involved in "real" silver soldering, you might consider Cupalloys "Comsol", which melts at 295C. That should be high enough to avoid any problems. It's on this page
 http://www.cupalloys.co.uk/soft-solders-c41.html

Andy
Sale, Cheshire
I've cut the end off it twice, but it's still too short

Offline PeterE

  • Sr. Member
  • ****
  • Posts: 458
  • Country: se
  • Gothenburg
Re: PeterE Tries to Build a Trojan ...
« Reply #29 on: August 21, 2012, 04:52:56 PM »
Hi Andy,

Thank you for the link to Cupalloy, very interesting as I also make MR models in brass requiring solder joining. I will read through very carefully and see where I get.

I have also done real silver soldering a good bunch of years ago. I then did I think four or five semesters in a silver smithing coarse. The only soldering done there was done on sterling silver using true silver solder and Borax as flux. Borax which was very nice to work with as it first dried when heqted and could then "glue" the small silver solder chips to the joint to keep them in place til they were molted. Did a fair bit of soldering then so I have the gear already. But I guess the 750 degrees is a tad too high for this, or?

The solders at Cupalloy seemed to flow att about two thirds of that temp.

BR

/Peter
Always at the edge of my abilities, too often beyond ;-)

Offline PeterE

  • Sr. Member
  • ****
  • Posts: 458
  • Country: se
  • Gothenburg
Re: PeterE Tries to Build a Trojan ...
« Reply #30 on: August 24, 2012, 01:13:54 PM »
While waiting for delivery of both some tooling (taps etc) and material I decided that I would only be dis-satified if I "fixed" the goofed parts. I would only see the errors and not the rest, so I made some new bits from some brass bar stock I have. First a new top cap ...

Compared with the original it is only the colour differing.

Then the bottom cap is in the 4-jaw...

... and it will stay there until I have all things ready like piston rod bore (4 mm) and the gland socket (1/4"x40) as the underside is the datum side.  When the gland bore and thread is done I will narrow down the "spigot" somewhat and then I can simply fit the whole thing in my ER-32 collet holder to make sure that the other side becomes correct and true.

I also read ahead in the documentation I found, and it seems like Mr Bertinat liked to make the different bits to measure as one chain and then make the holes and threads as a second round, hence nothing mentioned at this stage on how to machine and thread the bits as one go.

So, being a beginner with this, I find it suitable to follow the build description before doing it my way  :)

BR

/Peter
Always at the edge of my abilities, too often beyond ;-)

Offline saw

  • Hero Member
  • *****
  • Posts: 1003
  • Country: se
  • lucky amateur
    • Svenssons AckordsWerkstad
Re: PeterE Tries to Build a Trojan ...
« Reply #31 on: August 24, 2012, 01:43:10 PM »
Good work Peter  :thumbup: :thumbup:
_________________________
Greetings / Benni
http://myprojecty.wordpress.com/category/steam-engine/

Offline PeterE

  • Sr. Member
  • ****
  • Posts: 458
  • Country: se
  • Gothenburg
Re: PeterE Tries to Build a Trojan ...
« Reply #32 on: September 07, 2012, 03:55:13 PM »
Finally got delivery of a set of Imperial ME taps and dies which will make it easier to make the sensitive bits. Thereby I could also finalize the drilling and threading for the gland nut in the lathe. Now it is perfectly in line with the piston bore!  :D


Next step was to turn to thickness and make the little seat positioning (centering) the cover in the cylinder bore. I used the spigot to set it up in the collet to guarantee that it was centered and true and it worked beautifully.


The flange is still far too big but I will wait to saw/file it to shape until the necessary holes are in place. Then I can easily copy the original piece.

So, this means that I am back on track again!

BR

/Peter
Always at the edge of my abilities, too often beyond ;-)

Offline saw

  • Hero Member
  • *****
  • Posts: 1003
  • Country: se
  • lucky amateur
    • Svenssons AckordsWerkstad
Re: PeterE Tries to Build a Trojan ...
« Reply #33 on: September 07, 2012, 05:44:02 PM »
Nice done PeteE and it was a good deside that you bought the Imperial, I think that you will be more pleased with that when you are threading.  :headbang:
Nice to see youre progress  :clap: :clap:
_________________________
Greetings / Benni
http://myprojecty.wordpress.com/category/steam-engine/

Offline PeterE

  • Sr. Member
  • ****
  • Posts: 458
  • Country: se
  • Gothenburg
Re: PeterE Tries to Build a Trojan ...
« Reply #34 on: November 03, 2012, 07:20:00 PM »
 :update:
Hi all,

Finally I did get some shop time which resulted in one new item - the trunk guide - the material for which I waited for quite some time.


Made from one single piece of BMS. Turned out quite nicely, and I am pleased with it. Waiting to mark out and drill the holes until all bits are made.

Furthermore I took the plunge and set up to mill the port face holes, and they turned out well too  :bugeye:   :ddb: :ddb: :ddb:
Also the steam outlet hole landed in the correct place.  :D


Here we can see both the port face and the steam outlet.


After reading up I saw a useful tip on how to get the angle of the steam inlets from the port face to the ends of the cylinder at the right angle and in the correct place. the text said to mark out on the side using a pencil which will help determining the angle. Good idea, now it is time to see if I manage to do it right as well. The channel between the ports and the cylinder end shall be two 2mm dia holes. In the cylinder end there shall be a land of the same width as the ports (9/32 or 7,2 mm) and just over the 2 mm in breadth.

Will be back with pics on both my setup, the milling, and the result.

BR

/Peter
Always at the edge of my abilities, too often beyond ;-)

Offline andyf

  • In Memoriam
  • Hero Member
  • *****
  • Posts: 1795
  • Country: gb
    • The Warco WM180 Lathe - Modifications
Re: PeterE Tries to Build a Trojan ...
« Reply #35 on: November 03, 2012, 08:59:05 PM »
...The channel between the ports and the cylinder end shall be two 2mm dia holes. In the cylinder end there shall be a land of the same width as the ports (9/32 or 7,2 mm) and just over the 2 mm in breadth.

Will be back with pics on both my setup, the milling, and the result.

BR

/Peter


I like the positive thinking, Pete! "Shall be" rather than "should be". Forget the the subjunctives and just go for it  :dremel:

Andy
Sale, Cheshire
I've cut the end off it twice, but it's still too short

Offline NickG

  • Madmodder Committee
  • Hero Member
  • *****
  • Posts: 1890
Re: PeterE Tries to Build a Trojan ...
« Reply #36 on: November 04, 2012, 06:30:24 AM »
I've heard this way too - should have done it on the flat side though! You should if you've marked and measured it correctly you'll be able just to line it up with the drill in the vice. That's the theory, never tried it myself yet!  :thumbup:

edit: What am I on about? There is no flat side like a loco cylinder - ignore me  :lol:
Location: County Durham (North East England)

Offline PeterE

  • Sr. Member
  • ****
  • Posts: 458
  • Country: se
  • Gothenburg
Re: PeterE Tries to Build a Trojan ...
« Reply #37 on: November 04, 2012, 01:54:04 PM »
More updates!  :update:

Having thought about the setup before going to sleep, I kind of felt like it would work out the way I thought it out. So hereīs the setup.

First I clamped the cylinder in my smallest machine vice. To avoid getting odd angles, I placed a packing at the back of the cylinder and nipped up the vice.


Then I placed this small vice in the big one which resulted in the small one facing correctly so I could see what I was doing, and with a 2 mm drill in the collet chuck I aimed by eye what angle should be used (and wished for the best  :med: )

My point of aim was the edge of the cylinder bore and the front edge of the port face with the pencil line showing where the lower edge of the inlet port is.

Then secured the smaller vice in the bigger one, put a new 2 mm FC3 cutter in the milling collet and away it went.
I milled a land large enough to accomodate two 2 mm holes which became about 3 and a bit mm long and 2 and a bit mm wide. After that I placed the milling cutter a short distance from the edge and plunged it down a few mm to give the drill a good and straight start, lifted the mill and re-positioned a bit from the other edge and plunged it for the next hole.

Then change to the drill and drill through to the inlet port.


I was a bit worried that I would pass the port as the feeling was not very clear when using the geared feed on the mill instead of the lever feed, but I could actually feel enough to sense when  I broke through. Up with the drill and down the next hole.

Then turn the cylinder over and do it all again for the other side. The back on the back to clean the ports out with the 1.5 mm FC3 cutter.


Success !  :ddb: :ddb: :ddb: :ddb: :ddb:

All holes came out nice and clear right into their respective port inlet as can be seen from the example below.


This will mean that the cylinder is done and now only requires a bit of cleaning up.

Work continues ...

BR

/Peter
Always at the edge of my abilities, too often beyond ;-)

Offline AussieJimG

  • In Memoriam
  • Sr. Member
  • *****
  • Posts: 381
  • Country: au
Re: PeterE Tries to Build a Trojan ...
« Reply #38 on: November 04, 2012, 03:54:50 PM »
Well done Peter, a good result

Jim

Offline dsquire

  • In Memoriam
  • Hero Member
  • *****
  • Posts: 2275
  • Country: ca
  • Kitchener, Ontario, Canada
Re: PeterE Tries to Build a Trojan ...
« Reply #39 on: November 04, 2012, 04:31:53 PM »
Peter

Nice job on that, now one of the trickiest pieces is behind you.  :thumbup:  :D

Cheers  :beer:

Don
Good, better, best.
Never let it rest,
'til your good is better,
and your better best

Offline PeterE

  • Sr. Member
  • ****
  • Posts: 458
  • Country: se
  • Gothenburg
Re: PeterE Tries to Build a Trojan ...
« Reply #40 on: November 04, 2012, 04:47:03 PM »
Thanks Jim and Don!

For me every step is tricky as this is the first engine build ever for me.


BR

/Peter
Always at the edge of my abilities, too often beyond ;-)

Offline NickG

  • Madmodder Committee
  • Hero Member
  • *****
  • Posts: 1890
Re: PeterE Tries to Build a Trojan ...
« Reply #41 on: November 05, 2012, 01:49:43 PM »
Well done - I'll use that method now!  :lol:
Location: County Durham (North East England)

Offline krv3000

  • Hero Member
  • *****
  • Posts: 2183
  • Country: gb
Re: PeterE Tries to Build a Trojan ...
« Reply #42 on: November 05, 2012, 04:08:45 PM »
cuming a long nicely

Offline Meldonmech

  • Hero Member
  • *****
  • Posts: 933
Re: PeterE Tries to Build a Trojan ...
« Reply #43 on: November 08, 2012, 02:42:49 PM »
Hi 
      Well Done,  Like the method.

                                                     Cheers David

Offline PeterE

  • Sr. Member
  • ****
  • Posts: 458
  • Country: se
  • Gothenburg
Re: PeterE Tries to Build a Trojan ...
« Reply #44 on: November 08, 2012, 04:22:57 PM »
Thanks a lot!

Cannot claim any originality about the method since I read it somewhere, but it felt as it would be the right method for me - and it was.

Anyway, managed to get two thirds way through another fiddly little piece today, the gland nut for the piston rod in the lower cover.

After turning a piece of brass and threading it 1/4"x40 it needed six small slots around its circumference. 2 mm wide slots, hmmmm, time for the small FC3 cutter again.

I set it up in the mill using my six-sided collet adapter to mill the small slots axially. (I missed making the rod long enough to allow machining square to the axis  :palm:  ) Here it is ready for milling.


There is not much clearance as the mill is very short.


It worked out fine and no broken mill this time - phuhhh. The little nut parted off and will be faced off to size and properly finished as soon as I have a suitable mandrel.

Next up is the piston (CI), piston rod (BMS) and guide part to which the crank attaches (brass), but that is for another day.

BR

/Peter
Always at the edge of my abilities, too often beyond ;-)

Offline NickG

  • Madmodder Committee
  • Hero Member
  • *****
  • Posts: 1890
Re: PeterE Tries to Build a Trojan ...
« Reply #45 on: November 09, 2012, 04:08:43 AM »
Nice 1 - those stevenson hex and square collets are on my xmas list!
Location: County Durham (North East England)

Offline PeterE

  • Sr. Member
  • ****
  • Posts: 458
  • Country: se
  • Gothenburg
Re: PeterE Tries to Build a Trojan ...
« Reply #46 on: November 09, 2012, 01:41:35 PM »
Nick,

A very good choice for x-mas present. Also good precision I might add.

My two are often in use and they are ER-32 size. I also have the lathe collet holder as well as an MT2 holder for the mill.
In the picture you can actually also see my ER-16 collet holder originally bought for the MJ-189 lathe. Right here I have mounted the collet holder to an M14x1-MT2 adapter so I can use it on the mill. I also have the same lathe adapter which is going to get a back plate to fit the C3. That way I have useful collets from 1 mm up to 20 mm even if they come from two different sizes. Only the 10 mm collet is found in both series.

BR

/Peter
Always at the edge of my abilities, too often beyond ;-)

Offline NickG

  • Madmodder Committee
  • Hero Member
  • *****
  • Posts: 1890
Re: PeterE Tries to Build a Trojan ...
« Reply #47 on: November 09, 2012, 02:03:20 PM »
That's what I need as my mill collets are ER32. They were out of stock last time I checked! A lathe collet holder would be handy, I can put the MT3 holder in my lathe but you can't pass stock through it then / are limited to length.

Good what you have done there, made it a very versatile system.  :thumbup:
Location: County Durham (North East England)

Offline PeterE

  • Sr. Member
  • ****
  • Posts: 458
  • Country: se
  • Gothenburg
Re: PeterE Tries to Build a Trojan ...
« Reply #48 on: November 09, 2012, 04:52:59 PM »
The ability to pass the material through the collet is one of the main reasons for me to choose ER-collets and the lathe collet chucks.

BR

/Peter
Always at the edge of my abilities, too often beyond ;-)

Offline PeterE

  • Sr. Member
  • ****
  • Posts: 458
  • Country: se
  • Gothenburg
Re: PeterE Tries to Build a Trojan ...
« Reply #49 on: November 11, 2012, 01:46:42 PM »
Slowly advancing the build. Thought I would give the piston go. So, I cut out a small squarish lump of cast iron from a left-over piece and set it up in the 4-jaw to get a suitable circular stem to move into the collet chuck instead. As you can see, the stem for the collet chuck became fairly big in comparison to the piece that is going to be the piston  :palm:  (the photo angle lies somewhat though.)


As said, set it up in the collet chuck and turned to size. Then drilled the little center hole (3 mm) and made the groove for the graphite yarn to act as piston ring.


Finally a test assembly on a short piece of what was intended to be the piston rod, but allowing too little over length it became too short so I stopped.


Anyway, It became a good test and it seems to work out. I made the piston fit the cylinder with ease but no rattle, Any angle and it sticks. I hope this is the correct fit.

Before re-doing bits I am now again waiting for more material and a few more tools  :D

BR

/Peter
Always at the edge of my abilities, too often beyond ;-)