Author Topic: Overhaul of my SB 9A  (Read 20505 times)

Offline steamer

  • Jr. Member
  • **
  • Posts: 86
  • Country: us
Overhaul of my SB 9A
« on: July 27, 2012, 04:21:38 AM »
Hello

Well, this is the saga of my 9" Southbend model A long bed.   Man does this feel wierd starting again!

It started about a year and a half ago when a family member said he had this lathe and wanted to know if I would be interested in it?
Well....I had 4 lathes at the time...not all in running condition....so adding another one to the mix seemed dubious at best....however, the price was right...."come and get it out of my shop"....so...I figuired I'd at least fake interest and check it out.
Here's how I found her


Her serial number put her at October/November 1951.   She is a long bed with the large dial option...very sought after...and I know my eyes aren't getting any better...so going forward...a nice to have
She came with a collet set. drawbar. rack, lantern toolpost,motor and a pretty sad bench my family member had made.....that had to go!

I performed the tighten the saddle lock with the saddle in front of the headstock and then roll it back toward the tailstock test, and it didn't seem worn at all!   The flaking is still showing on the bed in most places....once I got underneath the scrunge....which was heavy
It appears to have spent some time in a automotive paint shop as there was several colors of overspray all over the lathe.....but seemed to look worse than it really was....it was pretty crusty!

Dave
"Mister M'Andrew, don't you think steam spoils romance at sea?"
Damned ijjit!

Offline steamer

  • Jr. Member
  • **
  • Posts: 86
  • Country: us
Re: Overhaul of my SB 9A
« Reply #1 on: July 27, 2012, 07:09:20 AM »
One of the first things I did was to come up with a plan for what I wanted it to be.
The SB is advantageous because parts are readily available for them.   Its the right size for small work, and there are lots of specialized accessories that can be purchased or made.

I decided I wanted the following
T slotted cross slide
tool post mounted drill spindle
tool post mounted milling spindle
Milling attachment
indexing head for the spindle
Steel base
3 jaw
4 jaw
faceplates
steadies
drill chucks
full collets
and QCTP.

I decided I wanted to use a AXA wedge toolpost so I could keep that in common with my Logan tooling.
One of the first parts I made was the T slotted cross slide,,,,,and I'll post on that next

Dave

"Mister M'Andrew, don't you think steam spoils romance at sea?"
Damned ijjit!

Offline Dan Rowe

  • Jr. Member
  • **
  • Posts: 26
  • Country: us
  • Dripping Springs TX
Re: Overhaul of my SB 9A
« Reply #2 on: July 27, 2012, 07:45:26 AM »
Hi Dave,
Yep I am watching this rebuild. I had forgotten how rough this one looked in the beginning.
Dan
Shayloco Dan

Offline steamer

  • Jr. Member
  • **
  • Posts: 86
  • Country: us
Re: Overhaul of my SB 9A
« Reply #3 on: July 27, 2012, 08:09:59 PM »
One of the first things I noticed was the countershaft.   The bearings were clearly worn.   The bearing on this one is the cast iron of the housing, and the shaft was very worn.   I decided to bore the housing for oilite bearings, and make a new shaft.

I set up the casting on the shop made boring table for my Logan.  The boring bar started life as a piece of scrap from the lucky box.


"Mister M'Andrew, don't you think steam spoils romance at sea?"
Damned ijjit!

Offline steamer

  • Jr. Member
  • **
  • Posts: 86
  • Country: us
Re: Overhaul of my SB 9A
« Reply #4 on: July 28, 2012, 06:06:25 AM »
Next came the T slotted cross slide.

This is a MLA casting and the iron is very nice.   It has very little residual stress and no hard spots.   I used the print that came with it with no drama


Then I scraped in the flats
The original cross slide marked up like this

Not particularly good considering all the scraping showed.  It definitely showed distortion

In any case here's the progression of bearing on the MLA unit


The top was then scraped in parallel to the flats

I'll post more on that

Dave


« Last Edit: July 28, 2012, 09:54:37 PM by steamer »
"Mister M'Andrew, don't you think steam spoils romance at sea?"
Damned ijjit!

Offline steamer

  • Jr. Member
  • **
  • Posts: 86
  • Country: us
Re: Overhaul of my SB 9A
« Reply #5 on: July 28, 2012, 06:25:20 AM »
Here's the top being scraped.  It was crowned quite a bit.. i suspect my old mill table is a bit crowned also


The angle ways came next


I didn't have a master long enough to reach the full length of the cross slide, and didn't really want to make a dedicated one just for 1 part,  so I had to start at one end and work across very carefully.

I did the same for the other angle way.

The cross slide is now used as a template for scraping in the saddle ways.  Starting with the flat ways, and then progressing to the angle ways.   I have not at this point checked the saddle to the bed.    That would come later

Next up the Tailstock...and a suprise!

Dave
"Mister M'Andrew, don't you think steam spoils romance at sea?"
Damned ijjit!

Offline steamer

  • Jr. Member
  • **
  • Posts: 86
  • Country: us
Re: Overhaul of my SB 9A
« Reply #6 on: July 28, 2012, 07:35:58 AM »
I checked the TS and it was found to have the following problems.

It had been dropped and was dinged on the rear of the upper body.
The TS base was worn into a "rocking chair" shape from years of use.
The quil seemed pretty good, and the taper wasn't torn up. 

I was fairly sure the TS was worn low....but I couldn't get a repeatable reading....due to the "rocker"
So the first thing I did was scrape the base to some resemblance of flat where they bear on the ways, using the far right end of the bed as a template.   

Then I check the TS body.   It was pointing down by .004" at the end of the extended and locked quil


Marking up the base showed a dent at the tail end which raised a burr which tilted the tailstock.   I took that down.

I'll type more later

Dave
"Mister M'Andrew, don't you think steam spoils romance at sea?"
Damned ijjit!

Offline steamer

  • Jr. Member
  • **
  • Posts: 86
  • Country: us
Re: Overhaul of my SB 9A
« Reply #7 on: July 28, 2012, 08:55:29 AM »
Here's a couple of photo's of what I found with the TS body.\


It's touching in the far quil area but not much in between.  There was a dented area in the for ground where I think it got dropped on the floor sometime in it's life.   I left the far region alone and only scraped the near side to rotate the spindle back to parallelism.

Getting there


Dave
"Mister M'Andrew, don't you think steam spoils romance at sea?"
Damned ijjit!

Offline steamer

  • Jr. Member
  • **
  • Posts: 86
  • Country: us
Re: Overhaul of my SB 9A
« Reply #8 on: July 28, 2012, 09:40:46 AM »
Once I scraped the base to bring the quil parallel and got it flat, and I checked the Base to the bed, I determined how low the TS was relative to the HS.    The result?    The TS is .018" LOW!    Wow!    Now the correct way to fix this is to lower the HS to match the TS.  Another Dodge to this is to put shims under the TS body.   Neither of these solutions particularly turned me on...The HS seemed perfect so why mess with it.   I don't like shims.

So I decided to make a new TS base instead.  I got a piece of Cast Iron out and started whittleing.


Dave


"Mister M'Andrew, don't you think steam spoils romance at sea?"
Damned ijjit!

Offline steamer

  • Jr. Member
  • **
  • Posts: 86
  • Country: us
Re: Overhaul of my SB 9A
« Reply #9 on: July 28, 2012, 11:07:58 AM »
Here's the result.


It's set about .020" high so that I can scrape it in both to the bed and alignment. ....but not yet.

Dave
"Mister M'Andrew, don't you think steam spoils romance at sea?"
Damned ijjit!

Offline steamer

  • Jr. Member
  • **
  • Posts: 86
  • Country: us
Re: Overhaul of my SB 9A
« Reply #10 on: July 28, 2012, 11:23:53 AM »
I then did up the Headstock.

No drama here.   The headstock was in great shape.   I put in new wicks and cleaned stuff up.   Be careful pulling these apart as dirt can be harboring in the cone pulley, when you disassemble it , that dirt can score the bore of the cone pulley, and will keep it from going back together!   Lightly stone everything and keep it VERY clean!


I bougth Steve Wells overhaul kit that has all the wicks and gaskets as well as a well written instruction manual so you know how all of this comes apart.   This is a must have resource, as I am about to show with the disassembly of the QCGB.

Dave

« Last Edit: July 28, 2012, 07:11:52 PM by steamer »
"Mister M'Andrew, don't you think steam spoils romance at sea?"
Damned ijjit!

Offline steamer

  • Jr. Member
  • **
  • Posts: 86
  • Country: us
Re: Overhaul of my SB 9A
« Reply #11 on: July 28, 2012, 02:56:36 PM »
OK
Gearbox
As removed.....scrungy!....and come to find out pretty worn in places.


I stripped the box with the instructions from Steve Wells book, removed the gear box tag, and then soaked the box in "Simple Green" and a brass bristle brush.   This was the end result


I replaced all the wicks which were hard as rock, and then had to repair 1 shaft and replace two bushings.   
Some paint, and a remounting of the change box tag.....which I put a coat of clear coat on just to make it "pop"...reassembled and


bouyed by the success I was having, I turned next to the apron....then it started going pear shaped........

Dave
« Last Edit: July 28, 2012, 03:46:09 PM by steamer »
"Mister M'Andrew, don't you think steam spoils romance at sea?"
Damned ijjit!

Offline steamer

  • Jr. Member
  • **
  • Posts: 86
  • Country: us
Re: Overhaul of my SB 9A
« Reply #12 on: July 28, 2012, 03:31:08 PM »
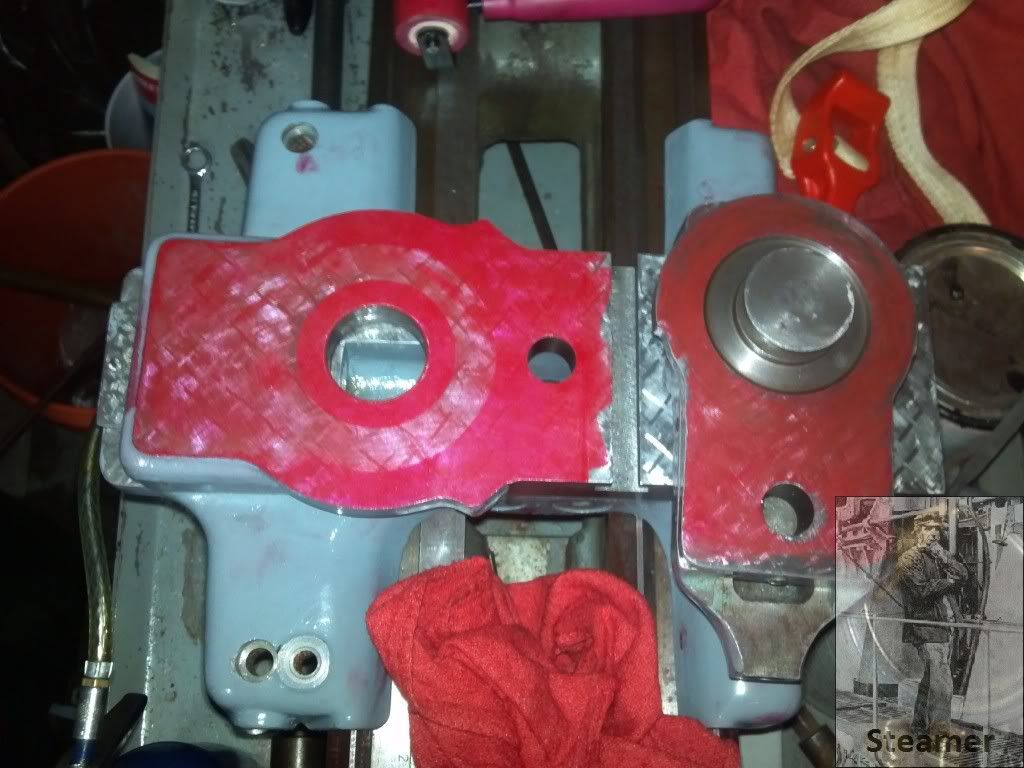
Well I started on the apron....I was up to this point fairly convinced that there wasn't much wear on this lathe.     The apron said otherwise.


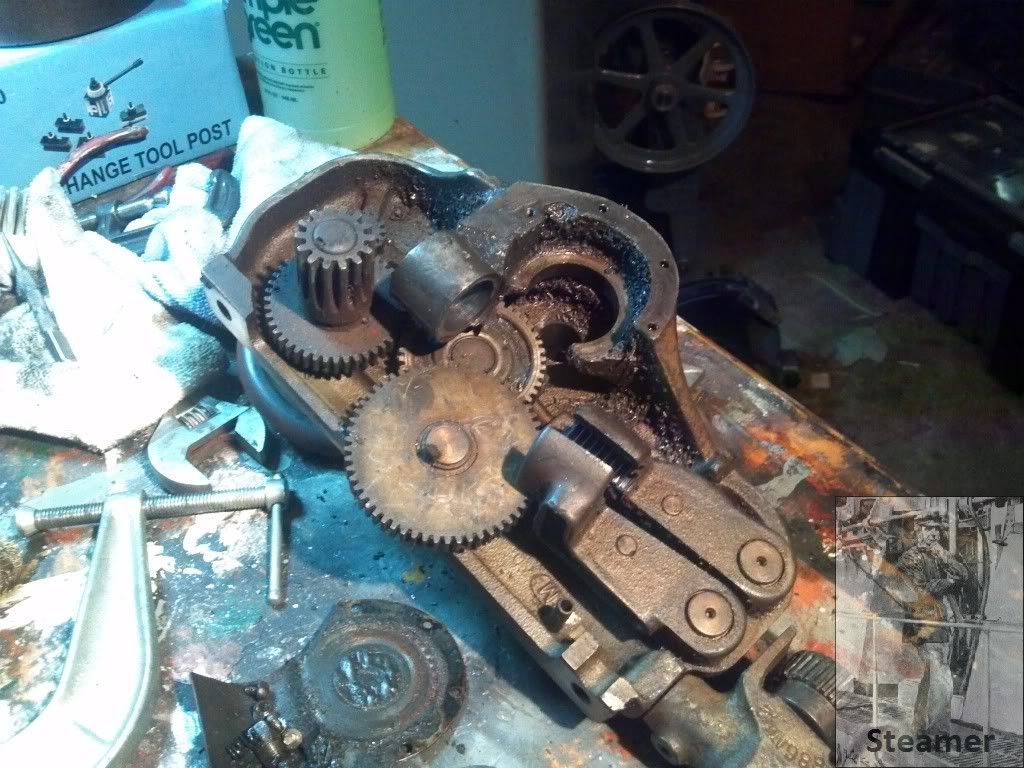
NEEDS new nuts, there is .04" radial wear in the feed worm gear shaft, and .06 axial wear!
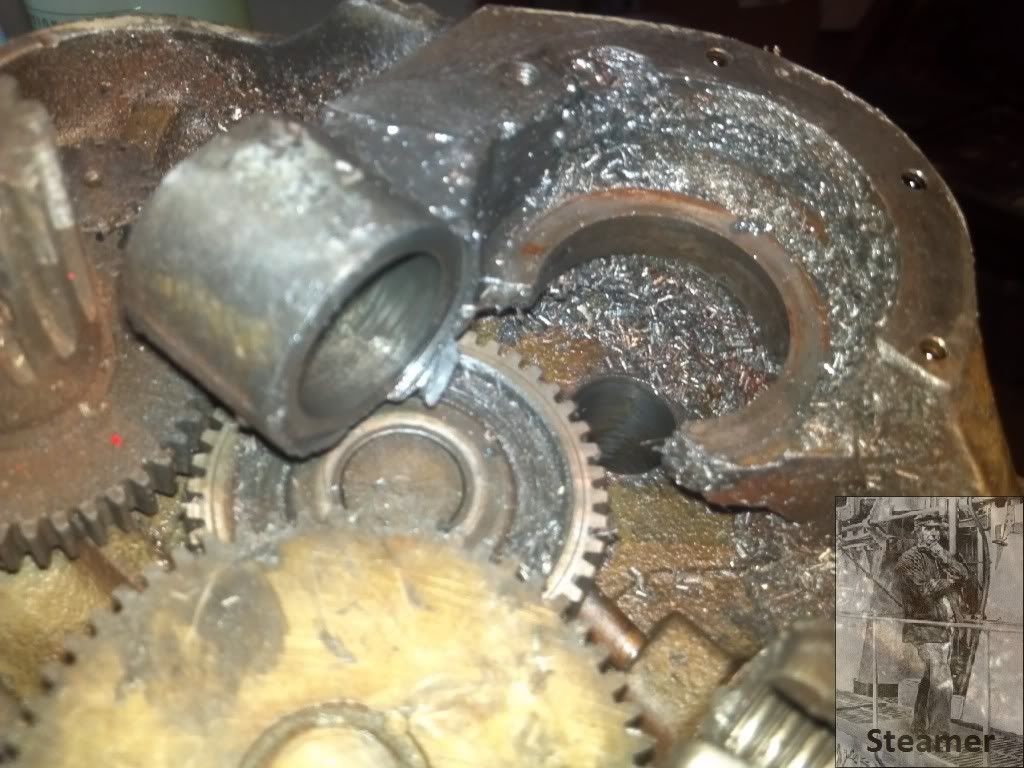
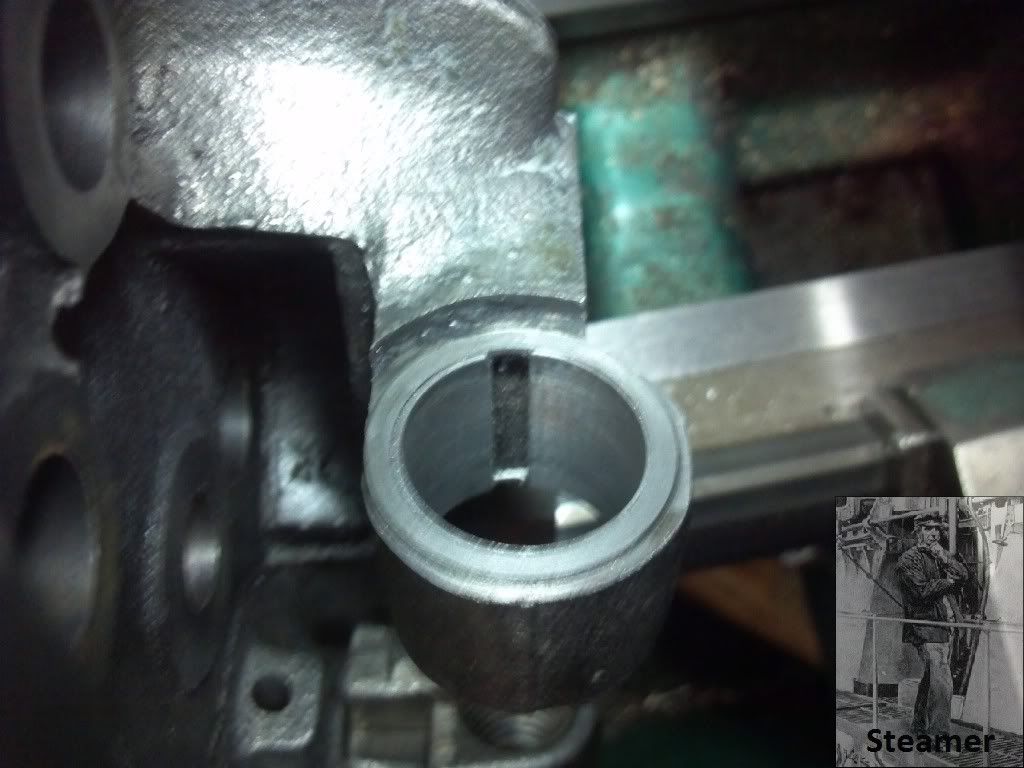
The worm gear bearing shaft measured round and straight, but the bore for the gear was way oblong and worn heavily....the wicks got old and this part just didn't get oil.

OK....after I cussed for a while...I came up with a way to fix it.
I cleaned up the apron, and measured the distance from the bottom of the saddle to the center of the leadscrew


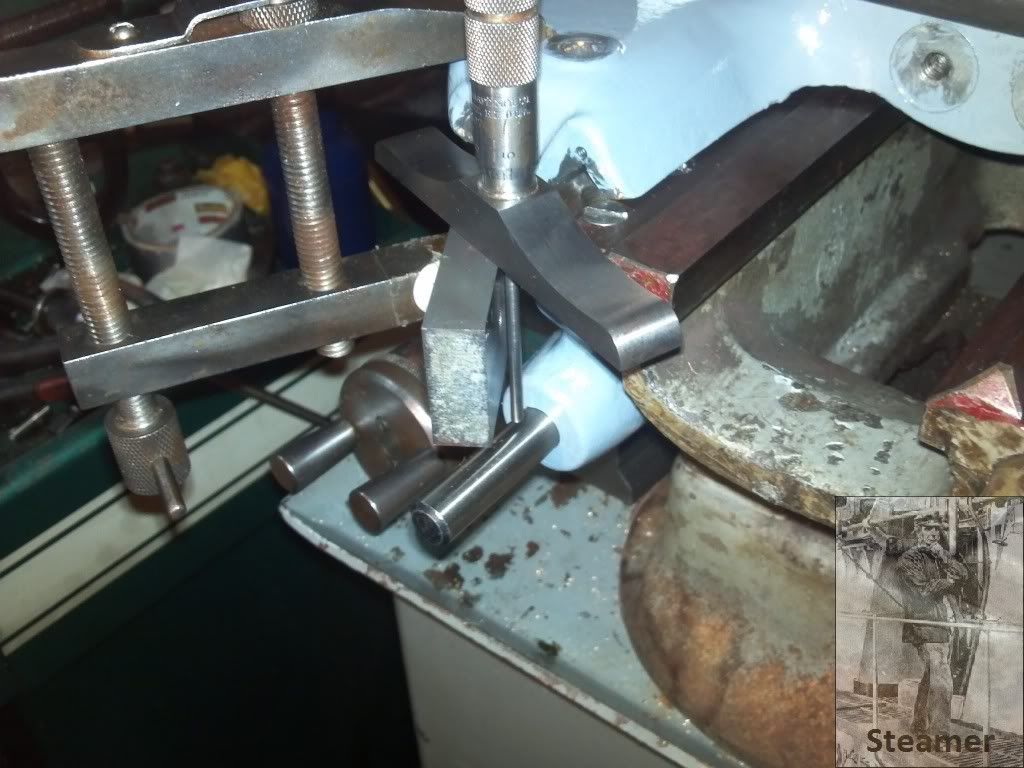
I then set up the leadscrew in the lathe and set the mating surface of the Saddle to the same height using adjustable parallels.


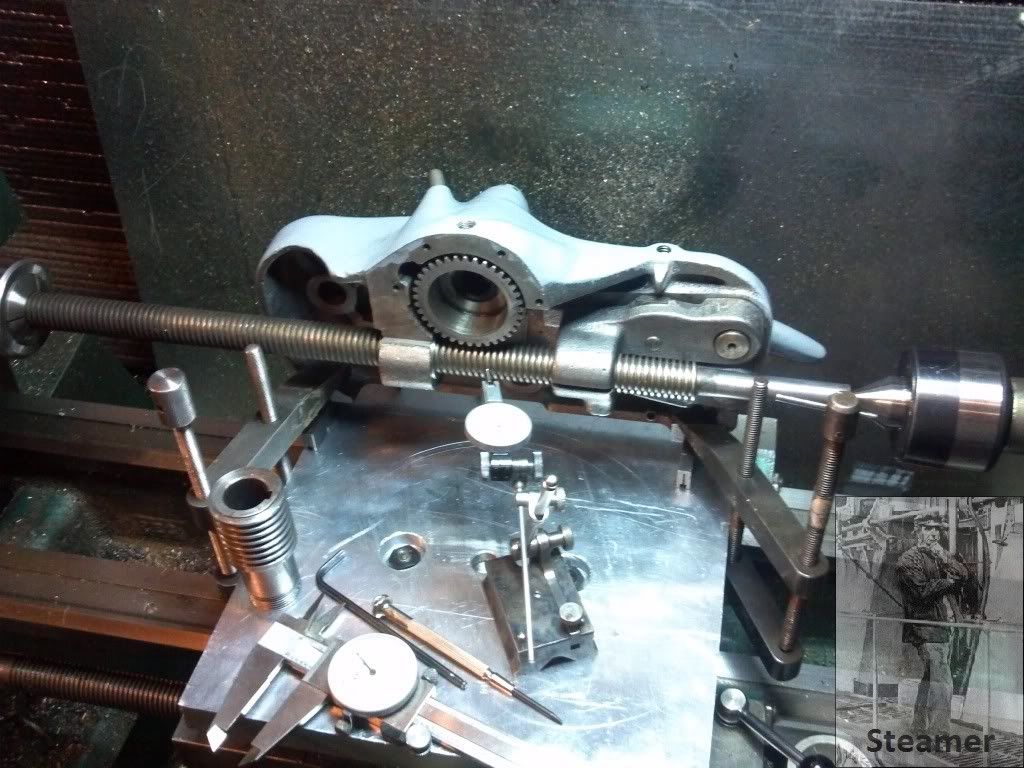
I made a cast iron bushing to .06 under the OD of the worm gear and approximately .06 bigger in diameter than the nominal bore of the housing.


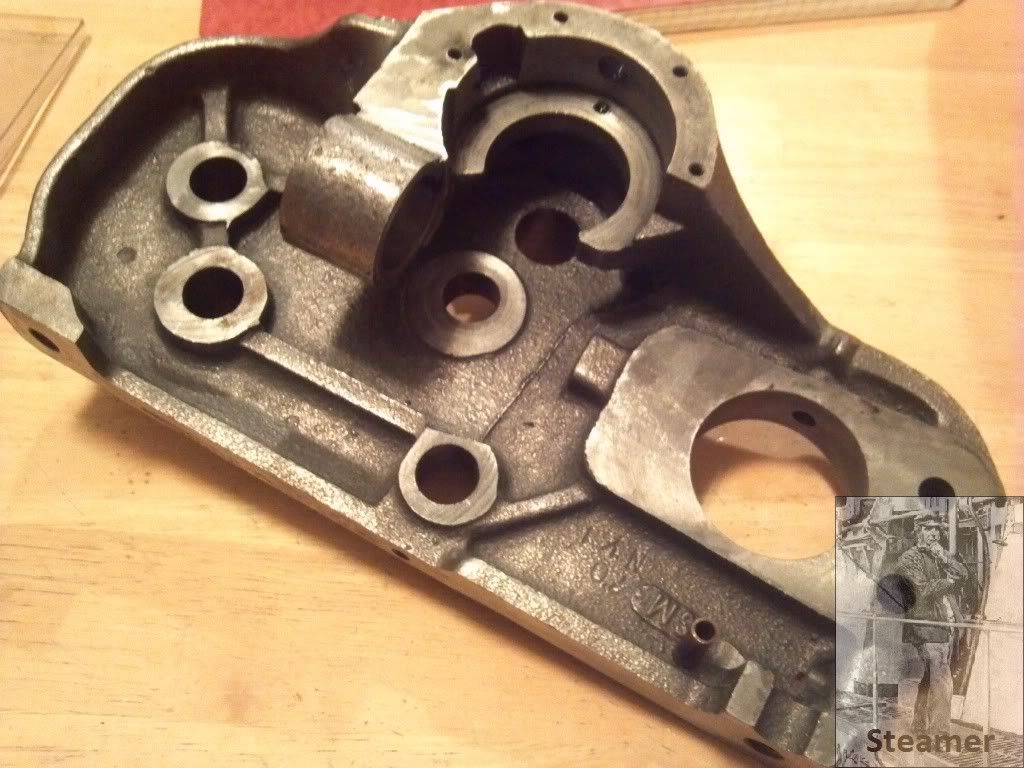
I then bored the housing to size, loctited the bushing in and then bored to size.
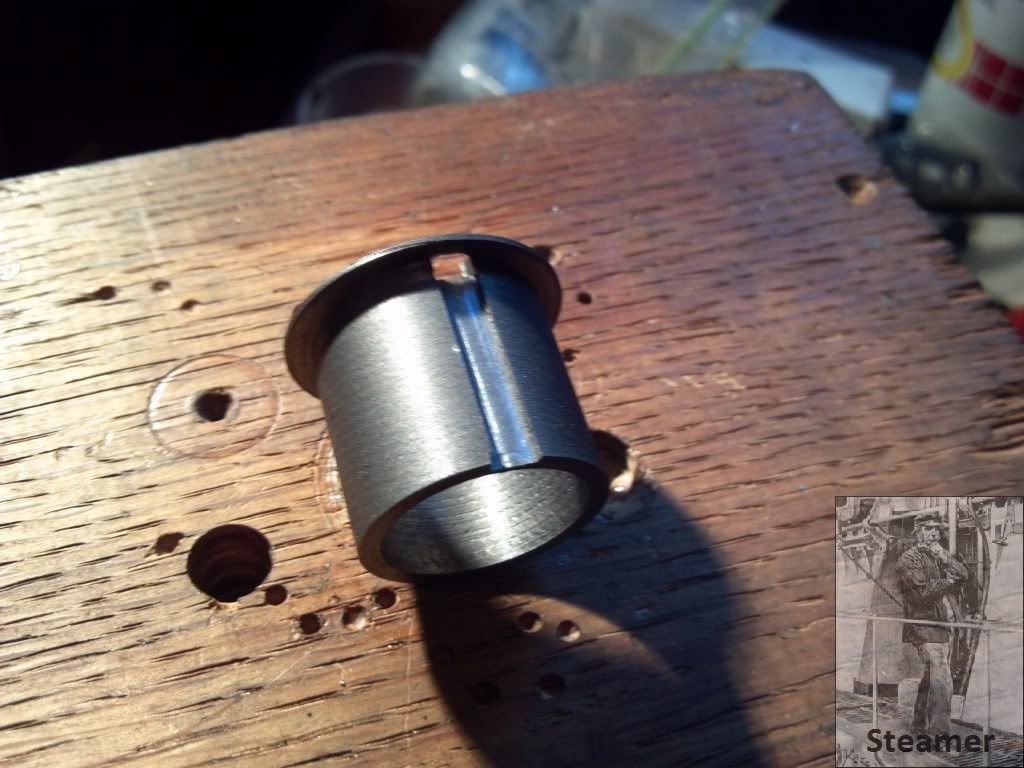
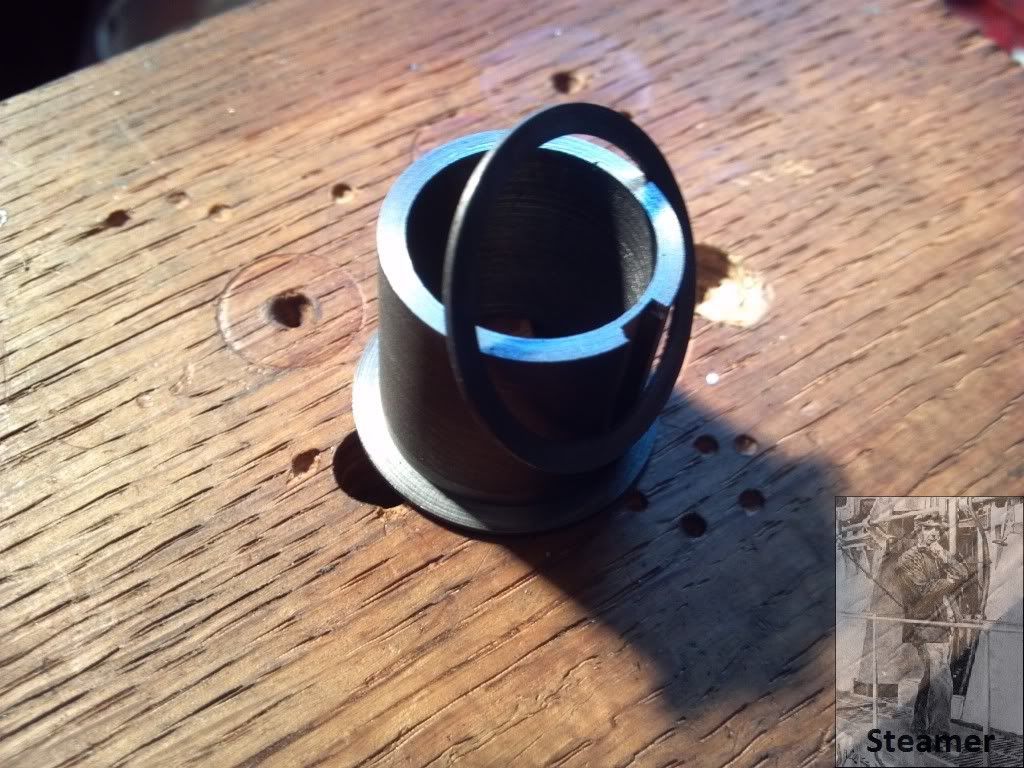
As you can see, I made the axial groove deep enough that so that once bored to size, the groove is exposed, like the original, for a piece of wick.


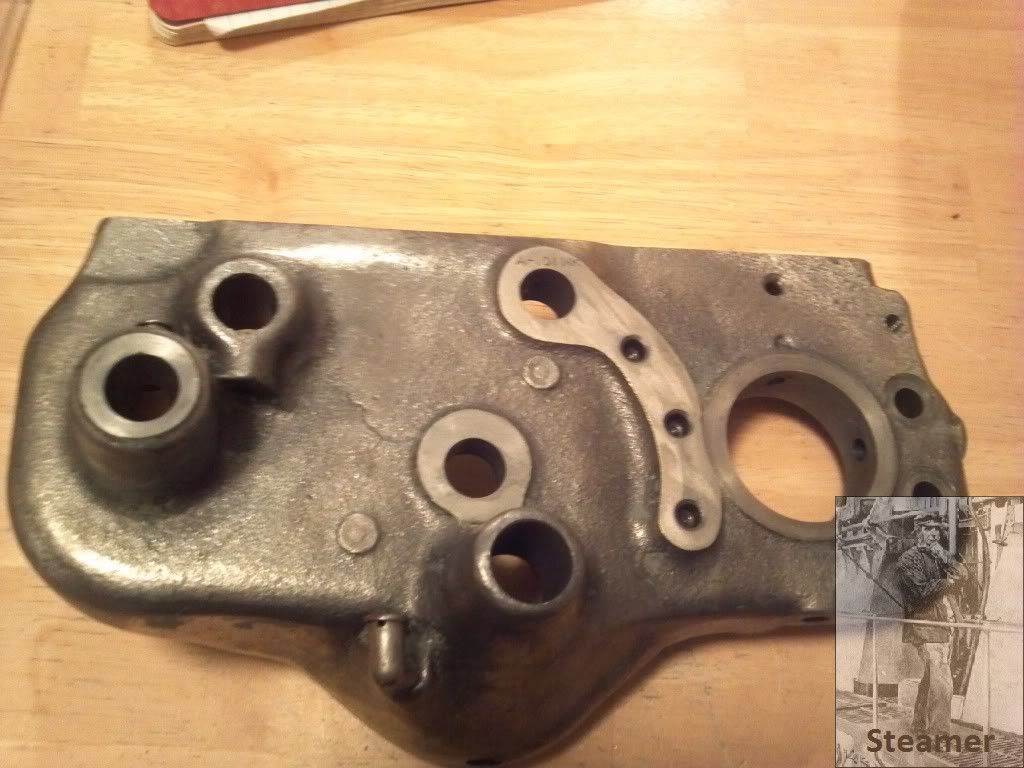
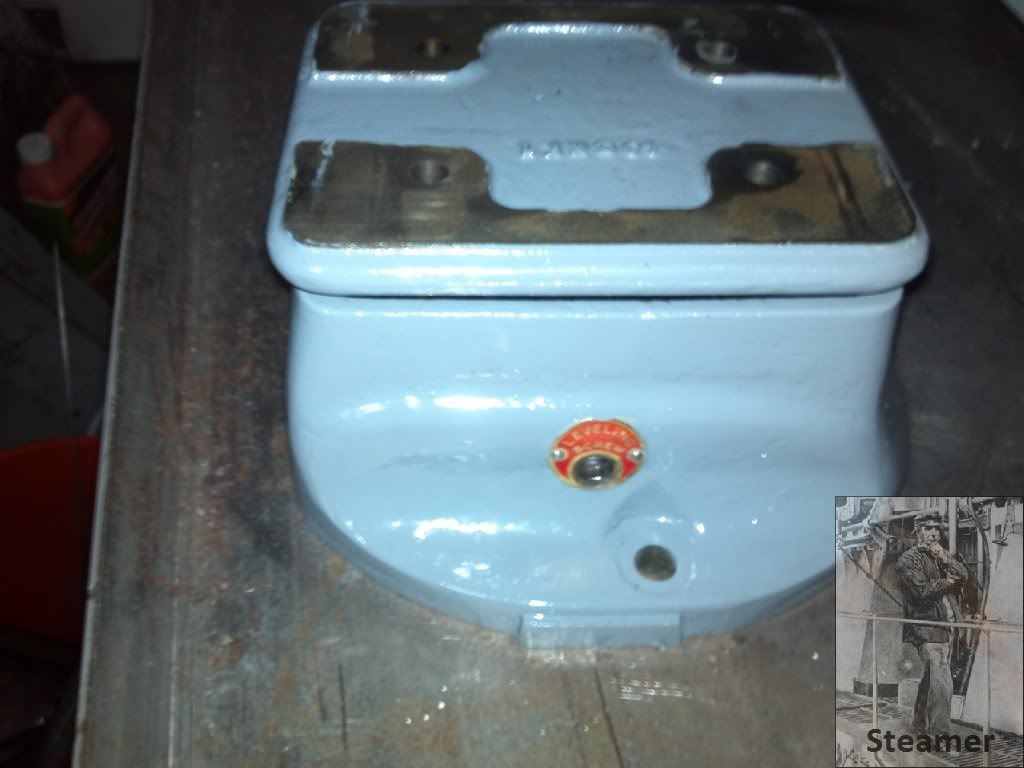
A couple of other bushings were replaced and all seemed well at this point....now the mistake!

What I should have done was measure the wear in the SADDLE before I did this.   What I found was the saddle is worn at the fron .010 and will need to be re-scraped to get the saddle level across the bed.  Additionally, I need to grind the .003" wear out of the bed....though this is very minor on a lathe this old, I'm not going to rescrape the saddle to a worn bed.. so the distance from the saddle to the leadscrew hanger is going to change.   I'll either need to take it off the saddle or shim the leadscrew hangers to lower the leadscrew......right now I'm waiting for funds to grind the bed....I'm getting closer.
Here's what she looks like thus far....I'll post some pictures of the tooling I've gathered for her thus far.


I've also rescraped the compound and base of the compound parallel to each other and to a good bearing with the cross slide


And I picked up some adjustable leveling feet also.


Dave
« Last Edit: July 28, 2012, 07:24:04 PM by steamer »
"Mister M'Andrew, don't you think steam spoils romance at sea?"
Damned ijjit!

Offline smfr

  • Jr. Member
  • **
  • Posts: 33
  • Country: us
Re: Overhaul of my SB 9A
« Reply #13 on: July 28, 2012, 04:36:42 PM »
This rebuild is inspiring! Looks like you're doing great solving all the hard problems!

Simon

Offline Stilldrillin

  • Global Moderator
  • Hero Member
  • *****
  • Posts: 4972
  • Country: gb
  • Staveley, Derbyshire. England.
Re: Overhaul of my SB 9A
« Reply #14 on: July 28, 2012, 04:47:50 PM »
Dave.
Watching quietly.   :thumbup:

This is some project!  :bugeye:

I really admire your attention to detail.  :clap: :clap:

David D

David.

Still drilling holes... Sometimes, in the right place!

Still modifying bits of metal... Occasionally, making an improvement!

Offline doubleboost

  • Madmodder Committee
  • Hero Member
  • *****
  • Posts: 1619
  • Country: gb
  • Newcastle Upon Tyne
Re: Overhaul of my SB 9A
« Reply #15 on: July 28, 2012, 04:50:32 PM »
Hi
Dave
It will be a great machine when it is finished
Some big similarities with my boxford the carrage is very similar
John

Offline steamer

  • Jr. Member
  • **
  • Posts: 86
  • Country: us
Re: Overhaul of my SB 9A
« Reply #16 on: July 28, 2012, 05:21:53 PM »
Thankyou Gentlemen,
I priced out getting the bed ground or aquiring the appropriate materials to scrape it....it was a wash!
I would need a 24 x 36 plate at a minimum....and I have no place to put it.

So The next step is to get the bed ground, and then use it as a master to scrape in the saddle and the TS....Then I'll need to align the leadscrew....Because of the size of the components it won't be so bad..so I guess I'm technically getting close.

This is good!   It's getting old and I'm anxious to use it!

Here's some photo's of the stuff I've aquired so far for her....
Indicator stand with quick mount

Lever action collet closer


Turret tailstock with tons of tooling


2 fixed steadies


I'm going to build a toolpost mounted spindle starting with a WW watchmakers lathe headstock as a spindle.   
I also got a AXA wedge tool post.

Dave

« Last Edit: July 28, 2012, 07:22:59 PM by steamer »
"Mister M'Andrew, don't you think steam spoils romance at sea?"
Damned ijjit!

Offline TroyO

  • Jr. Member
  • **
  • Posts: 26
Re: Overhaul of my SB 9A
« Reply #17 on: July 30, 2012, 06:44:50 PM »
Awesome... is this the new home Dave?

Now I know where to poke my head in for updates to my fave thread.  :D

Offline steamer

  • Jr. Member
  • **
  • Posts: 86
  • Country: us
Re: Overhaul of my SB 9A
« Reply #18 on: July 30, 2012, 09:12:22 PM »
Yes Sir!   Glad to see ya TroyO!

Dave
"Mister M'Andrew, don't you think steam spoils romance at sea?"
Damned ijjit!

Offline Dean W

  • Hero Member
  • *****
  • Posts: 571
  • My kingdom for a lathe!
    • Projects web pages
Re: Overhaul of my SB 9A
« Reply #19 on: July 31, 2012, 01:34:22 AM »
It's really looking mouth-watering good, Dave.  I know you've put gobs of hours and hard earned technique in to this
one, and I'm anxious for you to get to use it, (and I know you are, too!).  You're going to be in a pretty small club
when she's finished.  The "New 65 year old SB" club.  ; )

Someone said it's similar to a Boxford.  Wonder why that is...?   : )
Dean W.

Shop Projects:
http://www.deansphotographica.com/machining/projects/projects.html

Praise the Lord and pass the Carbide!

Offline steamer

  • Jr. Member
  • **
  • Posts: 86
  • Country: us
Re: Overhaul of my SB 9A
« Reply #20 on: July 31, 2012, 04:14:00 AM »
Hi Dean,

Supposedly, the Austrailian company Hercus made all the metric versions of the SB for SB.....though I don't know how true that is

Here's the page from Tony's site on the Southbend Clones

http://www.lathes.co.uk/southbend9-inch/page3.html :proj:

I'm getting  anxious too Dean....I think she'll be a  sweetheart when complete....and I could use her for smaller parts that need more "feel"

Dave
"Mister M'Andrew, don't you think steam spoils romance at sea?"
Damned ijjit!

Offline TroyO

  • Jr. Member
  • **
  • Posts: 26
Re: Overhaul of my SB 9A
« Reply #21 on: July 31, 2012, 02:02:19 PM »
Ohh hey, have you read through this website?
 
http://www.benchtest.com/w-doall.html

There's some info on scraping in a surface grinder where he is flattening a 4 foot way with a 3 foot reference.... it may have some ideas applicable to the SB ways?

He also has a page about a 9" SB lathe but it looks more like a clean and polish.

Offline steamer

  • Jr. Member
  • **
  • Posts: 86
  • Country: us
Re: Overhaul of my SB 9A
« Reply #22 on: August 02, 2012, 05:48:19 AM »
Hey Troy,

Thanks for the interest and support!   I have read through that site....the T&C grinder seems epic!

Dave
"Mister M'Andrew, don't you think steam spoils romance at sea?"
Damned ijjit!

Offline Dean W

  • Hero Member
  • *****
  • Posts: 571
  • My kingdom for a lathe!
    • Projects web pages
Re: Overhaul of my SB 9A
« Reply #23 on: August 02, 2012, 11:08:39 PM »
Supposedly, the Austrailian company Hercus made all the metric versions of the SB for SB.....though I don't know how true that is

I don't know how true it is either, Dave.  I admit to being a little facetious when I asked my (rhetorical) question
about Boxford looking like SB.  A lot of lathes look like SB for a good reason.  Great design, and the engineering
work had already been done.  Makes sense, really.
Dean W.

Shop Projects:
http://www.deansphotographica.com/machining/projects/projects.html

Praise the Lord and pass the Carbide!

Offline steamer

  • Jr. Member
  • **
  • Posts: 86
  • Country: us
Re: Overhaul of my SB 9A
« Reply #24 on: August 02, 2012, 11:27:04 PM »
I agree Dean....the SB spindle has got to be about the simplest, most cost effective and mechanically elegant designs I've every seen for a precision spindle....about as simple as a rock....and twice as durable...

Dave
"Mister M'Andrew, don't you think steam spoils romance at sea?"
Damned ijjit!

Offline steamer

  • Jr. Member
  • **
  • Posts: 86
  • Country: us
Re: Overhaul of my SB 9A
« Reply #25 on: August 26, 2012, 07:43:01 AM »
OK this week, I'll be sending my bed out for grinding hopefully this week,,,,,as long as work doesn't get in the way.

Dave
"Mister M'Andrew, don't you think steam spoils romance at sea?"
Damned ijjit!

Offline steamer

  • Jr. Member
  • **
  • Posts: 86
  • Country: us
Re: Overhaul of my SB 9A
« Reply #26 on: September 27, 2012, 05:20:22 AM »
OK!    The bed has been ground!   It should be here on Friday....then the fun begins!  :beer:

The bed was a mess.   There was .007" of wear on the front way....the rear way was higher than the front way...which means it was machined that way in 1951...Neither of the saddle ways were straight and the gib way....the one underneath on the back of the bed that the saddle gib bears against was out of parallel by .003".   Additionally the V ways were not 90 degrees.

But all the flaking was there! :lol:.....which means it was machined...and flaked.., but not scraped for alignment...ever!

So much for Southbend quality!.....

All has been corrected...everything...I've been told .....is parallel to .0004" over the 54" length.

That'll do

Now the scraping begins....saddle first.

I have some mods to do to the saddle and the tailstock...and the bench...patience.


Dave
"Mister M'Andrew, don't you think steam spoils romance at sea?"
Damned ijjit!

Offline Sic Semper Tyrannis

  • Jr. Member
  • **
  • Posts: 6
Re: Overhaul of my SB 9A
« Reply #27 on: September 27, 2012, 01:43:28 PM »
Who ground it?  What was turnaround?  Can you share price?

Offline RotarySMP

  • Sr. Member
  • ****
  • Posts: 463
  • Country: at
Re: Overhaul of my SB 9A
« Reply #28 on: September 27, 2012, 03:05:53 PM »
While you are waiting for it to return, you could build a wooden chuck carrier, so your don't ding that beautiful bed during a chuck change :)

http://www.homemadetools.net/images/3/handmade_chuck_carrier.jpg

http://www.practicalmachinist.com/vb/attachments/f38/11731d1234044888-lathe-chuck-how-big-can-i-hand-mount-000_0649-1.jpg

Best regards, Meilleures salutations, Mit freundlichen Grüßen, Cu salutari
Mark
https://www.youtube.com/c/RotarySMP

Offline steamer

  • Jr. Member
  • **
  • Posts: 86
  • Country: us
Re: Overhaul of my SB 9A
« Reply #29 on: September 27, 2012, 09:22:42 PM »
The grinder was Forest City Grinding, Rockford Illinois.

His prices are VERY reasonable.....but not cheap.  ( 500-1000)

However, I'd say they are far more reasonable than some I got quotes from  :jaw:

If you contact him, have your act together and know what you want.   He's very busy.

I found him extremely easy to work with.

You have to find your own way to ship back and forth.

Dave

"Mister M'Andrew, don't you think steam spoils romance at sea?"
Damned ijjit!

Offline steamer

  • Jr. Member
  • **
  • Posts: 86
  • Country: us
Re: Overhaul of my SB 9A
« Reply #30 on: September 27, 2012, 09:31:59 PM »
Thanks for the pictures and reply Rotary!


I plan to use a piece of plywood like I usually do...which should suffice.   I might mention my 12" logan has chucks heavy enough to use a cradle though

Dave
"Mister M'Andrew, don't you think steam spoils romance at sea?"
Damned ijjit!

Offline RotarySMP

  • Sr. Member
  • ****
  • Posts: 463
  • Country: at
Re: Overhaul of my SB 9A
« Reply #31 on: September 28, 2012, 04:56:50 PM »
Looking forward to seeing photos of the the newly ground bed.
Best regards, Meilleures salutations, Mit freundlichen Grüßen, Cu salutari
Mark
https://www.youtube.com/c/RotarySMP

Offline steamer

  • Jr. Member
  • **
  • Posts: 86
  • Country: us
Re: Overhaul of my SB 9A
« Reply #32 on: September 28, 2012, 05:54:54 PM »
Looking forward to seeing photos of the the newly ground bed.

Me Too!    shipping is delayed.....Monday!

Dave
"Mister M'Andrew, don't you think steam spoils romance at sea?"
Damned ijjit!

Rob.Wilson

  • Guest
Re: Overhaul of my SB 9A
« Reply #33 on: September 29, 2012, 04:22:08 AM »
Dont no how i missed the start of this thread  :palm:

first rate job Dave  :med:

Now this is a true machine overhaul showing how it really should be done ,i am sure you will be rewarded a hundred fold by the work and attention to detail you have put in .

what make of marking dye are you using ?

Rob


Offline steamer

  • Jr. Member
  • **
  • Posts: 86
  • Country: us
Re: Overhaul of my SB 9A
« Reply #34 on: September 29, 2012, 09:12:15 AM »
Hi Rob,

Here you go.

It's water soluable and readily available.    E S Dyjek

Dave
"Mister M'Andrew, don't you think steam spoils romance at sea?"
Damned ijjit!

Offline steamer

  • Jr. Member
  • **
  • Posts: 86
  • Country: us
Re: Overhaul of my SB 9A
« Reply #35 on: October 03, 2012, 05:54:48 PM »
Here's the bed....need to check it but it sure looks nice!


Dave
"Mister M'Andrew, don't you think steam spoils romance at sea?"
Damned ijjit!

Offline RotarySMP

  • Sr. Member
  • ****
  • Posts: 463
  • Country: at
Re: Overhaul of my SB 9A
« Reply #36 on: October 04, 2012, 04:44:31 PM »
Nice!
Best regards, Meilleures salutations, Mit freundlichen Grüßen, Cu salutari
Mark
https://www.youtube.com/c/RotarySMP