Author Topic: Harrison L5 rescue  (Read 133033 times)

Offline trevoratxtal

  • Full Member
  • ***
  • Posts: 183
  • Country: england
  • Torbay, South Devon, England
Re: Harrison L5 rescue
« Reply #75 on: August 07, 2012, 01:05:45 PM »
Hello Mick
It is not such a joke to put a L5 on castors, it is one of the few lathes that you can as the base is an integral part of the lathe.
Set up in the factory for portable use.
Many L5's were used on military ships and in the back of military lorry's for field use.
The wide spread use of the L5 in College and Schools was that it was possible to install move and re site at will without extensive bolting down to keep accuracy.
My L5A is on wheels and is jacked level, easy moved when back access is required.
It was for that reason I was a little concerned that you cut into the base of your lathe.
As you only took a little away I see no real problem with alignment.
I to have used the switch gear aperture as a cupboard, but without cutting any away.
I follow your refurbishment with great interest.
Trev

Offline micktoon

  • Hero Member
  • *****
  • Posts: 797
  • Country: gb
Re: Harrison L5 rescue
« Reply #76 on: August 07, 2012, 04:38:39 PM »
Hi Trev ....... intersting stuff............it would be solving a few problems if I could move the lathe about, I have my Graduate woodturning lathe on locking castors and its fine and very handy to be able to move about.
    How have you gone about mounting your lathe on wheels Trev, do you have any photos or comments about either ways to do it, or not do it ? I won't be doing anything to the lathe for a couple of days now so will have a serious think about the idea, I only put the comment 'just joking' as normally when you mention lathes and wheels people start to panic lol. The more things on wheels the better in general in my book  :thumbup:
cheers Mick.
 

Offline trevoratxtal

  • Full Member
  • ***
  • Posts: 183
  • Country: england
  • Torbay, South Devon, England
Re: Harrison L5 rescue
« Reply #77 on: August 08, 2012, 02:49:23 AM »
Hello Mick
The following pics I took back in 06 and posted on the Harrison Group of Yahoo.
It was a simple and quick method I use on all my heavy equipment. (surface grinder, Mill, excetera ).
The wheels are cut from solid bar, suitable angle iron bolted to the base of the machine to hold the wheel axils.
The lifting angle has a lose bolt in the middle to stop any chance of slipping from a trolly jack.
The jack being the steering at either end thus allowing the machine to be moved sideways.
Once the machine is in place I use packing to level the machine and sit it down firm, the wheels are then left hanging.
I will take more photos showing the machine close to a wall and tucked in tight next post.

Offline micktoon

  • Hero Member
  • *****
  • Posts: 797
  • Country: gb
Re: Harrison L5 rescue
« Reply #78 on: August 08, 2012, 05:37:36 PM »
Hi Trev, thanks for posting the photos, looks like you have found simple but effective way to do the job  :thumbup: :clap: I like the trolly jack idea for the steering, keeps things simple.............. I might just be doing the wheel style L5 I think  :beer:

   Cheers Mick.

Offline NickG

  • Madmodder Committee
  • Hero Member
  • *****
  • Posts: 1890
Re: Harrison L5 rescue
« Reply #79 on: August 13, 2012, 12:08:43 PM »
I like that idea ... it's wheelie good  :lol:

Lathe is looking great BTW Mick  :thumbup:
Location: County Durham (North East England)

Offline micktoon

  • Hero Member
  • *****
  • Posts: 797
  • Country: gb
Re: Harrison L5 rescue
« Reply #80 on: August 21, 2012, 12:48:43 PM »
     Got back to the lathe today and made some jacking mounts.
    After seeing Trev's idea ( Cheers Trev ) about putting wheels on and seeing what was lying around to make something out of.  I have decided to do half of the idea :scratch:. When I thought about it once the lathe had the jacking points at each end I could move into the wall and back out again ok, the main object of movement is for the coolant tank and general maintanence, if it needed moved further the jacking points would also allow the lathe to raised to put rollers under it if I needed to moved about the workshop for any reason. The advantages of doing it this way for me are .......... I had nowt to make the wheels with handy lol , so dont need to make them and it means I can also use the original levelling bolts system. If I did want to add wheels this could be done at a later date anyway as the wheel carriage would bolt on using the levelling bolt holes.

This shot shows always pick bits up at the scrapyard that look like they will be handy one day :clap:, all these bits are scrapyard finds, no cutting needed  :)


Tacked together and the two holes that were not needed welded up.


Tacked into place on cabinet


All welded up and a bolt used the same as Trev did, to stop jack slipping off.


The jack in place , works a treat  :thumbup:


Should look quite original once painted, I think this would have been a good idea from the factory to be honest, it give you a starting point to get things moved especially if you are in a tight spot  :thumbup:
  Cheers Mick

Offline doubleboost

  • Madmodder Committee
  • Hero Member
  • *****
  • Posts: 1619
  • Country: gb
  • Newcastle Upon Tyne
Re: Harrison L5 rescue
« Reply #81 on: August 21, 2012, 05:06:54 PM »
Hi
Mick
That will help in a tight corner :thumbup: :thumbup: :thumbup:
A little bit of under cut on those welds  :lol: :lol: :lol: :lol: :lol:
John

Offline micktoon

  • Hero Member
  • *****
  • Posts: 797
  • Country: gb
Re: Harrison L5 rescue
« Reply #82 on: August 21, 2012, 05:44:23 PM »
Hi John, aye the welds have a few faults lol, but I woulldnt like to try to get them brackets back off I can tell you  :lol: :lol:
Cheers Mick

Offline doubleboost

  • Madmodder Committee
  • Hero Member
  • *****
  • Posts: 1619
  • Country: gb
  • Newcastle Upon Tyne
Re: Harrison L5 rescue
« Reply #83 on: August 21, 2012, 05:55:30 PM »
I think it would be a burner job  :lol: :lol: :lol: :lol: :lol:
John

Offline Jonny

  • Hero Member
  • *****
  • Posts: 780
Re: Harrison L5 rescue
« Reply #84 on: August 29, 2012, 09:17:53 AM »
The L5, 11" and later 140 are easy to move around considering the weight.
Crow bar and lift then push under 4 scaffold tubes. One hand is all thats needed to get it moving. To get right up to walls it can be slid on the base with little effort, worst case with help of crow bar in the slots, just wind up the jacking feet.

Something like that on similar weight M300 would be ideal due to the two part base digging in.

Notice the 1" holes both ends of cabinet, they are alternative lifting holes to push a bar through. Also M16 thread in front of head is balance point for lifting.

Offline micktoon

  • Hero Member
  • *****
  • Posts: 797
  • Country: gb
Re: Harrison L5 rescue
« Reply #85 on: August 29, 2012, 05:59:11 PM »
 Hi Jonny, I knew the holes were for bars to go through the boxford shaper has the same type thing, I have never seen anyone use them mind, I will have to look for the M16 threaded hole , I can't say I have noticed it, I will have a look tomorrow. In the past I have moved the lathe as you say with crow bar in the end cut outs but not easy when things in the way at each end so hope the jack idea will be big improvement.
  I have been distracted again , this time its linked to the lathe getting done, I have things lying about all over on trollies etc like chucks , rotary table , milling vices, dividing head etc and can't get moved for them. So after Rob Wilson kindly gave me some box section ( :thumbup: Cheers Rob ) I decided it was time to make a storage shelf unit to hopefully get all the heavy stuff kept in one place and take up less room, making doing the lathe a bit easier ( I hope )

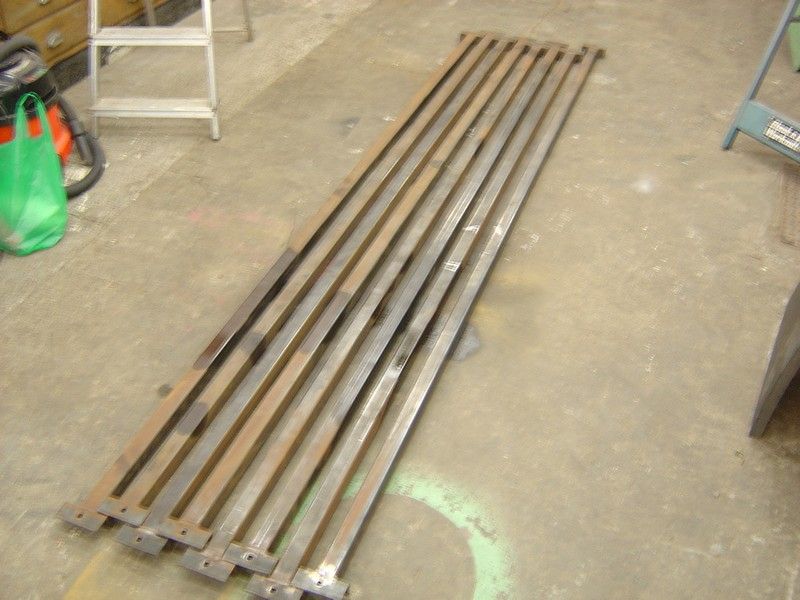
The box section with end brackets from a previous life.


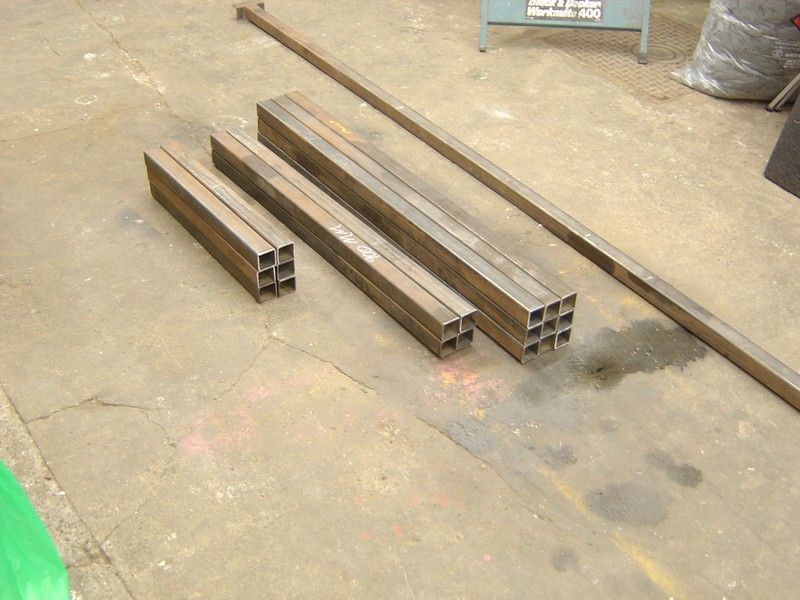
Cut up into bits to make the shelf unit.


Laid out on top of life size drawing on the floor for tack welding.


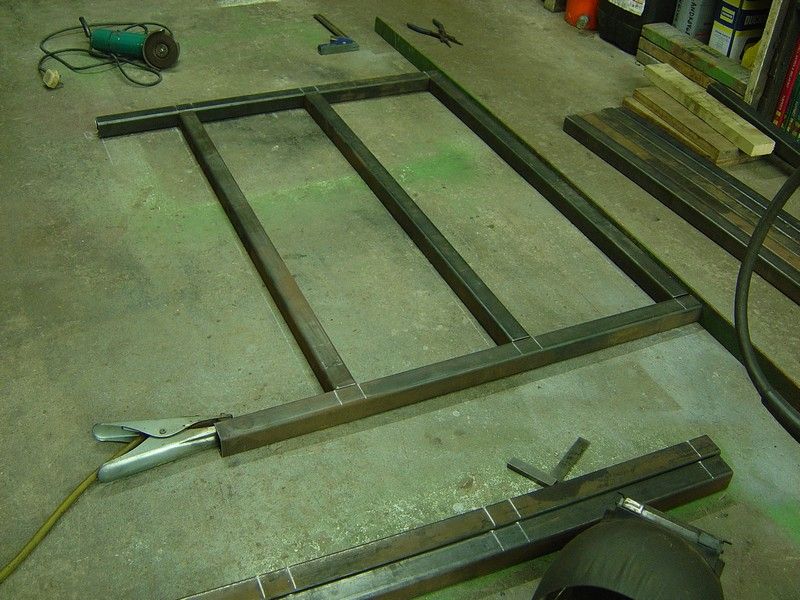
Starting to take shape, just tacking everything at this stage so it can be knocked into square.


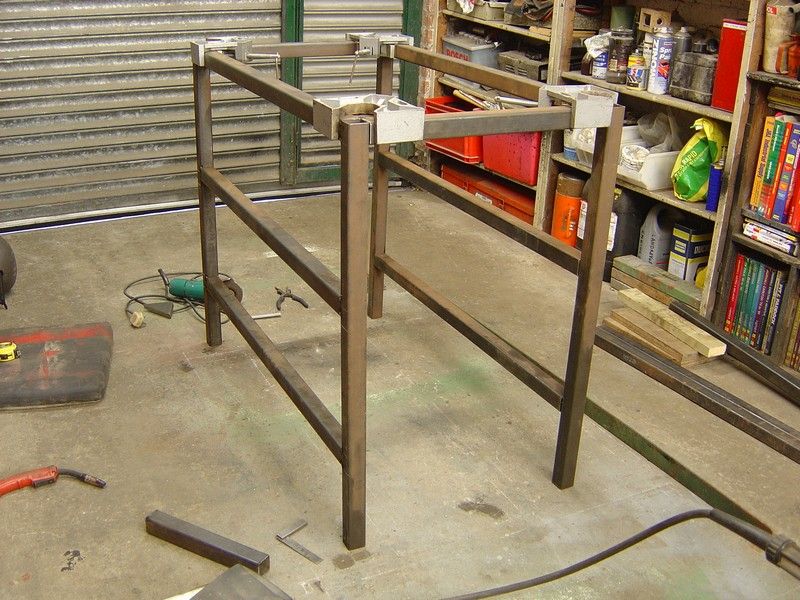
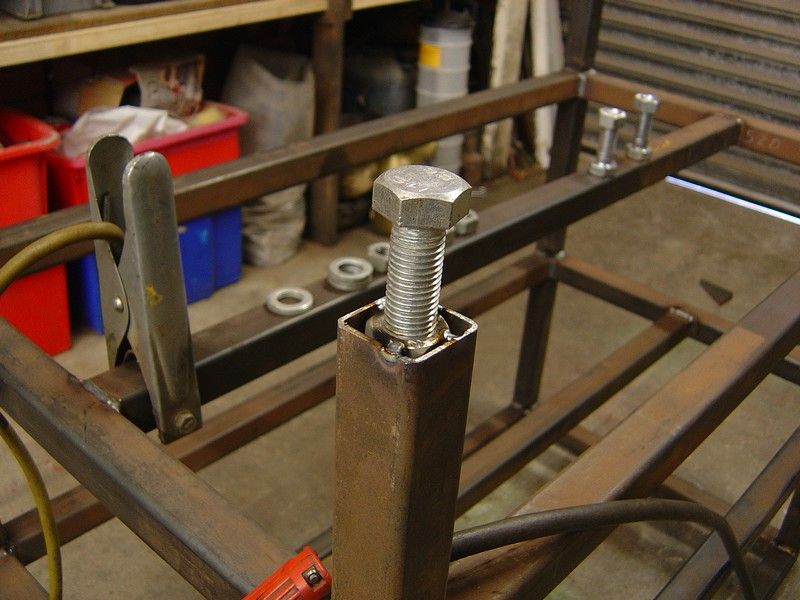
Main frame square and tack welded , just the middle shelf supports and the height adjustable feet to do.


The floor is miles from level where the shelf unit will be positioned so I am welding some big nuts into the leg bottoms and the matching blots will act as levelling jacks, tacked into place in this shot, then welded all around.


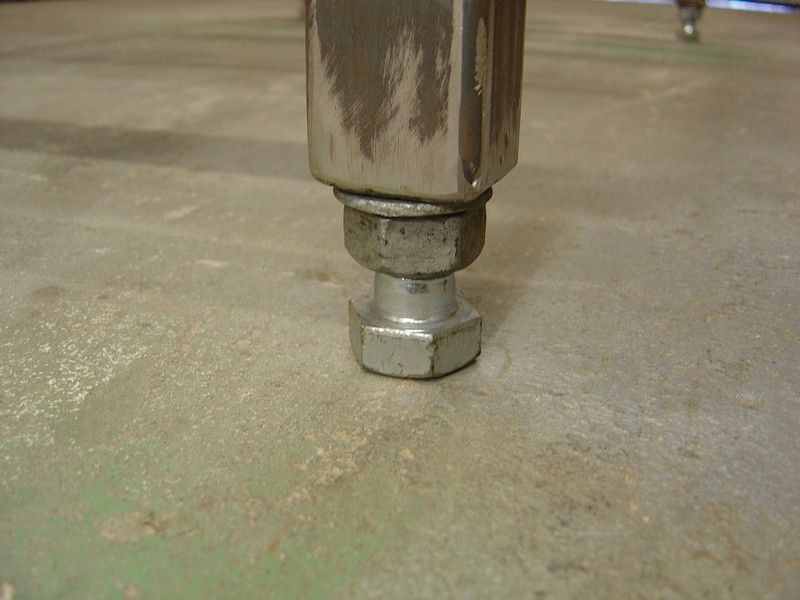
This is the bottom of a leg once welded up , works great for unlevel floors and cheap to do  :thumbup:


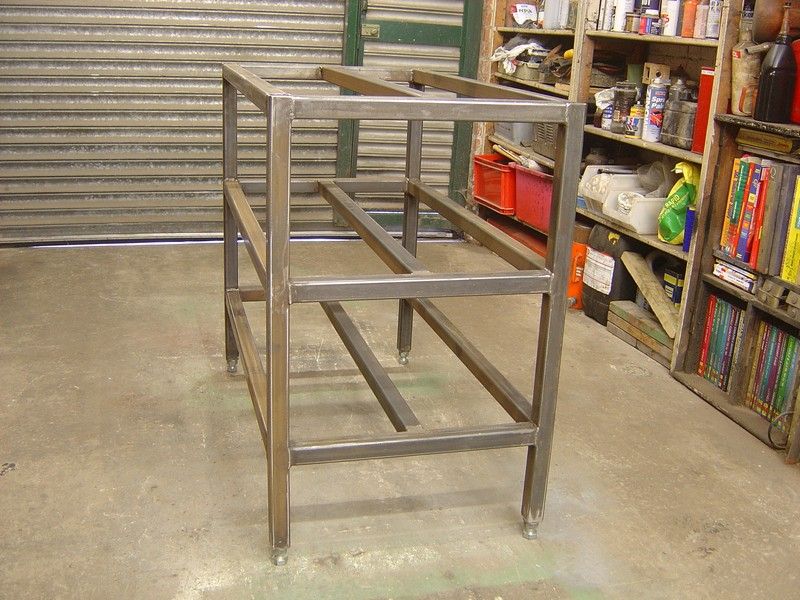
The finished frame sitting on its adjustable feet. Every joint is fully seam welded lol , just like the good old days :clap:, I like things I make to last :D , unlike most things you can buy these days , one tack weld and an M6 bolt each shelf so the first time you move or load it up it disintegrates  :bugeye:  :palm:


Primed up with etch primer, I find the small size paint rollers ( 1 inch diameter, 4 inch long , cotton type , used for household decorating ) work best for this sort of frame, brushing is hard work and leaves rough finish and spraying wastes loads of paint and also covers everything in 3 foot radius of the frame with paint :palm:


I will paint it the usual RAL6011 Machinery green :drool:  tomorrow and fit some 3/4 plywood shelf tops, then try to fit everything on it  :scratch: , I hope it will all fit  :scratch:
  Cheers Mick.

Offline doubleboost

  • Madmodder Committee
  • Hero Member
  • *****
  • Posts: 1619
  • Country: gb
  • Newcastle Upon Tyne
Re: Harrison L5 rescue
« Reply #86 on: August 29, 2012, 06:03:23 PM »
Nice looking stand Mick
I have a bench made with the same stuff  :lol: :lol: :lol: :lol:
John

Offline andyf

  • In Memoriam
  • Hero Member
  • *****
  • Posts: 1795
  • Country: gb
    • The Warco WM180 Lathe - Modifications
Re: Harrison L5 rescue
« Reply #87 on: August 29, 2012, 07:12:33 PM »
Mick, RAL 6011 aka Reseda Green is what Warco use on their Chinese stuff. I got the local branch of Johnstone's paints to mix some up for my Warco lathe, but when it needs a complete repaint I might choose something a bit more traditional.

I think the RAL classification is German, and 6011 was a shade once used on Mercs.

Andy
Sale, Cheshire
I've cut the end off it twice, but it's still too short

Offline Jonny

  • Hero Member
  • *****
  • Posts: 780
Re: Harrison L5 rescue
« Reply #88 on: August 30, 2012, 07:08:12 AM »
Better welder than me, most of mine has to be ground off.

Looks like you have some room in there, garage or a workshop?

Offline micktoon

  • Hero Member
  • *****
  • Posts: 797
  • Country: gb
Re: Harrison L5 rescue
« Reply #89 on: August 31, 2012, 06:21:01 PM »
 Hi John , Aye good stuff .........and you can't beat the price  :clap:

 Andy, you are right Resenda green, I think there is a BS number for the same colour and they call it Machinery Green, Rust-oleum do a good areosol called 'hard hat' as do plasti-kote who call theirs 'rust not', They both cover and dry really well and ideal for touch ups or small parts like vices etc. I have got them both from Cromwell tools before but noticed Wilkinsons ( wilcos ) supermarket type shop has some colours from Plasti- kote in their paint and decorating section.
  Jonny Cheers for the compliment on the welds ( there is still room for improvement mind ), its a garage come workshop, a garage thats been extended a couple of times and two cars get in there at night, so lots of room when the cars not there , not so much once they are inside.

 Well the storage rack is done, I put 18mm plywood shelves on it and then remembered I had some ali chequer plate off cuts from the scrapyard, I wish I had remembered about them before deciding the size of the unit as I could have covered the whole shelves right up to the edges by knocking an inch or so off each end of the unit, The ali still does the job and things slide on it , just would have looked better notched out around the legs and going to the very edge.

First it was painted with the small roller Machinery Green.


Then the plywood shelves attached with countersunk self tappers, The two bottom shelves only just fitted in the gap with a struggle if the shelves had of been any less height between them they would not have tilted and fitted into the gap.


Then two of the chequer off cuts per shelf were drilled and small ring shank nails hammered into the lowest part of the chequer pattern so the nail heads would notstick up and catch things getting slid onto the shelves. You can see what I mean about the ali being a bit short at the edges but still serves its purpose.


The finished job in position and with most of the stuff that will be getting kept on it , I will have a better decide on what goes where etc as time goes on.


The Hoffman dividing head was only just able to be lifted onto the top shelf but the J&S 15 inch rotary table will need two to lift it or engine hoist, it weighs almost as much as the shelf unit itsself lol.


At the moment I seem to have less space than when I started due to the stuff I have had to move to accomadate the shelves lol but once its all put away it will be a step in the right direction.
  Cheers Mick.

Offline doubleboost

  • Madmodder Committee
  • Hero Member
  • *****
  • Posts: 1619
  • Country: gb
  • Newcastle Upon Tyne
Re: Harrison L5 rescue
« Reply #90 on: August 31, 2012, 06:35:20 PM »
Cracking job Mick
Shame about the colour :doh: :doh: :doh: :doh:
That deviding head looks to be a heavy bugger
John

Offline micktoon

  • Hero Member
  • *****
  • Posts: 797
  • Country: gb
Re: Harrison L5 rescue
« Reply #91 on: September 23, 2012, 04:22:59 PM »
 :update:
  Well at long last I have managed to do a bit more on the lathe, I have just been distracted by one thing and another for weeks so not had time. I have moved the lamp along the back of the splash guard as if the lamp was in the best position every time I moved the chuck guard up it would hit the lamp arm or if the chuck guard was in the up position and I moved the lamp it would knock the chuck guard down. Set further along the splash guard and chuck guard should not effect each other.

 I cut the old lamp bracket up so I had the mounting end and a few more bits of plate were cut up to make the mount, I will bolt it to the splash guard. This is the parts for the mounting bracket.


This is the bracket welded up and mounted should do the job  :thumbup:


The next job is to make a mounting plate and brackets to house the inverter and a metal switch box that will have the switches for on / off , suds , lamp etc. While I was at a car boot sale today I spotted this panel, that must have been some sort of display I think. I asked the man how much he wanted for it and he said £2 .......  :bugeye:, so needless to say it came home with me   :thumbup: :drool:.

This is the box with the stuff mounted as bought , the coloured indicators are ledtec 240v led indicators with coloured diffusers.


This is switches etc removed, in total , an isolator switch 20A, five coloured indicators, a key type switch with two keys, an emergency stop switch , a stop switch and a side to side two way switch, a couple need the contact blocks but you can get them separate.


So all in all a bargain and big help for working out my control panel.
  Cheers Mick.

Offline micktoon

  • Hero Member
  • *****
  • Posts: 797
  • Country: gb
Re: Harrison L5 rescue
« Reply #92 on: September 24, 2012, 04:27:55 PM »
 I had a chance to do a bit more today, I started to make the addition to the splash guard , there was a gap between what the chuck guard and the splash guard managed to stop spraying out the back, which resulted in a stripe of suds up the wall. I decided to make a wrap around addition behind the chuck to cover the gap. I removed the tube that covers the edge of the guard from the area and will replace this with new stuff once the part is welded in place.

The sheet is about 16 guage or 1.6mm thick so ok to weld but stiff to bend when you have no bending gear  :scratch: after a bit of tapping around a tube it is looking more like what I am after, looks a bit too much like a lump of plate added on though, so a bend is needed  :dremel:


Another bend and a bit sliced off and its taking shape


I mig welded inside and out and bashed it on the anvil while still hot to get it as nice a bend as I could, I will weld it to the existing guard then put the cover tubing around so it looks neat and matches the rest of the guard. It fits ok but I might trim the top off a bit yet as it is taller than needed really.


That was as far as I got  today so watch this space  :thumbup:

 Cheers Mick.


Offline Jonny

  • Hero Member
  • *****
  • Posts: 780
Re: Harrison L5 rescue
« Reply #93 on: September 25, 2012, 10:18:46 AM »
M300 chuck guard.

Dont spoil it and paint it green.
When done yours you can do mine.

Like that box of switches.

Wanted a radiator but no wall room :thumbup:

Offline awemawson

  • Global Moderator
  • Hero Member
  • *****
  • Posts: 8968
  • Country: gb
  • East Sussex, UK
Re: Harrison L5 rescue
« Reply #94 on: September 25, 2012, 04:34:24 PM »
M300 chuck guard.

Dont spoil it and paint it green.
When done yours you can do mine.

Like that box of switches.

Wanted a radiator but no wall room :thumbup:


Nowt wrong with Resida Green. When I fitted a large roller shutter door to my barn, which is my workshop, I asked the wife what colour she wanted. She pointed at the barn outlook of our fields and hedges and she said 'that colour'. The chap fitting it got his colour chart out and Resida Green was the average of the green outlook. Since then I've painted all the exposed steel work to match with Resida Green tractor paint from an excellent seller on ebay.

AWEM
Andrew Mawson
East Sussex

Offline micktoon

  • Hero Member
  • *****
  • Posts: 797
  • Country: gb
Re: Harrison L5 rescue
« Reply #95 on: September 25, 2012, 05:33:42 PM »
  Hi Jonny and AWEM, thanks for your comments, I think you should both be happy, as although I am painting the harrison the proper Harrison grey just so it looks like it should when it was new , I still will be painting almost evrything else in sight, Resenda green  :thumbup: , although a few people seem to have a complex about the green I still think its a proper machine colour and most industrial factory type machinery is painted that green, it covers great and things look fresh when in that colour, I also wanted the workshop to have a consistant colour so anything that needed painted was all done green. :clap:

  I have got the addition to the splash guard finished today, I was going to go out and get some steel tube to edge the are with but after I put the local radio on and heard the total gridlock on the roads due to flooding around the Newcastle area I decided it would have to be made out of some stainless tube I had lying around, it was only long enough with 1 inch to spare  :bow:

  I cut the part down in height as it was taller than needed, I did this with an angle grinder and a 1mm thick cutting disc , they work really well.


I bent the stainless tube with a plumbers pipe bender as it was only thin walled.


I tack welded the bent tube to the top as a starting point then cut to suit with the angle grinder.


I pieced in the other bits of tube and welded up the joins , the front will match the original frame , they had actually used split tube so no welds on the back of the original as its only welded at the ends and joints. The back will not be seen as the lathe will be up against a wall , the rear tacks look worse in the photo than they are too but hold the trim tight and look original from the front side. :thumbup:


Starting to take shape, I have ground down the welds between the original and the new part too.


The finished job with the chuck guard and lamp in place to triple check nothing is going to hit anything it should not hit, all looking ok  :drool:


Next job is to make a fixture to attach the electrics box to , that will be located above the headstock and will bolt on via the four bolts tapped into the rear of the casting. So it looks like more cutting and welding tomorrow  :D

Cheers Mick.

Offline micktoon

  • Hero Member
  • *****
  • Posts: 797
  • Country: gb
Re: Harrison L5 rescue
« Reply #96 on: September 27, 2012, 04:38:46 PM »
 I have managed to do a bit more of the electric box mounting today. I am making it out of what I have rather than what I would use in an ideal world so its a bit more robust than needed but at least it will not fall off  :thumbup: The overall plan is to have a rear alloy plate to which will mount the inverter , a die cast alloy box to house the switch gear and transformer for the lo-volt lamp, along with a red three phase socket ( this will be used for the out-put of the inverter going to the lathe motor but will also mean other things could be plugged into the socket (chop saw)or three phase motors tested by plugging into the socket too) I have also decided to make the top of the vertical plate have a horizontal shelf to stop any debris going into the inverter top vents, this shelf will be edged with alloy angle and will do for storing dial indicator s etc.

 This is the two bits of 5mm thick alloy plate I have lying about. Due to the large bit only being an inch bigger than ideal I decided to leave it this size.


It will go roughly like this photo and have the shelf along the top edge, you can just see the markings where the inverter will go on the left side and the box on the right side at the top below it will go the legend plate for the lathe speeds. I have placed the clutch and gear levers back into position just to make sure everything has room to operate.


This is the bracket it will mount to that is bolted to the rear of the headstock casing.


The rear frame cut and clamped ready for welding, again just made from what I had about.


Welded up and clamped into position, this frame might get bolted to the headstock angle bracket but due casing not being flat it sits slightly off verticle so I might hold it into position and weld it to the angle bracket.


I will either use these holes to bolt through or plug weld them to the angle bracket if it needs to become 'one part' to compensate for the rear plate not sitting verticle.


Cheers Mick.

Offline doubleboost

  • Madmodder Committee
  • Hero Member
  • *****
  • Posts: 1619
  • Country: gb
  • Newcastle Upon Tyne
Re: Harrison L5 rescue
« Reply #97 on: September 27, 2012, 04:46:24 PM »
Hi
Mick
I think your switch mount should be man enough for the job  :D :D :D :D
Pleased you are painting the lathe grey  :lol: :lol: :lol: :lol: :lol:
John

Offline saw

  • Hero Member
  • *****
  • Posts: 1003
  • Country: se
  • lucky amateur
    • Svenssons AckordsWerkstad
Re: Harrison L5 rescue
« Reply #98 on: September 27, 2012, 04:48:48 PM »
Very nice work   :bow: :bow: :bow:
_________________________
Greetings / Benni
http://myprojecty.wordpress.com/category/steam-engine/

Offline steamer

  • Jr. Member
  • **
  • Posts: 86
  • Country: us
Re: Harrison L5 rescue
« Reply #99 on: September 27, 2012, 09:19:28 PM »
Nice work Mick!
 :beer: :beer:
Dave
"Mister M'Andrew, don't you think steam spoils romance at sea?"
Damned ijjit!