Author Topic: Harrison L5 rescue  (Read 133036 times)

Offline micktoon

  • Hero Member
  • *****
  • Posts: 797
  • Country: gb
Re: Harrison L5 rescue
« Reply #100 on: November 20, 2012, 08:24:34 PM »
I finally got back to doing the lathe today , I had an alloy damaged box I found at the scrapyard ages ago that needed patching up and holes filled in. Its going to be used as the main electrics box housing the transformer for the lo volt light and the main operating switches. An alloy switch box for the emergency switch with a hole that was bigger than my switch that needed filled so I could then drill the right size hole. The alloy shelf that will sit above the electrics box and inverter needed some alloy angle to go around the rim so things will not fall off the shelf. I have just spent an age trying to work out how to get the photos done on the new photo bucket so fingers crossed I have got it right or there may be no photos on this post lol.

The switch box cover with a hole that is too big.


Welded the patch in, welding could be better but will do the job.


Looks ok once ground off then sanded, I will now drill it the right size for the switch I have.


The corner of the alloy angle ready to weld , this will go around the shelf so things can not rattle off the edge.


This is it once welded , ground off and sanded.


The main electrics box was smashed on one side and had various holes drilled in it like these four here.


The four holes welded up, the clamp is holding a block of steel up onto the undersdie of the holes to stop the weld drooping through.


The area once ground off and sanded.


The main damage was on one side of the box , I cut out the badly dented bit and let in some alloy plate the same thickness, I clamped it in place with the steel block under the area to be welded and tack welded it into position.


The joins were then welded up around the patch.


The area patched side once , ground off filed and sanded, by some miracle whatever had damaged the box had missed the lid otherwise it would not have been worth trying to repair.


  Well all looks to have posted ok , but scary 15 minutes as Photo bucket as usual locked the computer up right at the end of the post so thought I had lost the lot  :bugeye: but lucky the post was still there on restart  :thumbup:

 Cheers Mick.


Offline Meldonmech

  • Hero Member
  • *****
  • Posts: 933
Re: Harrison L5 rescue
« Reply #101 on: November 21, 2012, 03:07:31 AM »
Hi Mick   
            Nice welding  looks like a new box, did you use a mig welder ?  I find restoring machinery very rewarding. The school I
attended had two lathes a Boxford and a Harrison L5. I always tried to use the Harrison, being a much better lathe, with more
facilities. I cut my first square threads both internal and external, for a screw jack, using the L5. Glad to see you making progress.

                    Cheers David

Offline micktoon

  • Hero Member
  • *****
  • Posts: 797
  • Country: gb
Re: Harrison L5 rescue
« Reply #102 on: November 21, 2012, 07:27:54 AM »
   Thanks David , it was a T.I.G welder set on AC I used to do the welding, its a Migtronic mte220 welder that is very good ( better than me ! ) I dont have a foot pedal control so some bits of alloy welding can bi tricky as heat builds up and suddenly what you are welding becomes a lump of mush :bugeye:, that happened on one bit last night when I was getting tired, I have to work out how to fix it today....... it will involve even more tricky welding  :palm:
  I have only heard good things about the Harrison L5 so hope all my effort will be worth it in the end  :thumbup:

   Cheers Mick

Offline trevoratxtal

  • Full Member
  • ***
  • Posts: 183
  • Country: england
  • Torbay, South Devon, England
Re: Harrison L5 rescue
« Reply #103 on: November 21, 2012, 12:29:30 PM »
"I have only heard good things about the Harrison L5 so hope all my effort will be worth it in the end  :thumbup:"
I am sure you will like it, it is a dream hands on machine, that tolerates many mistakes.
I am still following your progress by installments.

Regards
Trev

Offline micktoon

  • Hero Member
  • *****
  • Posts: 797
  • Country: gb
Re: Harrison L5 rescue
« Reply #104 on: November 21, 2012, 04:23:40 PM »
This is the corner that I melted last night, the shelf part is about 5mm thick and the angle edging about 2-3mm thick so any hesitation or the weld pool not forming straight away and this happens :palm:


I decided a patch was the best way so cut a scrap to fit but this time left it longer so the thinner part had more bulk to soak up the heat and also decided I would weld these similar bits together then weld the rear edging angle to them before attempting to join them near the corners and along the rear to the thicker shelf so again there would be more of the thinner edging to conduct the heat before it would melt away. This is the patch in place and cleaned where it needs welding.


I have now clamped the patch to the main angle edging with the steel block behind to again stop the alloy sagging if it gets too hot.


It welded fine this time , just had to be quick and make sure there was enough weld bead at the ends so when it is dressed up it will still have the straight edge .


After a bit of grinding, filing and sanding and trimmed off to length it looks fine  :drool:


I have cut the edging for the rear of the shelf but for some reason the welder has started to trip the garage and house breakers so after three attempts and all the lights going off have gave up for today, I will have to investigate tomorrow  :palm:

  Cheers Mick

Offline doubleboost

  • Madmodder Committee
  • Hero Member
  • *****
  • Posts: 1619
  • Country: gb
  • Newcastle Upon Tyne
Re: Harrison L5 rescue
« Reply #105 on: November 21, 2012, 04:30:24 PM »
Hi
Mick
Pleased to see you are back on the job
Your alloy welding looks fine
A foot pedal makes a massive differance to the ease of welding
John

Offline micktoon

  • Hero Member
  • *****
  • Posts: 797
  • Country: gb
Re: Harrison L5 rescue
« Reply #106 on: November 22, 2012, 05:14:50 PM »
 Nothing new to post I am afraid lads , as it looks like fault on the welder is causing the breaker to trip each time it turned on  :zap: :bang: :bang: :bang:, so as usual one job leads to another job as the first job stands unfinished  :palm: :palm:. My mate who knows about these matters is coming to test things on Saturday so fingers crossed its something fixable.
   I noticed the welder let me down the instant I mentioned that Migatronic was good kit .................. Typical , I should have known better  :(

  Cheers Mick

Offline doubleboost

  • Madmodder Committee
  • Hero Member
  • *****
  • Posts: 1619
  • Country: gb
  • Newcastle Upon Tyne
Re: Harrison L5 rescue
« Reply #107 on: November 22, 2012, 05:23:14 PM »
Hi
Mick
I know that feeling very well :doh: :doh: :doh: :doh: :doh:
I have a migatronic mig at work that gets hammerd every day
I also have a smaller one at home
Migatronic is good gear
I hope your fault is a simple one
John

Offline AdeV

  • Madmodder Committee
  • Hero Member
  • *****
  • Posts: 2434
  • Country: gb
Re: Harrison L5 rescue
« Reply #108 on: November 23, 2012, 08:54:22 AM »
Nothing new to post I am afraid lads , as it looks like fault on the welder is causing the breaker to trip each time it turned on  :zap: :bang: :bang: :bang:, so as usual one job leads to another job as the first job stands unfinished  :palm: :palm:. My mate who knows about these matters is coming to test things on Saturday so fingers crossed its something fixable.
   I noticed the welder let me down the instant I mentioned that Migatronic was good kit .................. Typical , I should have known better  :(

  Cheers Mick

Keep trying bigger circuit breakers - eventually the fault will reveal itself in the welder - just follow the smoke back to it's source  :Doh: :doh: :doh: :Doh:

My professional welder mate uses Migatronic stuff pretty much exclusively, so it's obviously (normally) good stuff.
Cheers!
Ade.
--
Location: Wallasey, Merseyside. A long way from anywhere.
Occasionally: Zhengzhou, China. An even longer way from anywhere...

lordedmond

  • Guest
Re: Harrison L5 rescue
« Reply #109 on: November 23, 2012, 10:22:22 AM »
dont tell him to do that we did that at work ( Stanton Iron Works ) on the DC system it was a floating system with neither leg decked , we used two lamp in series with the centre point connected to earth to fault find earths ( a fault one the - to deck and one on the + to deck was a short ) but it could play tricks with the control ccts

the object of the post revolves around a stubborn earth fault we knew which breaker it was on 500a one so we strapped a large copper bar on a spare 1000a breaker to earth for the other leg , switched on a bit of a spark ( these were open switch gear ) the fault cleared ,
we when down stairs for a brew hey Jeff I can here a fire engine going up the road ( we had our own works Fire engine ) the oil store was in flames we found out later that it had DC lighting ccts so we did find the fault but burn down the oil stores about 500 gals of lub oil for the cranes and machine shop


so yes you may find the fault but it can backfire on you  Take care with the sparky stuff it does not take prisoners if it get you hand to hand  :zap:


Stuart

Offline micktoon

  • Hero Member
  • *****
  • Posts: 797
  • Country: gb
Re: Harrison L5 rescue
« Reply #110 on: March 16, 2013, 01:33:45 PM »
 :update:  :dremel:  After a long break from the lathe I have finally got back to it ( Again lol ) just carried on where I left off with the mounting of the electric boxes.

This it the alloy backing plate and the top shelf mounted in location.


The front plate is getting drilled and counter sunk and the rear frame tapped to suit, I am mounting a red 3 phase socket to the rear of the panel so the motor can be plugged in, this way if I want to test 3 phase motors I can just wire a plug to them and use the lathes inverter to test things or even wire something else 3 phase up and use the lathe controls.


This is the alloy box for the emergency off switch that I am fitting to the front of the machine its knee height, easy to knock power off .....just in case I ever need it. As you can see the box is not square which made marking off the corner that needed cut out more hassle, I hacksawed and drilled the section out and cleaned up with files.


I have removed a section that was stopping the box fitting flat and it just needs bolted on now.


In final position with switch fitted.


This is the backplate and shelf all bolted up and the inverter and switch box fitted , the speed legend plate is bolted under the switch box as it was ackward to see mounted on top of the head stock as standard.


This is the box lid drilled with the layout of the switches , there will be main power on/off , a power on indicator light, start and stop push buttons, a forward/reverse switch , a speed control rotary knob , a suds switch and lamp switch.


 This is all just test fitting and the plan is tho then paint things before final fitting and installing wiring, I already know of distractions coming up but am just going to keep at the lathe till its done now so more updates to follow SOON !

  Cheers Mick.

Offline dsquire

  • In Memoriam
  • Hero Member
  • *****
  • Posts: 2275
  • Country: ca
  • Kitchener, Ontario, Canada
Re: Harrison L5 rescue
« Reply #111 on: March 16, 2013, 02:29:09 PM »
Nothing new to post I am afraid lads , as it looks like fault on the welder is causing the breaker to trip each time it turned on  :zap: :bang: :bang: :bang:, so as usual one job leads to another job as the first job stands unfinished  :palm: :palm:. My mate who knows about these matters is coming to test things on Saturday so fingers crossed its something fixable.
   I noticed the welder let me down the instant I mentioned that Migatronic was good kit .................. Typical , I should have known better  :(

  Cheers Mick

Mick

What did you find was the problem with the welder that caused the breaker to trip? I didn't recall seeing the answer. My appologies if I missed it.

Nice fitting of the emergency box and switch.  :D  :D

Cheers  :beer:

Don

Good, better, best.
Never let it rest,
'til your good is better,
and your better best

Offline doubleboost

  • Madmodder Committee
  • Hero Member
  • *****
  • Posts: 1619
  • Country: gb
  • Newcastle Upon Tyne
Re: Harrison L5 rescue
« Reply #112 on: March 16, 2013, 06:28:00 PM »
Hi
Mick
Nice to see you back on the job  :bugeye: :bugeye: :bugeye: :bugeye:
John

Offline micktoon

  • Hero Member
  • *****
  • Posts: 797
  • Country: gb
Re: Harrison L5 rescue
« Reply #113 on: March 16, 2013, 07:04:30 PM »
Nothing new to post I am afraid lads , as it looks like fault on the welder is causing the breaker to trip each time it turned on  :zap: :bang: :bang: :bang:, so as usual one job leads to another job as the first job stands unfinished  :palm: :palm:. My mate who knows about these matters is coming to test things on Saturday so fingers crossed its something fixable.
   I noticed the welder let me down the instant I mentioned that Migatronic was good kit .................. Typical , I should have known better  :(

  Cheers Mick

Mick

What did you find was the problem with the welder that caused the breaker to trip? I didn't recall seeing the answer. My appologies if I missed it.

Nice fitting of the emergency box and switch.  :D  :D

Cheers  :beer:

Don

Hi Don , I never really got to the bottom of it except to work out the breaker is on borderline and if the welder is set to AC when switched on it sometimes trips, but if set to DC then switched on it never trips..... If set to DC , switched on, then once on set to AC it wont trip.................. so as I am not looking for probems I just switch on in DC mode then transfer to AC  :D so far so good so fingers crossed it will stay that way :thumbup:

Offline dsquire

  • In Memoriam
  • Hero Member
  • *****
  • Posts: 2275
  • Country: ca
  • Kitchener, Ontario, Canada
Re: Harrison L5 rescue
« Reply #114 on: March 16, 2013, 07:52:35 PM »
Hi Don , I never really got to the bottom of it except to work out the breaker is on borderline and if the welder is set to AC when switched on it sometimes trips, but if set to DC then switched on it never trips..... If set to DC , switched on, then once on set to AC it wont trip.................. so as I am not looking for probems I just switch on in DC mode then transfer to AC  :D so far so good so fingers crossed it will stay that way :thumbup:

Mick

In other words, you are outsmarting it by trickery. I love a clever solution like that.  :lol: :lol:   

What ever works is fair game.    :lol: :lol:

Cheers   :beer:

Don


Good, better, best.
Never let it rest,
'til your good is better,
and your better best

Offline micktoon

  • Hero Member
  • *****
  • Posts: 797
  • Country: gb
Re: Harrison L5 rescue
« Reply #115 on: March 18, 2013, 06:05:09 PM »
I have got more done to the lathe today, it does not look like much on photos but there has been lots of thinking of what will fit where and where cables have to go etc . Then lots of drilling holes for cable glands and also mounting things so tapping half them and just bolting others. The main rear alloy plate is some horrible gummy type alloy and just clogs drills and hole saws up so I have had to use WD40 on them which is last thing I wanted with painting being one of the next stages but no way around it really and the lathe still needed a good de -grease anyway.

    This is the switch panel box with most of the holes drilled , the reason for drilling the larger holes in the box is the threaded part of the cable glands are not long enough to pass right through the backing plate and the box so I needed space for the securing nut on the back of the glands.
   The way I am doing it I will be able to paint the bracket , backing plate and box then re assemble and wire everything up off the lathe then just mount the whole lot pre wired and plug in the motor , lamp , suds pump and just have the flex to the knee height emergency switch to connect, this way it can all be done, then  put out the way until the rest of the lathe is done, also in the future if any component fails it should be able to be unplugged and took off with out opening the switch panel up.


This is the rear of the panel , the motor will plug into the red socket on the back here, I will also have flexes with plugs on them for the coolant pump and the lo - volt lamp.


The finished switch panel will look something like this , there is room to make labels above each switch on the panel, the two big switches at the bottom will be for the coolant and the lamp , they are much heavy duty than needed but were cheap. Then there is stop , start , below these are forward/ reverse and speed control as well as the main isolator and power on light.


 Next job is to get all these bits ready for primer ........... then paint them grey.
  Cheers Mick.


Offline doubleboost

  • Madmodder Committee
  • Hero Member
  • *****
  • Posts: 1619
  • Country: gb
  • Newcastle Upon Tyne
Re: Harrison L5 rescue
« Reply #116 on: March 18, 2013, 06:10:46 PM »
Looking good Mick :thumbup: :thumbup: :thumbup: :thumbup: :thumbup: :thumbup:
John

Offline micktoon

  • Hero Member
  • *****
  • Posts: 797
  • Country: gb
Re: Harrison L5 rescue
« Reply #117 on: May 03, 2013, 06:45:01 PM »
 Good Evening All , Well at long last I have got a bit more done to the Harrison. I have done various things without photos , like diamond filing the burs off every single cog tooth in the whole gearbox ....... not a five minute job , I have all new bearings for the spindle and new oil seals and generally cleaned and inspected everything. I managed to get the gear cog I needed to replace because of chipped teeth, thanks are due to Peter ( Bacup Hillbilly ) who had a spare gear cog and shaft , the holes in the clutch plates are oval and the pins worn, this was making the clutch grab and sometime not disengage , I have got new roller bearing pins and Rob Wilson is kindly going to drill and press the new pins in ( I was not confident of doing a good job of it ) Cheers Rob. The other part that was worn was a brake pad disc that is operated by the clutch lever, I did not even know it was there so have never used it ! It had wore down to the countersunk fixing bolts was was steel on steel not bronze on steel. The original was made of a bronze type brake material with particles inbedded in it, I could not get any of this so have made one out of bronze, it should still do the job.

This is the worn out part, the three holding coutersunk set screws had just been rubbing.


2 inch bronze bar, skimmed to size.


Drilled out in a couple of stages to almost the right ID , the drill is car boot job , rusty but sharp where it counts !


I marked out the three holes and drilled them on the Bridgeport.


I then skimmed the top surface so it was the right depth to the countersink s, then parted off.


The new disc in place along side the old one, its only after looking at this photo I think I might mill the three recessed flats into it as per the original so it has even contact with the steel collar it presses against , as it is it might wear uneven around the holes ? it wont do any harm to do it anyway.


Cheers Mick

Offline micktoon

  • Hero Member
  • *****
  • Posts: 797
  • Country: gb
Re: Harrison L5 rescue
« Reply #118 on: May 06, 2013, 05:20:31 PM »
 :update:  I have milled that disc so its like the original part , not much else done but hope to get more done this week.


Cheers Mick

Offline gndurant

  • Jr. Member
  • **
  • Posts: 10
Re: Harrison L5 rescue
« Reply #119 on: May 20, 2013, 04:48:54 PM »
Hi Mick,

Fantastic thread!  I'm rebuilding a Centec mill at the moment, so your experiences are particularly apt for me right now.  You've done a cracking job so far, and I can't wait to see her finished!

In the meantime, I just wondered what your plans for painting are?  I always struggle at that point, having no spray facilities.  During previous machine rebuilds I've tried brushing machine enamel and also experimented a little with foam rollers, the latter  with positive if mixed results.  I noticed you'd used mini rollers for your metal rack, hence wondered what you had in mind for the lathe?  Unless of course you have the space and kit to spray?

Cheers
Graeme

Offline micktoon

  • Hero Member
  • *****
  • Posts: 797
  • Country: gb
Re: Harrison L5 rescue
« Reply #120 on: May 20, 2013, 06:46:26 PM »
Hi Graeme , glad you are enjoying the project and hope your Centec mill is coming along ok. As far as the painting goes , I am going to mostly spray the lathe and probably roller and brush some tricky parts , like in the webs of the bed, inside the storage cupboards etc.
 I have never got very impressive results brushing paint on myself, I know it can be done but doing it yourself is another matter. When I have used the mini rollers I have had the best results with the ones that are more or less like velvet , a very short soft smooth surface , I think they might be meant for emulsion paint ? , the pound shop type ones seem to leave bits of fluff all over but if you get a half decent one and roll quite slowly they work well , I have used the foam type but they either seem to sort of expand and melt with the paint or leave lots of little bubbles that pop and leave marks. I did the metal frame with the foam type and its ok for the metal frame but not that smooth really, if you see it close up.
  Two tips I have found out are , You can sometimes roller the paint on then once its covered evenly and still wet, if there are say small bubbles or roller marks , you can gently go over it with a soft brush lighly, just dragging across the surface and it smooths out quite well. Or if you are going to roller , if you first go around hard to get into type areas brushing the paint on , say around hinges on a cabinet door etc but overlap onto flat bits , then you can roller all the easy bits and sort of roller into and just over the brushed areas and it melts in but probably looks better than just brushing , especially on larger fat areas, this is if your roller is working well and  looking nice. Hope this helps a bit Graeme , I will starting to paint things next week I hope so will post my progress anyway .
  Cheers Mick.

Offline gndurant

  • Jr. Member
  • **
  • Posts: 10
Re: Harrison L5 rescue
« Reply #121 on: May 21, 2013, 10:16:13 AM »
Hi Mick,

Thanks for your feedback on this - that actually helps a lot!  I had been put onto rollers by a chap on another forum, and found they worked much better than brushing.  I am using a machine enamel specially formulated for brush application, so it dries a little slower than standard enamel to allow the brush marks to flow out.  It does work, and the results are reasonable with brush application, but the roller is significantly better, especially on large flat areas.  It's not perfect by any means, but looks to me like an averagely reasonable sprayed finish - which is good enough for what I'm doing here, given that I don't have the option to spray!

I've been using foam rollers from Wickes - basically ten for five pounds, so you can afford to use them once and chuck them out.  Cleaning a roller of oil based paint would be my idea of hell, hence I quite like this approach.  They don't seem to be affected by the solvent in the paint I am using - a synthetic  thinners - which is good, though I did  worry about that before I tested them.  You're right about the tiny bubbles though.  My first attempt was plagued by them, but I found that if you run the roller over the surface lightly and rapidly as a last pass, it seems to flatten them all.

Where I have remaining problems - and where your final suggestion might work - is when painting around the "fiddly bits".  When painting a big flat featureless area, like a panel or the boxy base, they work really well.  However when painting round obstructions, like in my case where the drive shafts emerge from the body, or the gearbox levers emerge, I've found that the consistency of paint thickness is poor, and the results then look really patchy in terms of surface finish.  The paint is just too thinly applied and doesn't flow to form a continuous skin.  This could be because I'm using foam rollers, which aren't  the best.  I've tried extra hard to avoid this, but end up over working the paint with lots of attempts, and the results are not great. 

I could try more expensive rollers, but I'm thinking that if I use your idea of painting those parts first, using a brush to lay down a full paint film, and then using the roller to flatten out the brush marks, I could be in business.  Just a case of doing it all quickly before the paint starts to skin.  I reckon I can do that!

So, many thanks for taking the time to share your ideas.  This weekend I will test your suggestion on the remaining parts left to paint (that currently have a poor finish around the fiddly bits!).

Cheers
Graeme

Offline Anzaniste

  • Full Member
  • ***
  • Posts: 207
  • Country: gb
Re: Harrison L5 rescue
« Reply #122 on: May 22, 2013, 02:24:46 AM »
Hi Mick,

Fantastic thread!  I'm rebuilding a Centec mill at the moment, so your experiences are particularly apt for me right now.  You've done a cracking job so far, and I can't wait to see her finished!

In the meantime, I just wondered what your plans for painting are?  I always struggle at that point, having no spray facilities.  During previous machine rebuilds I've tried brushing machine enamel and also experimented a little with foam rollers, the latter  with positive if mixed results.  I noticed you'd used mini rollers for your metal rack, hence wondered what you had in mind for the lathe?  Unless of course you have the space and kit to spray?

Cheers
Graeme


Any chance of piccies? I've got a Centec that I intend to do up (one day :coffee:)

Some one some where suggested that when using brush type enamels that warming up both the job and the paint before starting the job is a great help to achieving a good brushed finish. I've never tried it but one can see the logic.
Scrooby, 1 mile south of Gods own County.

Offline gndurant

  • Jr. Member
  • **
  • Posts: 10
Re: Harrison L5 rescue
« Reply #123 on: May 22, 2013, 10:44:31 AM »
I'll see what I can do - maybe start a new thread.  I'm quite bad at logging progress in pictures, so I have a slightly sporadic set so far, but they do show before and after at least!

I started my re-paintwork in December, when the weather was still mild (12C).  In January it got cold, and the paint definitely didn't flow.  Being unable to raise the temperature of the sizeable cast iron lumps, I simply had to park that particular job until the weather improved.  And this year that meant April, so with two coats of primer and a minimum of two topcoats, I'm only now near completion!  I suspect if I could have warmed the iron sufficiently, and warmed the paint, it could have worked quite well even in the cold weather.  I did try leaving a lamp inside the base of the machine overnight, but the thermal inertia of 500kg of iron meant no perceptible difference!  Frustrating, though it did mean I was able to switch to a previously parked DIY job in the house, which has earned me enough credits to spend some good workshop time in the coming months!

Cheers
Graeme

Offline micktoon

  • Hero Member
  • *****
  • Posts: 797
  • Country: gb
Re: Harrison L5 rescue
« Reply #124 on: May 31, 2013, 04:55:39 PM »
Well at last some real progress on the lathe.

From looking pretty much stripped right down again.


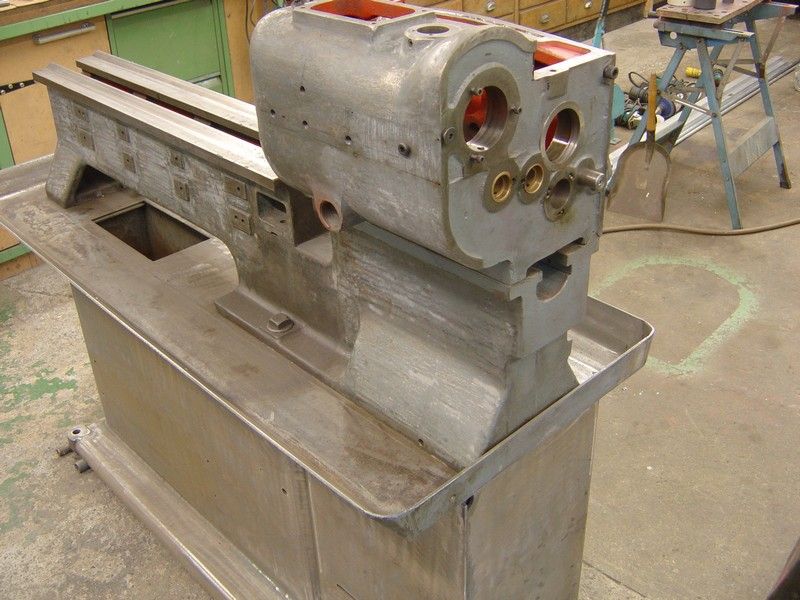
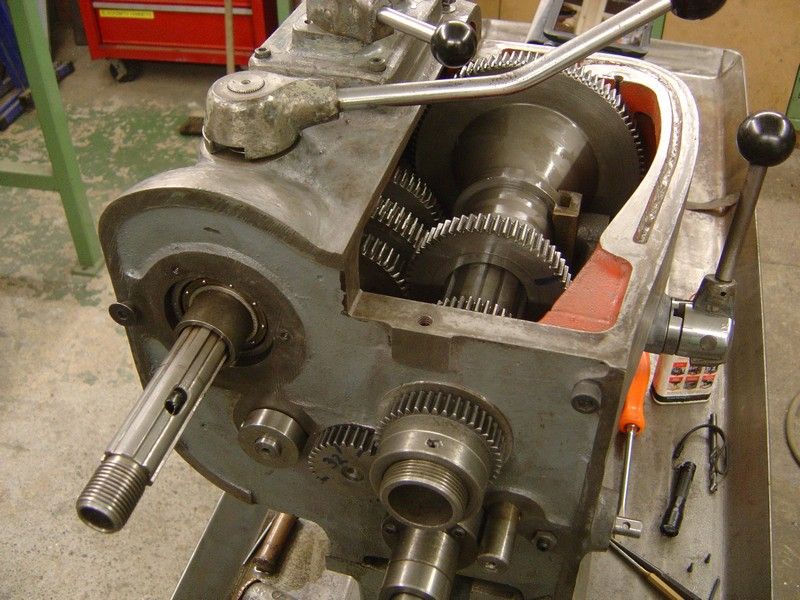
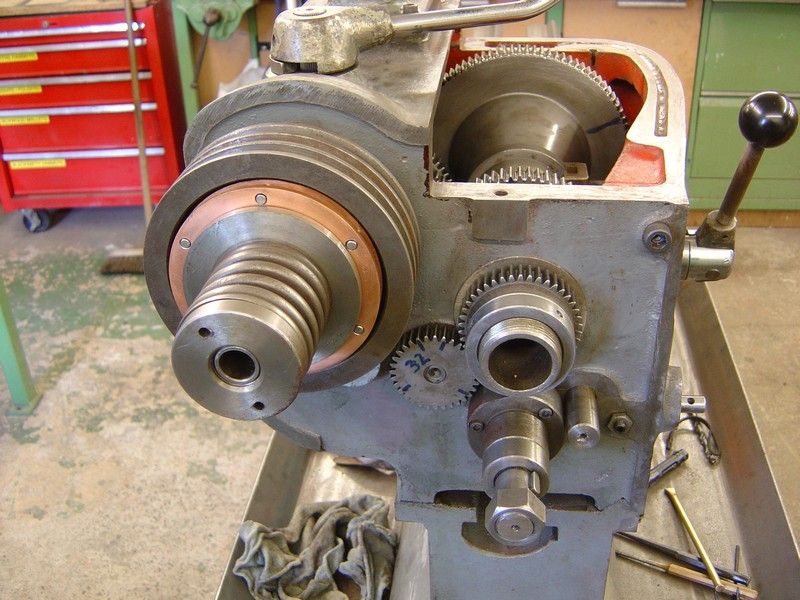
The mission was to get this lot back inside the headstock


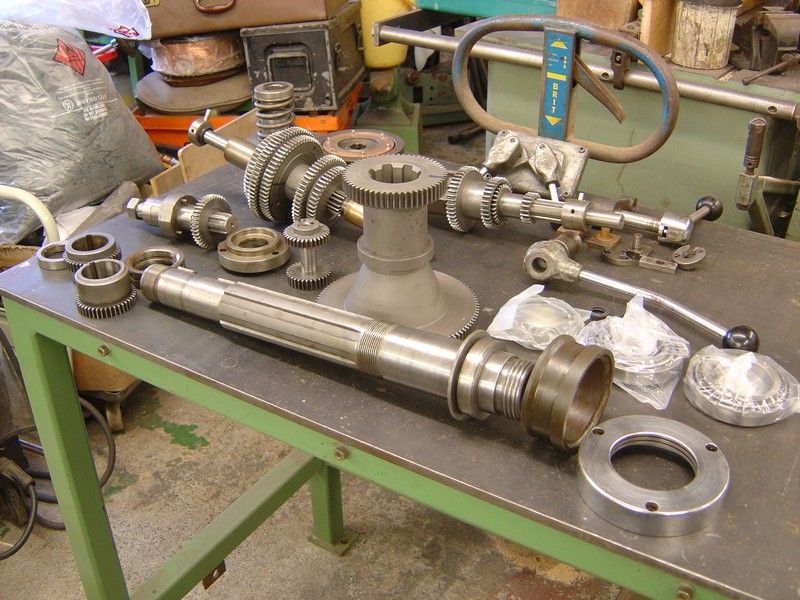
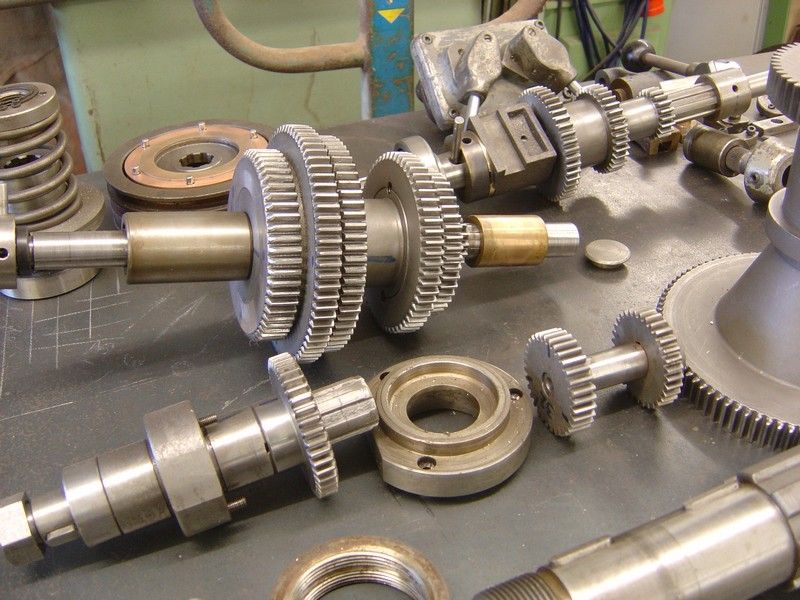
All the gears have been de burred, new spindle bearings and new oil seals, a couple of gears that had chipped teeth replaced and everything cleaned and checked over. The main problem with getting all the parts in seems to be most bits have to be inside the casing in their rough position but not actually in position and held there so that other things can be lined up at the same time, its a good job I had took plenty photos as my two manuals both have drawings that show several things that are not as this actual lathe so can do as much harm as help sometimes. Anyway after much struggling and trial and error , it all went back together and gears select and turn ok.


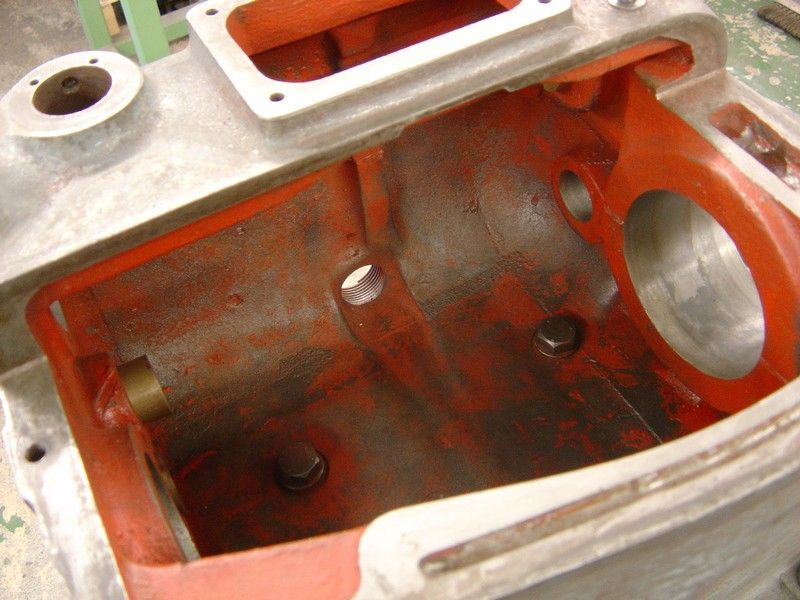
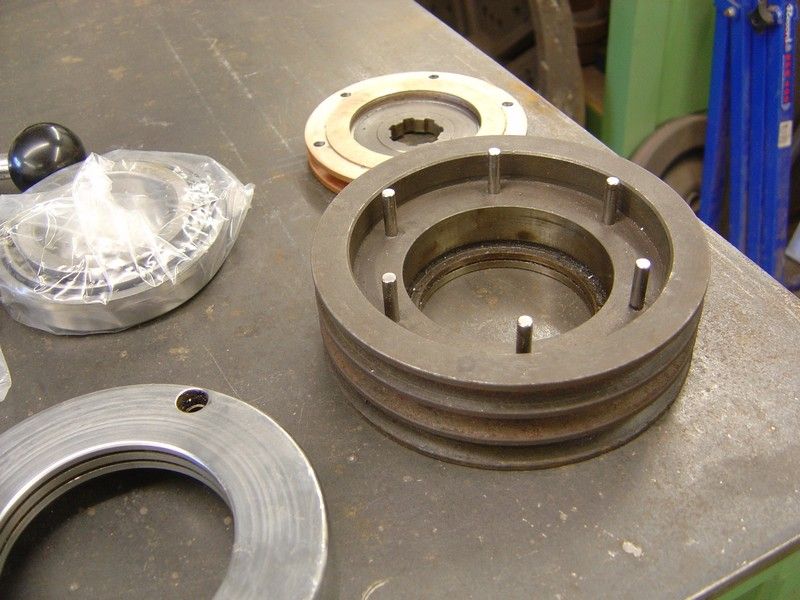
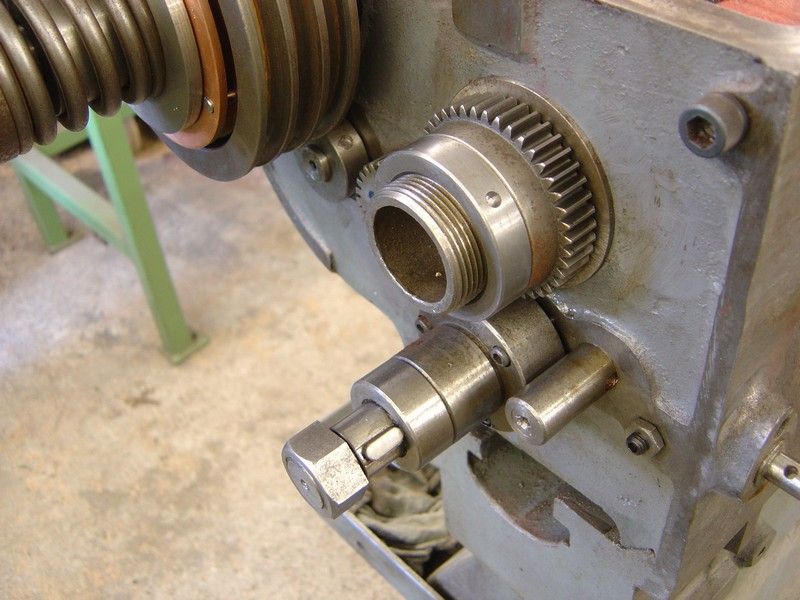
The next bit was the clutch , before the clutch used to snatch and sometimes not disengage, this was due to the pins in the vee pully that the clutch plate slide on having had notches worn into them and the clutch plates holes being worn oval. I was not confident of replacing the pins and drilling the plates spot on myself but Rob Wilson kindly did them for me , as you would expect Rob, he did a cracking job of them, cheers again Rob . You can see the pins in this photo, they have been fitted with slightly larger diameter roller bearing pins.


These are the plates with the new slightly larger holes drilled to match the new pins.


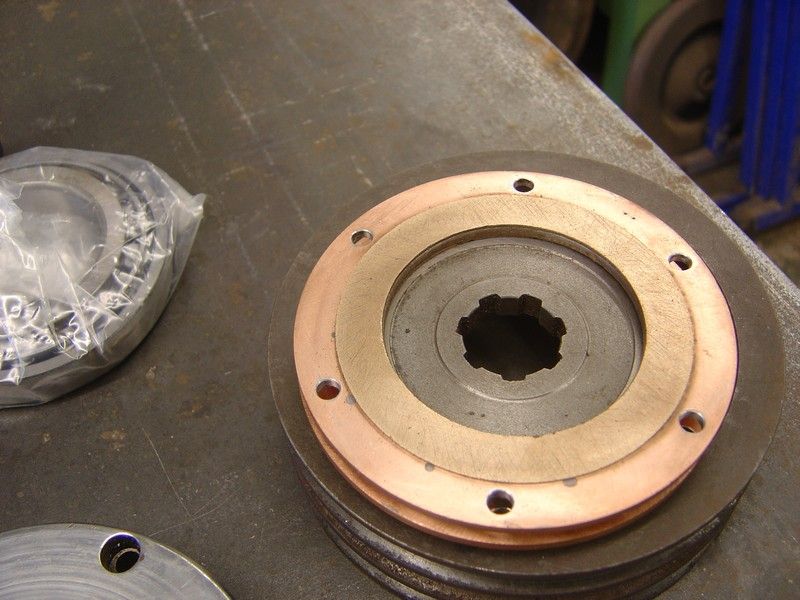
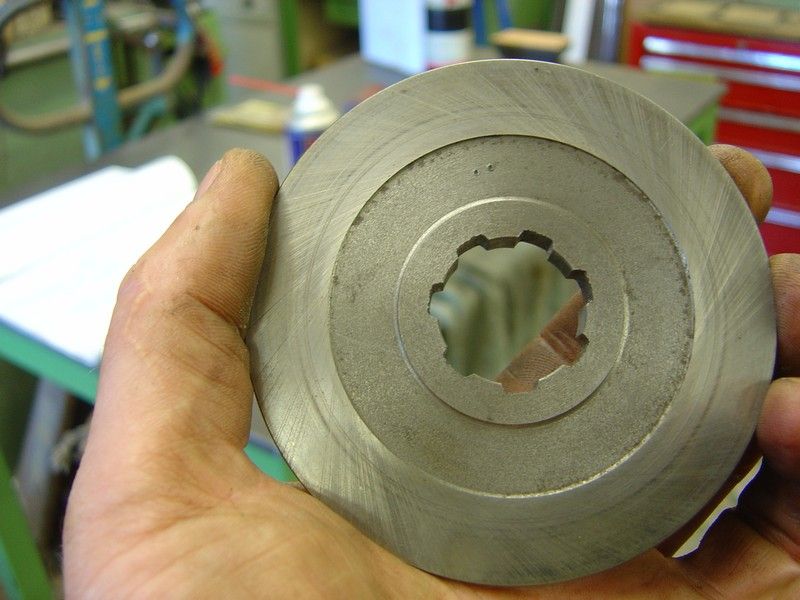
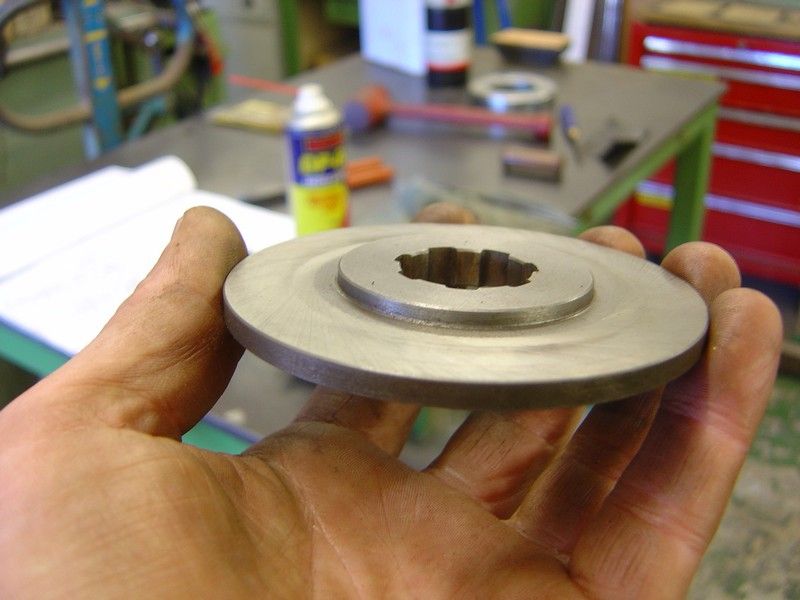
The clutch was then assembled, both the drawings were wrong and I could not remember at all how things went ! good job I had marked things as they came off, everything facing outwards received two small dot punch marks as you can see on second photo down at 12 O'clock , the steel clutch disc is flat one side and had a raised center on the other side as seen in third photo, it would have fit on either way but one way would be the wrong way , these marks ensured I put it in the correct way around so well worth taking the time to do this.


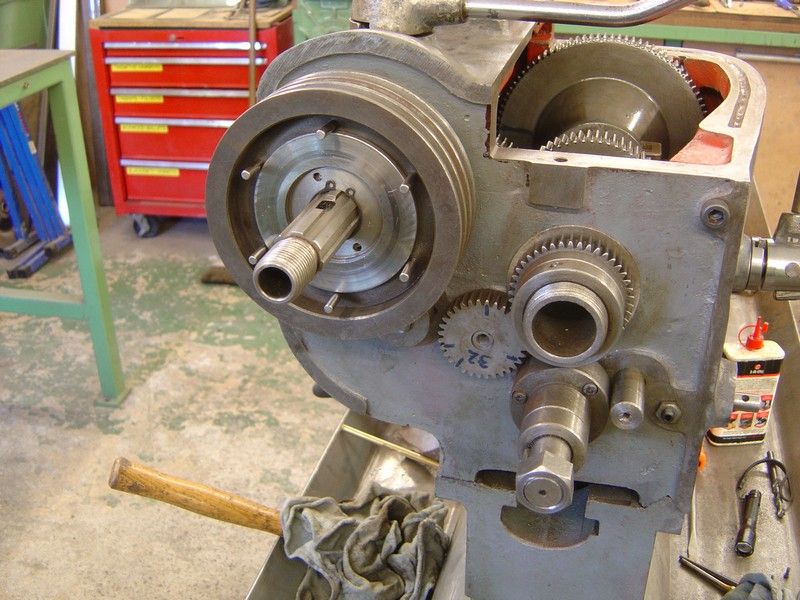
The next thing was a threaded collar on the end of the spindle has the holes chewed up so I drilled some new holes in the collar on the mill, lucky I already had the vee block and angle plate set up from doing something else on the mill as it would have taken longer to set up than do the holes.


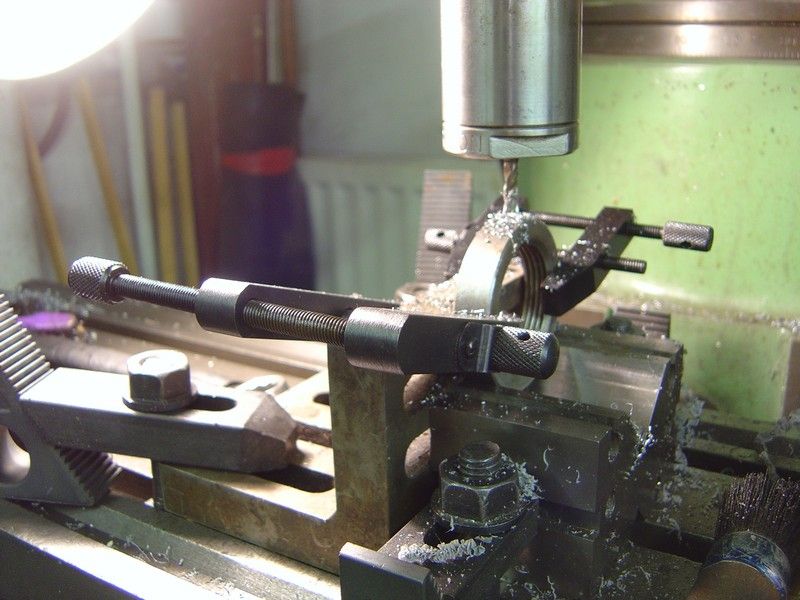
This is the collar back on the spindle.


The clutch was then trial and error assembled, but would not seem to work, after looking at it really carefully I noticed witness marks inside an adjustable collar and remembered that I had put a small pin in a separate place in case it got lost , this was the missing link and once fitted it all seems to work ok.


The next stage is to prepare things for painting , a good bit of sanding , filling and priming needed, at least things should look as if they are progressing once some paint goes on.

 Cheers Mick.