Author Topic: Maiwald Makeover.......  (Read 29266 times)

Offline Stilldrillin

  • Global Moderator
  • Hero Member
  • *****
  • Posts: 4972
  • Country: gb
  • Staveley, Derbyshire. England.
Maiwald Makeover.......
« on: June 29, 2012, 03:52:23 PM »
Well, here we go again!  :)

Another frail orphan, from my toy cupboard.

This is a James Maiwald hot air engine. It came to me at the end of 2009.


It isn't well! The main bearings are too far apart, and the flimsy crank is flexing.  :bang:


This is the best it has ever run.......


My thoughts are to fit an extra pair of bearings, held closer in to the crank throw.

Also, I thought it's flywheel looked better on my Maiwald flame licker. So, it was cannibalised.


Removing the bearings proved a struggle. The frames are laser cut, and the bearings were just rammed in, much too tight.....


A pair of inriggers. The excess material will be removed later.......


A bit of a shock, finding swarf in the displacer pot! Impacted onto the brass bush. Very poor workmanship..........


This was the state of play, at today's knock off........


More to come, as and when.  :thumbup:

David D
« Last Edit: June 29, 2012, 05:55:23 PM by Stilldrillin »
David.

Still drilling holes... Sometimes, in the right place!

Still modifying bits of metal... Occasionally, making an improvement!

Offline Stilldrillin

  • Global Moderator
  • Hero Member
  • *****
  • Posts: 4972
  • Country: gb
  • Staveley, Derbyshire. England.
Re: Maiwald Makeover.......
« Reply #1 on: July 07, 2012, 04:07:19 PM »
After giving this thing a good coat of looking at, I decided it was much too wide.......

So, I reduced the alloy spacer by 10mm per side, to 48mm.


Extended the thread on the beam pivot shaft. Then screwed on two nuts, and faced to make 48mm spacer rod.


The frame relied on the wooden base, to hold it all square.

Drilled the frames for an extra 48mm spacer shaft, to triangulate and make it self supporting.......


The beam pivot bearing had also seized. Turned an alloy bush, with a slight positioning step........


To hold it central........


The alloy big end/ crank assembly is much too flimsy. But, I'll give it one more chance......

Rebuilt it, using my favourite sleeve lock, at each end of the crankpin.......


Progressing, steadily!  :thumbup:

David D
David.

Still drilling holes... Sometimes, in the right place!

Still modifying bits of metal... Occasionally, making an improvement!

Rob.Wilson

  • Guest
Re: Maiwald Makeover.......
« Reply #2 on: July 07, 2012, 04:13:25 PM »
Looking Good David  :thumbup:


I bet deep down you smile when you come across "very poor workmanship"  :med: 


Rob
« Last Edit: July 07, 2012, 04:58:53 PM by RobWilson »

Offline sbwhart

  • Global Moderator
  • Hero Member
  • *****
  • Posts: 3530
  • Country: gb
  • Smile, Be Happy, Have Fun and Rock Until you Drop
Re: Maiwald Makeover.......
« Reply #3 on: July 07, 2012, 04:57:46 PM »
missed the start of this one

interesting looking engine Dave,

I think I'll be using some of your fix it methods on the simplex

Keep up the good work with the orphans

Stew
A little bit of clearance never got in the road
 :wave:

Location:- Crewe Cheshire

Offline Dean W

  • Hero Member
  • *****
  • Posts: 571
  • My kingdom for a lathe!
    • Projects web pages
Re: Maiwald Makeover.......
« Reply #4 on: July 08, 2012, 12:16:29 AM »
I like the looks of the model.  Hard to imagine how they could leave so much swarf in that cylinder!  Gosh, that's bad.
Looks like they had a nice model concept and then focused on cutting corners.  The size of the holes in the upright
supports for the crankshaft could have taken bearings that would allow a larger diameter crankshaft.

I'm glad you are on the job so the poor thing can get (re)built right.  I know it will be something special when
you finish with it!
Dean W.

Shop Projects:
http://www.deansphotographica.com/machining/projects/projects.html

Praise the Lord and pass the Carbide!

Offline Stilldrillin

  • Global Moderator
  • Hero Member
  • *****
  • Posts: 4972
  • Country: gb
  • Staveley, Derbyshire. England.
Re: Maiwald Makeover.......
« Reply #5 on: July 15, 2012, 04:16:18 AM »
Thanks for your kind comments, Chaps!  :thumbup:

Very slow progress, I'm afraid........

I assembled the crank frame with it's three spacers.
It's now rigid/ self supporting enough, to file the underside flat, to my surface plate.......


Finished the inrigger bearing holders........


Glued into place. Aligned with a length of 4mm silver steel. Positioned outward, by a piece of foam........


Perfectly aligned.........


Rebuilt the crank assembly. Installed a temporary flywheel.

Oiled round...... And fired up..........


And........


It still wouldn't run!  :bang: :bang:

David D
David.

Still drilling holes... Sometimes, in the right place!

Still modifying bits of metal... Occasionally, making an improvement!

Offline Dean W

  • Hero Member
  • *****
  • Posts: 571
  • My kingdom for a lathe!
    • Projects web pages
Re: Maiwald Makeover.......
« Reply #6 on: July 15, 2012, 09:08:07 PM »
And........


It still wouldn't run! 

Well, at least it's starting to look a bit more substantial.  We know it will run in the end, David, 'cause
we have you on the job!    :thumbup:

How's your supply of sleeve retainer holding out? 

Dean
Dean W.

Shop Projects:
http://www.deansphotographica.com/machining/projects/projects.html

Praise the Lord and pass the Carbide!

Offline Stilldrillin

  • Global Moderator
  • Hero Member
  • *****
  • Posts: 4972
  • Country: gb
  • Staveley, Derbyshire. England.
Re: Maiwald Makeover.......
« Reply #7 on: July 16, 2012, 12:40:28 PM »
Thank you Dean, for your confidence in me.  :thumbup:

Sleeve retainer? Hmmm..... After a very long, successful innings, it's beginning to splutter a little now.  :(

Guess it's about time for a grovelling pm.......  :poke:


After the fail, it was water tested.     

No dramatic bubbles, but some water inside, on stripdown.  :scratch:

Calculated the ratio..... That's ok at around 6 to 1.

Don't like the pifflin', (out of square?), crank throws. So, I started to make another assembly.........


I had no 4mm alloy plate. So, had to machine from a 6" long piece, of 40mm dia. bar.

I was rather proud of my scruffy little 7 x 12's performance........


Obviously, I parted off between centres.
But facing the bar, so far away from the 5" chuck was no problem........


The biggest performance improvement, after the taper rollers, has been the recently fitted steel spacer. In place of the original plastic one.


Another really worthwhile improvement!  :D

David D

David.

Still drilling holes... Sometimes, in the right place!

Still modifying bits of metal... Occasionally, making an improvement!

Offline NickG

  • Madmodder Committee
  • Hero Member
  • *****
  • Posts: 1890
Re: Maiwald Makeover.......
« Reply #8 on: July 16, 2012, 01:01:08 PM »
 :bang: These engines are so tempremental, if anyone can get them to run better you can though!

It just goes to show though, loose is the name of the game with hot air engines, they seem to like a little more clearance than most engines.

The crank shaft looks thick enough to me, as you say it's not given enough support by the bearings but your in-riggers should have solved that ... yeah, I reckon the webs are a bit flimsy, with all the flywheel weight on one side it may be skewing it a bit, your new flywheel looks a bit heavier than the other too.

Can't believe the swarf ... why on earth would you do that ... even if you were churning thousands out, it just doesn't make sense!
Location: County Durham (North East England)

Offline Stilldrillin

  • Global Moderator
  • Hero Member
  • *****
  • Posts: 4972
  • Country: gb
  • Staveley, Derbyshire. England.
Re: Maiwald Makeover.......
« Reply #9 on: July 17, 2012, 12:44:33 PM »
The tiny big end bearings came this morning.  :thumbup:

Two, 4mm thick discs, 16mm dia. drilled through 7mm, and mounted on a mandrel in r/ table.......


Application of 4mm endmill........


Drill and tap M3.......


Two new big ends, ready for loctiting........


Tiny, fiddly bits n pieces, that won't stay in me fingers. Or on the bench, once they've escaped..... Grumble.........   :bang:

David D
David.

Still drilling holes... Sometimes, in the right place!

Still modifying bits of metal... Occasionally, making an improvement!

Offline Dean W

  • Hero Member
  • *****
  • Posts: 571
  • My kingdom for a lathe!
    • Projects web pages
Re: Maiwald Makeover.......
« Reply #10 on: July 21, 2012, 05:38:08 PM »
Big ends, but they're little.  ; )  They look much nicer than the original items, David.  Much!
Dean W.

Shop Projects:
http://www.deansphotographica.com/machining/projects/projects.html

Praise the Lord and pass the Carbide!

Offline Ross

  • Full Member
  • ***
  • Posts: 130
  • Country: gb
    • Ross' steam engines
Re: Maiwald Makeover.......
« Reply #11 on: July 21, 2012, 09:52:16 PM »
Super stuff so far David!

Offline Stilldrillin

  • Global Moderator
  • Hero Member
  • *****
  • Posts: 4972
  • Country: gb
  • Staveley, Derbyshire. England.
Re: Maiwald Makeover.......
« Reply #12 on: July 24, 2012, 04:30:45 PM »
Dean, Ross.
Thanks Chaps! Much appreciated.......  :thumbup:

Well..... Here we go, again!

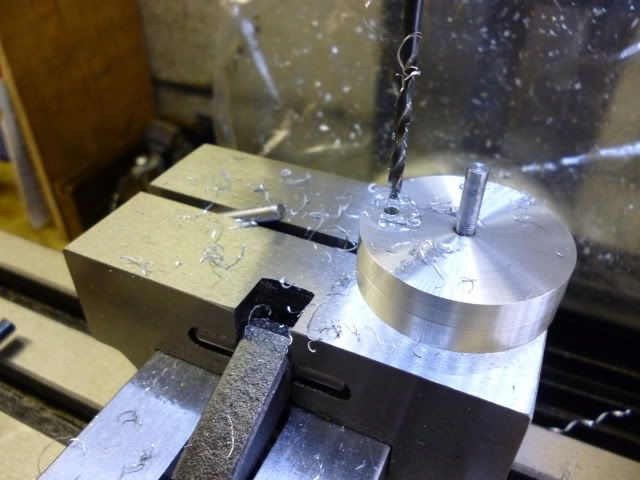
I drilled the crankpin holes.......


Luckily the assembly stayed temporarily pressed together, to allow a test run.

Assembled, with a pair of spare Mamod flywheels........


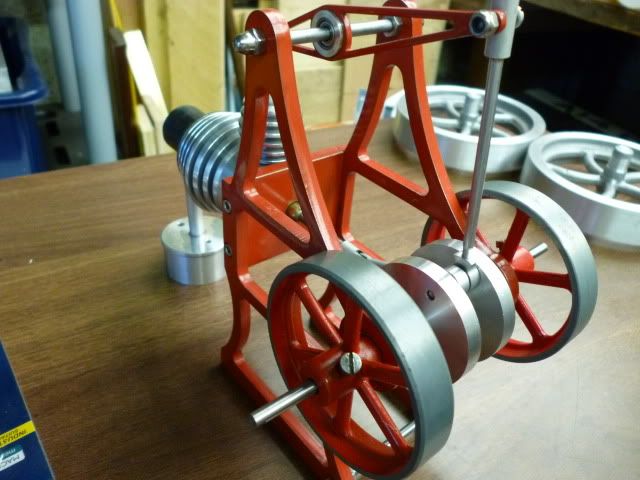
Fitted a new "wonderwick".


Fired up.


And it still wouldn't run. Again!  :bang:


What's wrong with the thing???  :bang: :bang:


Everything's been checked/ re done!! Hasn't it?? :scratch:


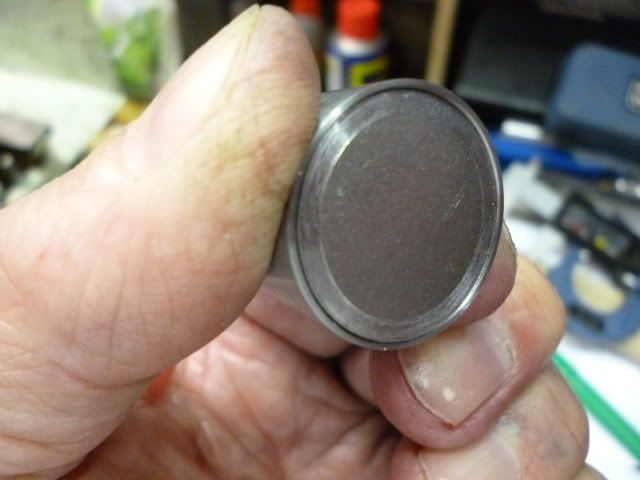
Took off the hot cap. Sucked...... Hard...... It stuck to me tongue....... Nothing wrong with it!!!


Until, I poked a finger inside........


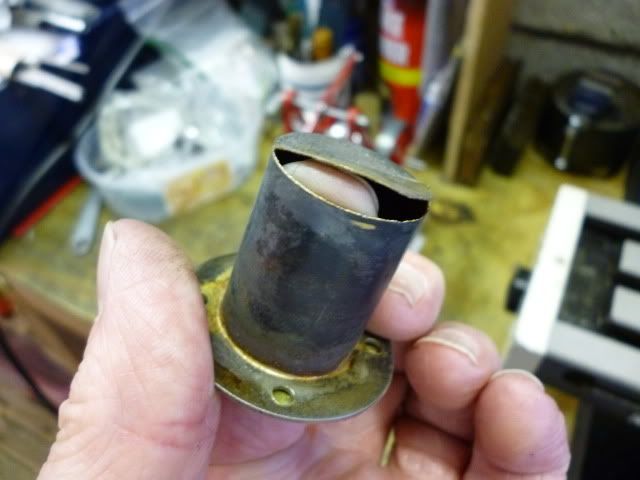
The wall thickness is around 9thou'. The end cap is 4thou', "tin"...........


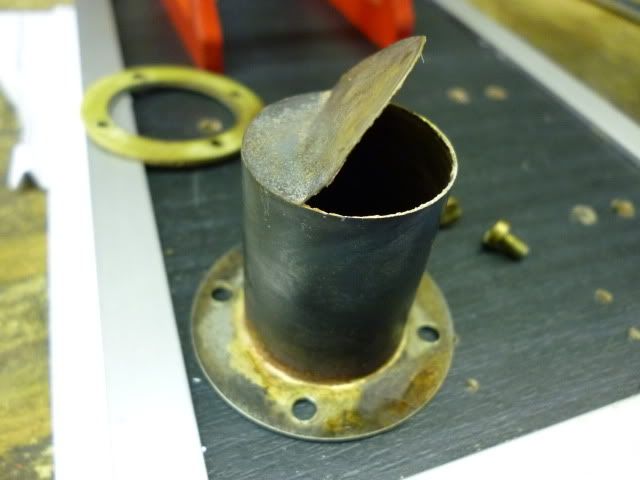
I guess it was acting as a one way valve!  :bang: :bang: :bang:

Sheesh!!

Sigh........

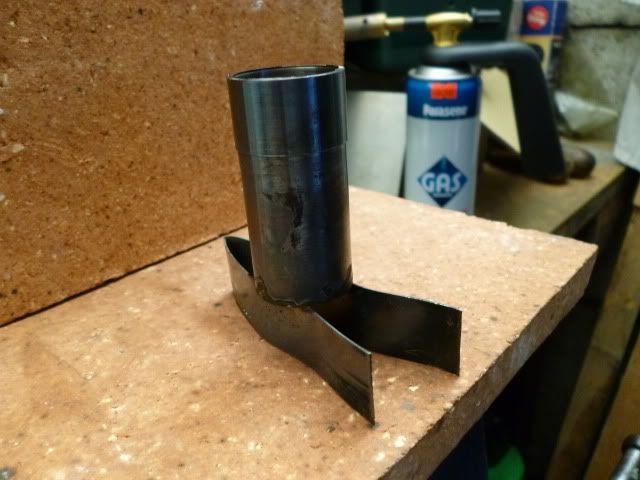
Nothing else to do, but make another, more robust cap. :(

Couldn't find any 1"od tube in the bits tub.

Mrs Drillin's exercise bike, now has a shorter saddle stem. (From inside the frame tube). Hope nobody tells her......  :palm:

Topped to 24mm+. Bored to 23mm.........


Friction turned an end cap........


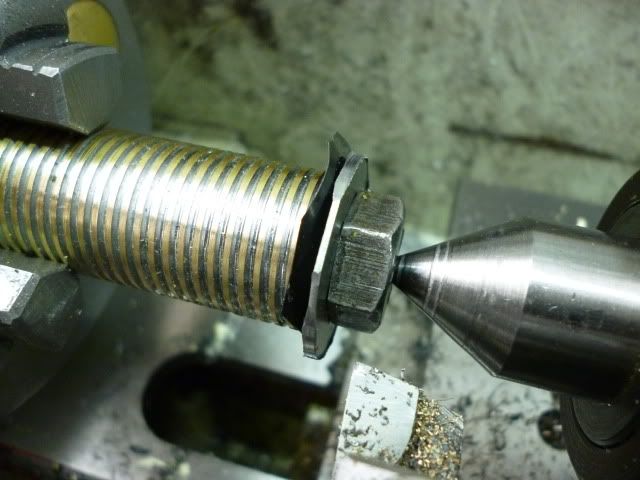
Couple of thou' under bore size.........


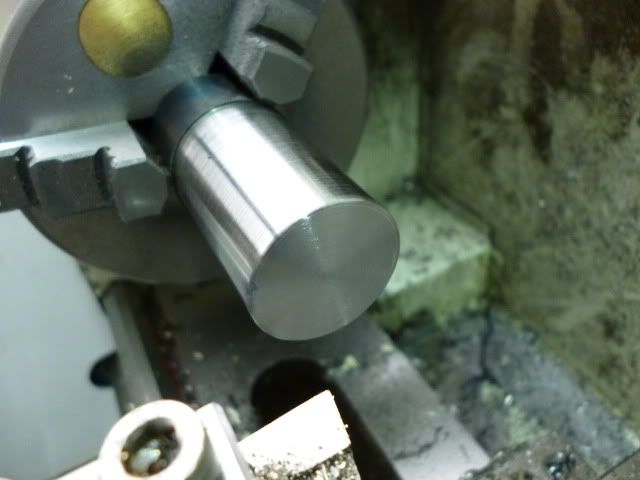
Silver soldered together........


Cleaned up, quite nicely........


I'm starting to worry about me. I don't get upset any more. I just expect things to go wrong........

And they do. Regularly!  :bang: :bang: :bang: :bang:

Machining a new, thicker flange, tomorrow. Probably!  :thumbup:

David D


David.

Still drilling holes... Sometimes, in the right place!

Still modifying bits of metal... Occasionally, making an improvement!

Offline krv3000

  • Hero Member
  • *****
  • Posts: 2183
  • Country: gb
Re: Maiwald Makeover.......
« Reply #13 on: July 24, 2012, 04:37:45 PM »
looking good so far

Offline Bluechip

  • Madmodder Committee
  • Hero Member
  • *****
  • Posts: 1513
  • Country: england
  • Derbyshire UK
Re: Maiwald Makeover.......
« Reply #14 on: July 24, 2012, 04:46:53 PM »
Hi Dave

What a bu99er eh ???  Beginning to look a nice little motor though ...  :thumbup:

Thought you gave me a demo. on a Maiwald ... not the same one is it? Can't be, t'other one ran ...

Dunno how you Silver Solder this weather ... was braising in my own sweat this afto. Up looking for bits in the roof space .. thought it was a bit cosy, thermometer said 52.2oC.   :loco:

Abandoned looking for the bits in favour of an in-depth survey of a 1L bottle of Becks ... ex-fridge.
 :beer:

Bright kid, I'll go far ...  :lol:

BC
I have a few modest talents. Knowing what I'm doing isn't one of them.

Offline Stilldrillin

  • Global Moderator
  • Hero Member
  • *****
  • Posts: 4972
  • Country: gb
  • Staveley, Derbyshire. England.
Re: Maiwald Makeover.......
« Reply #15 on: July 25, 2012, 01:00:00 PM »
Thanks Bob!  :thumbup:

Dave.
The Maiwald....... Was it this flamelicker?   :scratch:


Yes, it was a bit hot. Especially when relighting the blowtorch, in a hurry.....  :doh:

Didn't manage any flange work today.
After sincere and meaningful discussion. Management suggested I slap protective on the shed door.  :palm:

Tomorrow's another rip roaring day!  :)

David D

David.

Still drilling holes... Sometimes, in the right place!

Still modifying bits of metal... Occasionally, making an improvement!

Offline Bluechip

  • Madmodder Committee
  • Hero Member
  • *****
  • Posts: 1513
  • Country: england
  • Derbyshire UK
Re: Maiwald Makeover.......
« Reply #16 on: July 25, 2012, 01:33:08 PM »
Dave
 
That was the one ...  :thumbup:  remember it now.
Hard to keep up with you, so many orphans ... and resurrections ..
BC


I have a few modest talents. Knowing what I'm doing isn't one of them.

Offline NickG

  • Madmodder Committee
  • Hero Member
  • *****
  • Posts: 1890
Re: Maiwald Makeover.......
« Reply #17 on: July 25, 2012, 02:02:24 PM »
Nice one Dave, if you hadn't put your finger in there you may never have found that! I remember I ended up submerging my first stirling in the bath and blowing into the top of the power piston! That soon found the leaks!

Nick
Location: County Durham (North East England)

Offline Dean W

  • Hero Member
  • *****
  • Posts: 571
  • My kingdom for a lathe!
    • Projects web pages
Re: Maiwald Makeover.......
« Reply #18 on: July 25, 2012, 03:53:15 PM »
The way your finger went through that hot cap reminds me of how my fingers go through my jeans pockets.
No wonder I never have any money!  Keep at it, David.  : )
Dean W.

Shop Projects:
http://www.deansphotographica.com/machining/projects/projects.html

Praise the Lord and pass the Carbide!

Offline Stilldrillin

  • Global Moderator
  • Hero Member
  • *****
  • Posts: 4972
  • Country: gb
  • Staveley, Derbyshire. England.
Re: Maiwald Makeover.......
« Reply #19 on: July 27, 2012, 04:23:52 PM »
Dave, Nick, Dean.
Thanks for the smiles. Every little helps........  :thumbup:


Found one of my penny washers was the right o/d, for a 50% thicker flange.

Bored it to just slip over the original........


Marked the 12 oclock position, for orientation. I could then spot, and drill through, 'cos the holes were not in any sort of pcd.

Turned a step on the cylinder to support the flange in position.........


Silver soldered together.......


Looks ok, I think........


Fired up, using a different burner

We got a very hesitant runner!!


It reminded me of my little grandaughter, when she runs. All arms and legs, and stopping every few seconds!

Very hesitant!

So, I lubed the piston, with slide oil, and it just took off........


That will do for now!  :ddb: :ddb: :ddb:   :D


But!
Steel piston. Loose fit, in an alloy cylinder. Don't like that idea!


Do I make an alloy piston?

Or brass?

Do I open it out, and sleeve with steel, and brass piston?

What does the Team think?

David D

David.

Still drilling holes... Sometimes, in the right place!

Still modifying bits of metal... Occasionally, making an improvement!

Offline millwright

  • Sr. Member
  • ****
  • Posts: 273
  • Country: gb
  • Leeds West Yorshire
Re: Maiwald Makeover.......
« Reply #20 on: July 27, 2012, 04:39:48 PM »
David,
 I never doubted it would be runner, I think all your orphans know that. And im sure you wont be happy till its 100%.
Mmm easiest option new alloy piston, but will you be happy with that?   :beer:
John

Offline Stilldrillin

  • Global Moderator
  • Hero Member
  • *****
  • Posts: 4972
  • Country: gb
  • Staveley, Derbyshire. England.
Re: Maiwald Makeover.......
« Reply #21 on: July 27, 2012, 04:46:48 PM »
Hi John.
Thanks for your confidence!  :thumbup:

An alloy piston will expand at the same rate as the cylinder.
But, will it gall. Or will the lube, (5W-30 full synthetic), keep things sweet?

Don't like alloy for cylinders.  :(

David D
David.

Still drilling holes... Sometimes, in the right place!

Still modifying bits of metal... Occasionally, making an improvement!

Offline sbwhart

  • Global Moderator
  • Hero Member
  • *****
  • Posts: 3530
  • Country: gb
  • Smile, Be Happy, Have Fun and Rock Until you Drop
Re: Maiwald Makeover.......
« Reply #22 on: July 28, 2012, 02:10:50 AM »
You beat that one into submision Dave it's certainly a bit of a flapper a nice interesting runner well done

 :clap: :clap: :clap: :clap: :clap:

MMMM  new piston hey ? what about cast iron.

Stew
A little bit of clearance never got in the road
 :wave:

Location:- Crewe Cheshire

Offline Stilldrillin

  • Global Moderator
  • Hero Member
  • *****
  • Posts: 4972
  • Country: gb
  • Staveley, Derbyshire. England.
Re: Maiwald Makeover.......
« Reply #23 on: July 28, 2012, 08:14:06 AM »
Thanks Stew!
Cast iron? Never thought of that material! Though, just a replacement brass piston, is most likely, so far......  :thumbup:


I think I should have shown this video first.

Taken after the previous one, it shows the engine puffing out oil smoke, before stopping........


Total thick oil, run time was only some 2 minutes. I guess slide oil doesn't like elevated temperatures!

David D
David.

Still drilling holes... Sometimes, in the right place!

Still modifying bits of metal... Occasionally, making an improvement!

Offline NickG

  • Madmodder Committee
  • Hero Member
  • *****
  • Posts: 1890
Re: Maiwald Makeover.......
« Reply #24 on: July 28, 2012, 10:13:51 AM »
I was about to say the same as you all just have! Don't like ali for cylinders either but easiest would be to do an ali piston - then you get the gaulling issue but as you say the engine oil might keep it sweet. Amazing the difference the oil makes, it helps it seal as well as reduce friction.

If you have a different material for cyl and piston I guess one will expand more than the other and either seize it up or make it too loose eventually. I was going to say cast iron for both ... it's the best option for any engine in my opinion, though with this graphite may give you very good results, wouldn't need oil and you could leave the aluminium.

Nick
Location: County Durham (North East England)