Author Topic: Benji Builds a Stuart 10v (slowly)  (Read 10722 times)

Offline benji

  • Jr. Member
  • **
  • Posts: 12
Benji Builds a Stuart 10v (slowly)
« on: December 19, 2010, 01:21:00 PM »
Ok folks, if you can stand another thread on building a Stuart 10v...  here goes. This may take a little while as time, energy and temperature allow me out in the workshop.

Also I afraid I didn't take any picture when I started.  :doh:

I initially started machining using the Andrew Smith / Pengwern book Building a Vertical Steam Engine, but after Harold Hall published his series in Model Engineer I have started using some of his methods, I will mix and match as time goes on and no doubt improvise as I learn more.

First job was the boxbed, after measuring up I had 2.5mm to take off in total to get the height down to the 28mm specified, so that's errr 1.25mm per face. A quick clean up with a file to remove any flash and I mounted it up in the four jaw chuck to face the underside. So that's the first challenge.. how much to take off in the first cut? Every thing I've read about machining castings says to make sure your first cut takes of the hard surface. How deeps that then? In the end I took off 0.5mm using the slowest speed on my lathe (170 rpm).  That seemed to work ok, so I flipped the boxbed over in the chuck and did the same the other side.  First bit complete  :beer:

On to the sole plate. This one caused me a bit more thought. Stuart castings don't have a lot of excess meat on them, when I measure up I only had just over 1mm to take off, and that I decided I need to take off the top face to give me the correct dimension from the bearing centre line to the top face. So I filed and lapped the bottom flat on my granite chopping board, sorry surface plate( I think its quite good that Tescos have started doing engineering supplies  :) ) I then milled the top face down using my mill. I've still to drill the holes and open up the slot for the bearings.

Next I decide to tackle the standard, First off the feet exactly as per the book, using the 3 jaw chuck and a centre running on a plug in the bore. Its at this point I started using Harold Hall's method and made up a jig /fixture to drill the feet and then mount it on my homemade face plate


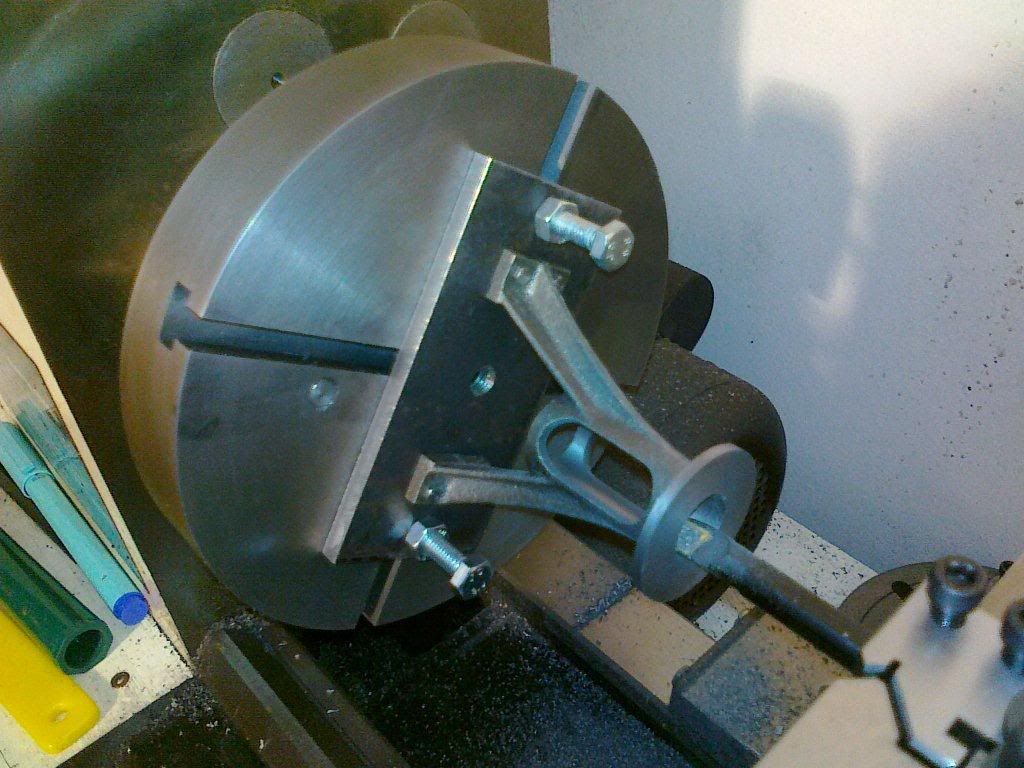
(sorry about the ropey photo there it was taken with my phone)

So progress up to now is


I'm starting on the cylinder next, once my workshop has warmed up. The 300w security lamp/heater is struggling at the moment though.

Any thoughts or comments so far are welcome.

mark


Offline rleete

  • Madmodder Committee
  • Hero Member
  • *****
  • Posts: 534
  • Country: us
Re: Benji Builds a Stuart 10v (slowly)
« Reply #1 on: December 19, 2010, 02:32:31 PM »
Engine builds seem to go in waves.  Looks like it's 10V time.

Nice start.
Creating scrap, one part at a time

Offline kwackers

  • Sr. Member
  • ****
  • Posts: 356
Re: Benji Builds a Stuart 10v (slowly)
« Reply #2 on: December 19, 2010, 05:57:11 PM »
Looking good!

I'm currently building a No 4 (sorry no pics, I can never be bothered getting the camera out), which is just a slightly bigger 10v really.

Offline benji

  • Jr. Member
  • **
  • Posts: 12
Re: Benji Builds a Stuart 10v (slowly)
« Reply #3 on: January 02, 2011, 11:57:23 AM »
Progress at last. Now the Primary Gifting Period and Auxiliary Generosity Zone is over, various relatives have gone home and I'm now allowed out "to play"

The bore and one face were machined using the four jaw chuck, but due to the bore in my chuck I was struggling to set up to face the other end at any thing like square. So on with the 3 jaw and I machined up an expanding mandrel to mount the cylinder on.


One problem I seem to have got here is the cylinder ports are not central on the length of the cylinder, I would have assumed they should be? However if I machine so they sit central I would end up with one thick and one thin cylinder flange. So I've ended up with equal thickness flanges and ports that are 1mm off centre.  Hmmmm

I've still to lap the bore to size, but I want to leave this until I've done all the machining needed.

Next job was the port face. I decided to do this on the milling machine, but first I needed to know how much to take off. The book gives a measurement of 20mm from the centre line of the bore, so I measured from the top off my lathe tool to the top of the casting. 0.61mm to take off.


I set the cylinder up on the angle plate by eye as I can't seem to find a flat face at right angle to the port face to measure from.

Sorry no photo of after yet.

That's all for today. Hopefully tomorrow I will get the ports drilled, and then make a start on the end caps.

Mark

Offline Jasonb

  • Sr. Member
  • ****
  • Posts: 451
  • Country: gb
Re: Benji Builds a Stuart 10v (slowly)
« Reply #4 on: January 02, 2011, 12:26:32 PM »
You can set the portface up horizontal just by laying a bar on it and measuring up each side from the mill table, rather than finding something to measure down from, just check the bar is sitting evenly if there is any draft angle on the face.

Bit late now but provided there was enough metal to get the threads into then unequal flanges would not be a problem as they are covered by the clading anyway. You may find the slide vale touches the valve chest so it may need the end of the chest easing a bit.

BTW for anyone who does not take ME, Harold Hall has put all the photos from his article onto his site

http://www.homews.co.uk/page42.html

Jason


Offline raynerd

  • Madmodder Committee
  • Hero Member
  • *****
  • Posts: 2893
  • Country: gb
    • Raynerds Projects - Raynerd.co.uk
Re: Benji Builds a Stuart 10v (slowly)
« Reply #5 on: January 02, 2011, 07:04:25 PM »
Great job Benji - it is coming along nicely! That is also good news that Jasonb has said about Harold Halls photos. His articles in ME was very helpful to my build so it is great he has put them on his website.

Chris

Offline benji

  • Jr. Member
  • **
  • Posts: 12
Re: Benji Builds a Stuart 10v (slowly)
« Reply #6 on: January 05, 2011, 02:29:01 PM »
Thanks for that tip with the bar Jason, I'll do that next time I machine a cylinder.

Harold Hall's website is very useful, bigger pictures make things a lot clearer. His method of using jigs and fixtures is definitely helping me.

Not much to report, ended up hunting for a coal hod on monday which seemed to eat into any "play" time I had set aside oh well...

I have a question regarding the bottom cover, the drawing calls for a 5/32" reamed hole. I'm planning to make a d bit reamer from some 5/32" silver steel, does an initial hole of 3.9mm sound about right? seeing as I reckon 5/32" is 3.97mm and I only have metric drill bits.

Mark

Offline Bluechip

  • Madmodder Committee
  • Hero Member
  • *****
  • Posts: 1513
  • Country: england
  • Derbyshire UK
Re: Benji Builds a Stuart 10v (slowly)
« Reply #7 on: January 05, 2011, 02:44:21 PM »
What's a 'coal hod' ??

Use to see bricklayers with sort of 'boxes on poles' climbing ladders.

No idea what a coal hod is though ..  :scratch:

Interesting engine .. I have a 9H set of castings aquired with the S7. Up in the roof space at the moment .... er ... maturing. Yes, thats what they're doing ..

Dave BC

« Last Edit: January 05, 2011, 02:49:13 PM by Bluechip »
I have a few modest talents. Knowing what I'm doing isn't one of them.

Offline Jasonb

  • Sr. Member
  • ****
  • Posts: 451
  • Country: gb
Re: Benji Builds a Stuart 10v (slowly)
« Reply #8 on: January 05, 2011, 03:57:05 PM »
I'd allow a bit more metal for removal so drill 3.7 or 3.8.

You can also make  a reamer from your silversteel, cut it diagonally across so the cut is about 4 times the dia long and then harden it. Rub the cut on a sharpening stone to hone it to a fine finish and then pass it through the hole with the lathe running at slow speed in this case I would drill 3.8

Jason

Offline madjackghengis

  • Hero Member
  • *****
  • Posts: 717
  • big engine
Re: Benji Builds a Stuart 10v (slowly)
« Reply #9 on: January 06, 2011, 11:31:47 AM »
Hi Mark, looks like the build is going along pretty well, are you painting as you go?  The initial bits assembled look like they're covered in wrinkle paint.  The ports were a more important issue than the ends of the cylinder, but you can always make allowances with the valve and timing.  IMHO, I'd say you could use the 3.9 drill, if you used a reamer such as described by Jason, they work well, but do prefer minimal metal removal.  I'd say you've got it going along pretty well so far, all in all, of course we're all waiting with baited breath to see and hear it running.  By the way Dave, what you're doing with your castings is called "seasoning", because all castings need to settle, and quit their adjusting to the conditions of earth after the heat of casting, it makes them more accurate and less liable to warping while machining.  I suspect a "coal hod" is something you use to carry coal up a ladder so you can fill your stove or fireplace by dumping coal down the chimney. :poke: :lol: mad jack

Offline benji

  • Jr. Member
  • **
  • Posts: 12
Re: Benji Builds a Stuart 10v (slowly)
« Reply #10 on: January 06, 2011, 03:36:39 PM »

 :lol:
  I suspect a "coal hod" is something you use to carry coal up a ladder so you can fill your stove or fireplace by dumping coal down the chimney.

Good description!! The last one got damaged on Christmas eve in a scuffle with a fat bearded bloke in a red jacket...  A coal hod is just a posh bucket for coal...

I'll make up a reamer as Jason suggested, that seems a lot easier than trying to make a d-bit. I've got some spare cast iron I can have a practice on to find the best size hole to drill.

Jack the reason it looks like I've painted things is just the dodgy lighting the photo's were taken in....

Mark


Offline Metalman

  • Jr. Member
  • **
  • Posts: 30
Re: Benji Builds a Stuart 10v (slowly)
« Reply #11 on: April 22, 2012, 10:01:08 AM »
Those making, or thinking of making, may like to know that in addition to the photographs  on his website, Harold Hall has added the text describing the methods. The first page is still at the same address, that is http://www.homews.co.uk/page42.html   but the whole feature now runs to 27 pages.

Kenneth