Author Topic: Flintlock rifle project  (Read 21452 times)

Offline Joe d

  • Sr. Member
  • ****
  • Posts: 251
  • Country: ca
Flintlock rifle project
« on: April 06, 2012, 08:57:20 PM »
Hi guys (especially Rob, since you asked...)

I didn't have enough to do over the winter, so I've got stuck into building a flintlock rifle.
Started over the Christmas holidays, and here is the progress to date:


This was the easy part, next is to try to do all the traditional carving on the stock
without completely stuffing it up... :doh: :doh:

Cheers, Joe

Offline Divided he ad

  • WARNING: LIKES SHINEY THINGS
  • The Collective
  • Hero Member
  • *****
  • Posts: 1950
  • Country: gb
  • Between Chester, Wrexham, ruthin & Holywell :-)
Re: Flintlock rifle project
« Reply #1 on: April 07, 2012, 03:06:56 AM »
That looks very well made Joe  :thumbup:

Am I correct to assume it's in working order?

How are you going to carve the stock, routers or more traditional?


Have you got any pictures of the early stages of the build?


Ralph.
I know what I know and need to know more!!!

Rob.Wilson

  • Guest
Re: Flintlock rifle project
« Reply #2 on: April 07, 2012, 04:37:03 AM »
  :drool:    :clap: :clap: :clap:  now is that not a thing of beauty  ,, Joe  :med: 

Looks like ALLOT of work has gone into the project  :dremel:  ,,, Just out of interest how long is it ?  and whats the Ye oldie reason for the extra material on the stock (second photo) .

Reckon you could shoot your dinner with it  :poke: :lol: :lol:


Rob 

Offline Joe d

  • Sr. Member
  • ****
  • Posts: 251
  • Country: ca
Re: Flintlock rifle project
« Reply #3 on: April 07, 2012, 09:35:12 AM »
Hi

Ralph: since you asked:

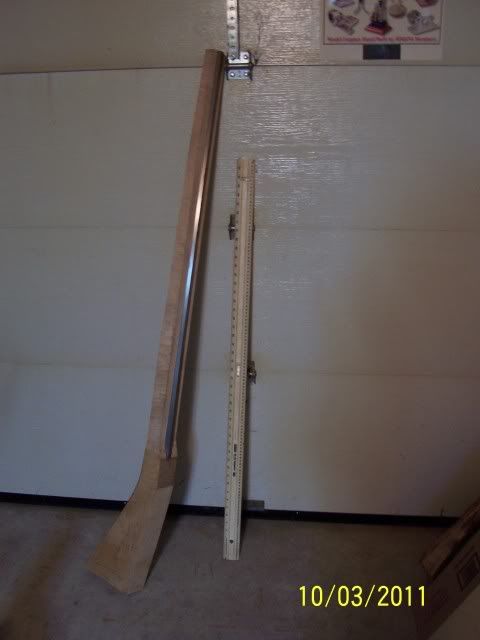
This is what it started out like: (that's a 4' rule next to it for scale)


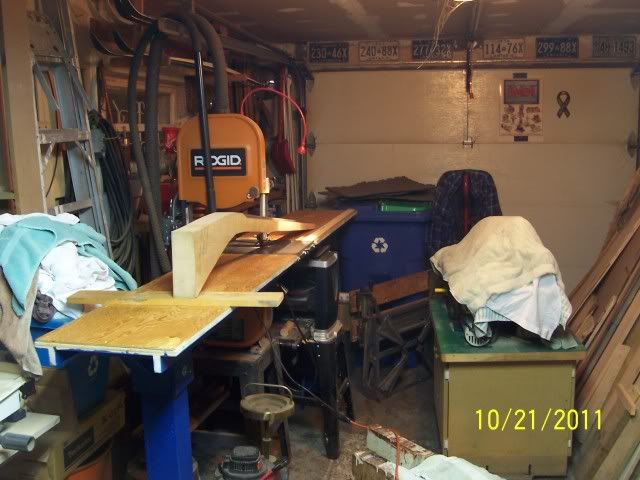
Removed a fair amount of excess wood on the band saw with the  :proj: in-feed
and out-feed tables


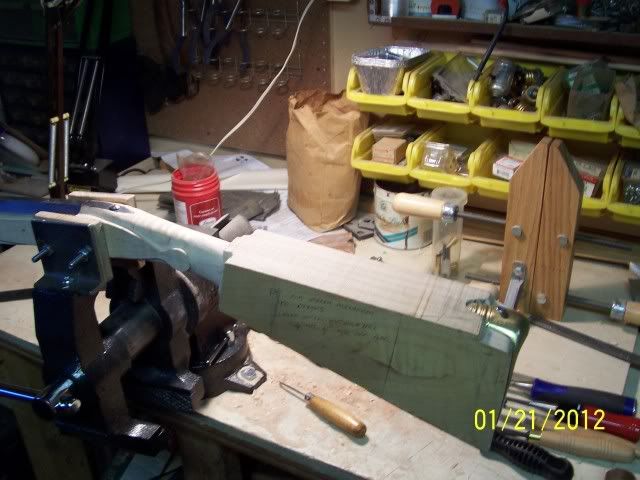
here was the butt in progress.. lots of shavings yet to go


The carving yet to come (purely decoration) will be chisels & knives, and is a bit worrisome as I've never
tried that yet.  Oh well, that's why I do these things... to try something new... :bang:

Rob:

the barrel is 50 caliber, 44", the whole  thing comes in bang on (pun accidental, but I like it so it stays...) at 5'

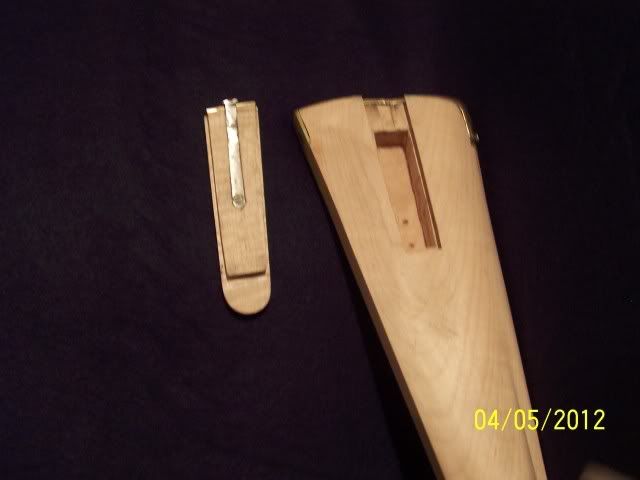
the little slab on the end of the butt is a removable cover for the so-called patch-box, wherein one may store
patches for the projectiles, cleaning stuff, or even a snack...


I will take it deer hunting in the fall, if past non-success in this pursuit keeps on, I'd better bring a snack in the patch-box!

cheers, Joe


Offline Divided he ad

  • WARNING: LIKES SHINEY THINGS
  • The Collective
  • Hero Member
  • *****
  • Posts: 1950
  • Country: gb
  • Between Chester, Wrexham, ruthin & Holywell :-)
Re: Flintlock rifle project
« Reply #4 on: April 07, 2012, 10:47:37 AM »
Thank you Joe,


Very much more informative with the early pic's   :thumbup:

That butt took a lot of reducing! One heck of a diet!   :lol:


How long did it take BTW?


Ralph.
I know what I know and need to know more!!!

Offline Joe d

  • Sr. Member
  • ****
  • Posts: 251
  • Country: ca
Re: Flintlock rifle project
« Reply #5 on: April 07, 2012, 01:19:59 PM »
Hi Ralph

I've got near to 200 hours in it so far.  The Mrs. HAS noticed the change from swarf to wood shavings
in the downstairs carpet :clap:

Joe

Offline Divided he ad

  • WARNING: LIKES SHINEY THINGS
  • The Collective
  • Hero Member
  • *****
  • Posts: 1950
  • Country: gb
  • Between Chester, Wrexham, ruthin & Holywell :-)
Re: Flintlock rifle project
« Reply #6 on: April 07, 2012, 05:15:20 PM »
Quote
The Mrs. HAS noticed the change from swarf to wood shavings
in the downstairs carpet :clap:

 :lol: :lol: :lol:  these things do put you in the dog house eh?


200hrs.... Time well spent :beer:


Ralph.
I know what I know and need to know more!!!

Offline Jonny

  • Hero Member
  • *****
  • Posts: 780
Re: Flintlock rifle project
« Reply #7 on: April 08, 2012, 03:53:20 PM »
Decent carving there Joe, it would scare me it being so long and so thin. Maples nice to work with though, once finished darken it traditionally and a proper oil jobby.

Have to ask and know what it takes to make those locks entirely by hand, were these from a kit with the trigger etc?

Offline Joe d

  • Sr. Member
  • ****
  • Posts: 251
  • Country: ca
Re: Flintlock rifle project
« Reply #8 on: April 09, 2012, 08:13:23 AM »
Jonny

Got to agree, maple is a treat to work with.  The fore end has bits that are less than 1/16" thick, with the barrel removed it's scary indeed.

I purchased the barrel and  rough castings for the trigger guard and butt-plate, and a complete flintlock that only requires polishing to finish it:


Manged to break the v-shaped spring you see in two pieces at the bottom of the photo, since replaced.  You can get these locks  anywhere from completely assembled, to rough castings in a bag.  There are a few guys out there who build the whole lot from scratch, reproducing the
curved bits from bar-stock must be really interesting :hammer:

The rest of the metal bits were made up in the shop, here's a snap of the trigger assembly:


Cheers, Joe

Offline doubleboost

  • Madmodder Committee
  • Hero Member
  • *****
  • Posts: 1619
  • Country: gb
  • Newcastle Upon Tyne
Re: Flintlock rifle project
« Reply #9 on: April 09, 2012, 10:22:52 AM »
Hi
Joe
Some very nice work there :thumbup: :thumbup: :clap: :clap:
A friend of mine used to make Brown Bess replicas
I think he used hydraulic tube forthe barell
They were proof tested for black powder
John

Offline Joe d

  • Sr. Member
  • ****
  • Posts: 251
  • Country: ca
Re: Flintlock rifle project
« Reply #10 on: April 09, 2012, 08:32:19 PM »
Thanks, John.  A Bess is well up on my "someday" list.  Genuine ones are still available here and there, but one would
need to rob several banks to afford one.... :clap: :clap:

Joe

Offline Jonny

  • Hero Member
  • *****
  • Posts: 780
Re: Flintlock rifle project
« Reply #11 on: April 10, 2012, 07:05:02 PM »
Them hooks look really dodgy Joe, wheres the swivel? Theres a bit of a flat just before the hooks as well, that will create probs.
Ideally you need spring clamps like these but longer. Above hammer http://pic20.picturetrail.com/VOL15/728921/3960275/49396020.jpg

Theres a bit of metal to remove making by hand, gives me tennis elbow, hated it.
Must say i only did quality work on best guns, now theres only one person left in the world with know how still doing it.

Clean up the parts and get working edges, then fit down. Work clean.

Offline Joe d

  • Sr. Member
  • ****
  • Posts: 251
  • Country: ca
Re: Flintlock rifle project
« Reply #12 on: June 05, 2012, 07:43:02 AM »
Jonny:  sorry about the delay in reply.  This particular model of lock hasn't got the swivel type link, but there sure are a lot of them
still working with the hook, empirically it would seem to work!  The spring I broke was in fact being removed with just such a
clamp as you showed... guess that part was just destined to go :bang:

Finished up the decorative carving bit, stained the whole thing with some ferric nitrate, and hit it with some linseed oil/bees wax
and here we are to date.


Still have to fabricate and install the sights, and drill the touch-hole, and then get myself out to the range! :ddb:

Cheers, Joe

Rob.Wilson

  • Guest
Re: Flintlock rifle project
« Reply #13 on: June 05, 2012, 11:54:12 AM »
 :clap: :clap: :clap: :clap:  Looking great Joe  :clap: :clap: :clap:

Will you be doing a video of you firing it ?   :)


Rob


You finished that traction engine  :poke: :)

Offline DaveH

  • Hero Member
  • *****
  • Posts: 1413
  • Country: za
  • Kempton Park, South Africa
Re: Flintlock rifle project
« Reply #14 on: June 05, 2012, 06:17:15 PM »
Joe,

Very nice work, looks terrific  :thumbup: :clap:  :bow:

 :beer:
DaveH
(Ex Leicester, Thurmaston, Ashby De La Zouch.)

Offline Jonny

  • Hero Member
  • *****
  • Posts: 780
Re: Flintlock rifle project
« Reply #15 on: June 06, 2012, 06:38:54 PM »
Coming along nicely Joe.

Know the type of hammer/spring relationship. The front of what would be the the hooks bares on the tumbler/hammer, the recess what i thought where a swivel goes is just relief when tumbler fired off.

Springs can go at any time, all good ones are 'pulled up' before fitting and tweaked when on the lock. Essentially the pulling up would take a thread on its own in an attempt to explain. Its the relieving of metal in the right areas so the arms bend without collapsing together. Any hard or what feels solid when using the spring clamps would be removed. Theres only two to my knowledge with the know how.

Dont forget if havent done already you need those springs to lie flat on the plate and tap in tight in the holes. If not could create other problems down the line.

Offline Joe d

  • Sr. Member
  • ****
  • Posts: 251
  • Country: ca
Re: Flintlock rifle project
« Reply #16 on: October 14, 2012, 11:53:12 PM »
Well, after a number of other things getting in the way, got the sights made and installed, and spent the day today at my
friend's farm where I finally got the ceremonial "first Shot" down the barrel.... :ddb:

Sadly, the video feature on my friend's camera was T/U, so that will have to wait for next time.

However, here are a few stills to whet your appetites :drool:


and, a night-time shot just 'cause all that pan/ muzzle flash is so so cool.... :D


Cheers, Joe

Offline mcr

  • Jr. Member
  • **
  • Posts: 61
Re: Flintlock rifle project
« Reply #17 on: October 15, 2012, 12:46:31 PM »
Fantastic :bugeye:

Offline andyf

  • In Memoriam
  • Hero Member
  • *****
  • Posts: 1795
  • Country: gb
    • The Warco WM180 Lathe - Modifications
Re: Flintlock rifle project
« Reply #18 on: October 15, 2012, 02:03:53 PM »
That's great, Joe.  A splendid smokepole!  :clap:

I can''t resist asking if you have yet hit anything with it - anything you were aiming at, that is.

Andy
Sale, Cheshire
I've cut the end off it twice, but it's still too short

Rob.Wilson

  • Guest
Re: Flintlock rifle project
« Reply #19 on: October 15, 2012, 04:45:50 PM »
 :clap: :clap: :clap: :clap: :clap: very cool Joe  :thumbup:


Did you make the powder horn ?


Rob

Offline Joe d

  • Sr. Member
  • ****
  • Posts: 251
  • Country: ca
Re: Flintlock rifle project
« Reply #20 on: October 15, 2012, 07:24:19 PM »
Thanks, guys.

I did in fact hit what I was aiming at... the manure heap at the other end of the barn.... I swear that fly will never father another.... :)

My friend used to have a 50 and 100 yard range set up in the field across the road.  Since last spring, due to several lawyers, a judge, and a now
ex-wife, he no longer has that field.  He has promised me that the targets will be re-installed on his side of the road by the time I visit again in November, at which point I can actually do something about regulating the sights.

And yes, Rob, I did make the powder horn.  The cow came from somewhere in the US, the wood for the spout and base plug are apple wood that has been seasoning quietly in my shop for over ten years since my neighbor cut it down.. I only got a few chunks from him as the silly bugger had already burnt the most part of it. :loco:

Cheers, Joe