Author Topic: Home built die filer  (Read 61072 times)

Offline CallMeAl

  • Jr. Member
  • **
  • Posts: 95
  • I came, I saw, I wondered how to do it!
Home built die filer
« on: August 04, 2011, 11:48:35 PM »
I have been intrigued by die filers since I found out about them on this forum.  I thought it would be a challenge to try to build one form scratch and it would allow me to practice my pattern making and casting, among other things.  I found this photo and really like the old time looks of this bench to die filer.


I know there is a company selling castings to make a similar unit, but the fun is seeing what you can come up with on your own.

So far, I have broken out the wood lathe (something I haven't touched in a while) and the band saw and after much fiddling, gluing, sanding, and filling I have made a pattern the approximates what is in the photo.  With no measurements to go by I am estimating the dimensions.


After filling the cracks with body putty and spackle and much sanding.  I have my pattern primed, waxed and ready to cast:


It has been kind of a hassle to the parting lines even with all the different pieces. This has been the most elaborate casting I have attempted.

Al
I skin cats my own way!

Offline dickda1

  • Full Member
  • ***
  • Posts: 161
Re: Home built die filer
« Reply #1 on: August 05, 2011, 12:09:17 AM »
Very nice pattern.  Aluminum sand casting next?
-Dick
sunny (mostly) San Francisco, land of looney people, sane politics and occasional earthquakes.
Skype: VladTheChemist

Offline DaveH

  • Hero Member
  • *****
  • Posts: 1413
  • Country: za
  • Kempton Park, South Africa
Re: Home built die filer
« Reply #2 on: August 05, 2011, 04:36:52 AM »
Al,

That's come out very well. :clap:
Looks great :thumbup:

DaveH
(Ex Leicester, Thurmaston, Ashby De La Zouch.)

Offline HS93

  • In Memoriam
  • Hero Member
  • *****
  • Posts: 788
  • Country: gb
Re: Home built die filer
« Reply #3 on: August 05, 2011, 04:50:15 AM »
I have been looking at this , but it depends on the postage I would only need the castings as I have a good supply of bronze at the moment,

Al, it looks like a nice project it would be nice to be able to cast things , I havent done it seence I was was at secondry school.

Peter

http://www.sc-c.com/metallathe/MLA-18.html

Re this post checked postage today and got a fast response from them unfortunatly its $118  :bang:

Peter
« Last Edit: August 05, 2011, 11:10:08 AM by HS93 »
I am usless at metalwork, Oh and cannot spell either . failure

Offline raynerd

  • Madmodder Committee
  • Hero Member
  • *****
  • Posts: 2893
  • Country: gb
    • Raynerds Projects - Raynerd.co.uk
Re: Home built die filer
« Reply #4 on: August 05, 2011, 10:52:00 AM »
Wow, nice work Al. This is something I would definately use and have been keeping my eye out for. They look very good for filing the crossing out of clock wheels. If you ever start a production line, can I have my name first on the list for a set of castings?!!   :ddb:

look forward to seeing your progress!

Chris

Offline Bernd

  • Madmodder Committee
  • Hero Member
  • *****
  • Posts: 3688
  • Country: us
  • 1915 C Cab
    • Kingstone Model Works
Re: Home built die filer
« Reply #5 on: August 05, 2011, 12:57:46 PM »
Nice work Al.  :thumbup:

looks good for just "guesstimating" the size. real talent there.  :clap:

Of course next we'll want to see the melt as it takes place, right?   :D

Bernd
Route of the Black Diamonds

Offline DaveH

  • Hero Member
  • *****
  • Posts: 1413
  • Country: za
  • Kempton Park, South Africa
Re: Home built die filer
« Reply #6 on: August 05, 2011, 01:49:08 PM »
Of course next we'll want to see the melt as it takes place, right?   :D
Bernd

I second that :D :D :D

DaveH
(Ex Leicester, Thurmaston, Ashby De La Zouch.)

Offline doubleboost

  • Madmodder Committee
  • Hero Member
  • *****
  • Posts: 1619
  • Country: gb
  • Newcastle Upon Tyne
Re: Home built die filer
« Reply #7 on: August 05, 2011, 04:36:48 PM »
Very nice pattern making  :clap: :clap: :clap:
Propper wood as well :bugeye: :bugeye: :bugeye:
Looking forward to see it cast  :dremel:
John

Offline CallMeAl

  • Jr. Member
  • **
  • Posts: 95
  • I came, I saw, I wondered how to do it!
Re: Home built die filer
« Reply #8 on: August 05, 2011, 11:31:04 PM »
Thanks all for viewing and comments.

dickda1: Yes, cast aluminum, hopefully tomorrow morning.

DaveH, Bernd : Thanks, I'll try to get a shot or two of the pour.

HS93: You guys sure take it in the **** on shipping!  This one of the reasons I'm trying to do my own casting, not only the parts are expensive, but shipping costs so much and I can used the saved money to buy more tools! :thumbup:

craynerd: One of these would great for the clock work parts you have been doing lately.  I plan no production, but it's sad to put so much effort into a pattern and only use it once...

doubleboost: Thanks, pattern making is almost the most difficult part of the process.  A good pattern makes the casting part sort of anticlimactic.  The wood used in the base of the pattern is the pallet runners that saved from when I got my mill - came all the way from China!

I skin cats my own way!

Offline CallMeAl

  • Jr. Member
  • **
  • Posts: 95
  • I came, I saw, I wondered how to do it!
Re: Home built die filer
« Reply #9 on: August 06, 2011, 06:33:30 PM »
Well, I made the pour.  I had to do it twice since the first attempt using my not so precise flask I got the drag and cope misaligned and the casting came out with a off set at the parting line. :doh:  Fortunately, one good thing about casting is you can remelt you mistakes, ram up a new flask, and pour it again!

The second one was much better only a slight misalignment.  I must make some better flasks.  I didn't take any shots of the ram up or the actual pour, that's been shown before.  I get wrapped up in the process and forget to do it anyway.

Here's what the shake out looked like:


After cleaning off the sand you can see the sprue and riser:


I'm fairly satisfied with result, not perfect, but not bad. Here it is with the sprue and riser cut off:


You can see the misalignment in this shot, nothing that can't be worked around:


The sprue was so big I thought I would try to turn it down and maybe make the motor drive pulley out of it:


If I can figure out how to hold on to this thing I will start machining it tomorrow.

Thanks for viewing.


I skin cats my own way!

PatJ

  • Guest
Re: Home built die filer
« Reply #10 on: August 06, 2011, 06:50:07 PM »
Nice pour Al, and great photos.

Thanks,

Pat J

Offline doubleboost

  • Madmodder Committee
  • Hero Member
  • *****
  • Posts: 1619
  • Country: gb
  • Newcastle Upon Tyne
Re: Home built die filer
« Reply #11 on: August 06, 2011, 07:11:34 PM »
That is a good solid casting  :clap: :clap: :clap: :clap:
John

Offline DaveH

  • Hero Member
  • *****
  • Posts: 1413
  • Country: za
  • Kempton Park, South Africa
Re: Home built die filer
« Reply #12 on: August 06, 2011, 07:23:23 PM »
Al,

That's a great looking casting.  :clap: :clap: :clap:
 :beer:
DaveH
(Ex Leicester, Thurmaston, Ashby De La Zouch.)

Offline CallMeAl

  • Jr. Member
  • **
  • Posts: 95
  • I came, I saw, I wondered how to do it!
Re: Home built die filer
« Reply #13 on: August 07, 2011, 06:53:01 PM »
Thanks, the casting did turn out OK.

The first thing I did was flatten the base with a fly cutter after figured out how to hold on to the casting upside down, I failed to get any photos of that process, but all the other operations would be base off that so I tried to get it right.

Next I mounted it on the rotary table to drill and countersink the mounting holes.  I had to make a bit holder extension, kind of wobbly, but with a little guidance I got it done. I needed the holes to help hold the casting for the next operations.


Mounted the casting  on an angle bracket to machine the rest of the surfaces and drill and bore the holes for drive shaft and table pivot. After drilling drive shaft hole, I was taking the drill bit out and dropped it about 3 ft to the floor and it broke in two! :palm:  I've never had that happen before! Fragile! :scratch::


Fly cutting the drive shaft boss:


I used a bar in the drive shaft holes to line up the holes for the reciprocating shaft:


Holes drilled - man I need more head space on this mill!  Just barley had room.


All holes drilled and ready for bushings:


Sizing the bushing OD fro a light press fit:


All bushing were a light press fit with a couple of smears of Locktite retaining goop:


Reamed bushings .001 over:


Casting machining complete.  Now to make the roundy, roundy, up & downy parts! :D

Thanks, for viewing.

Al

I skin cats my own way!

Offline doubleboost

  • Madmodder Committee
  • Hero Member
  • *****
  • Posts: 1619
  • Country: gb
  • Newcastle Upon Tyne
Re: Home built die filer
« Reply #14 on: August 07, 2011, 06:57:23 PM »
Coming along nicely  :clap: :clap: :clap: :clap:
John

Offline dsquire

  • In Memoriam
  • Hero Member
  • *****
  • Posts: 2275
  • Country: ca
  • Kitchener, Ontario, Canada
Re: Home built die filer
« Reply #15 on: August 07, 2011, 11:37:46 PM »
Al

Very nicely done, you make it look easy.  :D

Cheers  :beer:

Don

Good, better, best.
Never let it rest,
'til your good is better,
and your better best

Offline Pete49

  • Sr. Member
  • ****
  • Posts: 353
  • Country: au
Re: Home built die filer
« Reply #16 on: August 07, 2011, 11:46:07 PM »
great work so far Al :jaw: :mmr: Any chance of making the drawings public? Would love to try similar job from making the template to the finished project.
Cheers
Pete
oops..........oh no.........blast now I need to redo it

Offline NickG

  • Madmodder Committee
  • Hero Member
  • *****
  • Posts: 1890
Re: Home built die filer
« Reply #17 on: August 08, 2011, 05:11:50 AM »
Wow, very nice work Al, I've done some very simple sand casting before when I was much younger, we used the facilities where my dad used to teach. Found it difficult so I always find these casting threads mesmorising. Interesting project  :thumbup:
Location: County Durham (North East England)

Offline madjackghengis

  • Hero Member
  • *****
  • Posts: 717
  • big engine
Re: Home built die filer
« Reply #18 on: August 09, 2011, 10:36:34 AM »
That is an impressive piece of work you are taking on, and you are doing a beautiful job of it.  I myself bought the casting set long ago, at a time when it was far cheaper, and shipping was far less, and while I don't use it every day, having a die filer is a "need" in my shop, and I would not happily do without it.  I think you will be very pleased to have it when you are done.  I've seen several made to be attached to a lathe, and I always cringe at the thought of all the filings getting in the lathe.  I'm really looking forward to seeing the end product, great start.  Mad Jack

Offline AdeV

  • Madmodder Committee
  • Hero Member
  • *****
  • Posts: 2434
  • Country: gb
Re: Home built die filer
« Reply #19 on: August 09, 2011, 10:55:14 AM »

... I always cringe at the thought of all the filings getting in the lathe...


Surely the filings are just like swarf (small swarf, I grant you)? It's the abrasive stuff (aluminium oxide, etc.) that concerns me on the lathe, surely that'd cause far more wear than, say, brass filings...?
Cheers!
Ade.
--
Location: Wallasey, Merseyside. A long way from anywhere.
Occasionally: Zhengzhou, China. An even longer way from anywhere...

Offline Bernd

  • Madmodder Committee
  • Hero Member
  • *****
  • Posts: 3688
  • Country: us
  • 1915 C Cab
    • Kingstone Model Works
Re: Home built die filer
« Reply #20 on: August 09, 2011, 11:28:49 AM »
Al,

Very nice casting. That misalignment is hardly noticeable.  :thumbup:

Nice job on maching too.  :thumbup:

Keep up the great work and thanks for posting this little project.  :ddb:  :nrocks:

Bernd
Route of the Black Diamonds

Offline DaveH

  • Hero Member
  • *****
  • Posts: 1413
  • Country: za
  • Kempton Park, South Africa
Re: Home built die filer
« Reply #21 on: August 09, 2011, 11:57:44 AM »
Al,

Very impressive  :clap: :clap: :clap:

DaveH
(Ex Leicester, Thurmaston, Ashby De La Zouch.)

Offline dickda1

  • Full Member
  • ***
  • Posts: 161
Re: Home built die filer
« Reply #22 on: August 09, 2011, 04:11:18 PM »
Al, you are the man! :bow:

I have done a ton of aluminum castings and very frequently get blowholes (that I cover with body putty).  I am envious of the quality of your casting.

-Dick
sunny (mostly) San Francisco, land of looney people, sane politics and occasional earthquakes.
Skype: VladTheChemist

Offline Dean W

  • Hero Member
  • *****
  • Posts: 571
  • My kingdom for a lathe!
    • Projects web pages
Re: Home built die filer
« Reply #23 on: August 09, 2011, 08:07:00 PM »
Nice casting, Al.  Great machining steps, too.  This ought to turn out perfect!
Dean W.

Shop Projects:
http://www.deansphotographica.com/machining/projects/projects.html

Praise the Lord and pass the Carbide!

Offline CallMeAl

  • Jr. Member
  • **
  • Posts: 95
  • I came, I saw, I wondered how to do it!
Re: Home built die filer
« Reply #24 on: August 10, 2011, 12:39:53 AM »
Thanks for the great comments.

Pete49: I would be happy to share the drawings, if I really had any!  I made a rough layout drawing of the casting pattern in my old CAD program for a reference and then proceeded to ignore most of the dimensions. ::)

NickG: Ya, I find casting kind of difficult at times also.  It's nice I have a good supply of good scrap aluminum to work with and made various pieces of equipment to make it easier on me. It definitely as a learning curve!  I learn something every time I try it.

madjackghengis:  Thanks.  I didn't know if I really needed a die filer at this point, but it looks to be something that could be useful and I thought it would be fun to try to make one.  I looked at he prices of the casting from a couple of sources + shipping and figured I would try it.  I'm looking forward to seeing how it works!

Bernd, DaveH: Thanks.

dickda1: Thanks, like I said above it's nice to have a good source of cast hydraulic pump housings to work with.  I have had some issuses with defects and have used JB weld to fill pit holes it need be.

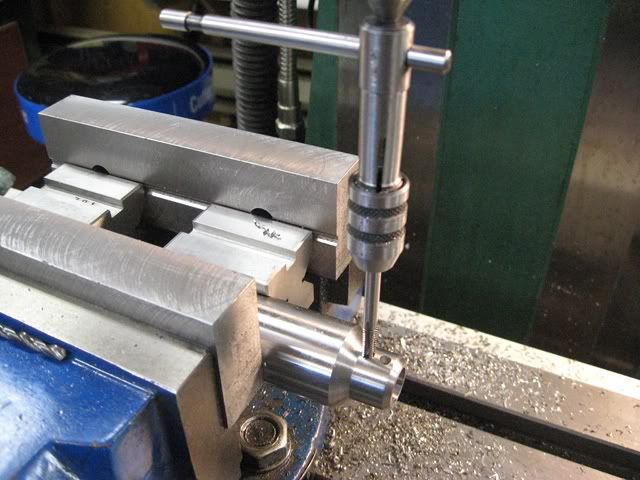
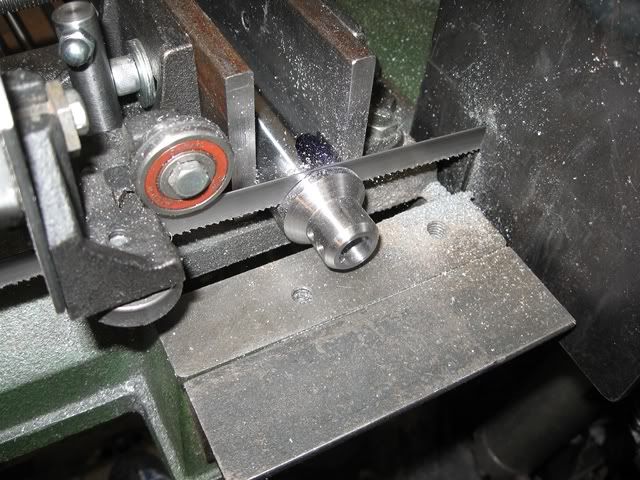
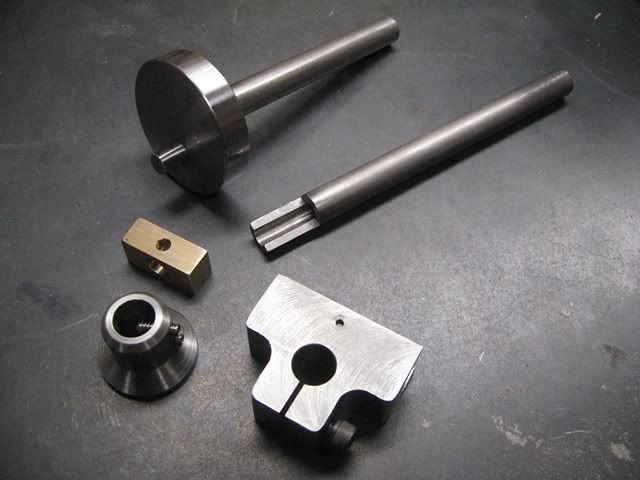
On to making rest of the parts.  I made the drive shaft from a piece on 1/2 inch O-1 rod, a slice off a chrome plated cylinder rod, and 5/16 dowel pin from a hydraulic pump.  All pressed together with a little Loctite.


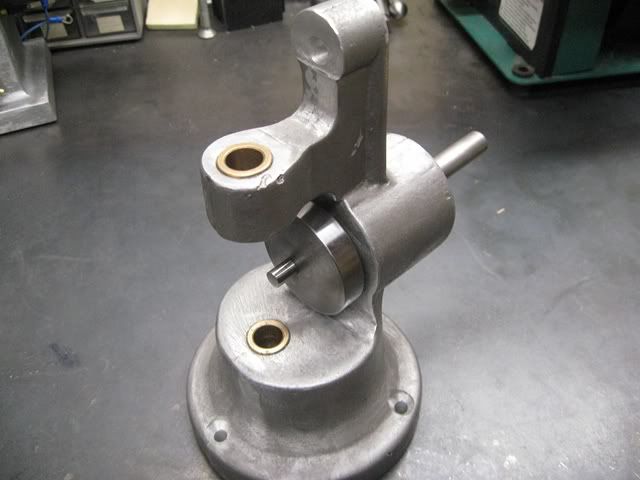
Testing the fit of the reciprocating shaft and getting the measurement from the end of drive pin to the shaft. The 6 inch A belt pully was bought at the local hardware store, I'm to lazy to make a pattern for something I can buy for $11.50!


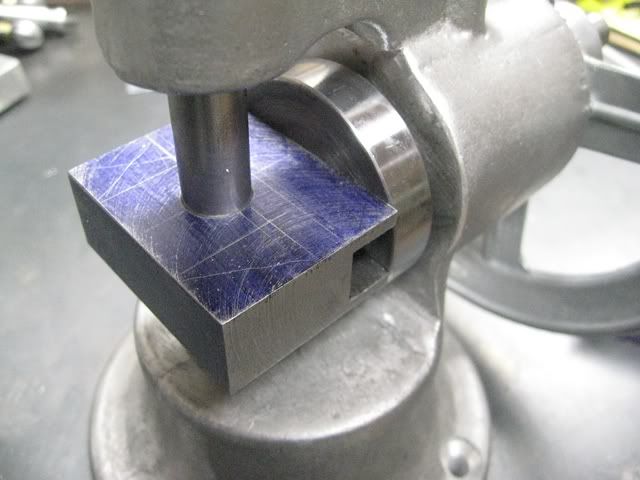
Fitting the cross slide block.  The brass came from melted down pump wear plates which I cast a block from.  This whole project owes it's existence to people destroying hydraulic components! :thumbup:


Test fitting the cross slide block:


Forming the rest of the block:


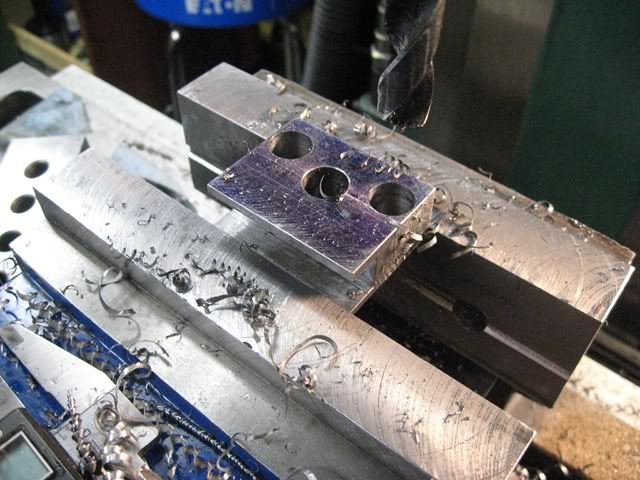
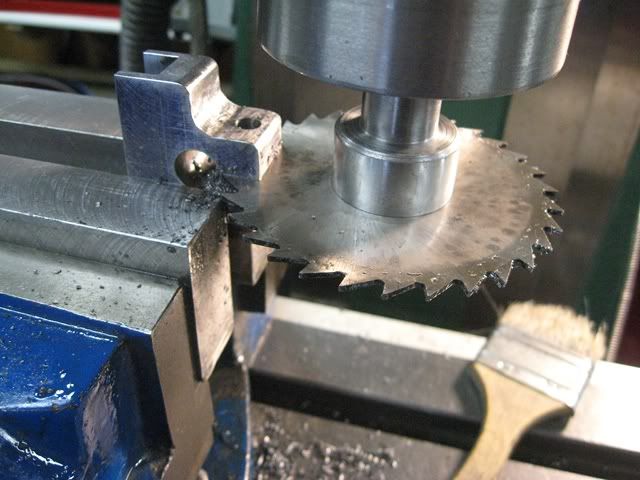
The reciprocating shaft was drilled for 1/4 inch diameter file shanks.  I only have 1/8 inch files, but I'm anticipating future options!  I was then sliced in half to allow the bit clamp grub screws to tighten up on the file shanks.


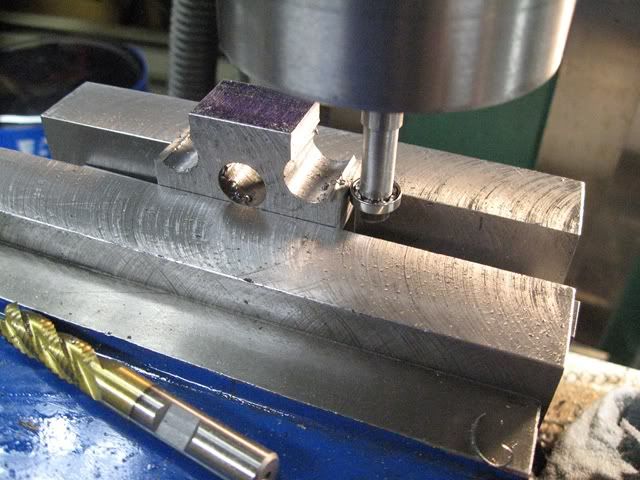
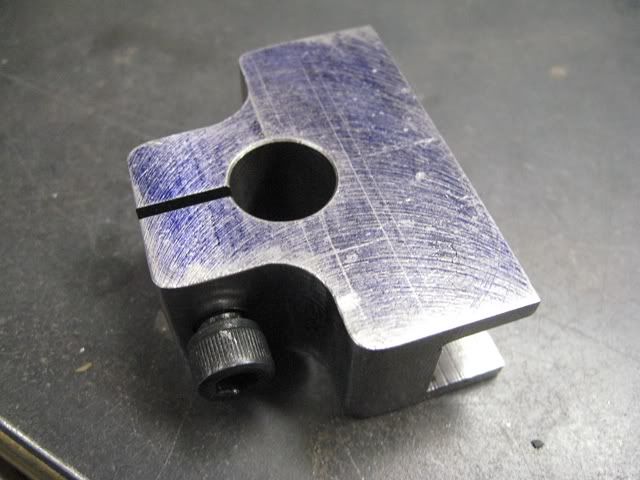
The clamp was made from another cylinder shaft, drilled to slide over the shaft, and tapped for two grub screws and finially cutoff and the cut faced on the lathe.


All the main parts made:


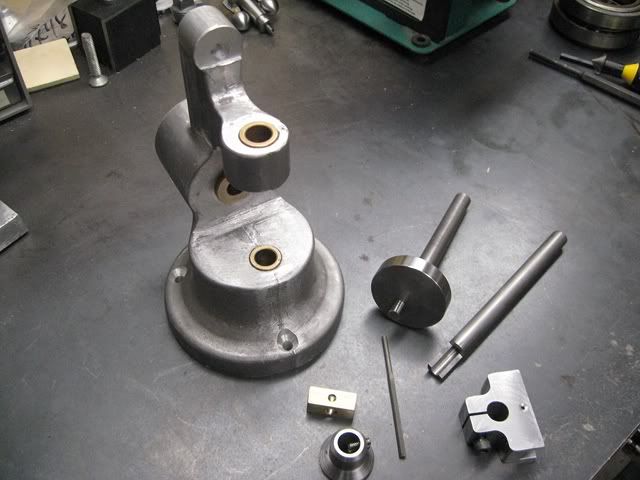
It's coming together now! I hope to get it assembled tomorrow and run in and start making a pattern for the table.

Thanks for viewing.

Al


I skin cats my own way!

Offline Henning

  • Full Member
  • ***
  • Posts: 136
  • Country: no
  • All the kit and no clue!
Re: Home built die filer
« Reply #25 on: August 10, 2011, 04:54:17 AM »
Wow! That's impressive  :clap:

Cool project  :thumbup:  :nrocks:
Henning

Just because i can't, doesn't mean i shouldn't?
Tool- lover, with a collection to show for it!

Offline Pete.

  • Hero Member
  • *****
  • Posts: 1075
  • Country: gb
Re: Home built die filer
« Reply #26 on: August 10, 2011, 05:42:36 AM »
Lovely work. I hope you have something sturdy to screw it down to coz the first time I started the motor on my butterfly it tried to take off :D

Offline PekkaNF

  • Hero Member
  • *****
  • Posts: 2523
  • Country: fi
Re: Home built die filer
« Reply #27 on: August 10, 2011, 05:53:00 AM »
Looks it's going to be a real practical tool. Look forwad your speedy progress (insert a green smile here - I'm workking on one chineese project...it's really taxing me).

Pekka

Offline cfellows

  • In Memoriam
  • Sr. Member
  • *****
  • Posts: 303
Re: Home built die filer
« Reply #28 on: August 10, 2011, 10:15:48 AM »
A great project, Al.  You're really doing a nice job.

Chuck

Offline Stilldrillin

  • Global Moderator
  • Hero Member
  • *****
  • Posts: 4972
  • Country: gb
  • Staveley, Derbyshire. England.
Re: Home built die filer
« Reply #29 on: August 10, 2011, 12:23:52 PM »
That's coming together nicely Al!  :thumbup: :clap: :clap:

David D
David.

Still drilling holes... Sometimes, in the right place!

Still modifying bits of metal... Occasionally, making an improvement!

Offline NickG

  • Madmodder Committee
  • Hero Member
  • *****
  • Posts: 1890
Re: Home built die filer
« Reply #30 on: August 10, 2011, 01:50:18 PM »
Yeah, very nice and flying along at a pace I could only dream of!
Location: County Durham (North East England)

Offline DaveH

  • Hero Member
  • *****
  • Posts: 1413
  • Country: za
  • Kempton Park, South Africa
Re: Home built die filer
« Reply #31 on: August 10, 2011, 06:34:17 PM »
Al,

Really great, you certainly don't hang about. :clap:

Looking very good, nicely photographed as well. :thumbup:

 :beer:
DaveH

(Ex Leicester, Thurmaston, Ashby De La Zouch.)

Offline doubleboost

  • Madmodder Committee
  • Hero Member
  • *****
  • Posts: 1619
  • Country: gb
  • Newcastle Upon Tyne
Re: Home built die filer
« Reply #32 on: August 10, 2011, 06:45:10 PM »
very nice  :thumbup: :thumbup: :thumbup: :clap: :clap:
John

Offline CallMeAl

  • Jr. Member
  • **
  • Posts: 95
  • I came, I saw, I wondered how to do it!
Re: Home built die filer
« Reply #33 on: August 11, 2011, 11:19:14 PM »
Thanks for the comments!

Yes, I did move along quickly after the casting was drilled and bushed.  The rest of the parts were pretty straight forward except the cross slide/reciprocating rod clamp.  I have gotten my shop and tooling to a point and learned enough, had enough blunders, and watched enough other peoples methods and projects on the forum that I can I do the easy stuff quickly! :D

Here are a couple of shots of the complete assembly except for the table I have made a pattern for but have yet to cast.


I have take the time to run the reciprocating mechanism in and it operates very smoothly.  Here is a test run with my two speed drill.  I quite pleased with how it works.


It will never operate as fast as it does in the 2nd half of the video, but I had to hot rod it a little! :)

Now to make the table, mount it, and hook up the little motor I found at an estate sale.

Thanks for viewing.

Al
I skin cats my own way!

Offline HS93

  • In Memoriam
  • Hero Member
  • *****
  • Posts: 788
  • Country: gb
Re: Home built die filer
« Reply #34 on: August 12, 2011, 12:20:11 AM »
that looks great, now what you need to do is sent your pattern to the uk as it is nice and ligt as compaired to a casting and one of the members who does castings over hear can nock some up and sell them to all us mayhemmers over hear saves it laying around your workshop doing nothing or if you have plans for it the pattern could be made hear.

keep up the good work

Peter
I am usless at metalwork, Oh and cannot spell either . failure

Offline raynerd

  • Madmodder Committee
  • Hero Member
  • *****
  • Posts: 2893
  • Country: gb
    • Raynerds Projects - Raynerd.co.uk
Re: Home built die filer
« Reply #35 on: August 12, 2011, 03:59:14 AM »
Great work Al !!

Chris

Offline DaveH

  • Hero Member
  • *****
  • Posts: 1413
  • Country: za
  • Kempton Park, South Africa
Re: Home built die filer
« Reply #36 on: August 12, 2011, 05:57:55 AM »
Al,

That is really good. :clap: :clap: :clap:
Works a treat. :thumbup: :thumbup: :thumbup:

 :beer:
DaveH
(Ex Leicester, Thurmaston, Ashby De La Zouch.)

Offline saw

  • Hero Member
  • *****
  • Posts: 1003
  • Country: se
  • lucky amateur
    • Svenssons AckordsWerkstad
Re: Home built die filer
« Reply #37 on: August 12, 2011, 07:30:25 AM »
Nice work congratt  :clap: :clap:
_________________________
Greetings / Benni
http://myprojecty.wordpress.com/category/steam-engine/

Offline NickG

  • Madmodder Committee
  • Hero Member
  • *****
  • Posts: 1890
Re: Home built die filer
« Reply #38 on: August 12, 2011, 09:06:30 AM »
Brilliant!  :thumbup:
Location: County Durham (North East England)

Offline Pete49

  • Sr. Member
  • ****
  • Posts: 353
  • Country: au
Re: Home built die filer
« Reply #39 on: August 12, 2011, 09:46:13 AM »
Top job on that and so quick too. :bow:
Pete
oops..........oh no.........blast now I need to redo it

Offline Bernd

  • Madmodder Committee
  • Hero Member
  • *****
  • Posts: 3688
  • Country: us
  • 1915 C Cab
    • Kingstone Model Works
Re: Home built die filer
« Reply #40 on: August 12, 2011, 01:12:51 PM »
Ditto on what was said above.  :thumbup:

Great job, and I think as Peter mentioned, you could probably make a bit of hobby spending money if put on the market.  :med:

Bernd
Route of the Black Diamonds

Offline CallMeAl

  • Jr. Member
  • **
  • Posts: 95
  • I came, I saw, I wondered how to do it!
Re: Home built die filer
« Reply #41 on: August 17, 2011, 11:19:56 PM »
Well I finally got this die filer pretty much done.

Thanks everyone for the comments.

I doubt there would much of a demand for these castings, they aren't as finished as some would expect and I'm far too lazy to try to make them marketable. This was just an exercise to try to expand my knowledge on pattern making and casting and hopefully end up with something that would be useful, plus I feel like I need to justify the money and time it took to put my little foundry together! ::)

Here are the final stages:

Cast the table pattern.  You can see the size on the sprue I used to try to prevent shrinkage defects.  I seemed to work since none appeared in the casting:


Machined the pivot for a true surface to hold the table while fly cutting with the big shop built adjustable fly cutter I made.  I don't get to use this very often.  Check out the video at the end to see it in action:


Table mounted on the die filer:


I made a mount for the die filer and the motor to drive it. I hung it off my grinder stand to use the light attached to the grinder, thrifty yes, but is vibrates a little more than it would on a stand alone base.


Notice the use of the split switch/plug combo I found in my junk drawer - it controls the motor and provides another handy plug in socket!


The motor mount and a close up the 1/8 hp motor I got at an estate sale which came with an adjustable pulley that was worth more the $10 I paid for the motor.  The motor is just perfect for this application.


Anyway, that's the project finished except for drilling a hole to lube the drive shaft bushings (made grease?)

Now, I have figure out what to do with it?  Here is a video of the table fly cutting and it in operation for the first time.  I only had a thin piece of galvanized sheet to try it out on.  Don't know what I'm doing and it shows!  I think this would be a great tool for the kind of clock work stuff craynerd does.


Thanks for sticking with me through the whole process, I enjoyed your comments.

Al
I skin cats my own way!

Offline dsquire

  • In Memoriam
  • Hero Member
  • *****
  • Posts: 2275
  • Country: ca
  • Kitchener, Ontario, Canada
Re: Home built die filer
« Reply #42 on: August 18, 2011, 12:53:35 AM »
Al

Looks to me like you made a very nice job on that, casting, machining and all. Once you use it a few times you will start to realize more places that you can use it instead of other machining operations. You will wonder how you got along without it. Thanks for taking us along for the ride.  :D :D

Cheers  :beer:

Don

Good, better, best.
Never let it rest,
'til your good is better,
and your better best

Offline Pete.

  • Hero Member
  • *****
  • Posts: 1075
  • Country: gb
Re: Home built die filer
« Reply #43 on: August 18, 2011, 01:42:51 AM »
Your castings have come out really nice, and so has the whole project. This is the sort of thing I would get a huge kick out of - building a machine and then making use of it.

Well done!

Offline Stilldrillin

  • Global Moderator
  • Hero Member
  • *****
  • Posts: 4972
  • Country: gb
  • Staveley, Derbyshire. England.
Re: Home built die filer
« Reply #44 on: August 18, 2011, 01:51:23 AM »
Blummin well done Al!  :clap: :clap:

That's a resounding success!  :)

I've enjoyed/ understood all you've shown and explained....... Thanks! :thumbup:

David D
David.

Still drilling holes... Sometimes, in the right place!

Still modifying bits of metal... Occasionally, making an improvement!

Offline John Hill

  • The Artful Bodger
  • Madmodder Committee
  • Hero Member
  • *****
  • Posts: 2016
  • Country: nz
Re: Home built die filer
« Reply #45 on: August 18, 2011, 01:59:59 AM »
Thats a great project and I am sure a very useful tool at the end of it! :thumbup: :thumbup: :thumbup:
From the den of The Artful Bodger

Offline Anzaniste

  • Full Member
  • ***
  • Posts: 207
  • Country: gb
Re: Home built die filer
« Reply #46 on: August 18, 2011, 02:10:10 AM »
Respect! From first posting on this forum on 5th August to completion on 18th August, now that is impressive and a quality article as well. Respect.

I also like your fly cutter; is it to the design in James  Harvey's book?
Scrooby, 1 mile south of Gods own County.

Offline AdeV

  • Madmodder Committee
  • Hero Member
  • *****
  • Posts: 2434
  • Country: gb
Re: Home built die filer
« Reply #47 on: August 18, 2011, 03:42:42 AM »
Nice work Al! That's a proper looking piece of kit; give it a lick of paint and people will be asking where you bought it from.

As far as what to do with it; my brief readings would suggest that it's pretty much a replacement for hand filing, especially where intricate shapes are needed.

I'm definitely adding one of these to the long list of Things to Make (When I Have a Foundry)...
Cheers!
Ade.
--
Location: Wallasey, Merseyside. A long way from anywhere.
Occasionally: Zhengzhou, China. An even longer way from anywhere...

Offline jgroom

  • Jr. Member
  • **
  • Posts: 87
  • Country: us
  • Kansas USA
Re: Home built die filer
« Reply #48 on: August 18, 2011, 11:13:43 AM »
Very nice Al!  I think this is the kind of tool that you never think you need but after you have one for a while you wonder how you ever got along without it.  :clap:

Cheers

Jeff

Offline Bernd

  • Madmodder Committee
  • Hero Member
  • *****
  • Posts: 3688
  • Country: us
  • 1915 C Cab
    • Kingstone Model Works
Re: Home built die filer
« Reply #49 on: August 18, 2011, 01:04:48 PM »
Al,

Superb project and presentation.  :bow: 

I like the grinding/filing station. Looks like you need to make that filing stand a bit more sturdier and perhaps a slower speed. Just suggestion mind you. All in all a nice little project you presented us with. :beer:

Bernd
Route of the Black Diamonds

Offline DaveH

  • Hero Member
  • *****
  • Posts: 1413
  • Country: za
  • Kempton Park, South Africa
Re: Home built die filer
« Reply #50 on: August 18, 2011, 01:17:21 PM »
Al,

Very well made from the castings to the finished article. :thumbup: :clap:

An excellent post, very well presented, well writen and photographed :clap: :clap: :clap:
 :beer:
DaveH
(Ex Leicester, Thurmaston, Ashby De La Zouch.)

Offline doubleboost

  • Madmodder Committee
  • Hero Member
  • *****
  • Posts: 1619
  • Country: gb
  • Newcastle Upon Tyne
Re: Home built die filer
« Reply #51 on: August 18, 2011, 05:45:36 PM »
Very nice :clap: :clap: :clap:
Thank you for a well photographed & written project log :thumbup: :thumbup:
Other than mining the ore yourself this is poropper scratch built :bugeye: :bugeye:
I am sure you will find lots of uses for your die filer :drool: :drool:
Well done
John

Offline arnoldb

  • Hero Member
  • *****
  • Posts: 515
  • Country: na
  • Windhoek, Namibia
Re: Home built die filer
« Reply #52 on: August 19, 2011, 03:54:15 AM »
Really good job Al  :clap: :clap:

Will definitely save a bit of wear on the fingers  :)

 :beer:, Arnold

Offline danstir4

  • Jr. Member
  • **
  • Posts: 5
Re: Home built die filer
« Reply #53 on: August 19, 2011, 09:21:11 AM »
Great project and I was amazed at the versatility of your skills!

Offline CallMeAl

  • Jr. Member
  • **
  • Posts: 95
  • I came, I saw, I wondered how to do it!
Re: Home built die filer
« Reply #54 on: August 21, 2011, 01:36:15 PM »
Thanks everyone for the nice comments.  I'm glad that I could contribute some thing to the form after watching all the wonderful builds that have been presented here.

Anzaniste:  Yes the fly cutter was made from the plan in Harvey's book.  One the first tools I made.  I use it every once in a while when I need a wide cut.  I need to make a counter weight for when the arm is extended out too far. Also, I haven't found the perfect grind on the tool bit yet.  As to the speed at which the project progressed, you need to figure in the week and a half of building the pattern that I didn't show this was by far the most time consuming part.

Bernd: I mounted it on my grinder stand to share the work light and to save space.  It vibrates a little, but it is not the bad for how much it will be used.  I will experiment with the variable pulley to find a speed that lessens the vibration but works fast enough to actually get some metal removal.
I skin cats my own way!

Offline dvbydt

  • Jr. Member
  • **
  • Posts: 83
  • Country: gb
Re: Home built die filer
« Reply #55 on: August 21, 2011, 04:26:43 PM »
Al,
Flycutter grinding. Think of it set up in the lathe as cutting from the inside to outside. That gives you a good idea of the rake angle and the necessary clearance angles. Radius the point a little like any lathe cutting tool and you should be OK to go! Hope that helps.

Ian

Offline crab

  • Jr. Member
  • **
  • Posts: 11
  • Country: us
Re: Home built die filer
« Reply #56 on: August 21, 2011, 05:14:10 PM »
Hi Al.NICE.A lot of that vibration may be due to the belt.You might try a twist link v belt and mabe a cast iron pulley.
Crab
Central California

Offline Pete.

  • Hero Member
  • *****
  • Posts: 1075
  • Country: gb
Re: Home built die filer
« Reply #57 on: August 22, 2011, 12:38:14 AM »
I think if you lightened the cross-slide block below the slot for the brass slider and thinned it either side of the pinch bolt, and used a hollow tube instead of solid for the ram, you'd see a huge difference. You could also cut out the crankshaft webs either side of the pin to make it a counterbalance.

Offline CallMeAl

  • Jr. Member
  • **
  • Posts: 95
  • I came, I saw, I wondered how to do it!
Re: Home built die filer
« Reply #58 on: August 24, 2011, 12:18:46 AM »
Crab:  I agree with you on the belt.  The belt is tensioned by the weight of the motor.  If I push down on the motor a little it smooth out the vibration somewhat.  Twist link belts are expensive, so I will live with a little vibration. ::)

Pete: Your suggestion of lightening up the reciprocating weight would probably help, but I'm to lazy to do it.  Thanks for the ideas.
I skin cats my own way!

Offline nearnexus

  • Jr. Member
  • **
  • Posts: 31
Re: Home built die filer
« Reply #59 on: August 24, 2011, 10:41:39 PM »
Probably one easy anti vibration measure would be to drill into the drive/fly wheel rim (or the face) each side of the pin that connects to the brass block - or mill a slot in it if there is room.

As it is, the weight of the pin is throwing it out of balance.

So countering that with a bit of metal removal would help.

It would be worth running the drive/ flywheel disconnected first to see just how much vibration it generates by itself.

Offline Davo J

  • Sr. Member
  • ****
  • Posts: 475
  • Country: au
Re: Home built die filer
« Reply #60 on: August 25, 2011, 04:08:46 AM »
I watched this from the beginning, and all I have to say is really great work. :beer:
For people not into casting, it would be easy enough to make out of weldments.

Dave

Offline madjackghengis

  • Hero Member
  • *****
  • Posts: 717
  • big engine
Re: Home built die filer
« Reply #61 on: August 31, 2011, 12:49:19 PM »
Hi Al, I hadn't looked for a while, computer down and all that, but your project turned out great.  I built the MLA filer years ago, and use it a lot.  The key to the vibration is everything has its natural harmonic frequency, and you have to stay out of that frequency, and the primary harmonics of it, and the vibration will be negligable.  I wouldn't lighten up any shafts as they are stressed primarily by inertia far more than the actual work performed and inertia is absolutely unforgiving.  Mine runs about the high speed of the first half of your first video, and it works well with steel, iron, brass, aluminum and stainless, just not anything hardened.  I assume you're cutting on the down stroke, so won't mention that.  Any old file can be used, you just have to grind the front end down to fit in your shank/clamp arrangement.  They're great for profiling side plates or removing casting sprue and lines I use mine all the time on engine parts.  I'll bet you find yourself using it more often than you think possible right at the moment.  That's a fine piece of machinery. :bow: :beer: Cheers, mad Jack

Offline raynerd

  • Madmodder Committee
  • Hero Member
  • *****
  • Posts: 2893
  • Country: gb
    • Raynerds Projects - Raynerd.co.uk
Re: Home built die filer
« Reply #62 on: August 31, 2011, 03:05:19 PM »
Hi Al,

I`ve not looked at this for the last week and just found your newest video and the table looks great.

A quick question for you; based on a comment I made in this thread, I have kindly been given a die filer from a fellow madmodder!!!!!  :ddb: :nrocks: :ddb:    I`ve not had time to look at it properly yet, not because I`m ungrateful, I just really want to get the clock near finished before I start taking on any new projects, be them from scratch made or just repairing/modding! One thing I have noticed about your video and others I have seen as well as from my own machine when I switched it on just to see it run, is that that they run pretty damn quick. Can you see any issues that would arise from installing a 3ph motor on my die filler and using it with a variable speed pot? I`m just thinking that that way I could slow the machine right down and take more time with delicate filing jobs.

Nice work on your die filler and it is hard to believe you made it right from your own pattern!!

Chris

Rob.Wilson

  • Guest
Re: Home built die filer
« Reply #63 on: September 02, 2011, 01:03:42 PM »
Hi Al  :bugeye:

Just read the complete thread ,,,,,,,, very nicely done  :bow: :bow: :bow: :bow: :bow: :bow: :bow: ,,,,,, A very fine bit of workshop kit you have made there ,, love the casting , first class  :drool:

Rob