Author Topic: Jan Ridders Otto 4 stroke build  (Read 64070 times)

Offline dbvandy

  • Full Member
  • ***
  • Posts: 170
Re: Jan Ridders Otto 4 stroke build
« Reply #25 on: February 21, 2011, 03:02:46 PM »
I got all three uprights made, bearings in and some 40mm plate spacers roughed out.  Now it REALLY looks like and engine...


More to come tonight...  took Sunday off to go play...

Doug
« Last Edit: February 22, 2011, 02:52:52 AM by dbvandy »
"if you can pay someone to do it, then you can do it... just might cost more and take longer."  ~Grandpa Vanderbilt

Offline dbvandy

  • Full Member
  • ***
  • Posts: 170
Re: Jan Ridders Otto 4 stroke build
« Reply #26 on: February 22, 2011, 01:28:41 AM »
Well, everything is mounted solid now and only a few things left to do.  I might be making fumes this weekend...

I made a center line on all the uprights and one down the center line on the base plate, lined them up and transferred the holes in the uprights to the base plate.  After the 3 back socket heads were in tight, I did the same for the front.


I had made the spacers for between the uprights last night and you can see them here.  Also, the 4 corner post and tapped and mounted.


The crank bearing mounts are marked with center lines as well and the hole locations are transferred from the base plates just like the uprights.  I changed the design a bit here:  the flywheel side is smaller so that I could mount the uprights from the bottom.  This will not effect the operation in the slightest, but if I need to make alignment adjustments I can just oversize the holes in the base plate.  The crank side is extra thick because that is what size stock I had in the drawer.


I decided to drill and tap a hole into my drill press table as a pivot for the cylinder hole and a 3/8th 4 flute end mill to plunge the stock out. Worked pretty good.  for those that are wondering... the chuck is heated and locktited on to the arbor.  (I hope I never need to get it off.)


The 1/4 -20 bolt was threaded through the table and then nylocked tight.


Most of the stock was plunged out and then the base plate was spun to even the sides.


Turned out pretty good...  the hole was then drilled out with the unibit (still love that thing...)


Here is where we are tonight.


On the agenda for tomorrow:  crank, cams, and intake/exhaust manifold...

more to come...

Doug
« Last Edit: February 22, 2011, 01:38:15 AM by dbvandy »
"if you can pay someone to do it, then you can do it... just might cost more and take longer."  ~Grandpa Vanderbilt

Offline NickG

  • Madmodder Committee
  • Hero Member
  • *****
  • Posts: 1890
Re: Jan Ridders Otto 4 stroke build
« Reply #27 on: February 22, 2011, 04:07:44 PM »
Absolutely flying along. Nice innovation cutting the large hole out.

It's a fair sized thing this one too ...

Nick
Location: County Durham (North East England)

Offline dbvandy

  • Full Member
  • ***
  • Posts: 170
Re: Jan Ridders Otto 4 stroke build
« Reply #28 on: February 23, 2011, 11:53:15 PM »
Well, finished the crank bearing blocks, crank, and cam blanks.

I cut the cams from 1 inch 4140.  The OD is 24mm with a 17mm hub.  I will cut the cam down to 20mm by removing the extra stock with the 4 inch belt sander down to the 20mm ledge I left on the hub side.


Both cams are 11.5mm which is the same distance as the valves are apart.


The crank shaft is 8mm from an old Lexmark ink jet printer.  I left it long so that I have options when it comes to the final flywheel design.  I put 2 bearings on the crank side and one on the flywheel side with an aluminum spacer in between.


The holes have been drilled into the head for the intake and exhaust.  The valve guides were high temp red loctited in (hope I never have to get them out).  Tappets and guides to be made after cams are ground.


As she sits tonight...


left to do...  
grind cams... Done
tappet holes and press in bronze bushings...  Done
tappets... Done
Intake/exhaust manifold
muffler
flywheel (faceplate just arrived from LMS today)... 75% done
wrist pin in piston
mill slot in base plate for belt
design ignition system (got the tazer yesterday...  don't think it will work, does not seem to recharge fast enough...  bummer...)...  25% Done
design carb (have some really cool ideas....)

Belt and pulleys purchased from SDP/SI, should be here next week.  I hated to spend the $$$$, but had to be done...

More to come....

« Last Edit: February 24, 2011, 09:31:24 PM by dbvandy »
"if you can pay someone to do it, then you can do it... just might cost more and take longer."  ~Grandpa Vanderbilt

Offline saw

  • Hero Member
  • *****
  • Posts: 1003
  • Country: se
  • lucky amateur
    • Svenssons AckordsWerkstad
Re: Jan Ridders Otto 4 stroke build
« Reply #29 on: February 24, 2011, 05:07:14 AM »
It's looling amazing  :bugeye:
_________________________
Greetings / Benni
http://myprojecty.wordpress.com/category/steam-engine/

Offline dbvandy

  • Full Member
  • ***
  • Posts: 170
Re: Jan Ridders Otto 4 stroke build
« Reply #30 on: February 25, 2011, 01:36:37 AM »
left to do...  
grind cams... Done
tappet holes and press in bronze bushings...  Done
tappets... Done
Intake/exhaust manifold
muffler
flywheel (faceplate just arrived from LMS today)... 75% done
wrist pin in piston
mill slot in base plate for belt
design ignition system (got the tazer yesterday...  don't think it will work, does not seem to recharge fast enough...  bummer...)...  25% Done
design carb (have some really cool ideas....)

Good day today.  Cams, tappets, flywheel, and part of the ignition done.  

I blacked up the cam blanks and marked them as per the plans.


Then I used the 36x4 belt sander to sand off the extra stock down to the 20mm lip.


This is the finished intake cam.  I will need to fine tune the timing once the belt is installed by grinding off more.


I measured the actual distance from the upright to the valve stem.  to my complete amazement, it was dead on...  go figure...  I then transferred those measurements to the cross brace so I could drill the 3/8 hole for the bushing.


The holes were drilled and then the bushings loctited in.  I sanded them flat with the belt sander and counter sunk the bushings.  The stock for the tappets is 1/4 inch stainless.


I then measured the distance between the cam and the top of the valve stem.  Then made 2 tappets.


Here is the finished cams and tappets.


Cams running:


I used the excel pie chart trick to divide the the flywheel into 6 parts for the lightning holes.  AND I got to reuse my 1/4 hole in the drill press table as an axle to spin the flywheel on while drilling.  I just took a piece of the 8mm shaft and threaded it 1/4-20.  Worked well.


Here she sits tonight...


Now off to bed...  more to come...

Doug


« Last Edit: February 25, 2011, 02:12:04 AM by dbvandy »
"if you can pay someone to do it, then you can do it... just might cost more and take longer."  ~Grandpa Vanderbilt

Offline dsquire

  • In Memoriam
  • Hero Member
  • *****
  • Posts: 2275
  • Country: ca
  • Kitchener, Ontario, Canada
Re: Jan Ridders Otto 4 stroke build
« Reply #31 on: February 25, 2011, 02:10:29 AM »
dbvandy

You have got that baby looking pretty good. It won't be long now and it will be making some noise.  :D :D

Cheers  :beer:

Don

Good, better, best.
Never let it rest,
'til your good is better,
and your better best

Offline saw

  • Hero Member
  • *****
  • Posts: 1003
  • Country: se
  • lucky amateur
    • Svenssons AckordsWerkstad
Re: Jan Ridders Otto 4 stroke build
« Reply #32 on: February 25, 2011, 04:47:24 AM »
Very nice  :bugeye:
_________________________
Greetings / Benni
http://myprojecty.wordpress.com/category/steam-engine/

Offline sorveltaja

  • Hero Member
  • *****
  • Posts: 605
Re: Jan Ridders Otto 4 stroke build
« Reply #33 on: February 25, 2011, 09:30:31 AM »
Turns out very nicely :wave:.

Looking forward to see it run.

Offline dbvandy

  • Full Member
  • ***
  • Posts: 170
Re: Jan Ridders Otto 4 stroke build
« Reply #34 on: February 25, 2011, 09:50:55 AM »
Belt an pulleys will be here Monday...  still deciding on ignition...  should make some fumes next week....

The roughness is bugging me more than anything, I want to start making it pretty!

Thanks for all the kind words.

Doug
"if you can pay someone to do it, then you can do it... just might cost more and take longer."  ~Grandpa Vanderbilt

Offline NickG

  • Madmodder Committee
  • Hero Member
  • *****
  • Posts: 1890
Re: Jan Ridders Otto 4 stroke build
« Reply #35 on: February 25, 2011, 01:32:08 PM »
Doug,
It looks brilliant that. I've never seen a close up of the valves moving up and down like that before. Was it just me or could you see the valves bouncing slightly? I'm not sure whether it'll have any bearing on how it runs? I was just sure I saw a gap sometimes between cam and follower. I know this problem sometimes occurs if revving an engine high, race prepared or high performance engines sometimes have dual springs. I'm going to use that great excel trick before I get some sort of dividing thingymbom. Also, it looks pretty already to me, not rough!
Location: County Durham (North East England)

Offline Bogstandard

  • Bogs Group
  • Hero Member
  • *****
  • Posts: 1107
Re: Jan Ridders Otto 4 stroke build
« Reply #36 on: February 25, 2011, 02:40:39 PM »
Nick,

You will find on most engines you have to have some sort of gap between the cam and what they are operating.

If you start a cold engine up with no gap, and by the time it has warmed up and expanded, the valves could in fact be held open or the valve timing all wrong. You usually set the 'tappets' up with a feeler gauge so that when the engine is up to running temp there is still a small gap to prevent the valves being held open and givng the correct valve timing.

John
If you don't try it, you will never know if you can do it.

Location - Crewe, Cheshire

Skype - bandit175

Offline dbvandy

  • Full Member
  • ***
  • Posts: 170
Re: Jan Ridders Otto 4 stroke build
« Reply #37 on: February 25, 2011, 02:45:51 PM »
Doug,
It looks brilliant that. I've never seen a close up of the valves moving up and down like that before. Was it just me or could you see the valves bouncing slightly? I'm not sure whether it'll have any bearing on how it runs? I was just sure I saw a gap sometimes between cam and follower. I know this problem sometimes occurs if revving an engine high, race prepared or high performance engines sometimes have dual springs. I'm going to use that great excel trick before I get some sort of dividing thingymbom. Also, it looks pretty already to me, not rough!

looking at the cam, it looks like at high revs the tappet is thrown up by the valve springs and rides along the cam relief for about 1/2 a rev, then settles down.  The valves should not have enough mass to overcome the pressure of the springs as they are pretty stout.

I just bought one of these:

http://cgi.ebay.com/ws/eBayISAPI.dll?ViewItem&item=260731555933

I do not expect perfection, but it should work ok for what I am going to do with it.

Doug
"if you can pay someone to do it, then you can do it... just might cost more and take longer."  ~Grandpa Vanderbilt

Offline dbvandy

  • Full Member
  • ***
  • Posts: 170
Re: Jan Ridders Otto 4 stroke build
« Reply #38 on: February 25, 2011, 02:49:13 PM »
Nick,

You will find on most engines you have to have some sort of gap between the cam and what they are operating.

If you start a cold engine up with no gap, and by the time it has warmed up and expanded, the valves could in fact be held open or the valve timing all wrong. You usually set the 'tappets' up with a feeler gauge so that when the engine is up to running temp there is still a small gap to prevent the valves being held open and givng the correct valve timing.

John

Correct.  I guessed at .008 gap like every other car engine I have ever worked on (the plans said nothing about it). If it turns out to be too much, I can cut another tappet a bit longer.  I toyed with the idea of an adjustable tappet, but they are so easy to make I decided against the extra effort.

Doug

"if you can pay someone to do it, then you can do it... just might cost more and take longer."  ~Grandpa Vanderbilt

Offline NickG

  • Madmodder Committee
  • Hero Member
  • *****
  • Posts: 1890
Re: Jan Ridders Otto 4 stroke build
« Reply #39 on: February 25, 2011, 03:21:53 PM »
Bogs,

Yeah good point, I know about the gaps - I remember setting them up on the older engines, turning the crank until each cam is at it's lowest lift then setting with the feeler gauge. Of course, most of the modern ones have these hydraulic tappets now which you just have to throw away when knackered instead of adjust!

I just thought it looked to me like the valves were bouncing at the bottom of their stroke with the inertia given to them by the cams. As you say though, this might change when warmed up. Not sure what speed you were spinning it at either. Should be ok, presume your springs are to the drawing Doug?

That rotary table looks like a good deal. I need to have a look at the Harrogate show, only trouble with going on the sat is, any bargains will probably have gone. At least I can go and have a play with them there though and get a feel for them

Nick

Location: County Durham (North East England)

Offline Bogstandard

  • Bogs Group
  • Hero Member
  • *****
  • Posts: 1107
Re: Jan Ridders Otto 4 stroke build
« Reply #40 on: February 25, 2011, 04:42:09 PM »
You don't get bargains any more Nick. If it is reduced, it is most probably cheap tat not worth looking at. All you are saving is the postage, and most of them are starting to do free anyway all the time.

At one time, you would get the VAT knocked off, but not any more. So I think you will be safe in the knowledge that what you want will be there.

John
If you don't try it, you will never know if you can do it.

Location - Crewe, Cheshire

Skype - bandit175

Offline madjackghengis

  • Hero Member
  • *****
  • Posts: 717
  • big engine
Re: Jan Ridders Otto 4 stroke build
« Reply #41 on: February 25, 2011, 11:14:33 PM »
You all must be living somewhere special, I don't remember giving up adjusting tappets, I still do on my bike, on my tractor and on my Mercedes too.  It's good to see the progress, you're just about ready to fire it I expect.  She's looking pretty good too.   :beer:  cheers, Jack

Offline scrapman

  • Full Member
  • ***
  • Posts: 114
Re: Jan Ridders Otto 4 stroke build
« Reply #42 on: February 26, 2011, 06:54:55 AM »
Great build Doug  :clap:

Offline NickG

  • Madmodder Committee
  • Hero Member
  • *****
  • Posts: 1890
Re: Jan Ridders Otto 4 stroke build
« Reply #43 on: February 26, 2011, 11:50:56 AM »
Jack, I think the only cars that have solid followers here these days are stuff like BMW M3's etc, but you can't adjust those, you have to change 24 shims, hence why the servicing costs so much!!

John, that's good to know, will see what's on offer then. Can see me spending a lot of time around the machine DRO stand contemplating too!

Anyway sorry for going off topic Doug, can't wait for the next installment!

 
Location: County Durham (North East England)

Offline DavidA

  • Hero Member
  • *****
  • Posts: 1219
  • Country: gb
Re: Jan Ridders Otto 4 stroke build
« Reply #44 on: February 26, 2011, 03:30:49 PM »


..Correct.  I guessed at .008 gap like every other car engine I have ever worked on (the plans said nothing about it)...


In the notes for for the engine,  referring to sheet six,  Jan suggests 0.3 mm gap.

Dave.

Offline dbvandy

  • Full Member
  • ***
  • Posts: 170
Re: Jan Ridders Otto 4 stroke build
« Reply #45 on: February 27, 2011, 11:28:20 AM »


..Correct.  I guessed at .008 gap like every other car engine I have ever worked on (the plans said nothing about it)...


In the notes for for the engine,  referring to sheet six,  Jan suggests 0.3 mm gap.

Dave.

Guess I should read the notes at some point during the build.....

Doug
"if you can pay someone to do it, then you can do it... just might cost more and take longer."  ~Grandpa Vanderbilt

Offline dbvandy

  • Full Member
  • ***
  • Posts: 170
Re: Jan Ridders Otto 4 stroke build
« Reply #46 on: February 27, 2011, 12:24:04 PM »
Well... its been a few days since I have uploaded some pics, so, here you go...

Let me first start off with a video of how you should listen to that little voice in your head when it says.. "be ready to grab it if something happens"


All is well...  camera fine, engine fine...  clamp not fine, extra tight now....

Anyway,  I got the piston and connecting rod cut and assembled.  I am going to use a Viton o-ring for a good seal, but I might not need it... it seems to have decent compression now... we will see...

I had to make something shiny...


I used a hard brass rod for the wrist pin.  Jan suggest steel, but that might grove the side of the cylinder, so brass works good. Not enough compression to worry about sheer...  The bushings are brass as well.  The oil blow by from the fuel mix will keep them good and lubed.


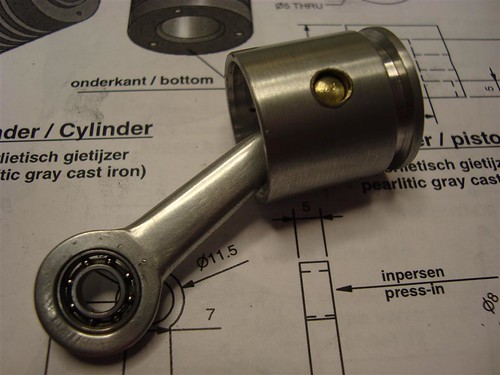
Piston installed.  What a pain...  I see now why Jan has only three bolts in the bottom of the cylinder,  you can then take the cylinder off to remove the piston.  I have four and one is under the main bearing support, so to remove the piston I have to take the engine just about completely apart.  I think on next assembly I will forget to put in the hidden bolt...  oops...


I added some footsies.  The center spacers were removed and drilled and tapped 1/4-20 on the bottom for some threaded rod jam locked into the 1 1/8 38mm long feet.  I will get some rubber to glue onto the bottom.


The flywheel supports took forever.  If I had it to do over again, I would line drill them out when fully assembled and trued on the lathe.  I oversized the hole on the flywheel so that it is only supported by the two aluminum end pieces.  It is within .0005 eccentricity and .001 wobble.  I could probably get that out with bolt tightening, but its pretty close...


Now for something that I have been dreading...  the manifold.  I would like to say it came to me in a dream, but really it dawned on me what to do while watching Survivor on Wednesday.  The engine usually lives on the coffee table when we are not in the shop, so I have time to stare at it and design.  

I decided to have the intake and exhaust come out the top for symmetry and then I don't have to cut into the side of a curved surface for the intake.
The stock was just a piece of 1/2 x 3/4 6061 rough cut on the band saw, drilled for mounting holes (I used two, plan only one) then indicated on the lathe.  


Then I turned and grooved.  Turned out pretty good... I was worried that it might grab and get thrown because there was VERY little on the inside lip to chuck onto.


I then cut out the extra on the top sides and drilled the holes for the muffler and intake (to be made today)


And now some videos for your viewing pleasure...

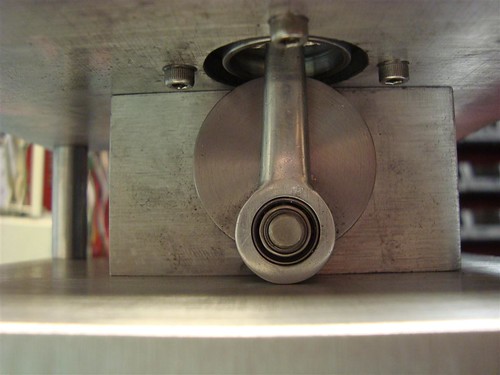
Piston and crank.  Nothing hits, but it is reeeaaalllyyy close..  about .5mm gap between the connecting rod and the base.  Might have to modify if it starts rubbing when at full speed...


Clamp REAL tight and plug removed so there is no compression.  


Exhaust valve held open with cam, plug in.


More to come... thanks for your constructive comments and suggestions...

Doug
« Last Edit: February 27, 2011, 01:17:57 PM by dbvandy »
"if you can pay someone to do it, then you can do it... just might cost more and take longer."  ~Grandpa Vanderbilt

Offline saw

  • Hero Member
  • *****
  • Posts: 1003
  • Country: se
  • lucky amateur
    • Svenssons AckordsWerkstad
Re: Jan Ridders Otto 4 stroke build
« Reply #47 on: February 27, 2011, 01:01:03 PM »
Your'e engine comes up very nisley now  :clap:
_________________________
Greetings / Benni
http://myprojecty.wordpress.com/category/steam-engine/

Offline dbvandy

  • Full Member
  • ***
  • Posts: 170
Re: Jan Ridders Otto 4 stroke build
« Reply #48 on: February 27, 2011, 05:20:52 PM »

In the notes for for the engine,  referring to sheet six,  Jan suggests 0.3 mm gap.

Dave.

Dave,  you must have a different set of drawings than me.  Mine are dated Jul 25 -09 and I have read it cover to cover now and do not see that info...

Could you send your copy to dbvandy@gmail.com so I can compare?

Thanks!

Doug.
"if you can pay someone to do it, then you can do it... just might cost more and take longer."  ~Grandpa Vanderbilt

Offline dbvandy

  • Full Member
  • ***
  • Posts: 170
Re: Jan Ridders Otto 4 stroke build
« Reply #49 on: February 28, 2011, 12:07:10 AM »
I'm running out of things to do without belts and ignition parts.  Belt and cogs will be here tomorrow...  I hope I got the right size...

I redesigned the muffler.  It looked like it might be a bit fragile and exposed and easily damaged or knocked off.  Not that I am going to be tossing the motor around, but things happen, so I made it with a mount that bolts to the tappet cross member.


It is high temp loctited together.


The intake was the same idea.  I will connect the nipple to the vapor tank with some silicone hose or some aluminum tubing.


And a view of it on the motor.  Starting to look pretty complete now.


More to come...  not much more, but more just the same...
« Last Edit: February 28, 2011, 12:08:44 AM by dbvandy »
"if you can pay someone to do it, then you can do it... just might cost more and take longer."  ~Grandpa Vanderbilt