Author Topic: snow Tandem  (Read 30626 times)

Offline Joe d

  • Sr. Member
  • ****
  • Posts: 251
  • Country: ca
Re: snow Tandem
« Reply #25 on: April 30, 2010, 10:58:28 AM »
Hey Rob

Go for it.  There are a bunch of parts on this thing that could be cast as opposed to machined from barstock.... :clap: :clap: :clap:

Cheers, Joe


Rob.Wilson

  • Guest
Re: snow Tandem
« Reply #26 on: May 01, 2010, 04:13:03 PM »
Hi Joe

You read my mined  :lol: :lol: i was thinking the very same thing ,,,,,,,,,,,,,,,oh so many things to build  :proj:

Regards Rob  :thumbup:

Offline Joe d

  • Sr. Member
  • ****
  • Posts: 251
  • Country: ca
Re: snow Tandem
« Reply #27 on: June 17, 2010, 10:37:39 PM »
Been a while, a number of sadly not machining related things in the way lately, but finally able to pick up where I had left off, with plumbing:  here are the bits for the exhaust manifold, straightforward turning for the flanges, and used the tubing bender I built a little earlier for the first time for real...


Instead of building some complex jig for soldering, used the engine it's self: first the curved pipes into the flanges


and then the bottom end of the curved pipes into the straight section of the manifold


still got some cleaning up to do, some excess flux and a few spots with some wayward solder. ::) ::)

Cheers, Joe

Offline Stilldrillin

  • Global Moderator
  • Hero Member
  • *****
  • Posts: 4972
  • Country: gb
  • Staveley, Derbyshire. England.
Re: snow Tandem
« Reply #28 on: June 18, 2010, 02:15:46 AM »
Very nice to see this is moving on again, Joe.  :wave:

Neat work, adding to the already completed, neat work......  :thumbup:

Well done!  :clap:

David D
David.

Still drilling holes... Sometimes, in the right place!

Still modifying bits of metal... Occasionally, making an improvement!

Offline Joe d

  • Sr. Member
  • ****
  • Posts: 251
  • Country: ca
Re: snow Tandem
« Reply #29 on: July 01, 2010, 11:32:01 AM »
Thanks, David.

Got some more done in between some surprise honeydo's... :wack:

Tried out the fit of the exhaust manifold with the coolant return in place, and was not at all pleased, the curved pipes of the manifold were just touching the coolant return pipe.... not visually pleasing at all.  so, faffed around for the best part of a week, made new dies for the tubing bender to try to form a tighter curve for the manifold pipe (in several sizes) and used up all the tubing I had on hand with no useful result... so then went with plan B, and put an "s" bend in the coolant inlet and return pipes, and it looks a lot better to me now.
This will change the size of the outlet pipes from the water jacket, no biggie.  :hammer:

That done, moved on to the fuel intake manifold.  First up: cut a little piece off of my secret stash of 1/2" brass..


after a little milling & drilling, cut and bent some tubing, and here are the bits


Again used the engine as the soldering jig


and here's all the plumbing done to date,


and, couldn't resist sticking it all together to have a look


The fitting in the centre of the intake manifold still needs a bit to hold the carb, I'll make it to fit the carb once I've acquired one...
otherwise in plumbing only got the 4 little bits left to do that return the coolant from the water jacket to the coolant return manifold

Cheers, Joe

Offline Brass_Machine

  • Administrator
  • Hero Member
  • *****
  • Posts: 5504
  • Country: us
Re: snow Tandem
« Reply #30 on: July 01, 2010, 10:48:45 PM »
Wow. Nice pipework Joe!

Eric
Science is fun.

We're all mad here. I'm mad. You're mad.

Offline Joe d

  • Sr. Member
  • ****
  • Posts: 251
  • Country: ca
Re: snow Tandem
« Reply #31 on: July 04, 2010, 10:30:46 PM »

Thanks, Eric

Almost the end of plumbing :ddb:
Turned some brass to make flanges


Bent some tubing with the shop-built tubing bender


Here's all the parts together, shaped the flanges by hand with a file, seemed like way too much mucking around to machine it for four pieces whose only critical point is the fit of the tubing  ::)


soldered together,


And here they are in place. Coolant from the water jacket exits through these assemblies, squirts into the funnels to return to the coolant tank.


Fuel tank or coolant tank next, haven't quite decided...

Cheers, Joe

Offline madjackghengis

  • Hero Member
  • *****
  • Posts: 717
  • big engine
Re: snow Tandem
« Reply #32 on: July 05, 2010, 09:37:28 AM »
Hi Joe, it's been a while since I looked at your build log, and I have to say you've done some very fine work and the engine is coming along smashing.  I think it won't very long before you are posting a video of it running, and we get to see and hear what one of these unique engines look and sound like in operation.  The pipe work looks beautiful, the different metals are doing a bang up job of drawing the eyes to the details, and it is quite impressive looking and makes me a bit envious.  Outstanding job and patience. :bow: :bugeye: :jaw: mad jack

Rob.Wilson

  • Guest
Re: snow Tandem
« Reply #33 on: July 05, 2010, 11:37:35 AM »
 :bugeye: fine bit of pipe work Joe  :bow: :bow: :bow: your making good use of the pipe bender  :dremel:

Rob

Offline Joe d

  • Sr. Member
  • ****
  • Posts: 251
  • Country: ca
Re: snow Tandem
« Reply #34 on: July 06, 2010, 12:05:11 AM »
and makes me a bit envious.   mad jack

Mad jack:  I've been following your radial build....no need for any envy on your part :thumbup:  thanks none the less for the kind comments.

Thanks Rob. 

Decided to get going on the fuel tank, and I know that  :worthless: so there will be some soon.

Joe

Offline Joe d

  • Sr. Member
  • ****
  • Posts: 251
  • Country: ca
Re: snow Tandem
« Reply #35 on: July 09, 2010, 12:57:03 AM »


Got going on the fuel tank assembly.  Needed some 1/4" ali angle, only had 1/2" :bang: so milled off the extra bit


the base is just a bit of ali with a few holes drilled & tapped, here's where that angle goes, and the start on the cross pieces that will hold up the tank


decided to make some brackets for the u-bolts that will secure the tank.  The plans had simply called out bending over a little tab on each side of the cross piece, but that would have been too easy :hammer:.  Set up a piece of ali in the mill, and did everything I could in that set up


then parted them off


a little fussing about with some files, and here we are


Now I need a tank to go on the base, started out by truing up the ends of a bit of tube


and that's where it is at the moment.  Not sure how much will get done in the next little while, Number One son is due home on leave from the Navy on Saturday :beer: :beer:, so shop time will no doubt be curtailed.

Cheers, Joe

Offline Bernd

  • Madmodder Committee
  • Hero Member
  • *****
  • Posts: 3688
  • Country: us
  • 1915 C Cab
    • Kingstone Model Works
Re: snow Tandem
« Reply #36 on: July 09, 2010, 01:34:51 AM »
Those brakets look nice Joe. :thumbup:

That's what makes an excellent model is the little details like that.

Bernd
Route of the Black Diamonds

Offline Stilldrillin

  • Global Moderator
  • Hero Member
  • *****
  • Posts: 4972
  • Country: gb
  • Staveley, Derbyshire. England.
Re: snow Tandem
« Reply #37 on: July 09, 2010, 02:24:04 AM »
Those brakets look nice Joe. :thumbup:

That's what makes an excellent model is the little details like that.

Bernd

Wot Bernd said!  :thumbup:

Really excellent detailing.......  :clap:

David D
David.

Still drilling holes... Sometimes, in the right place!

Still modifying bits of metal... Occasionally, making an improvement!

Offline Joe d

  • Sr. Member
  • ****
  • Posts: 251
  • Country: ca
Re: snow Tandem
« Reply #38 on: July 12, 2010, 12:30:59 AM »
Bernd and David: thanks, guys

Managed to get some shop time after all, so got a little further along with the tank..

Turned the end caps


The plans call for one end to made of lucite in order to see the state of the fuel supply.  I didn't much care for this idea ::), so instead I've milled a slot for a rather more discrete fuel gauge


Then started on the bosses for fuel in and fuel out.... they need a radius to match the tank, so set them up on the face plate and not only did two at once, balanced the load on the lathe too! :smart:


Once done with the radii, turned them around in the four-jaw, and drilled them through, and added a very slight counterbore, and tapped the filler boss


the fuel out boss was just finished off with a hacksaw and files, but the filler boss got a little turning...made up a quick & dirty mandrel with the matching thread, and cut a taper on it just for the look of it


Here's the state of play tonight:  stuck little bits of pipe in the counter-bores in each of the bosses, these will serve to locate the bosses in place on the tank so they won't slide around whilst waiting for the glue to dry, glued a bit of clear Plexiglas in the slot for the fuel gauge, and glued the blind tank end in place.


Still have to drill the holes for the bosses, stick'em in place, and then can locate the other tank end with the slot vertical in relation to the bosses... also have to make the filler cap (again) and (again) as so far there are two failed attempts in the save it for another possible use bin..... :bang: :bang:

Cheers, Joe

Offline madjackghengis

  • Hero Member
  • *****
  • Posts: 717
  • big engine
Re: snow Tandem
« Reply #39 on: July 12, 2010, 09:38:53 AM »
Well Joe, you look like you're making some real progress, I think you made the right decision regarding the tank end, and the slot for a fuel gauge rather than the whole end.  No matter what, gas eats plastic eventually, and you always end up replacing the part sooner or later, better a small rectangle of plastic than a whole tank end.  Looks like a good job, it should go nicely with the whole look of the tandem, when it is done, fine job.  :thumbup: mad jack

Offline Joe d

  • Sr. Member
  • ****
  • Posts: 251
  • Country: ca
Re: snow Tandem
« Reply #40 on: July 13, 2010, 07:49:10 AM »
Thanks, mad jack.  Well, except for the filler cap :bang:  , fuel tank is done :ddb:

Set up some steel rod in a collet for threading each end 0-80 for u-bolts


glued the bosses in place, the other end of the tank, a bit of cleaning up and assembly, and here we are!


From the other side:


next up: coolant resevoir

Cheers Joe

Offline Dean W

  • Hero Member
  • *****
  • Posts: 571
  • My kingdom for a lathe!
    • Projects web pages
Re: snow Tandem
« Reply #41 on: July 14, 2010, 01:55:30 AM »
It sure looks great, Joe.  Gets prettier every post!

Dean
Dean W.

Shop Projects:
http://www.deansphotographica.com/machining/projects/projects.html

Praise the Lord and pass the Carbide!

Offline Joe d

  • Sr. Member
  • ****
  • Posts: 251
  • Country: ca
Re: snow Tandem
« Reply #42 on: July 14, 2010, 10:59:45 AM »
Thanks Dean

Dove in and made a few mods  :mmr: to the stand that holds up the tank, as I just didn't like the look of the original  :(


Here's the fuel tank with the MkII stand


from another angle


Like this one better...

Cheers, Joe

Offline Joe d

  • Sr. Member
  • ****
  • Posts: 251
  • Country: ca
Re: snow Tandem
« Reply #43 on: July 19, 2010, 10:41:51 PM »

Got on with the coolant tank after re-working the fuel tank stand.  Started out by truing up some 3" OD ali tube, and then cleaning up the exterior


A straightforward bit of turning and boring for the top


Set up the stock for the base on the rotary table to mill the recess that the tank body sits in


Then used the base-plate as it's own template for locating the mounting holes on the wooden base


Made up the inlet and outlet fittings, a replay of the bits for the fuel tank, so no photo of that, and then stuck it all together with some more two-part epoxy (with my carefully hoarded chunks of cast iron weighing things down while the epoxy sets up)


And here it is where it belongs.


Getting close to the finish line now, only got the coolant pump, cams, carb, and a few oilers left to machine, and then its assembly and start figuring out why it won't run..... :scratch: :scratch:

Cheers, Joe

Offline Joe d

  • Sr. Member
  • ****
  • Posts: 251
  • Country: ca
Re: snow Tandem
« Reply #44 on: July 26, 2010, 09:14:50 PM »
Hi all

Got started on the coolant pump.  The plans called for using a submersible electric pump in the reservoir, didn't much care for that, so after asking a few questions  decided to go with Jerry Howell's magnetic drive pump.  Of course, I can't just follow the plans, so there have been a few modifications already... :)

I didn't have an appropriate piece of round stock, so soldered a temporary spigot on a chunk of my secret stash of 1/2" plate brass, and then turned the spigot so it would run true


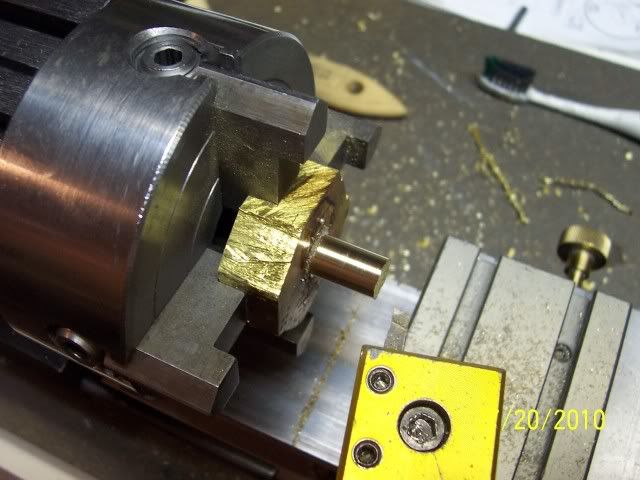
Turned it round, reversed it in the chuck and machined off the spigot in the process of hollowing out the piece, then silver brazed it to a piece of flat stock..
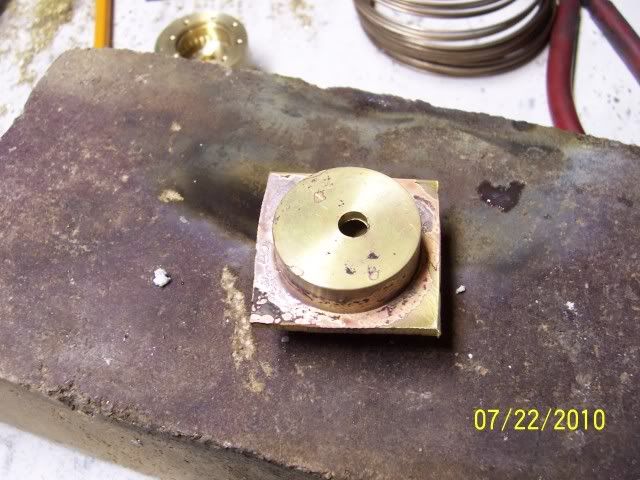
(and, if you look closely, just behind the firebrick you can see the first one, stuffed it up drilling the bolt circle...      :hammer:.)


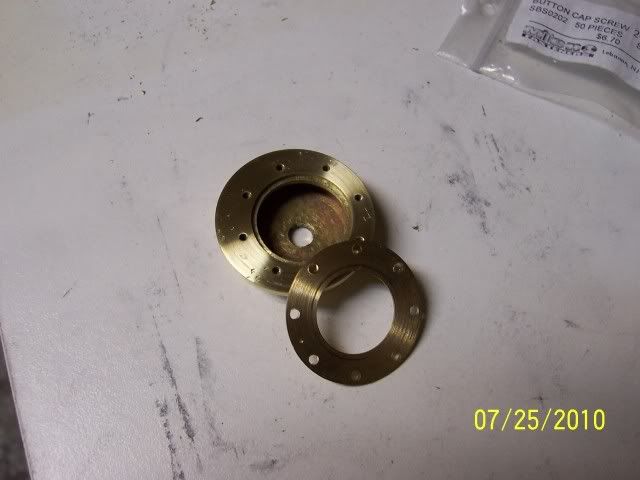
Jerry's plans call for a delrin piece threaded into the brass body to hold the impeller in place.  I still don't have a thread-cutting lathe, so left the hole in the pump body un-threaded, will also not thread the delrin insert, and will hold it together with this clamping ring


Next up is the impeller, turned the blank with a shoulder on the bottom to facilitate holding it on the rotary table with a strap of spare ali, off-set it to mill the slots, re-centred and drilled the holes for the magnets, after this re-chucked it in the lathe and turned off the shoulder


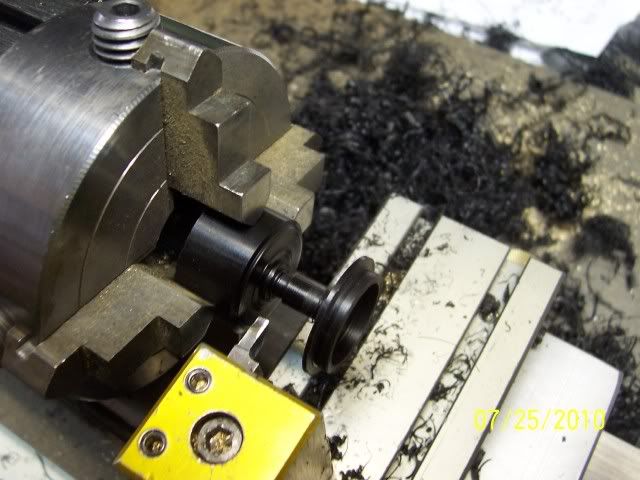
and here is the delrin piece ready for parting off.  First time I've machined this stuff, boy it sure cuts easily with a nice finish.  Nice soft non-cut-causing swarf, too  :clap:


Made the pulley for the thing, and then added it to the pile of parts that don't fit, so next up will be another one.... and inlet & outlet bits.

Cheers, Joe

Offline Stilldrillin

  • Global Moderator
  • Hero Member
  • *****
  • Posts: 4972
  • Country: gb
  • Staveley, Derbyshire. England.
Re: snow Tandem
« Reply #45 on: July 27, 2010, 03:23:40 AM »
Joe, I love machining delrin, when I get the opportunity.

Sorry, no other comment to make......  :scratch:

Enjoying every pic. Every description. Watching it grow.......  :thumbup:

Keep on, keeping on!   :D

David D
David.

Still drilling holes... Sometimes, in the right place!

Still modifying bits of metal... Occasionally, making an improvement!

Offline Joe d

  • Sr. Member
  • ****
  • Posts: 251
  • Country: ca
Re: snow Tandem
« Reply #46 on: August 01, 2010, 11:11:55 PM »
Thanks, Dave, still keeping on here! :ddb:


Got a bit further with the pump:


Turned the driven pulley that in turn moves the impeller.  Looks like a real simple part, huh?  This danged thing took me three tries: overbored the hole for the bearings in the first one,  :hammer: the tool grabbed the second one out of the 4-jaw and tossed it across the shop leaving un-recoverable dings, :hammer: :hammer: the third one came out OK


Then turned the driving pulley, this one worked out first time :clap:


soldered the inlet and outlet to the pump body


made up a mounting bracket, here it is with the rest of the parts


And here they are stuck together.


Still have to test it moving some fluid,  :beer: and then mount it on the base of the engine.

Cheers, Joe

Offline Bernd

  • Madmodder Committee
  • Hero Member
  • *****
  • Posts: 3688
  • Country: us
  • 1915 C Cab
    • Kingstone Model Works
Re: snow Tandem
« Reply #47 on: August 02, 2010, 07:02:48 PM »
Hey Joe,

In that last picture, is that the "over bored hole"?  :lol: :lol:

Lookin' good. Can't wait to see it all in one piece. Nice solder job BTW.

Bernd
Route of the Black Diamonds

Offline Joe d

  • Sr. Member
  • ****
  • Posts: 251
  • Country: ca
Re: snow Tandem
« Reply #48 on: August 04, 2010, 10:24:16 AM »
Hey Bernd.  That's the "I evidently needed the practice hole" :bang: :bang: :bang:


Got the bench test done on the pump, we have circulation!  :ddb: :ddb: Here's a very short video thereof...


Here it is stuck in place


And with the flywheel in place.  The clearance was dictated by the belt I had on hand.. sometimes ya gits lucky! :thumbup:


the other side


not much left now...

Joe

Offline Stilldrillin

  • Global Moderator
  • Hero Member
  • *****
  • Posts: 4972
  • Country: gb
  • Staveley, Derbyshire. England.
Re: snow Tandem
« Reply #49 on: August 04, 2010, 10:35:17 AM »
"And with the flywheel in place.  The clearance was dictated by the belt I had on hand.. sometimes ya gits lucky! "

Nah!

Don't go selling yourself short Joe...... That was precise forward planning!   :thumbup:

Well done, again!  :clap:

David D
David.

Still drilling holes... Sometimes, in the right place!

Still modifying bits of metal... Occasionally, making an improvement!