Author Topic: snow Tandem  (Read 30636 times)

Offline Joe d

  • Sr. Member
  • ****
  • Posts: 251
  • Country: ca
snow Tandem
« on: March 08, 2010, 12:28:02 AM »
Hi all

Started this a couple of years ago, got the cylinders done and a few other bits, and then shelved it for quite a while. Finally got back at it last fall, and have been nibbling away at it ever since. Still have the cams to do, and then have to take a break to make some tooling, need some line-boring bars to finish the cylinders, and need to make a tubing bender for the coolant, fuel, and exhaust.


a look at the crank end of things


Cheers, Joe

Offline dsquire

  • In Memoriam
  • Hero Member
  • *****
  • Posts: 2275
  • Country: ca
  • Kitchener, Ontario, Canada
Re: snow Tandem
« Reply #1 on: March 08, 2010, 02:47:29 AM »
Hi Joe

I would like to take this opportunity to welcome you to MadModders. It looks like you have already caught  :proj:.
It is looking pretty good for starters. I'll be watching your progress here as you post up any updates. It certainly looks like their are lots of interesting pieces in this engine.  :D :D

Cheers  :beer:

Don
« Last Edit: March 08, 2010, 02:51:01 AM by dsquire »
Good, better, best.
Never let it rest,
'til your good is better,
and your better best

Offline Dean W

  • Hero Member
  • *****
  • Posts: 571
  • My kingdom for a lathe!
    • Projects web pages
Re: snow Tandem
« Reply #2 on: March 08, 2010, 02:58:32 AM »
Nice to see this magnificent build making itself known here, Joe.
You're a top hand, Mr.

Dean
Dean W.

Shop Projects:
http://www.deansphotographica.com/machining/projects/projects.html

Praise the Lord and pass the Carbide!

Offline Bernd

  • Madmodder Committee
  • Hero Member
  • *****
  • Posts: 3688
  • Country: us
  • 1915 C Cab
    • Kingstone Model Works
Re: snow Tandem
« Reply #3 on: March 08, 2010, 08:25:46 AM »
Nice start on that engine Joe.

Looking forward to many more posts on your adventure of building this engine.

BTW, Welcome to the collective.  :borg:

Bernd
Route of the Black Diamonds

Rob.Wilson

  • Guest
Re: snow Tandem
« Reply #4 on: March 09, 2010, 07:56:36 AM »
Hi Joe  :wave:

Great job  :bugeye: this is going to be one fine looking engine  :clap: :clap: :clap: :clap:

Cheers Rob

Offline Stilldrillin

  • Global Moderator
  • Hero Member
  • *****
  • Posts: 4972
  • Country: gb
  • Staveley, Derbyshire. England.
Re: snow Tandem
« Reply #5 on: March 09, 2010, 08:17:37 AM »
Hi Joe,  :wave:

Welcome to the collective! We`re a bit of a mixed bunch on here......  :D

That`s some project you`re on with. Looking forward to seeing further progress!  :thumbup:

Enjoy!

David D
David.

Still drilling holes... Sometimes, in the right place!

Still modifying bits of metal... Occasionally, making an improvement!

Offline sbwhart

  • Global Moderator
  • Hero Member
  • *****
  • Posts: 3530
  • Country: gb
  • Smile, Be Happy, Have Fun and Rock Until you Drop
Re: snow Tandem
« Reply #6 on: March 09, 2010, 08:59:17 AM »
Welcome aboard the cube  :borg: Joe

A very nice build of a real interesting engine, I was watching a full size Robey tandem in action recently they are real powerful beasts, this one was used as a winding engine, watched them stop and start it they had to use a donkey engine to wind it over to get the valves in the correct position before they could restart it.

Look forward to following progress.

Have fun

Stew
A little bit of clearance never got in the road
 :wave:

Location:- Crewe Cheshire

Offline madjackghengis

  • Hero Member
  • *****
  • Posts: 717
  • big engine
Re: snow Tandem
« Reply #7 on: March 09, 2010, 10:12:52 AM »
Welcome aboard, Joe, I looked at that engine build with longing, but one has to choose what to focus on, or will end up with more projects than time to accomplish any of them, so I've been hoping to see one of these get a build log going, and watch it come together.  I'm looking forward to seeing the sticky points, and how you get around them, and to the day you put a video on, showing us how she looks running, and hearing her sound off.  I hope you enjoy it as much as I enjoy watching the build.
mad jack :jaw:

Offline Joe d

  • Sr. Member
  • ****
  • Posts: 251
  • Country: ca
Re: snow Tandem
« Reply #8 on: March 09, 2010, 10:50:05 AM »
Well,  thanks for all the comments/welcomes.  Seems that the collective IS assimilating me.....  for those interested, there is a build log over on HMEM here but now that I'm here too, I'll keep you guys up to date as well.

Cheers, Joe

Offline Brass_Machine

  • Administrator
  • Hero Member
  • *****
  • Posts: 5504
  • Country: us
Re: snow Tandem
« Reply #9 on: March 09, 2010, 11:55:43 AM »
That is such a great engine. Saw some about 3 years ago at cabin fever...

Very cool stuff.

Eric
Science is fun.

We're all mad here. I'm mad. You're mad.

Offline Joe d

  • Sr. Member
  • ****
  • Posts: 251
  • Country: ca
Re: snow Tandem
« Reply #10 on: March 30, 2010, 12:52:49 AM »
Well, finished up various tooling side-tracks, and got back to the main event. 

Spent a bit of time to make up a boring bar to line-bore the cylinders:


and a driving dog


and damned near ruined a cylinder assembly as the part shifted during boring... came out with a bore slanting off to the side...I'd bolted a bit of angle to the cross slide, and bolted the cylinder to that, and it was not up to the job. :hammer:

soooooo after a longish pause for recriminations and practising bad words, went back to the 4 jaw, indicated the thing to pretty much zero runout and finished the job that way.  Fixing the boo-boo has left me with a bore that is .0025 bigger than the plans call out, I'll adjust the piston size to fit. 

Once the bore was done, bolted on the head without moving the cylinder and  bored the head for the piston rod bushing


Installed the bushing, and the head cover and reamed them to final dimension


Then turned it around in the chuck, re-indicated as close to dead nuts as I could, and did the 2nd head the same way,
and then all over again for the second cylinder assembly

And here's the stack-up:


This one got me worried for a little while!

Cheers, Joe

Offline Bernd

  • Madmodder Committee
  • Hero Member
  • *****
  • Posts: 3688
  • Country: us
  • 1915 C Cab
    • Kingstone Model Works
Re: snow Tandem
« Reply #11 on: March 30, 2010, 08:51:50 AM »
Nice save Joe.  :thumbup:

To bad that line boring didn't work out for you. Looks like your streching the limits of the Taig there.

Bernd
Route of the Black Diamonds

Offline Joe d

  • Sr. Member
  • ****
  • Posts: 251
  • Country: ca
Re: snow Tandem
« Reply #12 on: April 06, 2010, 11:05:25 AM »
Thanks. Bernd.  There have been a few moments that I'm right on the edge of Taig's envelope ..Moving along... time for pistons & rings

Chucked up a piece of cast iron, turned it to the required diameter, bored to the required ID, and here I'm about to start parting them off


and here's a pile of rings (I need 4, so I should be good even after breaking some in the installation)


The pistons are held on their rods with two set screws at 90* so I turned them oversized, drilled and tapped for the set screws, and then mounted them on the piston rods to act as an arbor to turn to final size and cut the grooves for the rings


And here you need your x-ray vision to see the all where they belong inside the cylinder.  (It's all in there. Trust me.)


Cheers, Joe

Offline Brass_Machine

  • Administrator
  • Hero Member
  • *****
  • Posts: 5504
  • Country: us
Re: snow Tandem
« Reply #13 on: April 06, 2010, 09:02:16 PM »
Looks nice Joe. You make it seem like it is easy stuff. Good job!

Eric
Science is fun.

We're all mad here. I'm mad. You're mad.

Rob.Wilson

  • Guest
Re: snow Tandem
« Reply #14 on: April 08, 2010, 06:14:04 AM »
Hi Joe


Great work  :jaw: :bow: :bow: :bow:


Regards Rob

Offline Joe d

  • Sr. Member
  • ****
  • Posts: 251
  • Country: ca
Re: snow Tandem
« Reply #15 on: April 08, 2010, 08:46:43 PM »
Thanks, Eric.

Rob:  Good to hear from you, mate!  Don't be such a stranger.

Cheers, Joe

Offline Dean W

  • Hero Member
  • *****
  • Posts: 571
  • My kingdom for a lathe!
    • Projects web pages
Re: snow Tandem
« Reply #16 on: April 08, 2010, 11:12:47 PM »
You're doing a mighty fine job, Joe.

Dean
Dean W.

Shop Projects:
http://www.deansphotographica.com/machining/projects/projects.html

Praise the Lord and pass the Carbide!

Offline madjackghengis

  • Hero Member
  • *****
  • Posts: 717
  • big engine
Re: snow Tandem
« Reply #17 on: April 09, 2010, 08:43:37 AM »
Hi Joe, good to see some serious progress on that engine, it's also good to know other people have to adjust the size of their pistons on occasion too, I'd hate to feel alone in that regard.  Nice job, keep it up and we'll see a real show stopper.  mad jack

Offline Joe d

  • Sr. Member
  • ****
  • Posts: 251
  • Country: ca
Re: snow Tandem
« Reply #18 on: April 28, 2010, 11:06:55 AM »
Well, been a while... caught one of the many bugs going around, and have been bloody miserable for most of the last couple of weeks.  Actually stayed home from work one day (I HATE wasting a day off work being ill.)  Anyhow, went in the shop every day, and most days came right back out again, realizing that running machinery was not going to end well.  Slowly starting to get back to normal, so have slowly started to make some progress

Got the honking big chunk of flat ali squared up and drilled here and there for the base plate


Then started on the coolant return manifold, turned the "funnels" that go on the top of the vertical pipes


soft soldered in place


and then soft soldered  them on to a longish bit of pipe that runs back to the coolant tank that isn't built yet


Lots to do still, but it's getting there!

Cheers, Joe

Offline Bernd

  • Madmodder Committee
  • Hero Member
  • *****
  • Posts: 3688
  • Country: us
  • 1915 C Cab
    • Kingstone Model Works
Re: snow Tandem
« Reply #19 on: April 29, 2010, 09:45:30 AM »
Looking googs Joe.  :thumbup:

Sure are a lot of pieces in that engine.

Bernd
Route of the Black Diamonds

Offline DeereGuy

  • Full Member
  • ***
  • Posts: 203
    • D1 Adapter Solutions
Re: snow Tandem
« Reply #20 on: April 29, 2010, 08:42:10 PM »
Ditto...your coming along nicely...keep up the good work.

Offline Joe d

  • Sr. Member
  • ****
  • Posts: 251
  • Country: ca
Re: snow Tandem
« Reply #21 on: April 29, 2010, 09:57:01 PM »
Thanks, guys.

Once it's all done, I'm going to calculate just how many pieces there are.... don't want to know just yet :bugeye:

Joe

Offline madjackghengis

  • Hero Member
  • *****
  • Posts: 717
  • big engine
Re: snow Tandem
« Reply #22 on: April 30, 2010, 07:49:36 AM »
Hi Joe, your build is coming along very well now, you've got quite a bit accomplished, and it's beginning to look like an engine. :thumbup: :thumbup: mad jack

Offline Joe d

  • Sr. Member
  • ****
  • Posts: 251
  • Country: ca
Re: snow Tandem
« Reply #23 on: April 30, 2010, 08:30:14 AM »
Thanks for that mad Jack.... I've been following along on the Radial you're doing... gives me a really bad case of  :proj:

Cheers, Joe

Rob.Wilson

  • Guest
Re: snow Tandem
« Reply #24 on: April 30, 2010, 08:47:23 AM »
Hi Joe  :clap: :clap: :clap: :clap: :clap: :clap:

Your giving me  :proj:   ,,,,,,,,,top job   :bow: :bow: :bow:


Regards Rob

Offline Joe d

  • Sr. Member
  • ****
  • Posts: 251
  • Country: ca
Re: snow Tandem
« Reply #25 on: April 30, 2010, 10:58:28 AM »
Hey Rob

Go for it.  There are a bunch of parts on this thing that could be cast as opposed to machined from barstock.... :clap: :clap: :clap:

Cheers, Joe


Rob.Wilson

  • Guest
Re: snow Tandem
« Reply #26 on: May 01, 2010, 04:13:03 PM »
Hi Joe

You read my mined  :lol: :lol: i was thinking the very same thing ,,,,,,,,,,,,,,,oh so many things to build  :proj:

Regards Rob  :thumbup:

Offline Joe d

  • Sr. Member
  • ****
  • Posts: 251
  • Country: ca
Re: snow Tandem
« Reply #27 on: June 17, 2010, 10:37:39 PM »
Been a while, a number of sadly not machining related things in the way lately, but finally able to pick up where I had left off, with plumbing:  here are the bits for the exhaust manifold, straightforward turning for the flanges, and used the tubing bender I built a little earlier for the first time for real...


Instead of building some complex jig for soldering, used the engine it's self: first the curved pipes into the flanges


and then the bottom end of the curved pipes into the straight section of the manifold


still got some cleaning up to do, some excess flux and a few spots with some wayward solder. ::) ::)

Cheers, Joe

Offline Stilldrillin

  • Global Moderator
  • Hero Member
  • *****
  • Posts: 4972
  • Country: gb
  • Staveley, Derbyshire. England.
Re: snow Tandem
« Reply #28 on: June 18, 2010, 02:15:46 AM »
Very nice to see this is moving on again, Joe.  :wave:

Neat work, adding to the already completed, neat work......  :thumbup:

Well done!  :clap:

David D
David.

Still drilling holes... Sometimes, in the right place!

Still modifying bits of metal... Occasionally, making an improvement!

Offline Joe d

  • Sr. Member
  • ****
  • Posts: 251
  • Country: ca
Re: snow Tandem
« Reply #29 on: July 01, 2010, 11:32:01 AM »
Thanks, David.

Got some more done in between some surprise honeydo's... :wack:

Tried out the fit of the exhaust manifold with the coolant return in place, and was not at all pleased, the curved pipes of the manifold were just touching the coolant return pipe.... not visually pleasing at all.  so, faffed around for the best part of a week, made new dies for the tubing bender to try to form a tighter curve for the manifold pipe (in several sizes) and used up all the tubing I had on hand with no useful result... so then went with plan B, and put an "s" bend in the coolant inlet and return pipes, and it looks a lot better to me now.
This will change the size of the outlet pipes from the water jacket, no biggie.  :hammer:

That done, moved on to the fuel intake manifold.  First up: cut a little piece off of my secret stash of 1/2" brass..


after a little milling & drilling, cut and bent some tubing, and here are the bits


Again used the engine as the soldering jig


and here's all the plumbing done to date,


and, couldn't resist sticking it all together to have a look


The fitting in the centre of the intake manifold still needs a bit to hold the carb, I'll make it to fit the carb once I've acquired one...
otherwise in plumbing only got the 4 little bits left to do that return the coolant from the water jacket to the coolant return manifold

Cheers, Joe

Offline Brass_Machine

  • Administrator
  • Hero Member
  • *****
  • Posts: 5504
  • Country: us
Re: snow Tandem
« Reply #30 on: July 01, 2010, 10:48:45 PM »
Wow. Nice pipework Joe!

Eric
Science is fun.

We're all mad here. I'm mad. You're mad.

Offline Joe d

  • Sr. Member
  • ****
  • Posts: 251
  • Country: ca
Re: snow Tandem
« Reply #31 on: July 04, 2010, 10:30:46 PM »

Thanks, Eric

Almost the end of plumbing :ddb:
Turned some brass to make flanges


Bent some tubing with the shop-built tubing bender


Here's all the parts together, shaped the flanges by hand with a file, seemed like way too much mucking around to machine it for four pieces whose only critical point is the fit of the tubing  ::)


soldered together,


And here they are in place. Coolant from the water jacket exits through these assemblies, squirts into the funnels to return to the coolant tank.


Fuel tank or coolant tank next, haven't quite decided...

Cheers, Joe

Offline madjackghengis

  • Hero Member
  • *****
  • Posts: 717
  • big engine
Re: snow Tandem
« Reply #32 on: July 05, 2010, 09:37:28 AM »
Hi Joe, it's been a while since I looked at your build log, and I have to say you've done some very fine work and the engine is coming along smashing.  I think it won't very long before you are posting a video of it running, and we get to see and hear what one of these unique engines look and sound like in operation.  The pipe work looks beautiful, the different metals are doing a bang up job of drawing the eyes to the details, and it is quite impressive looking and makes me a bit envious.  Outstanding job and patience. :bow: :bugeye: :jaw: mad jack

Rob.Wilson

  • Guest
Re: snow Tandem
« Reply #33 on: July 05, 2010, 11:37:35 AM »
 :bugeye: fine bit of pipe work Joe  :bow: :bow: :bow: your making good use of the pipe bender  :dremel:

Rob

Offline Joe d

  • Sr. Member
  • ****
  • Posts: 251
  • Country: ca
Re: snow Tandem
« Reply #34 on: July 06, 2010, 12:05:11 AM »
and makes me a bit envious.   mad jack

Mad jack:  I've been following your radial build....no need for any envy on your part :thumbup:  thanks none the less for the kind comments.

Thanks Rob. 

Decided to get going on the fuel tank, and I know that  :worthless: so there will be some soon.

Joe

Offline Joe d

  • Sr. Member
  • ****
  • Posts: 251
  • Country: ca
Re: snow Tandem
« Reply #35 on: July 09, 2010, 12:57:03 AM »


Got going on the fuel tank assembly.  Needed some 1/4" ali angle, only had 1/2" :bang: so milled off the extra bit


the base is just a bit of ali with a few holes drilled & tapped, here's where that angle goes, and the start on the cross pieces that will hold up the tank


decided to make some brackets for the u-bolts that will secure the tank.  The plans had simply called out bending over a little tab on each side of the cross piece, but that would have been too easy :hammer:.  Set up a piece of ali in the mill, and did everything I could in that set up


then parted them off


a little fussing about with some files, and here we are


Now I need a tank to go on the base, started out by truing up the ends of a bit of tube


and that's where it is at the moment.  Not sure how much will get done in the next little while, Number One son is due home on leave from the Navy on Saturday :beer: :beer:, so shop time will no doubt be curtailed.

Cheers, Joe

Offline Bernd

  • Madmodder Committee
  • Hero Member
  • *****
  • Posts: 3688
  • Country: us
  • 1915 C Cab
    • Kingstone Model Works
Re: snow Tandem
« Reply #36 on: July 09, 2010, 01:34:51 AM »
Those brakets look nice Joe. :thumbup:

That's what makes an excellent model is the little details like that.

Bernd
Route of the Black Diamonds

Offline Stilldrillin

  • Global Moderator
  • Hero Member
  • *****
  • Posts: 4972
  • Country: gb
  • Staveley, Derbyshire. England.
Re: snow Tandem
« Reply #37 on: July 09, 2010, 02:24:04 AM »
Those brakets look nice Joe. :thumbup:

That's what makes an excellent model is the little details like that.

Bernd

Wot Bernd said!  :thumbup:

Really excellent detailing.......  :clap:

David D
David.

Still drilling holes... Sometimes, in the right place!

Still modifying bits of metal... Occasionally, making an improvement!

Offline Joe d

  • Sr. Member
  • ****
  • Posts: 251
  • Country: ca
Re: snow Tandem
« Reply #38 on: July 12, 2010, 12:30:59 AM »
Bernd and David: thanks, guys

Managed to get some shop time after all, so got a little further along with the tank..

Turned the end caps


The plans call for one end to made of lucite in order to see the state of the fuel supply.  I didn't much care for this idea ::), so instead I've milled a slot for a rather more discrete fuel gauge


Then started on the bosses for fuel in and fuel out.... they need a radius to match the tank, so set them up on the face plate and not only did two at once, balanced the load on the lathe too! :smart:


Once done with the radii, turned them around in the four-jaw, and drilled them through, and added a very slight counterbore, and tapped the filler boss


the fuel out boss was just finished off with a hacksaw and files, but the filler boss got a little turning...made up a quick & dirty mandrel with the matching thread, and cut a taper on it just for the look of it


Here's the state of play tonight:  stuck little bits of pipe in the counter-bores in each of the bosses, these will serve to locate the bosses in place on the tank so they won't slide around whilst waiting for the glue to dry, glued a bit of clear Plexiglas in the slot for the fuel gauge, and glued the blind tank end in place.


Still have to drill the holes for the bosses, stick'em in place, and then can locate the other tank end with the slot vertical in relation to the bosses... also have to make the filler cap (again) and (again) as so far there are two failed attempts in the save it for another possible use bin..... :bang: :bang:

Cheers, Joe

Offline madjackghengis

  • Hero Member
  • *****
  • Posts: 717
  • big engine
Re: snow Tandem
« Reply #39 on: July 12, 2010, 09:38:53 AM »
Well Joe, you look like you're making some real progress, I think you made the right decision regarding the tank end, and the slot for a fuel gauge rather than the whole end.  No matter what, gas eats plastic eventually, and you always end up replacing the part sooner or later, better a small rectangle of plastic than a whole tank end.  Looks like a good job, it should go nicely with the whole look of the tandem, when it is done, fine job.  :thumbup: mad jack

Offline Joe d

  • Sr. Member
  • ****
  • Posts: 251
  • Country: ca
Re: snow Tandem
« Reply #40 on: July 13, 2010, 07:49:10 AM »
Thanks, mad jack.  Well, except for the filler cap :bang:  , fuel tank is done :ddb:

Set up some steel rod in a collet for threading each end 0-80 for u-bolts


glued the bosses in place, the other end of the tank, a bit of cleaning up and assembly, and here we are!


From the other side:


next up: coolant resevoir

Cheers Joe

Offline Dean W

  • Hero Member
  • *****
  • Posts: 571
  • My kingdom for a lathe!
    • Projects web pages
Re: snow Tandem
« Reply #41 on: July 14, 2010, 01:55:30 AM »
It sure looks great, Joe.  Gets prettier every post!

Dean
Dean W.

Shop Projects:
http://www.deansphotographica.com/machining/projects/projects.html

Praise the Lord and pass the Carbide!

Offline Joe d

  • Sr. Member
  • ****
  • Posts: 251
  • Country: ca
Re: snow Tandem
« Reply #42 on: July 14, 2010, 10:59:45 AM »
Thanks Dean

Dove in and made a few mods  :mmr: to the stand that holds up the tank, as I just didn't like the look of the original  :(


Here's the fuel tank with the MkII stand


from another angle


Like this one better...

Cheers, Joe

Offline Joe d

  • Sr. Member
  • ****
  • Posts: 251
  • Country: ca
Re: snow Tandem
« Reply #43 on: July 19, 2010, 10:41:51 PM »

Got on with the coolant tank after re-working the fuel tank stand.  Started out by truing up some 3" OD ali tube, and then cleaning up the exterior


A straightforward bit of turning and boring for the top


Set up the stock for the base on the rotary table to mill the recess that the tank body sits in


Then used the base-plate as it's own template for locating the mounting holes on the wooden base


Made up the inlet and outlet fittings, a replay of the bits for the fuel tank, so no photo of that, and then stuck it all together with some more two-part epoxy (with my carefully hoarded chunks of cast iron weighing things down while the epoxy sets up)


And here it is where it belongs.


Getting close to the finish line now, only got the coolant pump, cams, carb, and a few oilers left to machine, and then its assembly and start figuring out why it won't run..... :scratch: :scratch:

Cheers, Joe

Offline Joe d

  • Sr. Member
  • ****
  • Posts: 251
  • Country: ca
Re: snow Tandem
« Reply #44 on: July 26, 2010, 09:14:50 PM »
Hi all

Got started on the coolant pump.  The plans called for using a submersible electric pump in the reservoir, didn't much care for that, so after asking a few questions  decided to go with Jerry Howell's magnetic drive pump.  Of course, I can't just follow the plans, so there have been a few modifications already... :)

I didn't have an appropriate piece of round stock, so soldered a temporary spigot on a chunk of my secret stash of 1/2" plate brass, and then turned the spigot so it would run true


Turned it round, reversed it in the chuck and machined off the spigot in the process of hollowing out the piece, then silver brazed it to a piece of flat stock..
(and, if you look closely, just behind the firebrick you can see the first one, stuffed it up drilling the bolt circle...      :hammer:.)


Jerry's plans call for a delrin piece threaded into the brass body to hold the impeller in place.  I still don't have a thread-cutting lathe, so left the hole in the pump body un-threaded, will also not thread the delrin insert, and will hold it together with this clamping ring


Next up is the impeller, turned the blank with a shoulder on the bottom to facilitate holding it on the rotary table with a strap of spare ali, off-set it to mill the slots, re-centred and drilled the holes for the magnets, after this re-chucked it in the lathe and turned off the shoulder


and here is the delrin piece ready for parting off.  First time I've machined this stuff, boy it sure cuts easily with a nice finish.  Nice soft non-cut-causing swarf, too  :clap:


Made the pulley for the thing, and then added it to the pile of parts that don't fit, so next up will be another one.... and inlet & outlet bits.

Cheers, Joe

Offline Stilldrillin

  • Global Moderator
  • Hero Member
  • *****
  • Posts: 4972
  • Country: gb
  • Staveley, Derbyshire. England.
Re: snow Tandem
« Reply #45 on: July 27, 2010, 03:23:40 AM »
Joe, I love machining delrin, when I get the opportunity.

Sorry, no other comment to make......  :scratch:

Enjoying every pic. Every description. Watching it grow.......  :thumbup:

Keep on, keeping on!   :D

David D
David.

Still drilling holes... Sometimes, in the right place!

Still modifying bits of metal... Occasionally, making an improvement!

Offline Joe d

  • Sr. Member
  • ****
  • Posts: 251
  • Country: ca
Re: snow Tandem
« Reply #46 on: August 01, 2010, 11:11:55 PM »
Thanks, Dave, still keeping on here! :ddb:


Got a bit further with the pump:


Turned the driven pulley that in turn moves the impeller.  Looks like a real simple part, huh?  This danged thing took me three tries: overbored the hole for the bearings in the first one,  :hammer: the tool grabbed the second one out of the 4-jaw and tossed it across the shop leaving un-recoverable dings, :hammer: :hammer: the third one came out OK


Then turned the driving pulley, this one worked out first time :clap:


soldered the inlet and outlet to the pump body


made up a mounting bracket, here it is with the rest of the parts


And here they are stuck together.


Still have to test it moving some fluid,  :beer: and then mount it on the base of the engine.

Cheers, Joe

Offline Bernd

  • Madmodder Committee
  • Hero Member
  • *****
  • Posts: 3688
  • Country: us
  • 1915 C Cab
    • Kingstone Model Works
Re: snow Tandem
« Reply #47 on: August 02, 2010, 07:02:48 PM »
Hey Joe,

In that last picture, is that the "over bored hole"?  :lol: :lol:

Lookin' good. Can't wait to see it all in one piece. Nice solder job BTW.

Bernd
Route of the Black Diamonds

Offline Joe d

  • Sr. Member
  • ****
  • Posts: 251
  • Country: ca
Re: snow Tandem
« Reply #48 on: August 04, 2010, 10:24:16 AM »
Hey Bernd.  That's the "I evidently needed the practice hole" :bang: :bang: :bang:


Got the bench test done on the pump, we have circulation!  :ddb: :ddb: Here's a very short video thereof...


Here it is stuck in place


And with the flywheel in place.  The clearance was dictated by the belt I had on hand.. sometimes ya gits lucky! :thumbup:


the other side


not much left now...

Joe

Offline Stilldrillin

  • Global Moderator
  • Hero Member
  • *****
  • Posts: 4972
  • Country: gb
  • Staveley, Derbyshire. England.
Re: snow Tandem
« Reply #49 on: August 04, 2010, 10:35:17 AM »
"And with the flywheel in place.  The clearance was dictated by the belt I had on hand.. sometimes ya gits lucky! "

Nah!

Don't go selling yourself short Joe...... That was precise forward planning!   :thumbup:

Well done, again!  :clap:

David D
David.

Still drilling holes... Sometimes, in the right place!

Still modifying bits of metal... Occasionally, making an improvement!

Offline Joe d

  • Sr. Member
  • ****
  • Posts: 251
  • Country: ca
Re: snow Tandem
« Reply #50 on: August 11, 2010, 12:01:45 PM »

That was precise forward planning!   :thumbup:David D

Sure you haven't been listening over my shoulder as I try to claim that with the Mrs? ::)

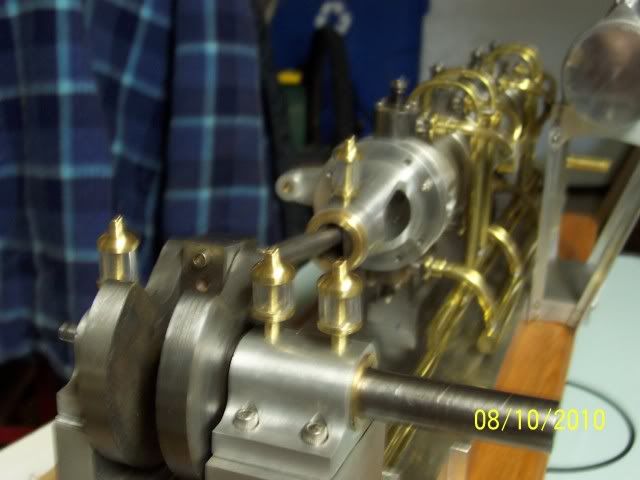
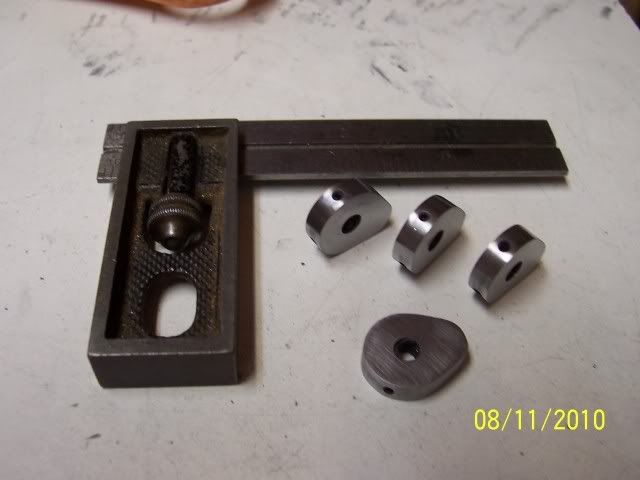
Made up the oilers, they are mostly decorative, the reservoir doesn't actually hold any oil, but the centre shaft is drilled through so that an occasional drop can be put through to the bearings
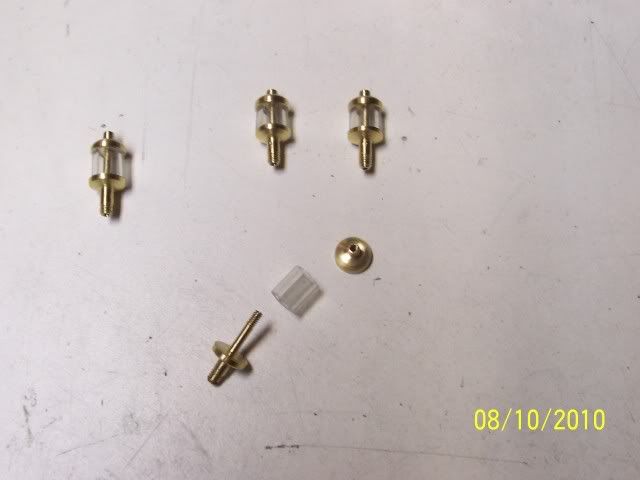

they go here:


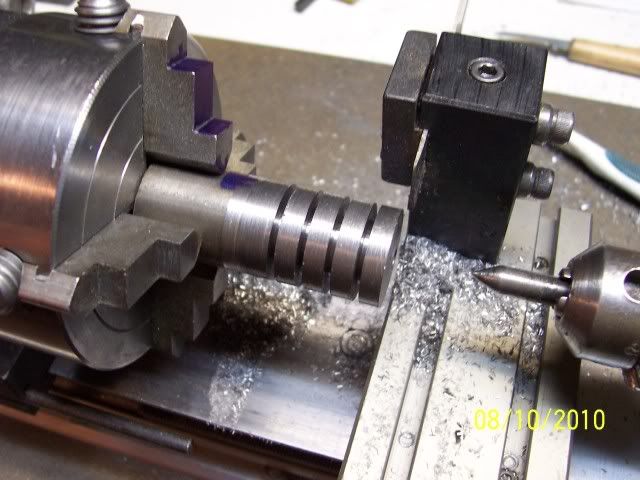
Got the cams out of the way... :ddb:

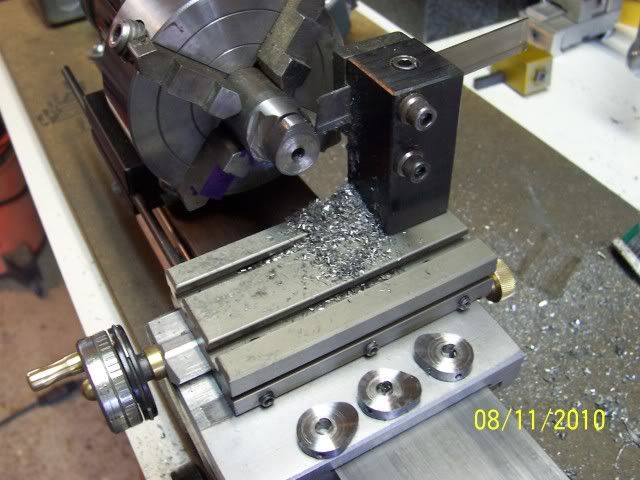
trued up a chunk of steel in the lathe, drilled & reamed for the cam shaft, popped in a temporary dead centre, and cut a little deeper than the minor dia with a parting tool, this way once all the other machining is done, I can can come back and part them off without an interrupted cut


off to the mill to whittle away everything that doesn't look like a cam... :dremel: used a fly cutter, and rotated the stock a very approximate 10-15 degrees per cut,


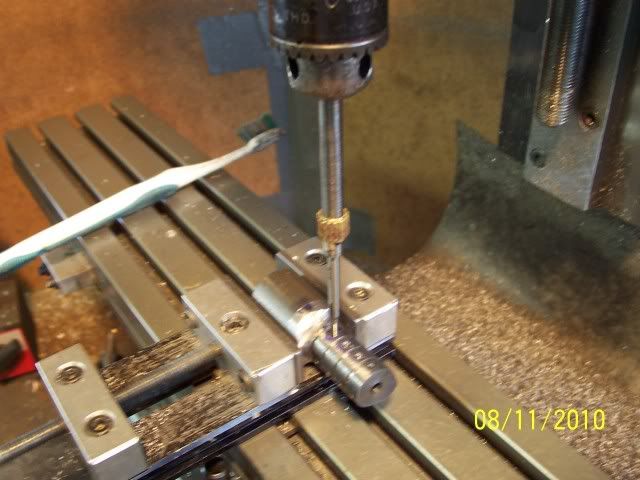
cleaned it up on the belt sander to remove all the little facets left from the milling, and them back in the mill for drilling and tapping for set-screws


then back in the lathe for parting off, easy-peasy to pick up the original parting cuts :headbang:


and then some fairly finger-numbing cleaning up with numerous ascending grits of sand paper...and ta-dah: some cams!


This thing is soooo close... :ddb: :ddb: I've got to make or acquire a carb, make the fitting to attach said carb to the fuel intake manifold, cut 4 gaskets for the coolant outlets,  install the fuel line, and.... and..... dang, nothing else left to machine! The rest is all assembly.

(Of course, then the re-making of some parts will no doubt ensue....)

Cheers, Joe

Offline dsquire

  • In Memoriam
  • Hero Member
  • *****
  • Posts: 2275
  • Country: ca
  • Kitchener, Ontario, Canada
Re: snow Tandem
« Reply #51 on: August 11, 2010, 02:22:38 PM »
Joe

Looking pretty good there. Won't be long now and it will be sputtering and coughing then clearing its throat and purring like a kitten. Wonderful job joe.  :ddb: :ddb: :ddb:

Cheers  :beer:

Don

Good, better, best.
Never let it rest,
'til your good is better,
and your better best

Offline Brass_Machine

  • Administrator
  • Hero Member
  • *****
  • Posts: 5504
  • Country: us
Re: snow Tandem
« Reply #52 on: August 11, 2010, 03:26:50 PM »
Nice job Joe!

Waiting anxiously for the video of it running!

Eric
Science is fun.

We're all mad here. I'm mad. You're mad.

Offline Joe d

  • Sr. Member
  • ****
  • Posts: 251
  • Country: ca
Re: snow Tandem
« Reply #53 on: September 06, 2010, 12:59:59 PM »
Thanks, Eric, me too!

Got busy and painted the parts that need painting, and then stopped faffing about and started building a carb instead of buying one... made up the carb body: squared up some ali in the mill, bored, drilled, tapped, turned bosses, taper-turned for venturi, neglected to take any "in progress" photos, so here it is done:


with the dimension established by the body, I could now make the fitting to attach the thing to the manifold, turned, drilled, and bored


soldered it to the the piece that joins the two halves of the intake manifold


and here's all the bits where they belong:


Still have to make the barrel, so, unless I've missed something somewhere, I have got

ONE PIECE LEFT TO MACHINE  :ddb: :ddb:

Cheers, Joe