Author Topic: The Eddgwick arrived!  (Read 32001 times)

Offline mattinker

  • Hero Member
  • *****
  • Posts: 1316
  • Country: fr
The Eddgwick arrived!
« on: June 12, 2015, 01:28:32 PM »
It arrived yesterday, intact! I was more than a little anxious. Shipping by road a machine that isn't crated is bad enough, but without being there to see it loaded, is worse. The driver showed up yesterday without warning, I'd asked that he telephone me half an hour before arriving. So a bit caught short, I jump started the neighbours fork lift that hasn't been used in two years. Off I went, I hadn't brought the strop that I'd planned to use if there was a problem with the pallet. Transit had not been kind to the pallet, it looked doubtful and was! I had to get the lathe unloaded quickly as buses were having problems getting by. I got it out and onto the ground. I then spent some time getting the forks out from under the disintegrated pallet without it falling over, a couple of hours later, hanging from a strop it was in my workshop. Exhausted, I left it until today to have a look at it. There were quite a few things with it that I didn't expect.


Mostly Imperial reamers.

A usable selection of high-speed steel and carbide tooling.


The milling cutters and slitting saws should come in handy.


The fixed steady is original and fits.


The four jaw and the face plate were a surprise, they are both screw fitting and don't fit the bolt up chuck mount!


I thought of John Mills carefully oiling chuck mounting threads when I saw this!
The previous owner said he'd had the lathe for twelve years, he'd obviously never use anything but the three jaw chuck!

I put a plug on it today and ran it, everything worked. Didn't make any chips, but that'll be soon!

Adev, if you found out anything more on the specifications for the oil I'd love to hear from you.

More later, regards, Matthew


Offline awemawson

  • Global Moderator
  • Hero Member
  • *****
  • Posts: 8968
  • Country: gb
  • East Sussex, UK
Re: The Eddgwick arrived!
« Reply #1 on: June 12, 2015, 01:33:21 PM »
Matthew that's excellent that it's arrived safely - I now look forwards to the ongoing story of it rising Phoenix like from it's neglected state. :thumbup:
Andrew Mawson
East Sussex

Offline vtsteam

  • Global Moderator
  • Hero Member
  • *****
  • Posts: 6466
  • Country: us
  • Republic of Vermont
Re: The Eddgwick arrived!
« Reply #2 on: June 12, 2015, 01:51:36 PM »
 :clap: :clap: :clap: :clap: :clap: :clap: :clap: :clap: :clap: :clap: :clap: :clap: :clap: :clap: :clap: :beer:
I love it when a Plan B comes together!
Steve
https://www.youtube.com/watch?v=4sDubB0-REg

Offline John Rudd

  • Hero Member
  • *****
  • Posts: 2526
  • Country: gb
Re: The Eddgwick arrived!
« Reply #3 on: June 12, 2015, 02:06:13 PM »
Great ending to the story....

I hope you and your new machine have a happy relationship :clap:
eccentric millionaire financed by 'er indoors
Location:  Backworth Newcastle

Skype: chippiejnr

Online hermetic

  • Hero Member
  • *****
  • Posts: 771
  • Country: england
Re: The Eddgwick arrived!
« Reply #4 on: June 12, 2015, 02:21:54 PM »
Good news Matt. and a cracking lathe to boot! Hope you are feeling better!
Phil
Man who says it cannot be done should not disturb man doing it! https://www.youtube.com/user/philhermetic/videos?

Offline mattinker

  • Hero Member
  • *****
  • Posts: 1316
  • Country: fr
Re: The Eddgwick arrived!
« Reply #5 on: June 12, 2015, 03:49:24 PM »
Thanks Guys, I'm still wiped-out!

I just went a little mad and ordered my compromise DRO, it's not as expensive as a full blown DRO, but as I work in metric a lot this suits me.

http://www.ebay.com/itm/Igaging-3-Piece-set-6-12-36-Digital-Readout-Read-Out-DRO-w-Remote-display-/131049270885?

It's not the cheapest one on the market, but it's the cheapest I've found that will ship to France! I have an idea for making up for the 7" inches in length for the very rare occasion when I might need more than 35".

Regards, mùatthew

Offline John Rudd

  • Hero Member
  • *****
  • Posts: 2526
  • Country: gb
Re: The Eddgwick arrived!
« Reply #6 on: June 12, 2015, 04:14:57 PM »
Arc Eurotrade sell the very same scales,.....,

Should have said, you were buying......could have bought them here and sent out to you.... :doh:
eccentric millionaire financed by 'er indoors
Location:  Backworth Newcastle

Skype: chippiejnr

Offline mattinker

  • Hero Member
  • *****
  • Posts: 1316
  • Country: fr
Re: The Eddgwick arrived!
« Reply #7 on: June 12, 2015, 04:28:22 PM »
It would have been better, I could have got the longer scales, but the three scales come out at about the same price when calculating the exchange rate and shipping! Never mind, it's too late now!

Regards, Matthew

Offline John Rudd

  • Hero Member
  • *****
  • Posts: 2526
  • Country: gb
Re: The Eddgwick arrived!
« Reply #8 on: June 12, 2015, 04:30:57 PM »
Matt,
Pm sent .....
eccentric millionaire financed by 'er indoors
Location:  Backworth Newcastle

Skype: chippiejnr

Offline chipenter

  • Hero Member
  • *****
  • Posts: 909
  • Country: gb
Re: The Eddgwick arrived!
« Reply #9 on: June 13, 2015, 03:06:11 AM »
Those scales turn into ramdom number generators iff they get coolant inside , I must make a cover for mine .
Jeff

RobWilson

  • Guest
Re: The Eddgwick arrived!
« Reply #10 on: June 13, 2015, 03:17:12 AM »
Nice one Matthew  :clap: :thumbup:

It's good to see the lathe fined a new home  and given a new lease of life :dremel:


Rob

Offline Pete W.

  • Hero Member
  • *****
  • Posts: 852
  • Country: gb
Re: The Eddgwick arrived!
« Reply #11 on: June 13, 2015, 05:23:29 AM »
Hi there, Matthew,

Have I missed the first part of this story?   :scratch:   :scratch:   :scratch: 
Best regards,

Pete W.

If you can keep your head when all about you are losing theirs, you haven't seen the latest design change-note!

Offline RussellT

  • Hero Member
  • *****
  • Posts: 520
  • Country: gb
Re: The Eddgwick arrived!
« Reply #12 on: June 13, 2015, 05:37:42 AM »
The lathe looks OK - a bit better in your photos than the original listing.  I'm curious to know - what's the verdict on the cross slide hand wheel?

Is it safe to assume that transport cost more than the lathe?

Russell
Common sense is unfortunately not as common as its name suggests.

Offline mattinker

  • Hero Member
  • *****
  • Posts: 1316
  • Country: fr
Re: The Eddgwick arrived!
« Reply #13 on: June 13, 2015, 07:43:50 AM »
Hi there, Matthew,

Have I missed the first part of this story?   :scratch:   :scratch:   :scratch:

Yep! It started out as:-
http://madmodder.net/index.php/topic,10710.msg124393.html#msg124393
Regards, Matthew

Offline mattinker

  • Hero Member
  • *****
  • Posts: 1316
  • Country: fr
Re: The Eddgwick arrived!
« Reply #14 on: June 13, 2015, 07:53:53 AM »
Those scales turn into ramdom number generators iff they get coolant inside , I must make a cover for mine .

Thanks for the heads up, I suspected as much, I've had that experience with calipers! They're a compromise!

Regards, Matthew.

Offline mattinker

  • Hero Member
  • *****
  • Posts: 1316
  • Country: fr
Re: The Eddgwick arrived!
« Reply #15 on: June 13, 2015, 07:55:23 AM »
Nice one Matthew  :clap: :thumbup:

It's good to see the lathe fined a new home  and given a new lease of life :dremel:


Rob

Thanks Rob!!

Offline mattinker

  • Hero Member
  • *****
  • Posts: 1316
  • Country: fr
Re: The Eddgwick arrived!
« Reply #16 on: June 13, 2015, 08:06:22 AM »
The lathe looks OK - a bit better in your photos than the original listing.  I'm curious to know - what's the verdict on the cross slide hand wheel?

Is it safe to assume that transport cost more than the lathe?

Russell

The verdict isn't completely out on the cross-slide. I haven't dismantled it yet, but as far as I can see, it needs a touch of straightening and either welding a stub on the end or building up with weld and machining. The hand-wheel is in good shape and the broken stub has already been removed.

You safely assumed right! I got a good deal on the Transport, but it was still more expensive than the lathe at €348 including VAT the lathe was €212 at the current exchange rate. I'm pleased, that's less than a similar lathe here without transport!

Regards, Matthew.

Offline mattinker

  • Hero Member
  • *****
  • Posts: 1316
  • Country: fr
Re: The Eddgwick arrived!
« Reply #17 on: June 13, 2015, 08:14:14 AM »
Some thoughts,

As the lathe has no reverse, it would be extremely difficult to cut metric threads as is. I have everything I need to set up a reversing switch, so it's a question of time.

The suds pump is missing so it looks like it's going to be an indoor fountain pump!

The bed wear is quite high, I haven't measured it yet, but I'm having thoughts about making a grinding jig to regrind them.

Any thoughts would be welcome! Regards, Matthew

Offline AdeV

  • Madmodder Committee
  • Hero Member
  • *****
  • Posts: 2434
  • Country: gb
Re: The Eddgwick arrived!
« Reply #18 on: June 14, 2015, 05:07:19 AM »
Hi Matt,

Great to see the old girl made it! Looking forward to seeing some chips made...

Making a screw adapter to take the backplate shouldn't be too taxing? If you can cut a piece of steel to fit the bolt-up flange, then simply machine a nose with some threads on it, and you're good to go. I was lucky, I got a proper Edgwick backplate that bolts straight on. I've only used it once, though, now I've got a 3-jaw that fits & is reasonably accurate, I mostly use that.

Regarding metric screwcutting - the gearbox will handle that, and the screw cutting dial that should be fitted will work properly, so you don't need a reverse. Just disconnect the half nut, run back to the start, and use the dial to re-engage. Or just use dies like I do  :beer:

Oil - Any decent hydraulic oil should do. I use this stuff: http://www.lubetechshop.co.uk/product_info.php?cPath=25_40&products_id=86 I use that on the ways & tailstock as well, although having more recently bought some proper slideway oil, I'll probably switch to that for the bed/tailstock.
Cheers!
Ade.
--
Location: Wallasey, Merseyside. A long way from anywhere.
Occasionally: Zhengzhou, China. An even longer way from anywhere...

Offline mattinker

  • Hero Member
  • *****
  • Posts: 1316
  • Country: fr
Re: The Eddgwick arrived!
« Reply #19 on: June 14, 2015, 08:32:47 AM »
Hi Matt,

Great to see the old girl made it! Looking forward to seeing some chips made...

Making a screw adapter to take the backplate shouldn't be too taxing? If you can cut a piece of steel to fit the bolt-up flange, then simply machine a nose with some threads on it, and you're good to go. I was lucky, I got a proper Edgwick backplate that bolts straight on. I've only used it once, though, now I've got a 3-jaw that fits & is reasonably accurate, I mostly use that.

Regarding metric screwcutting - the gearbox will handle that, and the screw cutting dial that should be fitted will work properly, so you don't need a reverse. Just disconnect the half nut, run back to the start, and use the dial to re-engage. Or just use dies like I do  :beer:

Oil - Any decent hydraulic oil should do. I use this stuff: http://www.lubetechshop.co.uk/product_info.php?cPath=25_40&products_id=86 I use that on the ways & tailstock as well, although having more recently bought some proper slideway oil, I'll probably switch to that for the bed/tailstock.

Thanks AdeV,
As you say, making adapter plates shouldn't be to challenging! They are pretty certainly Whitworth, which the gearbox will handle fine!  I'm not sure that I agree about the dial to re-engage metric threads! A metric lead screw has a different type of thread dial, this is because they are not fractional, from what I can gather, three gears are required instead of one to make a metric thread dial work. As this is a 4TPI lead-screw, geared to produce metric threads, the ration may not be repeatable! There is a brass plate on the carriage, photo below, pretty badly damaged, the last two lines read,

 "For any "illegible odd?" Whitworth pitches and all metric threads, keep guide screw nut engaged and return saddle by reversing feed clutch."


I hadn't deciphered the plate when I wrote about reversing. Do you have the plate? Is it legible? It would be nice to be able to know which marks on the thread dial correspond with what!

Thanks for the info about the oil, I'm new to this kind of gearbox.

Regards, Matthew


Offline Pete.

  • Hero Member
  • *****
  • Posts: 1075
  • Country: gb
Re: The Eddgwick arrived!
« Reply #20 on: June 14, 2015, 09:43:54 AM »
You can use that method for all screwcutting which would make the dial redundant unless you want to start making multi-start threads.

Offline AdeV

  • Madmodder Committee
  • Hero Member
  • *****
  • Posts: 2434
  • Country: gb
Re: The Eddgwick arrived!
« Reply #21 on: June 14, 2015, 10:11:02 AM »
Yes, I have that plate on mine - unfortunately, although complete, it's so badly bashed about that I can't read it. I'll get my camera with macro lens on it later, hopefully with a suitably big & clear picture I can make out the missing bits. My mobile phone camera just isn't good enough.
Cheers!
Ade.
--
Location: Wallasey, Merseyside. A long way from anywhere.
Occasionally: Zhengzhou, China. An even longer way from anywhere...

Offline vtsteam

  • Global Moderator
  • Hero Member
  • *****
  • Posts: 6466
  • Country: us
  • Republic of Vermont
Re: The Eddgwick arrived!
« Reply #22 on: June 14, 2015, 10:22:39 AM »
I've made out essentially invisible writing on unreadable tractor tags like that by shooting with a decent camera, and then cranking up the magnification, contrast and/or brightness values in a photo editor. You'd be amazed what it can show up.  :thumbup:
I love it when a Plan B comes together!
Steve
https://www.youtube.com/watch?v=4sDubB0-REg

Offline AdeV

  • Madmodder Committee
  • Hero Member
  • *****
  • Posts: 2434
  • Country: gb
Re: The Eddgwick arrived!
« Reply #23 on: June 14, 2015, 10:34:11 AM »
Well, I just did a little experiment - and you're dead right, the screw cutting dial does not work for metric threads...

I'll just stick with Whitworth... :)

IIRC, from watching an American lathe tutorial, even TPIs can start on any number or half number & will thread correctly. Odd numbers I think have to go on the whole number only. But, I could be wrong, it's been a long time since I watched that video.
Cheers!
Ade.
--
Location: Wallasey, Merseyside. A long way from anywhere.
Occasionally: Zhengzhou, China. An even longer way from anywhere...

lordedmond

  • Guest
Re: The Eddgwick arrived!
« Reply #24 on: June 14, 2015, 11:01:46 AM »
This may be of help assuming your gearbox can produce the metric pitch

It shows that you can disengage the half nuts


Stuart
« Last Edit: June 14, 2015, 12:58:46 PM by dsquire »

Offline Pete.

  • Hero Member
  • *****
  • Posts: 1075
  • Country: gb
Re: The Eddgwick arrived!
« Reply #25 on: June 14, 2015, 11:23:25 AM »
You CAN do it, but since you have to reverse the lathe either way you might as well wind it back with the half-nuts closed.

Offline awemawson

  • Global Moderator
  • Hero Member
  • *****
  • Posts: 8968
  • Country: gb
  • East Sussex, UK
Re: The Eddgwick arrived!
« Reply #26 on: June 14, 2015, 11:51:19 AM »
But Ox's way means you don't have to stop the lathe quickly - so coming up to a shoulder is more 'relaxed' !
Andrew Mawson
East Sussex

Offline RussellT

  • Hero Member
  • *****
  • Posts: 520
  • Country: gb
Re: The Eddgwick arrived!
« Reply #27 on: June 14, 2015, 12:33:54 PM »
Making a screw adapter to take the backplate shouldn't be too taxing

I wondered whether the two extra holes in the back plate were there for bolting it straight to the spindle?

Russell
Common sense is unfortunately not as common as its name suggests.

Offline Pete.

  • Hero Member
  • *****
  • Posts: 1075
  • Country: gb
Re: The Eddgwick arrived!
« Reply #28 on: June 14, 2015, 01:41:50 PM »
But Ox's way means you don't have to stop the lathe quickly - so coming up to a shoulder is more 'relaxed' !

Yeah it does have the advantage when threading to a shoulder.

Offline mattinker

  • Hero Member
  • *****
  • Posts: 1316
  • Country: fr
Re: The Eddgwick arrived!
« Reply #29 on: June 14, 2015, 02:37:49 PM »
Thank you all, I'm putting my bad memory down to heavy metals, I had actually seen the Ox tools video, completely forgot it, maybe, now that I have a lathe with a thread indicator I might just remember the technique! Definitely take the panic out of things!

Russel, the face plate wont bomt up, there is a boss on the back, modification is going to be in order.

Thanks AdeV, I haven't cleaned up my thread indicator plate much yet, I could probably do better! Steve's photo editing methods should improve things.

Building up the end of the shaft.


The shaft was broken between the hand wheel and the dial. Underneath the dial, was a buton to adjhust the friction on the dial. A screw in the shaft pushed against a taper, pushing out the friction piece. You can see where the shaft had been heated to remove or straighten it. The bearing part of the shaft is straight and untouched.


I was lucky, I got the wedge out easily!


I began by building up on the side opposite the bend.


more building up. I used some Castolin rods that I bought for welding railway track! They don't quench harden. I was able to keep the shaft both cool and soft.


Faced off and centre drilled.


Turning down the weld.


As the bearing part of the shaft was untouched it was relatively easy to cut the major diameter.


It's not very photogenic! This was after a little touch up with emery paper, it looks better "in the flesh"!


All the bits fit, it needs the key way and drilling and tapping for the friction adjuster!

Regards, Matthew

Offline awemawson

  • Global Moderator
  • Hero Member
  • *****
  • Posts: 8968
  • Country: gb
  • East Sussex, UK
Re: The Eddgwick arrived!
« Reply #30 on: June 14, 2015, 03:09:01 PM »
Good work Matthew  :bow:

It must have had a wallop to bend that pear handle to that artistic shape - they are often just in on a taper so I'm surprised it didn't detach
Andrew Mawson
East Sussex

Offline mattinker

  • Hero Member
  • *****
  • Posts: 1316
  • Country: fr
Re: The Eddgwick arrived!
« Reply #31 on: June 14, 2015, 03:46:21 PM »
Andrew, It must as you say have been a "wallop"! The shaft was bent slightly over about an inch, the part with the handle was sheared off. The pear handle is threaded on!

Regards, Matthew

Offline vtsteam

  • Global Moderator
  • Hero Member
  • *****
  • Posts: 6466
  • Country: us
  • Republic of Vermont
Re: The Eddgwick arrived!
« Reply #32 on: June 14, 2015, 11:35:33 PM »
You're working fast Matt! :dremel: Now a little heat in the right place and that walloped handle will bend back into shape with mere taps.  :clap:

Nice to see things put back in order.  :beer:
I love it when a Plan B comes together!
Steve
https://www.youtube.com/watch?v=4sDubB0-REg

Offline mattinker

  • Hero Member
  • *****
  • Posts: 1316
  • Country: fr
Re: The Eddgwick arrived!
« Reply #33 on: June 15, 2015, 11:08:59 PM »
You're working fast Matt! :dremel: Now a little heat in the right place and that walloped handle will bend back into shape with mere taps.  :clap:
Steve,
I'm not sure about working fast, here's a not very good before after pic. I added about 1 5/16" or 35mm in length which didn't take me more than an hour or two's welding, I used 4mm diameter rods which means the metal goes down fast. I find building up something like this much quicker and easier than constructional welding. It is probably scary to launch in and build things up, but it can be really worthwhile and I'd encourage people to try! For the end of this lead-screw, there is no load on it at all. The untouched part is the bearing surface, the second third is where the dial rides and the new part is only to hold the handle!


Regards, Matthew

Offline vtsteam

  • Global Moderator
  • Hero Member
  • *****
  • Posts: 6466
  • Country: us
  • Republic of Vermont
Re: The Eddgwick arrived!
« Reply #34 on: June 16, 2015, 09:36:18 AM »
That seems fast to me!

I've been thinking about your bed wear question Matt, and your mentioning grinding. I'm guessing the wear is beyond what scraping would accomplish in any kind of reasonable amount of time, but I'm not a professional scraper, and don't know how fast those guys can get a long bed down. Maybe better tools than I had (carbide, etc) can move faster than I do.

But if wear is really serious, then I guesss grinding, and/or Turciting (which I have absolutely no knowledge of other than Fergus occasional mentions here) is the solution most often resorted to.

Any grinding with a portable/DIY jig will duplicate whatever accuracy the jig has, so that would be the focus in designing one. If followed by scraping, then the required tolerance would only need to be enough to get it to the level where scraping could then take over and finish off. Grinding and scraping the ways though will alter other relationships to the various sliding parts and headstock, and these too would probably need attention. It's likely a whole lathe set of corrections and adjustments would follow. Not beyond doing, but probably part of the whole job needed.

One other thing though, which I don't mean in any kind of defeatest way, is learning to work with an older lathe as a specialized machinist skill set to produce good work. So I mean it in a positive way. Here is a brief discussion of that -- which may prove helpful for many of us -- those who have older lathes and lack the immediate means to correct them. It did for me:

http://www.eztram.com/helpfulhints_results.asp?Hints_ID=13

ps. though very helpful it is a bit hard to read straight through without enough paragraphs!  :scratch:

For something like that, I like to select copy and paste the text into a word processor and add paragraph spacing to make it easier to read. I usually then save a copy of useful tips like that, because I know I'll come back to them.

I love it when a Plan B comes together!
Steve
https://www.youtube.com/watch?v=4sDubB0-REg

Offline awemawson

  • Global Moderator
  • Hero Member
  • *****
  • Posts: 8968
  • Country: gb
  • East Sussex, UK
Re: The Eddgwick arrived!
« Reply #35 on: June 16, 2015, 09:48:44 AM »
Steve, if the bed is a double inverted V, often there are relatively unworn ways - usually a flat and a V - that the tailstock bears on - these can at a push be used to grind the worn ways.

If you look at the first picture Matthew posted in this thread, where some reamers are laying across the bed, you can see the two pairs of 'V and flat' - one for the carriage which will be the worn pair, and one for the tailstock that should barely be touched.

Turcite is mainly used to build up under the carriage and / or cross slide, to bring them back up to original height so that shafts and lead screws still keep their original relationships. Although some machines do have ways entirely made of Turcite it's not usual to do this as a repair.
Andrew Mawson
East Sussex

Offline mattinker

  • Hero Member
  • *****
  • Posts: 1316
  • Country: fr
Re: The Eddgwick arrived!
« Reply #36 on: June 16, 2015, 10:08:17 AM »
Steve,

Thank you for your thoughts and the http://www.eztram.com/helpfulhints_results.asp?Hints_ID=13 I don't think your being defeatist, I think it's important to know how to go about compensating.
 I haven't actually tried the lathe yet so I don't know what I'm up against. The wear is visible without even touching, which is why I'm a bit apprehensive! There are unworn machined surfaces along the sides and the top of the bed that would make good guide surfaces for a grinding carriage. The "moglice" option I think is out for me because of the length of the bed, I may be able to use it on the cross slide, but I'm not sure that I'll need to.

I'm in the thought phase, I suspect that it would be a huge scraping task, I have to admit, I like the idea of making a grinding carriage we'll see about the reality!

I see Andrew has answered while I was typing. The rear "V" way looks to be in much better shape than the front. There are also the sides and the two places on the top that look good like nicely machined faces. Once I've got the carriage back together I'll know more!

Regards, Matthew 


Offline vtsteam

  • Global Moderator
  • Hero Member
  • *****
  • Posts: 6466
  • Country: us
  • Republic of Vermont
Re: The Eddgwick arrived!
« Reply #37 on: June 16, 2015, 10:14:59 AM »
So for a DIY grinding jig you could maybe use the tailstock (if beefy enough) as a sort of mount for a grinder. The tailstock would have to be fastened down to allow sliding without vertical play (depends on the fixing method).

I don't know how the headstock is attached to the bed. On a smaller lathe like the ones I own the headstock rides on top of the ways, though bolted down. If removed (and removable) the ways could conceivably be ground throughout, and the headstock scraped to lower to equal the removed material of the ways, bringing it into proper height with the tailstock.

If not removable, I guess the Turcite would be needed on the tailstock. Or maybe if the tialstock has a removable shoe (as mine does on the Craftsman and new lathe)  a new shoe could be cast thicker to compensate. I do wonder about the carriage -- how important is it that it remain the same height if the ways are scraped? I do think the vees for the tialstock would need to clear in it, but that isn't bearing fit, just a clearance fit and so probably fairly easy to do.
I love it when a Plan B comes together!
Steve
https://www.youtube.com/watch?v=4sDubB0-REg

Offline vtsteam

  • Global Moderator
  • Hero Member
  • *****
  • Posts: 6466
  • Country: us
  • Republic of Vermont
Re: The Eddgwick arrived!
« Reply #38 on: June 16, 2015, 10:40:21 AM »
Actually, re. above, if the headstock set on the ways and was removable, whether it needed to be scraped to equal the drop in the ways would depend on what it bears. The tailstock part of the ways would remain at original height. The carriage portion would be the lowered part.

Likewise the tailstock might not need Turciting/shoe thickening, and maybe the opposite - scraping. It all depends on whether the headstock center height moves down with the grinding process or remains where it is in relation to the tailstock (and how it moves after the operation). Complicated to describe in words, but probably quick to see on the actual lathe.
I love it when a Plan B comes together!
Steve
https://www.youtube.com/watch?v=4sDubB0-REg

Offline hanermo

  • Full Member
  • ***
  • Posts: 103
Re: The Eddgwick arrived!
« Reply #39 on: June 16, 2015, 10:41:33 AM »
I believe several peeople have successfully ground lathe beds with all sorts of cartridges and carriages, from a router motor onwards.
Several threads, even video on youtube.

The only question is what is your reference plane, and how do you effect movement.

I, myself, would use linear rails, and a temporary carriage mounted on them.
I import and sell linear rails, so I have them in stock - this does have an effect.

I originally made a temp carriage to grind the ways on my very large shop built cnc mill.
It ran on a large glass table, and the grinder was a std double end grinder from the home store.
Worked fine.

This time, I have just fit the linear rails to large tool steel flats directly as first step.
The flats are first smoothed with a large belt sander.

And no, it wont dig in, because the flats are very large in comparison to material removal rate of a sander.
Even using a top end industrial hand sander (Festo, 1400 W), 50 mm tool steel flats, 2.4 m long, 20 mm thick.
45 grit belts.
35 mm linear guides bolted onto the 50 mm wide flats. The edges got rounded a bit, by 1-2 mm. Doesnt matter at all, as the edges are not used.
The assy runs smoothly, and one end of back side has a bit of twist.
This is very clearly felt by moving the back carriage by hand as it gets stiff.
I will qualify the error a bit with a few DTIs, and then later smooth or shim the underlying part as needed.

Moral of story:
Its doable, and not all that hard.

Offline mattinker

  • Hero Member
  • *****
  • Posts: 1316
  • Country: fr
Re: The Eddgwick arrived!
« Reply #40 on: June 16, 2015, 10:56:31 AM »
The Edgwick has a built in head stock, so no removing it! It also has a movable gap bed piece that would need to be ground too. The head-stock is more than solid enough, but would in my view be too cumbersome. The carriage that is evolving in my head would have four skateboard bearings arranged to sit on the "V".  The top of the carriage ways are unworn in the horizontal plane on which a Teflon pad could maintain the height. The whole thing could be held down using the tail-stock clamping way with bearings and springs to apply pressure to the grind stone. It seems to me to be better to use a spring than some kind of solid slide, as the wheel can then lift until it's sparked out. Grinding is not like milling. It would be nice to be able to use the cariage feed to move the grinding caridge!

Steve, Any grinding would be in preparation for a final scrape to get things back into line.

Thanks Hanermo, I think it would be quite a lot of work to mount linear rails, not worth the effort and I don't have them in stock! I like the moral of the story!

Regards, Matthew

Offline vtsteam

  • Global Moderator
  • Hero Member
  • *****
  • Posts: 6466
  • Country: us
  • Republic of Vermont
Re: The Eddgwick arrived!
« Reply #41 on: June 16, 2015, 11:04:49 AM »
Well that sounds like a plan for the ways grinding.  :dremel:

And presumably the tailstock would remain at the same height it is now, since you wouldn't grind the part of the ways it rides on? And the headstock as well, so no need for Turcite, unless there has been wear.

The only tricky part if you don't have one (or access to one) is using a straightedge for the scraping part.

whatever grinding carriage you build can be driven by a nut slipped onto the leadscrew -- it doesn't even have to be a halfnut, if you can reverse the carriage back.
I love it when a Plan B comes together!
Steve
https://www.youtube.com/watch?v=4sDubB0-REg

Offline mattinker

  • Hero Member
  • *****
  • Posts: 1316
  • Country: fr
Re: The Eddgwick arrived!
« Reply #42 on: June 16, 2015, 11:23:32 AM »
Well that sounds like a plan for the ways grinding.  :dremel:

And presumably the tailstock would remain at the same height it is now, since you wouldn't grind the part of the ways it rides on? And the headstock as well, so no need for Turcite, unless there has been wear.

The only tricky part if you don't have one (or access to one) is using a straightedge for the scraping part.

whatever grinding carriage you build can be driven by a nut slipped onto the leadscrew -- it doesn't even have to be a halfnut, if you can reverse the carriage back.

I think it would be easy to drive the carriage. The tail-stock way would remain as is. The straight edge is another problem for another day!

Regards, Matthew

Offline awemawson

  • Global Moderator
  • Hero Member
  • *****
  • Posts: 8968
  • Country: gb
  • East Sussex, UK
Re: The Eddgwick arrived!
« Reply #43 on: June 16, 2015, 11:27:51 AM »
So Matthew, is the headstock and bed one casting? Quite unusual if it is, and it must have made planing and grinding the bed un-necessarily hard when the made them. Most head stock sit on the way, and many can be swivelled for alignment down the bed. Colchesters having a pivot peg at the rear and a pair of adjusters sitting between the shears to tweak it.
Andrew Mawson
East Sussex

Offline mattinker

  • Hero Member
  • *****
  • Posts: 1316
  • Country: fr
Re: The Eddgwick arrived!
« Reply #44 on: June 16, 2015, 12:12:50 PM »
So Matthew, is the headstock and bed one casting? Quite unusual if it is, and it must have made planing and grinding the bed un-necessarily hard when the made them. Most head stock sit on the way, and many can be swivelled for alignment down the bed. Colchesters having a pivot peg at the rear and a pair of adjusters sitting between the shears to tweak it.

Headstock and bed one casting! Removable gap.

Regards, Matthew

Offline mattinker

  • Hero Member
  • *****
  • Posts: 1316
  • Country: fr
Re: The Eddgwick arrived!
« Reply #45 on: June 16, 2015, 01:36:39 PM »
Oops my bad, the headstock is separate, well diguised join!

Regards Matthew.

Offline awemawson

  • Global Moderator
  • Hero Member
  • *****
  • Posts: 8968
  • Country: gb
  • East Sussex, UK
Re: The Eddgwick arrived!
« Reply #46 on: June 16, 2015, 01:46:11 PM »
I'm not overly surprised. It would be a nightmare to make as one piece.
Andrew Mawson
East Sussex

Offline AdeV

  • Madmodder Committee
  • Hero Member
  • *****
  • Posts: 2434
  • Country: gb
Re: The Eddgwick arrived!
« Reply #47 on: June 16, 2015, 02:59:06 PM »
They're definitely separate - I have a spare headstock :D
Cheers!
Ade.
--
Location: Wallasey, Merseyside. A long way from anywhere.
Occasionally: Zhengzhou, China. An even longer way from anywhere...

Offline krv3000

  • Hero Member
  • *****
  • Posts: 2183
  • Country: gb
Re: The Eddgwick arrived!
« Reply #48 on: June 16, 2015, 05:45:04 PM »
good work so far keep it up  :clap: :clap: :clap: :clap:

Offline mattinker

  • Hero Member
  • *****
  • Posts: 1316
  • Country: fr
Re: The Eddgwick arrived!
« Reply #49 on: June 17, 2015, 09:58:53 AM »
They're definitely separate - I have a spare headstock :D
Ade, Wow, a spare head stock, has it got the intemediary gear you need? What happened to th rest of it?

Thanks KRV!

Regards, Matthew

Offline Manxmodder

  • Hero Member
  • *****
  • Posts: 739
  • Country: gb
Re: The Eddgwick arrived!
« Reply #50 on: June 17, 2015, 11:00:13 AM »
Oops my bad, the headstock is separate, well diguised join!

Regards Matthew.

Matt,glad to see you got her to France in one piece.
The joints are often hard to detect because they were often filled or filleted over with foundry filler/linseed whiting potions to prevent any coolant from creeping in between the joint faces.....OZ.
Helixes aren't always downward spirals,sometimes they're screwed up

Offline AdeV

  • Madmodder Committee
  • Hero Member
  • *****
  • Posts: 2434
  • Country: gb
Re: The Eddgwick arrived!
« Reply #51 on: June 17, 2015, 11:13:20 AM »
They're definitely separate - I have a spare headstock :D
Ade, Wow, a spare head stock, has it got the intemediary gear you need? What happened to th rest of it?

Thanks KRV!

Regards, Matthew

Hi Matt,

Yep - I only wanted the gears, but it was easier for the seller to just take the headstock off & send that. I also got a replacement tailstock (I need to re-make the brass insert in mine, there's about 1/3" of backlash, but as I haven't (yet) found a suitable left-hand ACME tap, and my attempts at making a single-point tap have, so far, been laughable... I figured it might be quicker just to buy another one!

The lathe in question was being scrapped, I can't remember why, IIRC the screwcutting gearbox was smashed and possibly there was damage to the bed, hence it being sold for parts.
Cheers!
Ade.
--
Location: Wallasey, Merseyside. A long way from anywhere.
Occasionally: Zhengzhou, China. An even longer way from anywhere...

Offline AdeV

  • Madmodder Committee
  • Hero Member
  • *****
  • Posts: 2434
  • Country: gb
Re: The Eddgwick arrived!
« Reply #52 on: June 21, 2015, 01:51:00 PM »
Well, I've tried my best to decipher the screw cutting dial plate, but it's just too far gone :(

I'll stick a picture on the web somewhere later (it's 11MB, too big to upload here, and I've temporarily forgotten the password to my web space...)

I can just about decipher the bottom two lines, which read:

"For any odd Whitworth pitches and all metric threads keep ???"
"screw nut engaged and return saddle by reversing feed clutch"

I'm not sure what they mean by "reversing feed clutch", as far as I know there is no such clutch. There's a forward/reverse gear, but I wouldn't want to try to use that while the lathe is in motion.

(edit: Attached a 1/2 size picture, it's still pretty big)
Cheers!
Ade.
--
Location: Wallasey, Merseyside. A long way from anywhere.
Occasionally: Zhengzhou, China. An even longer way from anywhere...

Offline vtsteam

  • Global Moderator
  • Hero Member
  • *****
  • Posts: 6466
  • Country: us
  • Republic of Vermont
Re: The Eddgwick arrived!
« Reply #53 on: June 21, 2015, 02:22:54 PM »
Quote
Take first cut when........ opposite mark
Or subsequent engagements...........
For whole even number threads engage at any..........(mark, probably)
For whole odd number threads engage at any number mark
For threads ending in 1/2.............
For any odd Whitworth pitches and all metric threads keep guide
screw nut engaged and return saddle by reversing feed clutch.
I love it when a Plan B comes together!
Steve
https://www.youtube.com/watch?v=4sDubB0-REg

Offline mattinker

  • Hero Member
  • *****
  • Posts: 1316
  • Country: fr
Re: The Eddgwick arrived!
« Reply #54 on: June 21, 2015, 03:23:03 PM »
Thanks Steve, that looks like a really good start to deciphering the plate!

Adev thank you for posting the pic of the plate! The last two lines I could read from my plate, it means, stop the lathe when the carriage arrives at the end of the thread without disengaging the half nuts, reverse the feed or the drive, and power feed the carriage back to the beginning of the cut.

thanks again, Matthew

Offline DMIOM

  • Hero Member
  • *****
  • Posts: 676
  • Country: gb
  • Isle of Man
Re: The Eddgwick arrived!
« Reply #55 on: June 21, 2015, 05:10:19 PM »
In terms of deciphering eroded lettering, if you had the patience you might want to to try RTI (Reflectance Transformation Imaging) - its being developed/used by archaeologists for tasks like teasing faint engravings from rock surfaces etc.   Info & free software here

Dave

Offline vtsteam

  • Global Moderator
  • Hero Member
  • *****
  • Posts: 6466
  • Country: us
  • Republic of Vermont
Re: The Eddgwick arrived!
« Reply #56 on: June 21, 2015, 05:25:01 PM »
Well we can intuit that it would probably say something like:

Take first cut when pointer is opposite proper mark. Repeat
for subsequent engagements.
For whole even number threads engage at any mark.
For whole odd number threads engage at any numbered mark.
For threads ending in 1/2 engage at the same mark.
For any odd Whitworth pitches and all metric threads keep guide.
screw nut engaged and return saddle by reversing feed clutch.
I love it when a Plan B comes together!
Steve
https://www.youtube.com/watch?v=4sDubB0-REg

Offline mattinker

  • Hero Member
  • *****
  • Posts: 1316
  • Country: fr
Re: The Eddgwick arrived!
« Reply #57 on: June 21, 2015, 06:09:39 PM »
Thanks Steve, that looks right, I'll try that when I get it back together!

Today I got back to it,

Cross drilling 1/4", a bit that I still have after being away from the Imperial system for 36 years!


Sorry about the shake! Milling the key way.


Fitting the key, I thought of you Steve, a nice filing exercise!

I had some trouble boring and tapping the centre of the shaft to take the dial friction screw. First thing I had trouble drilling 5mm to thread M6 for the adjuster screw. I then had trouble tapping, I concluded that I had hard spots where the original metal was. I was afraid to snap the tap, so I drilled it out to 6mm with a carbide tipped masonry bit re-sharpened to cut metal and tapped for an M6 helicoil, I'm home I thought. The grub screw wouldn't got through sticking, dirt maybe, so I tried a tap in it, and then, **** happens as they say, I broke the tap trying to get it out! I can only think the it caught on the helicoil it would go neither in nor out, I'd been so careful! So far, my efforts at breaking up the tap have failed, there's 25mm 1" in there below the surface. I think that my way out is drill or grind from the side where the helicoil is, get the tap out, weld up and machine!

Regards, Matthew.

Offline vtsteam

  • Global Moderator
  • Hero Member
  • *****
  • Posts: 6466
  • Country: us
  • Republic of Vermont
Re: The Eddgwick arrived!
« Reply #58 on: June 21, 2015, 07:18:53 PM »
Oh nooooooooooooo.........! :(
I love it when a Plan B comes together!
Steve
https://www.youtube.com/watch?v=4sDubB0-REg

Offline Pete.

  • Hero Member
  • *****
  • Posts: 1075
  • Country: gb
Re: The Eddgwick arrived!
« Reply #59 on: June 22, 2015, 02:32:22 AM »
Damn that's bad luck. From here I'd be most tempted to cut the shaft off beyond the cross-drill, counterbore it then make a whole new end which plugs snugly in the counterbore then weld the pair together.

Offline awemawson

  • Global Moderator
  • Hero Member
  • *****
  • Posts: 8968
  • Country: gb
  • East Sussex, UK
Re: The Eddgwick arrived!
« Reply #60 on: June 26, 2015, 12:24:11 PM »
Andrew Mawson
East Sussex

Offline mattinker

  • Hero Member
  • *****
  • Posts: 1316
  • Country: fr
Re: The Eddgwick arrived!
« Reply #61 on: June 26, 2015, 12:49:52 PM »
Matthew,

Here's another one for spares :)

http://www.ebay.co.uk/itm/Edgwick-gap-bed-lathe-/261945343821?pt=LH_DefaultDomain_3&hash=item3cfd28bf4d

Cheap at half the price, wait a minuet, that's more expensive than mine including transport!

To follow, the end of cross slide lead screw woes to follow shortly!


Regards, Matthew

Offline DavidA

  • Hero Member
  • *****
  • Posts: 1219
  • Country: gb
Re: The Eddgwick arrived!
« Reply #62 on: June 26, 2015, 01:12:27 PM »
First thing I had trouble drilling 5mm to thread M6

Isn't the correct tapping drill for 6 mm in steel 5.2 mm ?

Dave.

Offline appletree

  • Full Member
  • ***
  • Posts: 202
Re: The Eddgwick arrived!
« Reply #63 on: June 26, 2015, 02:21:26 PM »
I generally work on the principle that within reason the correct tapping drill is the biggest one you have which will pass through a nut of the thread you wish to cut and just sometimes one that nearly passes through if only a couple of though too big.  Don’t get me wrong I am not being rough only where I live you cannot just pop out and get the correct size.

Offline AdeV

  • Madmodder Committee
  • Hero Member
  • *****
  • Posts: 2434
  • Country: gb
Re: The Eddgwick arrived!
« Reply #64 on: June 26, 2015, 06:11:34 PM »
Matthew,

Here's another one for spares :)

http://www.ebay.co.uk/itm/Edgwick-gap-bed-lathe-/261945343821?pt=LH_DefaultDomain_3&hash=item3cfd28bf4d

Wow - that's a very early model, note the clutch lever sticking downwards out of the top left hand corner of the headstock (the later ones, like mine and Matt's) have the clutch lever sticking upwards at the bottom right of the headstock - a much better position, because you don't need to step to one side to reach it.

I've asked the seller for a photograph of the screwcutting dial plate, if it's got one, hopefully that will let both Matt & I run our screw cutting dials properly!
Cheers!
Ade.
--
Location: Wallasey, Merseyside. A long way from anywhere.
Occasionally: Zhengzhou, China. An even longer way from anywhere...

Offline mattinker

  • Hero Member
  • *****
  • Posts: 1316
  • Country: fr
Re: The Eddgwick arrived!
« Reply #65 on: June 27, 2015, 10:47:01 PM »
It's been awhile since I wrote, I've been having a spot of health problems, a lung infection, three days "observation" in hospital the week before last, antibiotics, I'm tired, but on the mend, more scans next week. trouble sleeping, but that's not new!

First thing I had trouble drilling 5mm to thread M6

Isn't the correct tapping drill for 6 mm in steel 5.2 mm ?

Dave.

Dave, 5mm is the general used size. I have come to the conclusion that my build up material was work hardening, the deeper I drilled, the harder it got as despite frequent oiling it was getting hotter and hotter in there!

Discretion being the better pat of valour, I decided that it would be easier to cross drill the dial and put a slug of Teflon in the hole with a grub screw to put pressure on it to give adjustable friction on the dial.


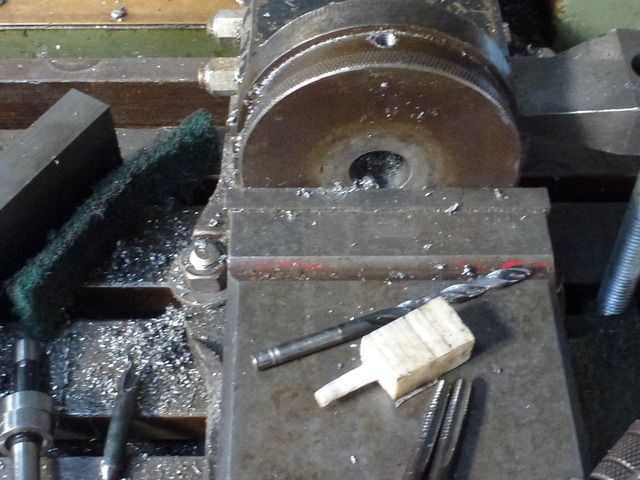
The white lump is a Teflon off cut, I put it in the three jaw on the little Emco, turned it down, I had to finish it by hand as it was too soft to go all the way down to 5mm.


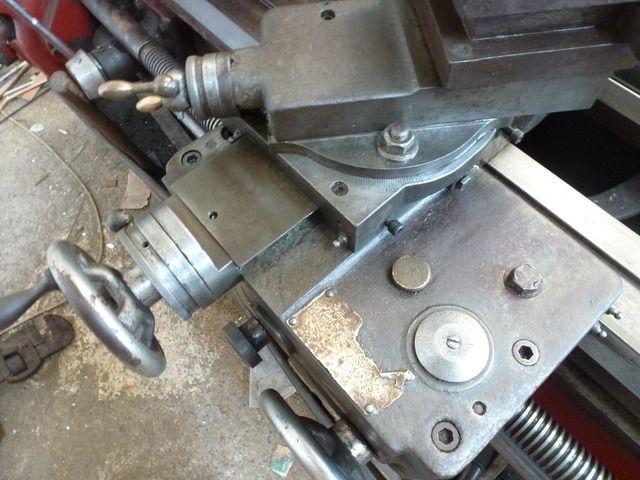
Reassembled. The previous owner had treated the oil nipples as grease nipples, cleaned and oiled up it's a lot less stiff. The "pear" handles bent back very easily with a piece of 30mm pipe.


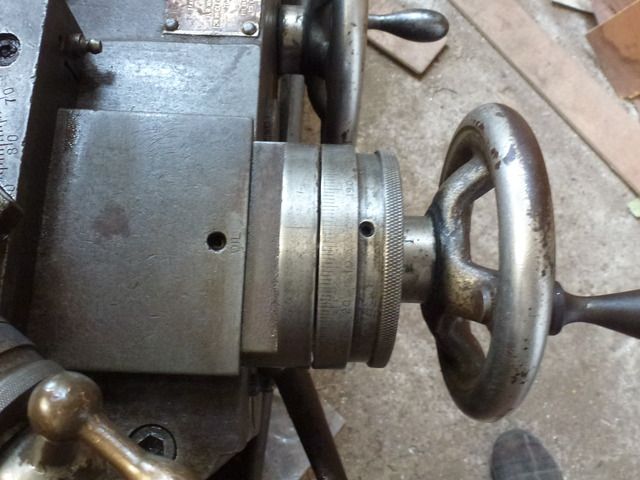
I tried to clean up the threading dial, now it's illegible because the engraving is really shallow, when it's turning you just can't see anything, not even the lines!

AdeV, did the seller of the other Edwick ever get back to you, good thinking on your part. Each time I go to look at something, you've been there before! Like you, I didn't know any thing about the oilers, other than they are not grease nipples (grease zerks), I was able to benefit from your experience once again, I've ordered a pump type oil can that I should be able to adapt as an oiler.

regards, Matthew.

Offline AdeV

  • Madmodder Committee
  • Hero Member
  • *****
  • Posts: 2434
  • Country: gb
Re: The Eddgwick arrived!
« Reply #66 on: June 28, 2015, 08:58:47 AM »
Hi Matt,

The guy I bought my spare parts from has since scrapped the rest of the lathe, so no joy there.

The chap who's selling the early model that Andrew found, has promised to "try" to get a photo, apparently he's not near the lathe very often (I get the impression he's selling it on behalf of someone else).

I'll post here as soon as I have anything...

I must admit I've never investigated how my cross-slide gauge works, I just un-nip the outer wheel, adjust the inner, and nip up again. I always assumed it just trapped the inner wheel between two fixed elements...
Cheers!
Ade.
--
Location: Wallasey, Merseyside. A long way from anywhere.
Occasionally: Zhengzhou, China. An even longer way from anywhere...

Offline mattinker

  • Hero Member
  • *****
  • Posts: 1316
  • Country: fr
Re: The Eddgwick arrived!
« Reply #67 on: June 28, 2015, 09:43:21 AM »
AdeV,

I discovered when I got the dial off mine, that there was a cross drilling with a wedge shaped piece in it. A grub screw in the shaft pushes the wedge out to give more friction, it's not just pinched!

Regards Matthew.

lordedmond

  • Guest
Re: The Eddgwick arrived!
« Reply #68 on: June 28, 2015, 11:38:08 AM »
I always thought with metric threads you deducted the pitch from the dia to give the tapping size , that's what I do it works and is easy to work out with my single Brian cell


Stuart

Offline mattinker

  • Hero Member
  • *****
  • Posts: 1316
  • Country: fr
Re: The Eddgwick arrived!
« Reply #69 on: June 28, 2015, 12:08:42 PM »
I always thought with metric threads you deducted the pitch from the dia to give the tapping size , that's what I do it works and is easy to work out with my single Brian cell


Stuart

Exactly!

Offline mattinker

  • Hero Member
  • *****
  • Posts: 1316
  • Country: fr
Re: The Eddgwick arrived!
« Reply #70 on: June 28, 2015, 02:18:06 PM »
AdeV,

I've searched the web for Thread dial information, and it turns out that Steve's "reconstitution" is spot on, nothing exotic or special about the Edgwick. Thanks again Steve!

Well we can intuit that it would probably say something like:

Take first cut when pointer is opposite proper mark. Repeat
for subsequent engagements.
For whole even number threads engage at any mark.
For whole odd number threads engage at any numbered mark.
For threads ending in 1/2 engage at the same mark.
For any odd Whitworth pitches and all metric threads keep guide.
screw nut engaged and return saddle by reversing feed clutch.

Regards, Matthew

Offline vtsteam

  • Global Moderator
  • Hero Member
  • *****
  • Posts: 6466
  • Country: us
  • Republic of Vermont
Re: The Eddgwick arrived!
« Reply #71 on: June 28, 2015, 11:37:01 PM »
Glad to help if I can Matt -- I envy you your lathe, and very glad it ended up in good hands. :beer:
I love it when a Plan B comes together!
Steve
https://www.youtube.com/watch?v=4sDubB0-REg