Author Topic: Dividing head  (Read 90050 times)

Offline tom osselton

  • Hero Member
  • *****
  • Posts: 1256
  • Country: ca
Re: Dividing head
« Reply #75 on: October 12, 2013, 02:03:54 AM »
Exellent job your doing!  :clap:

Offline mattinker

  • Hero Member
  • *****
  • Posts: 1316
  • Country: fr
Re: Dividing head
« Reply #76 on: October 15, 2013, 01:50:23 AM »
Exellent job your doing!  :clap:

Well Tom, I'm not very convinced by the "Excellent job", I've been putting off boring out to sleeve as it's taken the wind out of my sales!

Anyway, here we go!


Before re-boring to sleeve, I decided to square up the two remaining sides. To do this I moved the locating pins to allow mounting 90°s from the boring axis. I had a bit of trouble seating, one of the pins was a little proud which made it rock. I didn't think much of this and proceeded to  square  up and  clamp down.


Fly cutting the first side.


Checking the first face for square.


The second face was very close to the carriage.


Not much room for manoeuvre!


It cleaned nicely. So, on to the boring bit.


Centring the bore.


I'm too absent minded to count the number of turns of the handle of the cross slide, so I "G" clamped a pair of callipers to the cross slide.


Having found the first side with an edge finder, zeroed and and back to the second edge.


Wound back to half the distance et voila, the centre.


The crunch, not only was the bore over sized, it was also high on the left and low on the right!! I obviously hadn't screwed the guide dowels in far enough when I bored it first time round. I've been back over the photos I think I can see screw threads that show that both of the pins are proud! Result, I have to sleeve both ends and remake the split cotter.!


To allow me to remove the casting and put it back in the same place (I'm going to press the sleeves in.) I made a stop with two bolts to be sure it won't move!


This is my piece of Al for the sleeves, if you look closely, you can see "Perrier" written on it. I use "Soda" cans buried in in dry sand as ingot moulds, which also make nice "billets"!

That's it for today I hope to get back to this soon as I'd like to start on the next phase!

Regards, Matthew


Offline mattinker

  • Hero Member
  • *****
  • Posts: 1316
  • Country: fr
Re: Dividing head
« Reply #77 on: October 20, 2013, 03:26:57 PM »
Hi,


I'm certainly learning a lot on this project! I don't think that this next bit is very interesting.


You can see how far out the bore was. I wasn't sure whether it was worth sleeving or whether it would be better to go back to the beginning and cast another! I decided it was less work to bore it out.


I bored out from both sides. I had to reface both ends so that the sleeves would fit flush.


I made two sleeves, the one on the left is for the chuck end, I lengthened the sleeve so that the spindle would be offset to allow clearance for the chuck mounting nuts and studs, originally I had planned to add a steel spacer. The right hand one has the banjo mounting on it. I cut the banjo mount off the casting so that the banjo would mount square to the body and line up the gears. I also made another split cotter as lining up the old one wasn't worth the effort! I've already documented the boring operation.


I pressed in the interference fit plugs in with my 16ton press. I trued up the end faces of the casting between centres and fitted the spindle.


So, here it is, where I thought I was about a week ago! I managed to get a nice sliding fit on the shaft. Fortunately, the shaft is 30mm, so I was able to use one of my Moore & Wright bore gauges which helped a lot! I bought a cheap set of bore gauges that really aren't worth bothering with. I was thinking about a dial bore gauge anybody got any suggestions.

Now I can get back to the project! regards, Matthew.

Offline vtsteam

  • Global Moderator
  • Hero Member
  • *****
  • Posts: 6466
  • Country: us
  • Republic of Vermont
Re: Dividing head
« Reply #78 on: October 20, 2013, 10:39:07 PM »
Must feel good to know you've fixed a problem, done it right, and that it is what it is supposed to be. There is satisfaction in that, even though you wanted to move on. It's a good tool you've made, and are making.  :thumbup: :clap:
I love it when a Plan B comes together!
Steve
https://www.youtube.com/watch?v=4sDubB0-REg

Offline mattinker

  • Hero Member
  • *****
  • Posts: 1316
  • Country: fr
Re: Dividing head
« Reply #79 on: October 21, 2013, 09:18:47 AM »
Thanks VT,

yes it's nice to have saved the project, to get it right when it was well off the rails! I'm looking forward to being able to use it.

Regards, Matthew

Offline mattinker

  • Hero Member
  • *****
  • Posts: 1316
  • Country: fr
Threading
« Reply #80 on: October 25, 2013, 09:53:29 PM »
Hi,

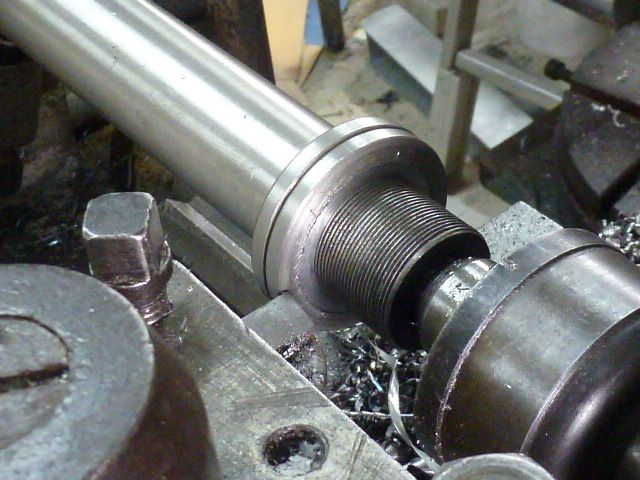
I've been a bit apprehensive about the next bit. I've only done a couple of threads before. I decided to make the spindle threads first, I've got a lot of work in the spindle, so get it right, then even though it's supposed to be easier to fit an outside thread to an inside I wouldn't mind making nuts as I would making another spindle!


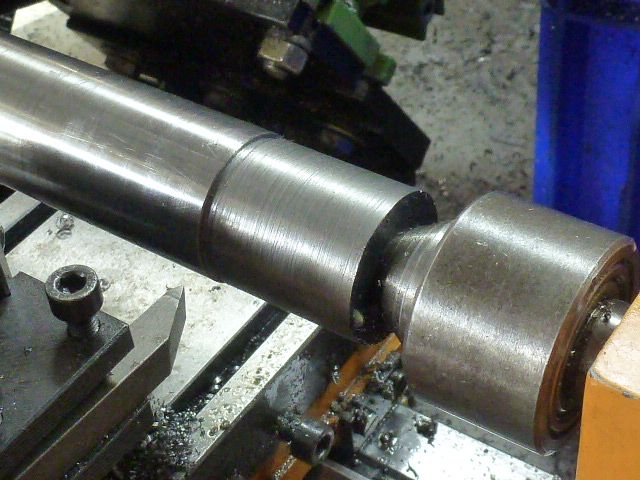
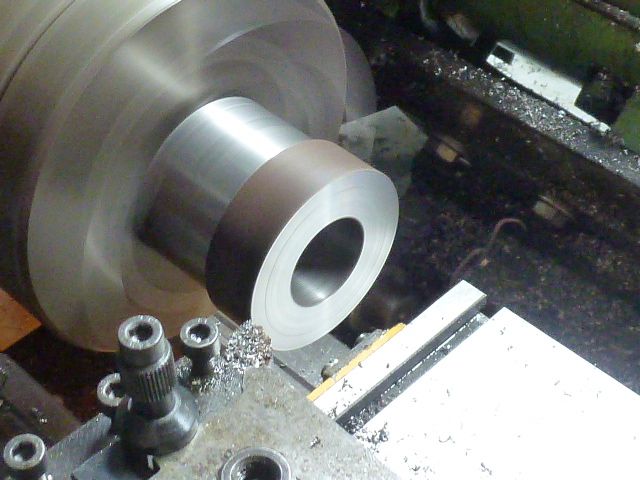
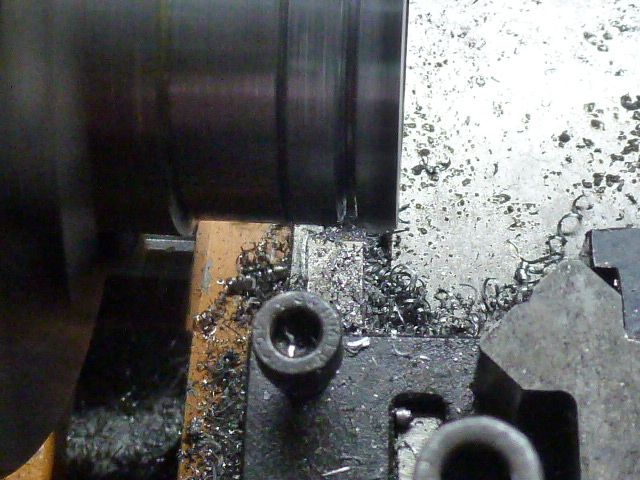
I turned the end of the spindle down to 28mm, (2mm under the spindle diameter) and turned a run out for the thread.


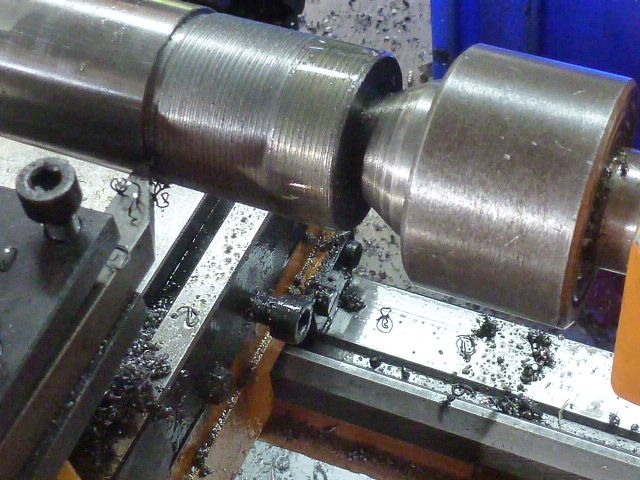
So far so good, M1 thread, first pass OK with the right pitch.


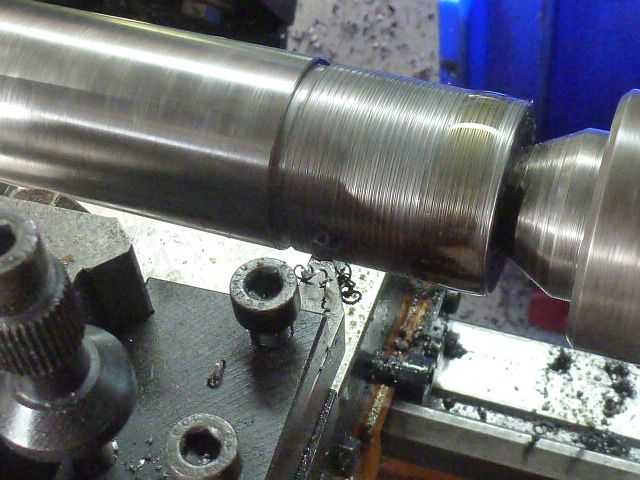
I didn't use the top slide although it was set at 29.5°, I felt I' mix things up, a 1mm thread is only half a millimetre per side the depth of cut is easier on the cross slide.


That was a lot easier than I thought! Had I screwed up I could always make it a 27X1mm thread!


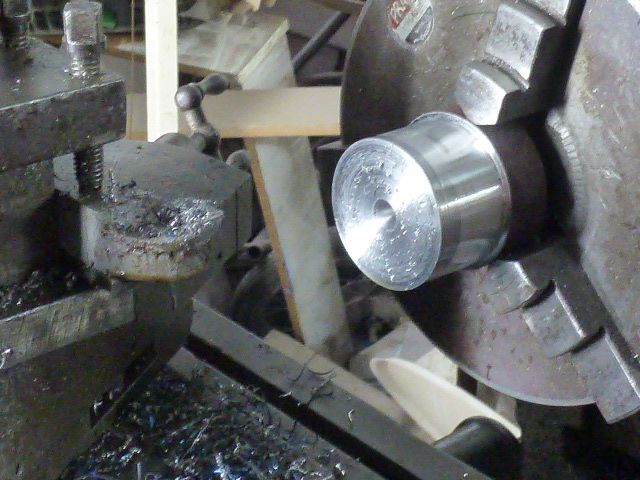
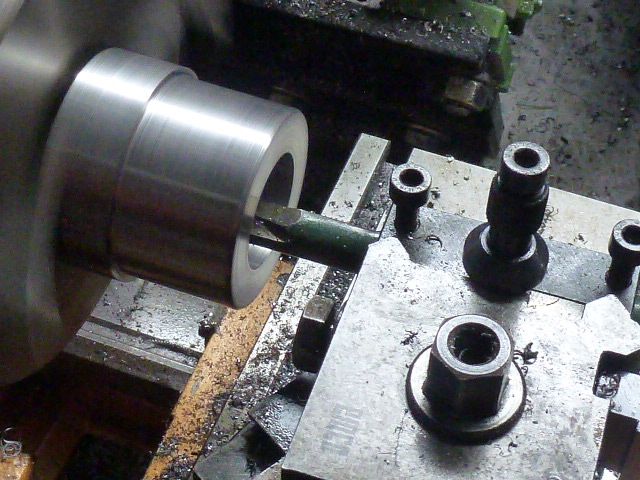
On to the nuts, I roughed these out on the Colchester, faster and capable of drilling bigger holes.


The usual, after centre drilling step drill.


I seem to have missed out a few steps, I've gone from 6mm to 22mm, there were a few intermediary sizes in between.


Final size, 25mm.


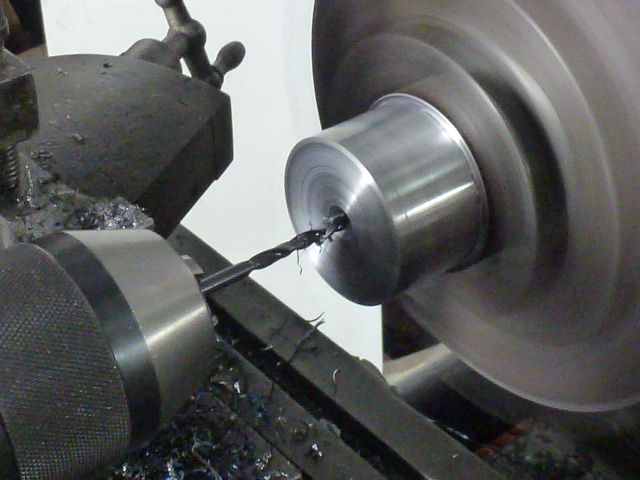
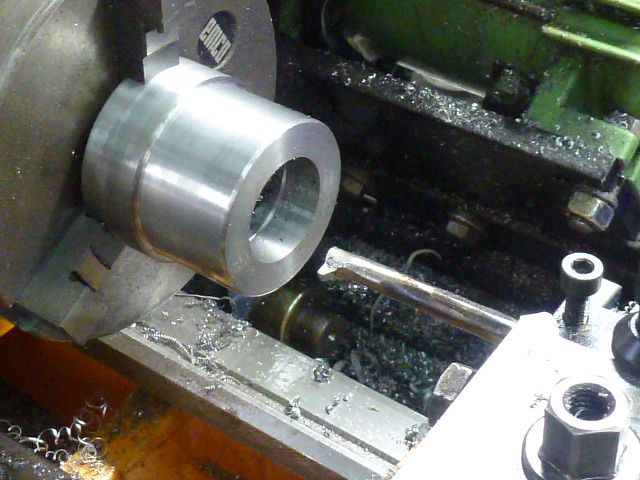
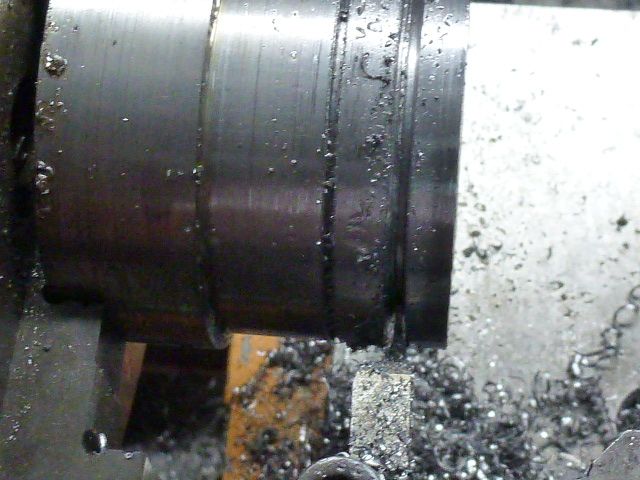
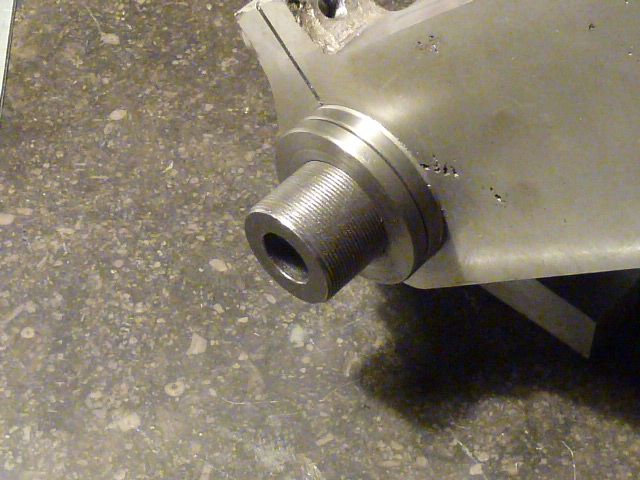
Back to the Emco, the three jaw chuck is pretty accurate, I could now true up the rusty bit to be able to have a nice symmetrical part.


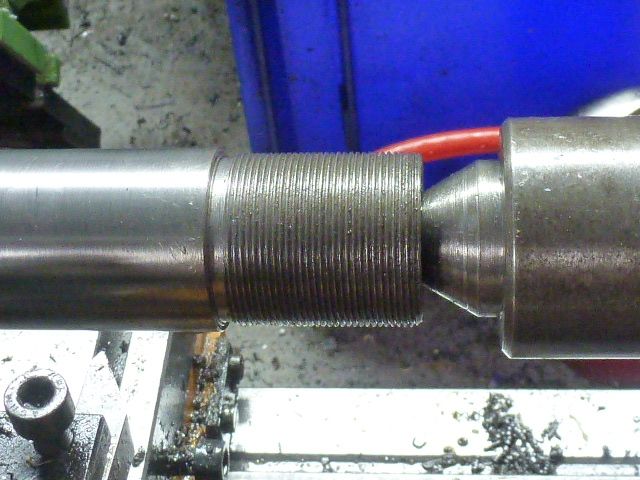
Boring out to 27mm for the 28x1mm thread, which is close to a 24tpi thread.


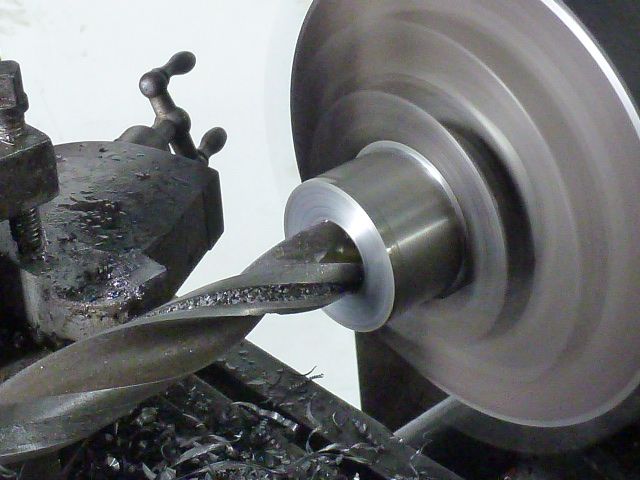
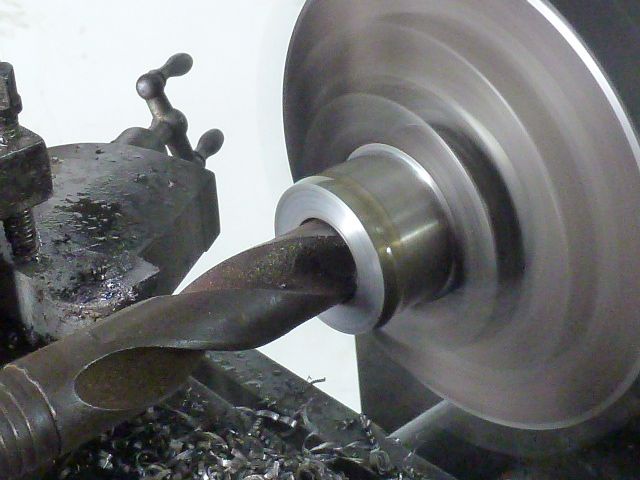
I re-ground a broken tap which was easier than making an internal threading tool. It would have been easier to use a larger metric tap as they are all 60°.  As the "point" is only a 0.5mm triangle, it's hard to see. A longer reach would have been better.


I had amongst my second hand tool bits a an acme tool bit which was a good size for making a run out groove for the thread.


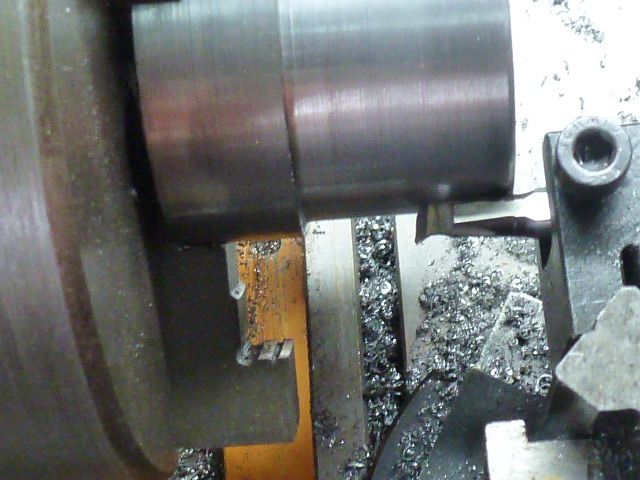
When I ground the tool, I ground the back of the tool parallel so that when lined up with the part, I knew it was square with the job.

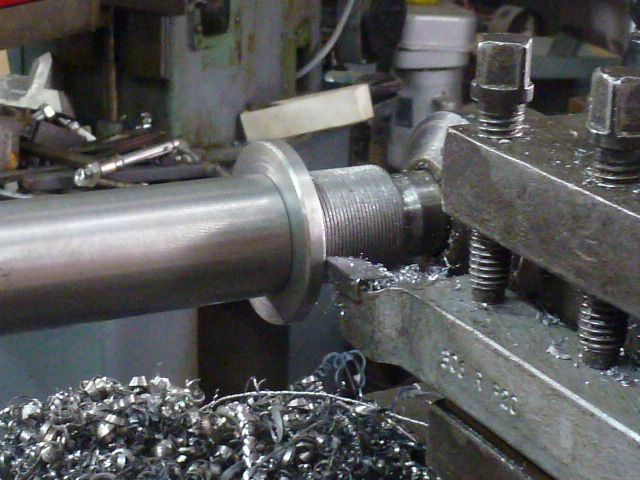
I was a bit concentrated on the work in hand so I forgot a few photos. Amongst other things, I had to run the carriage half the length of the bed to be able to test fit the spindle. It all went smoothly and I ended up with a nice fitting thread.


I need to make myself a decent rear mounted parting tool. I improvised and ended up finishing with the hacksaw. It was the last straw for the 25 year old drive belt which had already stretched, it snapped in half.


The broken belt meant that it was back to the Colchester three jaw, which, isn't the best thing to surface thin nuts. however, I was able to work on the centres which at least were parallel with the face of the chuck.
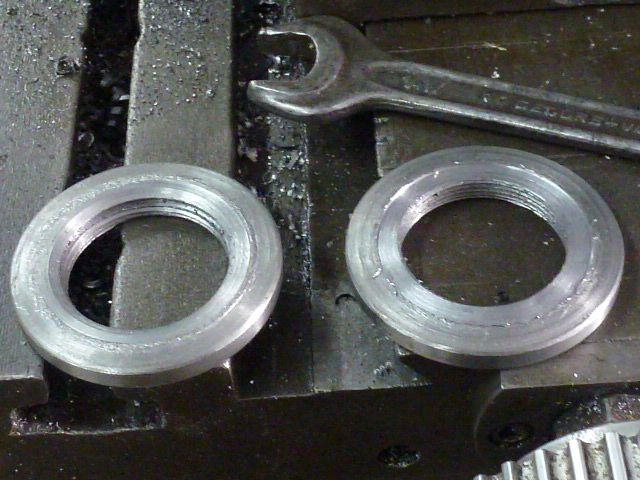
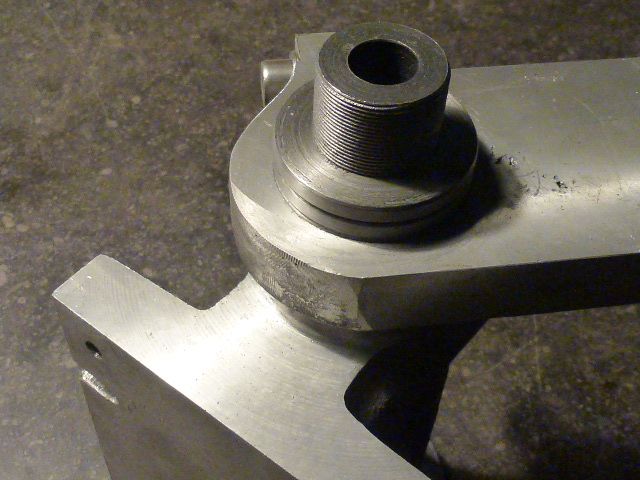


The two nuts.


I was able to use the spindle as a mandrel between centres to surface the nuts.


I had thought that I could use the dividing head to drill the holes in the nuts, but without the drive belt, (It's on order from the UK, out of stock in Belgium) it would be a bit difficult.

I'm pleased with my threading and the end result, now it's make  all the little bits.

To be continued.


Offline vtsteam

  • Global Moderator
  • Hero Member
  • *****
  • Posts: 6466
  • Country: us
  • Republic of Vermont
Re: Dividing head
« Reply #81 on: October 26, 2013, 10:26:01 AM »
Ahh, progress!  :thumbup: :thumbup: :clap:

Matt you're good at showing there are many alternate paths to a result. It's fun seeing how you do things, and a couple ideas are stored away here if I ever get stuck somewhere as alternatives.

I've been gradually switching over to the link belts for spindles at least, Each time I buy a length, there is always some left over -- eventually I'll have enough to make up a quick spare for just about anything that breaks. Actually if you aren't using one machine with a link belt, in a pinch you can borrow it for another machine with a broken belt, assuming it is long enough.

Great work. Keep it up, you're almost there!
I love it when a Plan B comes together!
Steve
https://www.youtube.com/watch?v=4sDubB0-REg

Offline mattinker

  • Hero Member
  • *****
  • Posts: 1316
  • Country: fr
Re: Dividing head
« Reply #82 on: October 26, 2013, 02:16:15 PM »
Thanks Steve,

I'm getting to the part where there are lots of little bits to make. The Emco has an extraordinary 5mm wide belt, that's not a typo, it's 5mm. No link belts available. The motor that I've got mounted to it came of a V10 which is about twice as powerful as the original. About a week ago it stretched, that's when I started thinking about a spare! I've done the single point threading, all the rest can be done with taps and dies on the Colchester.

I'm enjoying myself when things go forward!!

Regards, Matthew

Offline DavidA

  • Hero Member
  • *****
  • Posts: 1219
  • Country: gb
Re: Dividing head
« Reply #83 on: October 26, 2013, 03:46:44 PM »
I like his bench.  It's cluttered with 'stuff'.

Now I don't feel so alone.

Dave. :thumbup:

Offline doubleboost

  • Madmodder Committee
  • Hero Member
  • *****
  • Posts: 1619
  • Country: gb
  • Newcastle Upon Tyne
Re: Dividing head
« Reply #84 on: October 26, 2013, 04:12:46 PM »
Coming along very nicely
John

Offline mattinker

  • Hero Member
  • *****
  • Posts: 1316
  • Country: fr
Re: Dividing head
« Reply #85 on: October 26, 2013, 04:39:31 PM »
Dave,

the clutter is a life long battle. I'm working on it, but I'm glad it reassures you, at least that way there's some positive in it!


John,

thanks!

regards, Matthew

Offline mattinker

  • Hero Member
  • *****
  • Posts: 1316
  • Country: fr
Fixed steady.
« Reply #86 on: October 27, 2013, 05:37:16 PM »
Hi,

for the next part of my dividing head I'm going to need a fixed steady. I started building one a long time ago, I hadn't yet bought my milling machine and my shaper wasn't set up.


It needs a foot to bolt it to the bed of the lathe to become operational.
The base is cut out 15mm hot rolled, the thickest I can cut with my plasma cutter.


A piece of 20x50mm for the foot.


A "v" was cut into the block to fit onto the V ways of the bed.


I then milled two flats so that the foot would sit down square on the bed.


To fix the "foot" to the ways I used a piece of 40 x 20 into which I milled 2 steps so that the middle fitted between the ways. I drilled and tapped M20 in the middle for the single fixing bolt.


Test fit of the foot assembly.


To bridge the 28mm gap between the foot and the steady rest, I cut out a piece of cold  10mm x 50 and tacked it into place.


Test fit of the assembled steady rest.


Welded! I have two gussets to weld onto the base and it will be usable I hope.

I lost some of the photos of what i did today, I hope it's reasonably comprehensible. I'm glad to have made this tool usable, it will probably need modifications, but at least it's usable!

Regards, Matthew

Offline DavidA

  • Hero Member
  • *****
  • Posts: 1219
  • Country: gb
Re: Dividing head
« Reply #87 on: October 28, 2013, 05:47:39 PM »
Love that steady.

I really need to make one for each of my lathes as there are one or two part finished projects that I can't complete without one. I was thinking along similar lines. But without the ball races.

The clutter is also the bane of my life. But I have a pathalogical fear of throwing anything out.

Dave.

Offline mattinker

  • Hero Member
  • *****
  • Posts: 1316
  • Country: fr
Re: Dividing head
« Reply #88 on: October 28, 2013, 06:29:21 PM »
Thanks Dave,

this dividing head is pushing me into new areas that I'm enjoying, I have to finish the steady do the next bit. The tools to make tools!

I just have too many things to organize.

regards, Matthew

Offline Fredbare

  • Full Member
  • ***
  • Posts: 169
  • Country: gb
  • Fakenham, Norfolk
Re: Dividing head
« Reply #89 on: October 28, 2013, 07:05:46 PM »
Just back from holiday in France, and caught up with this project. Great job, well written and great photos, thanks for sharing.

John

Offline vtsteam

  • Global Moderator
  • Hero Member
  • *****
  • Posts: 6466
  • Country: us
  • Republic of Vermont
Re: Dividing head
« Reply #90 on: October 28, 2013, 08:39:28 PM »
Nice looking steady Matt!  :thumbup: :thumbup: :clap: :beer:
I love it when a Plan B comes together!
Steve
https://www.youtube.com/watch?v=4sDubB0-REg

Offline mattinker

  • Hero Member
  • *****
  • Posts: 1316
  • Country: fr
Re: Dividing head
« Reply #91 on: October 29, 2013, 01:03:49 AM »
 :mmr:
Just back from holiday in France, and caught up with this project. Great job, well written and great photos, thanks for sharing.

John

Thanks for the nice words, it's nice to have feed back! More soon.

Where in France?

Matthew

Offline mattinker

  • Hero Member
  • *****
  • Posts: 1316
  • Country: fr
Re: Dividing head
« Reply #92 on: October 29, 2013, 01:07:27 AM »
Nice looking steady Matt!  :thumbup: :thumbup: :clap: :beer:

Steady as she goes! I realise that the only real steady that I've seen is the one I just finished! I owe a lot to the internet and people sharing!

Matthew

Offline krv3000

  • Hero Member
  • *****
  • Posts: 2183
  • Country: gb
Re: Dividing head
« Reply #93 on: October 29, 2013, 06:33:17 PM »
hi and well dun

Offline Fredbare

  • Full Member
  • ***
  • Posts: 169
  • Country: gb
  • Fakenham, Norfolk
Re: Dividing head
« Reply #94 on: October 30, 2013, 06:35:29 PM »
La Jarousse, about 5k north of Jumilhac-le-Grand.

John

Offline mattinker

  • Hero Member
  • *****
  • Posts: 1316
  • Country: fr
Re: Dividing head
« Reply #95 on: October 30, 2013, 06:54:03 PM »
I haven’t been to the Dordoigne for a long time! Full of Britts from what I hear! Nice rolling countryside, and good food!

Regards, Matthew

Offline mattinker

  • Hero Member
  • *****
  • Posts: 1316
  • Country: fr
Re: Dividing head
« Reply #96 on: November 03, 2013, 10:26:15 AM »
Hi,
To enable me to finalise the length of the threads and the spindle, I had first to finish off the nuts.


Centre finder to place the radial hole in the nut, I did it the other way as well to centre on the edge as well.


I centre drilled and then drilled at3.5mm.


I mounted the spindle in the Colchester with the fixed steady (three Al  tabs to protect the spindle.. I had in between times done some experimenting, using a piece of 30mm cold rolled. The three skate bearings all had a tendency to run slightly tilted, which cut a groove in the test piece! A surprising narrow groove like a pipe cutter cut! I filed the ends of the fingers so that the opposite edges of the wheel touched first, counteracting the tendency to tilt. A bit of hand fitting with a file brought the rollers up straight and got rid of the groove.

The other thing that I did was to add twoon gussets to the base, not for strength, but for rigidity. I didn't take any photos of the "development" stage.


First operation, trim back the threads to their final length.


Drilling out to 16.5mm to begin the 17mm bore for the insert. I am making a system to change the size of the spindle end as I have three sets of change wheels that have different internal bores (12 14 and 16mm), each set also has it's own key size, so I couldn't just use sleeves to change diameters.


The spindle is now cut to it's final length, allowing enough length for the locking screw for the interchangeable gear carriers.


Way back in the beginning of the thread, I'd drilled the spindle 12mm, the tapping size for14mm, here I'm tapping 14mm for the gear carrier.

Having bored out to 17mm and a taper down to 14mm to centre and guide the gear carrier.


Using the spindle as a mandrel to centre drill the end of the gear carrier after turning it down to 12mm.


Drilling for 6.75, tapping diameter for M8.


Tapping M8 for the Gear retaining screw.


Gear test fit.


12mm inside Ø Gear carrier, showing taper to allow alignment.


So two more gear carriers to make, with their key ways and keys, before I start the banjo. One of my gear "sets" is a plastic one (mini lathe gear set), it looks to me to be better formed than one of the steel sets I have!

To be continued! Regards, Matthew


Offline Chuck in E. TN

  • Hero Member
  • *****
  • Posts: 572
  • Country: us
  • USAF Retired
Re: Dividing head
« Reply #97 on: November 03, 2013, 11:20:02 AM »
Great work, Mathew. I'm working on my furnace to be able to make the casting for this and other projects.
I like the taper feature on the gear carriers.
Chuck
Chuck in E. TN
Famous TN last words: "Hey ya'll, watch this..."
MicroMark 7x14, HF X2 mill, Green 4x6 saw. Harbor Freight 170A mig

Offline mattinker

  • Hero Member
  • *****
  • Posts: 1316
  • Country: fr
Re: Dividing head
« Reply #98 on: November 03, 2013, 03:28:57 PM »
Thanks Chuck!

It took me a long time to decide how I was going to make the interchangeable gear carriers, that's why I left that end of the shaft as long as possible. I had a vague idea in the beginning, which is why I drilled 14 and 12mm into the shaft, but I hadn't got anything clear. The angle is about 20° which means it's short and not locking. It seems to be working out OK!

Regards, Matthew

Offline krv3000

  • Hero Member
  • *****
  • Posts: 2183
  • Country: gb
Re: Dividing head
« Reply #99 on: November 03, 2013, 05:03:14 PM »
hi its all cuming together